Welcome to ESP32 Core Board repository
11. MQTT IoT Communication Protocol
MQTT IoT Communication Protocol
MQTT IoT Communication Protocol1. MQTT Overview2. Core Concepts2.1 Publish/Subscribe Model2.2 Topic2.3 QoS (Quality of Service)3. ESP32-S3 MQTT Hardware Features4. Project Architecture and FlowMQTT Event Callback Flow5. Hardware Dependencies6. Source Code Analysis6.1 Header Files and Macro Configuration6.2 WiFi Initialization and Event Callback (Review)6.3 mqtt_event_handler() — MQTT Event Callback6.4 vMqttTask() — MQTT Main Task6.5 esp_mqtt_client_publish() Parameter Description7. Operation Flow7.1 Build and Flash Flow7.2 Testing Method7.3 Normal Log8. Common Problems
1. MQTT Overview
MQTT (Message Queuing Telemetry Transport) is the most mainstream lightweight publish/subscribe messaging protocol in the IoT field. It is based on TCP and uses publish/subscribe (Pub/Sub) model instead of traditional client-server direct connection, achieving producer-consumer space-time decoupling.
Importance: MQTT is the de facto standard for IoT communications, natively supported by almost all major cloud platforms including Alibaba Cloud IoT, Huawei Cloud IoT, AWS IoT, and Azure IoT. Its protocol overhead is extremely small (minimum only 2-byte fixed header), especially suitable for bandwidth-constrained, power-sensitive embedded devices.
Application Scenarios:
Smart Home: Temperature/humidity sensors report data periodically, mobile app remotely controls lights/AC
Industrial IoT: PLC devices upload production line status in real-time, cloud sends start/stop commands
Connected Vehicles: Vehicle OBD data remote collection, remote lock/unlock control
Smart Agriculture: Soil moisture sensors report regularly, automatic irrigation system triggers based on threshold
Smart Energy: Electricity/water meter remote reading, photovoltaic inverter power generation data real-time monitoring
| Feature | MQTT | HTTP |
|---|---|---|
| Communication model | Publish/Subscribe (Broker relay) | Request/Response (direct) |
| Message direction | Bidirectional (publish + subscribe) | Client actively requests |
| Protocol overhead | Min 2-byte fixed header | Hundreds of bytes of Headers |
| Real-time push | Native support (subscribe = push) | Need polling or WebSocket |
| QoS levels | 0/1/2 three levels | None |
| Will message | Supported (auto-publish on disconnect) | Not supported |
| Typical applications | IoT sensor reporting, smart home | Web API, web browsing |
This project implements MQTT client, connecting to public Broker
broker.emqx.io:1883, subscribing totest/esp32/recvtopic to receive messages, publishing one message totest/esp32/sendevery 3 seconds.
2. Core Concepts
2.1 Publish/Subscribe Model
x┌──────────────┐│ MQTT Broker ││ broker.emqx ││ .io:1883 │└──┬───────┬──┘Subscribe │ │ Subscribetest/esp32/recv ┌──────┘ └──────┐ test/esp32/recv│ │┌─────┴─────┐ ┌─────┴─────┐│ ESP32-A │ │ MobileApp ││ (Client1) │ │ (Client2) │└───────────┘ └───────────┘ESP32 publish("test/esp32/send", "Hello")→ Broker forwards to all clients subscribed to test/esp32/send
2.2 Topic
MQTT routes messages through topic strings, supporting hierarchical structures:
| Topic | Description |
|---|---|
test/esp32/send | ESP32 publishes to this topic |
test/esp32/recv | ESP32 subscribes to this topic |
sensor/temperature | Temperature sensor data |
home/bedroom/light | Bedroom light control |
home/+/light | Wildcard "+" matches single level (e.g. bedroom, kitchen) |
home/# | Wildcard "#" matches multiple levels (e.g. bedroom/light/status) |
2.3 QoS (Quality of Service)
| QoS | Name | Semantics | Applicable Scenario |
|---|---|---|---|
| 0 | At most once | Fire and forget, no delivery guarantee | High-frequency sensor data (no impact if some frames lost) |
| 1 | At least once | Guaranteed delivery, may duplicate | Important control commands |
| 2 | Exactly once | Guaranteed delivery and no duplication | Billing/payment information |
This project uses QoS 0, suitable for periodic reporting scenarios.
3. ESP32-S3 MQTT Hardware Features
MQTT is based on TCP. After ESP32-S3 connects via WiFi, it uses espressif__mqtt component to implement client functionality.
| Feature | Description |
|---|---|
| Transport layer | TCP (default 1883) or TLS/SSL (8883) |
| Broker | broker.emqx.io:1883 (EMQX public test server) |
| Required component | espressif__mqtt (must declare in idf_component.yml) |
| Keep Alive | Default 120s, broker considers device offline if no communication beyond this |
4. Project Architecture and Flow
xxxxxxxxxxapp_main()└─ xTaskCreate(vMqttTask, stack=8KB, prio=5)└─ vMqttTask():├─ wifi_init() ← WiFi connect + wait for IP│├─ esp_mqtt_client_init(&mqtt_cfg) ← Create MQTT client│ └─ .broker.address.uri = BROKER_URI│├─ esp_mqtt_client_register_event() ← Register event callback│ └─ ESP_EVENT_ANY_ID → mqtt_event_handler│├─ esp_mqtt_client_start() ← Start client (async connect)│└─ while(1): ← Publish loop├─ esp_mqtt_client_publish(TOPIC_SEND, "Hello ESP32 MQTT")└─ vTaskDelay(3000ms)
MQTT Event Callback Flow
xxxxxxxxxxMQTT_EVENT_CONNECTED ← Broker connected successfully→ esp_mqtt_client_subscribe(TOPIC_RECV) → Auto subscribe to topic→ ESP_LOGI "Subscribed to receive topics"MQTT_EVENT_DATA ← Received subscribed topic message→ Print event->data_len + event->data
5. Hardware Dependencies
Hardware Connection: No external wiring, WiFi wireless communication
Required Components:
mqtt_client(espressif__mqtt),esp_wifi,esp_netif,esp_event,nvs_flash
Note:
esp_mqttis a third-party component from ESP-IDF Component Registry, not built into IDF. Before using, must declare dependency inmain/idf_component.yml, otherwise compilation will fail to find the header file:xxxxxxxxxx## IDF Component Manager Manifest Filedependenciesidfversion'>=4.1.0'espressif/mqtt"*"After declaration, execute
idf.py build, the component manager will automatically download the component tomanaged_components/directory.
6. Source Code Analysis
Full source: Source Code → ESP-IDF → 5.Network_Protocol → 7.MQTT
6.1 Header Files and Macro Configuration
First, include required headers, and define WiFi connection parameters, Broker address, and publish/subscribe topics.
xxxxxxxxxx//broker.emqx.io:1883"// Publish topic// Subscribe topic6.2 WiFi Initialization and Event Callback (Review)
The WiFi STA connection flow in this experiment (NVS init, wifi_init(), WiFi event callback wifi_event_handler()) was detailed in 5.2 WIFI-STA Mode and won't be repeated here. After WiFi connects, event group notifies MQTT task to continue.
WiFi event callback details: 5. Network Protocols and Wireless Communication -> 2. WIFI-STA Mode -> WIFI-STA Mode
6.3 mqtt_event_handler() — MQTT Event Callback
mqtt_event_handler() only cares about two moments: connected to Broker, received message. After connecting, first thing is to call esp_mqtt_client_subscribe() to subscribe to test/esp32/recv—after subscribing, when anyone sends to this Topic, you automatically receive it. QoS 0 means fire and forget, suitable for high-frequency sensor data. When message received, MQTT_EVENT_DATA triggers, print message content and length from event->data.
xxxxxxxxxxstatic void mqtt_event_handler(void *arg, esp_event_base_t base,                               int32_t event_id, void *event_data){    esp_mqtt_event_handle_t event =        (esp_mqtt_event_handle_t)event_data;
    switch (event->event_id) {        case MQTT_EVENT_CONNECTED:            ESP_LOGI(TAG, "MQTT Connected");            // Subscribe to topic (QoS 0 = at most once)            esp_mqtt_client_subscribe(event->client,                                      TOPIC_RECV, 0);            ESP_LOGI(TAG, "Subscribed to topic: %s",                     TOPIC_RECV);            break;
        case MQTT_EVENT_DATA:            // Print received data            ESP_LOGI(TAG, "Receive: %.*s",                     event->data_len, event->data);            break;
        default:            break;    }}
6.4 vMqttTask() — MQTT Main Task
vMqttTask() first connects to WiFi, then to MQTT Broker, then in infinite loop sends one message outward every 3 seconds. esp_mqtt_client_start() is asynchronous—it returns immediately, connection process runs in background, after connecting, MQTT_EVENT_CONNECTED callback notifies you.
esp_mqtt_client_publish() parameters: topic specifies which topic to publish to, data is message content, len fill 0 for SDK to auto-calculate length (strlen), qos fill 0 means fire and forget without confirmation, retain fill 0 means don't let Broker cache this message for later subscribers.
xxxxxxxxxxvoid vMqttTask(void *pv){    // Init WiFi    wifi_init();
    // Set Broker address    esp_mqtt_client_config_t mqtt_cfg = {        .broker.address.uri = BROKER_URI,    };
    // Create MQTT client    esp_mqtt_client_handle_t client =        esp_mqtt_client_init(&mqtt_cfg);
    // Register MQTT event callback    esp_mqtt_client_register_event(client, ESP_EVENT_ANY_ID,                                   mqtt_event_handler, NULL);
    // Start MQTT client (async)    esp_mqtt_client_start(client);
    // Loop to publish messages    while (1) {        char msg[] = "Hello ESP32 MQTT";        // Params: client, topic, message, length(0=auto),        //         qos(0), retain(0)        esp_mqtt_client_publish(client,                                TOPIC_SEND,                                msg,                                0,                                0,                                0);        ESP_LOGI(TAG, "Send message: %s", msg);        // 3s interval        vTaskDelay(pdMS_TO_TICKS(3000));    }}
6.5 esp_mqtt_client_publish() Parameter Description
esp_mqtt_client_publish() is the core API for MQTT message publishing. Parameters:
xxxxxxxxxxint esp_mqtt_client_publish( esp_mqtt_client_handle_t client, // MQTT client handle const char *topic, // Target topic const char *data, // Message payload int len, // Length (0=auto) int qos, // QoS: 0=at most once // 1=at least once // 2=exactly once int retain // 0=do not retain // 1=Broker caches last message);7. Operation Flow
7.1 Build and Flash Flow
ESP-IDF Flash Flow: See ESP-IDF → 1. Before Development → 3. Build and Flash.
7.2 Testing Method
Ensure ESP32 WiFi can connect to external network (can ping
broker.emqx.io).Flash MQTT to ESP32, observe connection and sending logs on serial.
On PC, use MQTTX or mobile MQTT debugging assistant: For detailed usage, refer to: (MQTT Client Tool Demo | EMQX 5.3 Documentation)

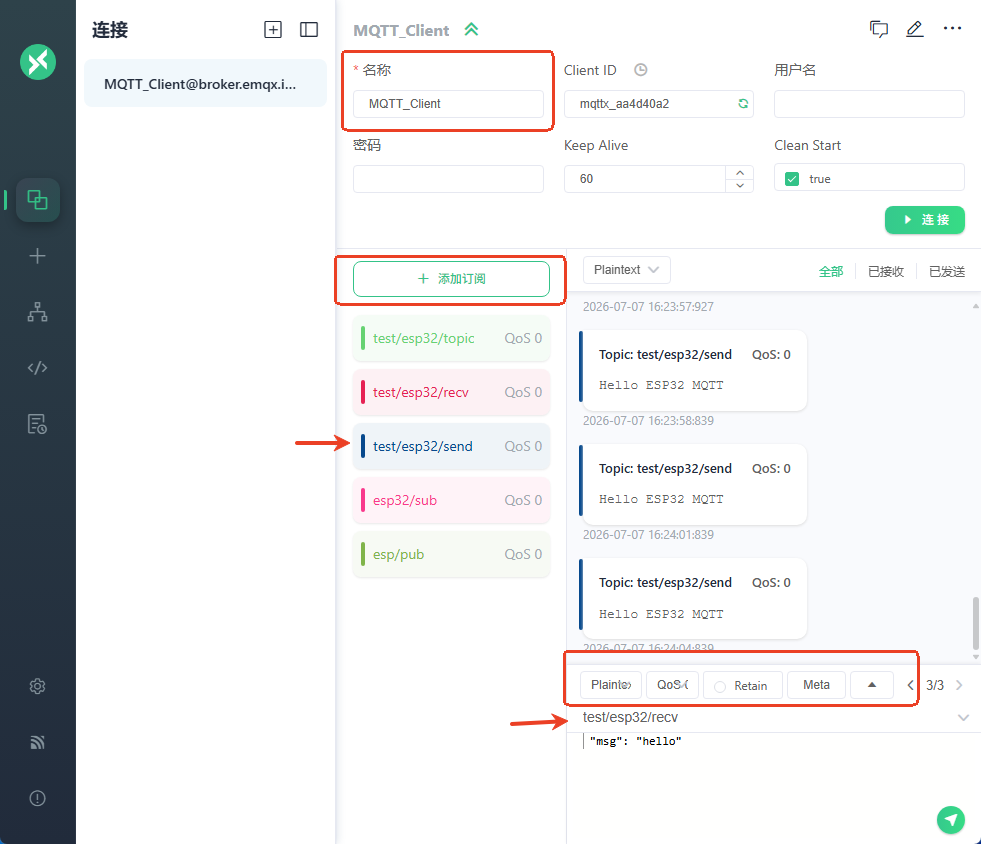
Connect
broker.emqx.io:1883Subscribe
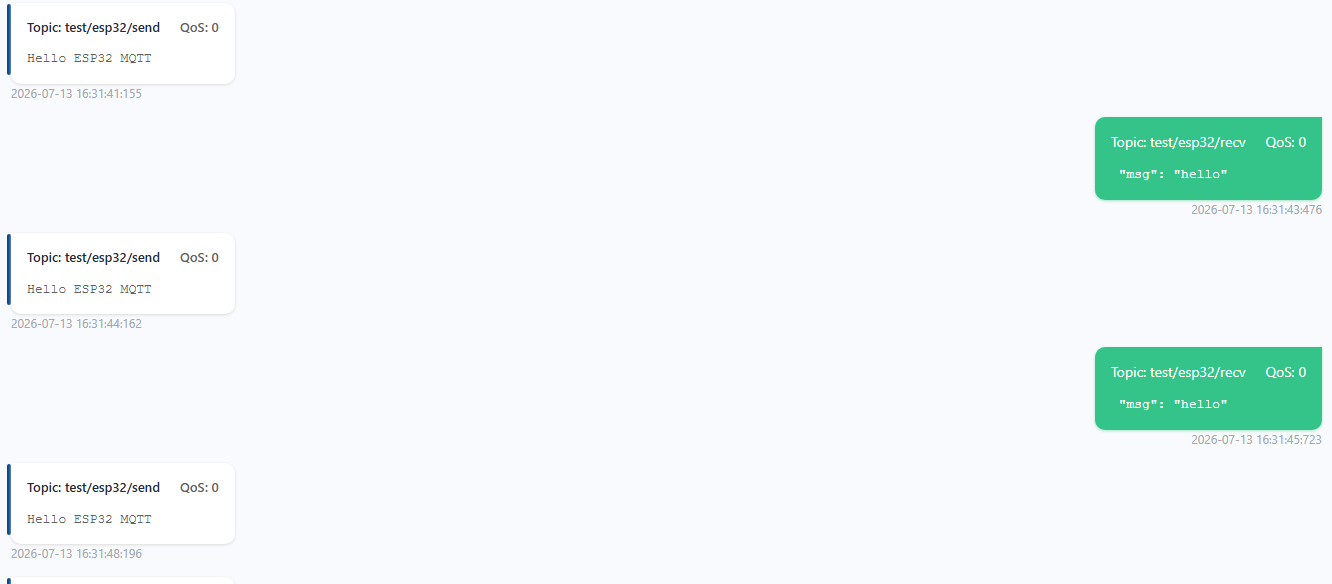
test/esp32/send→ Receive messages published by ESP32 every 3 secondsPublish any message to
test/esp32/recv→ ESP32 serial prints received content
7.3 Normal Log
xxxxxxxxxxI (3856) MQTT-CLIENT: Got IP: 192.168.11.100I (3858) MQTT-CLIENT: WiFi connected successfully!I (4860) MQTT-CLIENT: MQTT ConnectedI (4862) MQTT-CLIENT: Subscribed to receive topics: test/esp32/recvI (4864) MQTT-CLIENT: Send message: Hello ESP32 MQTTI (7864) MQTT-CLIENT: Send message: Hello ESP32 MQTT
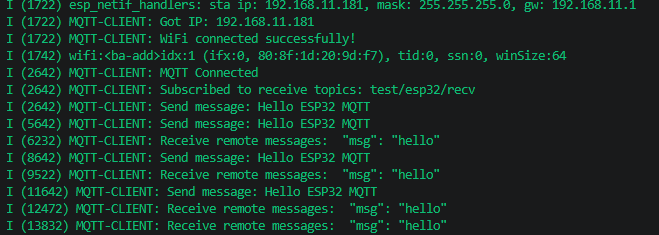
When PC MQTTX sends "msg": "hello" to test/esp32/recv:
xxxxxxxxxxI (9000) MQTT-CLIENT: Receive remote messages: {"msg": "hello"}
8. Common Problems
| Symptom | Cause | Solution |
|---|---|---|
MQTT_EVENT_CONNECTED never triggers | Broker address wrong or WiFi no external network | Confirm BROKER_URI correct; ping broker.emqx.io test external network |
Compilation error mqtt_client.h not found | espressif__mqtt dependency not added | Add espressif/mqtt: "*" in main/idf_component.yml |
| Subscribe but receive no messages | Subscribe and publish topics inconsistent | Check TOPIC_RECV exactly matches PC publish topic |
| Publish successful but PC didn't receive | PC not subscribed or subscribed to different topic | Confirm PC has subscribed to test/esp32/send |
| Broker frequently disconnects and reconnects | Keep Alive interval too large | Set .session.keepalive = 60 in esp_mqtt_client_config_t |
| MQTT message Chinese garbled | Terminal encoding issue | MQTT natively supports any binary data (including UTF-8), check display end encoding |
| Need TLS/SSL encryption | mqtt:// is plaintext transmission | Change to mqtts://broker.emqx.io:8883 and configure certificate |