Welcome to ESP32 Core Board repository
3. WIFI AP Mode
WIFI AP Mode Experiment
WIFI AP Mode Experiment1. WIFI AP Mode Overview2. Core Concepts2.1 How AP Mode Works2.2 Configuration Parameters2.3 Core API3. Hardware Dependencies4. Project Architecture and Flow5. Source Code Explained5.1 Configuration and Activation5.2 Client Connection Monitoring6. Operating Procedures6.1 Flashing and Running6.2 Expected Results6.3 Serial Output Example6.4 Verification Methods7. Common Problems
1. WIFI AP Mode Overview
WiFi AP (Access Point, hotspot mode) lets the ESP32-S3 turn itself into a wireless router/hotspot; other devices (phones, computers, another ESP32) can search for and connect to this hotspot to achieve LAN communication.
AP mode has irreplaceable application value in the IoT field. First, it is the foundation of provisioning technology — when a device is first deployed and no WiFi network is available, the device first runs in AP mode, the user connects their phone to the hotspot and sends the router password to the device through a web page or App, and the device then switches to STA mode to go online (this is the first step of the SmartConfig / Web provisioning process). Second, in no-router scenarios (field work, site inspections, temporary exhibitions), AP mode lets users directly connect to devices point-to-point for parameter configuration, status viewing, and firmware upgrades without depending on any network infrastructure. In addition, AP mode is also widely used in LAN multi-user collaboration scenarios — multiple phones or computers connect to the same ESP32-S3 hotspot for local chat, file sharing, multiplayer games, and other LAN applications.
This experiment configures the ESP32-S3 in AP mode; a phone or computer can view the connection status after connecting.
Typical application scenarios:
| Application Type | Example |
|---|---|
| Device provisioning | Phone connects to ESP32 hotspot -> enter home WiFi on web page -> ESP32 switches to STA |
| Offline LAN | Multiple ESP32s form an ad-hoc network (no router needed) |
| Debugging | Connect directly for debugging when there is no WiFi in the field |
| File transfer | Phone connects to ESP32 hotspot and uploads/downloads files |
In AP mode the ESP32-S3 supports about 4~8 devices connecting simultaneously at most.
2. Core Concepts
2.1 How AP Mode Works
┌──────────┐Phone ─────→ | |PC ────────→ | ESP32-S3 | (no Internet, pure LAN)Tablet ────→ | (AP) |└──────────┘
The ESP32-S3 creates its own hotspot and broadcasts the SSID; other devices scan and connect. The ESP32-S3 acts as a DHCP server to assign IPs to clients. In AP mode, the ESP32-S3's default IP is usually 192.168.4.1.
2.2 Configuration Parameters
| Parameter | Description | Value Used in This Experiment |
|---|---|---|
| AP_SSID | Hotspot name | "ESP32_AP" |
| AP_PASSWORD | Hotspot password | "12345678" (at least 8 characters) |
| authmode | Encryption method | WPA_WPA2_PSK |
| Max connections | Number of simultaneously connected devices | 4~8 (depends on firmware configuration) |
2.3 Core API
ximport networkap = network.WLAN(network.AP_IF) # create AP interfaceap.active(True) # activateap.config(essid="ESP32-AP", # set SSID + password password="12345678", authmode=network.AUTH_WPA_WPA2_PSK)ip, _, _, _ = ap.ifconfig() # get AP's own IPap.status('stations') # get connected clientsap.active(False) # deactivate3. Hardware Dependencies
The ESP32-S3 has a built-in 2.4 GHz WiFi module, no external hardware needed.
4. Project Architecture and Flow
xxxxxxxxxxScript execution (single-file .py)||- create AP interface -> set SSID/password/encryption|- wait for AP activation -> print IP||- while True:|- poll the list of connected clients|- detect new connection -> print MAC address|- detect disconnect -> print MAC address|- sleep(1s)
5. Source Code Explained
Full source code: Source Code -> MicroPython -> 4.Network Protocols -> WiFi_AP -> WiFi_AP.py
5.1 Configuration and Activation
AP_IF interface -> active(True) -> config(ssid, password, authmode) sets the hotspot parameters -> wait for activation to complete.
xxxxxxxxxxAP_SSID = 'ESP32_AP' # AP SSIDAP_PASSWORD = '12345678' # AP password (min 8 chars)def main(): ap = network.WLAN(network.AP_IF) # create AP interface ap.active(True) # activate ap.config(essid=AP_SSID, password=AP_PASSWORD, authmode=network.AUTH_WPA_WPA2_PSK) # WPA2 encryption while not ap.active(): time.sleep_ms(100) # wait for activation ip, _, _, _ = ap.ifconfig() print('WiFi AP ready') print(' SSID :', AP_SSID) print(' IP :', ip)5.2 Client Connection Monitoring
status('stations') gets the MAC list of connected devices; comparing two consecutive snapshots implements connect/disconnect detection.
xxxxxxxxxxdef mac_str(mac): """bytearray -> readable string""" return '%02x:%02x:%02x:%02x:%02x:%02x' % (mac[0], mac[1], mac[2], mac[3], mac[4], mac[5])prev = []while True: cur = [t[0] for t in ap.status('stations')] # current clients for mac in cur: # new connections if mac not in prev: print('Connected :', mac_str(mac)) for mac in prev: # disconnected if mac not in cur: print('Disconnected:', mac_str(mac)) prev = cur time.sleep(1) # 1s polling interval
status('stations')returns a list of (MAC, ...) tuples of connected devices; connect/disconnect detection is implemented by comparing two consecutive snapshots.
6. Operating Procedures
6.1 Flashing and Running
Thonny IDE steps: See MicroPython -> 1. Before Development -> 3.Thonny IDE.
Thonny IDE flashing steps: See the MicroPython -> 1. Before Development -> 3.Thonny IDE
- Open
WiFi_AP.pyin Thonny IDE and click Run - Open the WiFi settings on your phone and search for
ESP32_AP - Enter the password
12345678to connect
6.2 Expected Results
After the ESP32-S3 creates the hotspot, the phone can find and connect to it. The serial port prints client connect/disconnect logs.
6.3 Serial Output Example
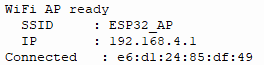
xxxxxxxxxxWiFi AP readySSID : ESP32_APIP : 192.168.4.1Connected : aa:bb:cc:dd:ee:ffDisconnected: aa:bb:cc:dd:ee:ff
Hotspot is on, phone connects successfully
Phone disconnects

6.4 Verification Methods
| Operation | Expected Result |
|---|---|
| Phone searches for WiFi | Sees ESP32_AP |
| Phone enters the password and connects | Serial prints Connected: <MAC> |
| Phone disconnects from WiFi | Serial prints Disconnected: <MAC> |
7. Common Problems
| Symptom | Cause | Solution |
|---|---|---|
| Phone cannot find the hotspot | AP not activated or 5 GHz band incompatible | The ESP32-S3 only supports 2.4 GHz; confirm the phone is searching in the 2.4G band |
| Prompts "wrong password" when connecting | Password shorter than 8 characters | WPA2 requires a password of at least 8 characters |
| Cannot access the Internet after connecting | AP mode has no Internet | AP mode only provides a LAN and does not forward Internet traffic |