Welcome to ESP32 Core Board repository
6. TCP Client Experiment
TCP Client Experiment
TCP Client Experiment1. TCP Overview2. Core Concepts2.1 TCP Three-Way Handshake2.2 TCP vs UDP API Comparison2.3 Three Return Values of recv()3. Project Architecture and Flow3.1 TCP Client4. Hardware Dependencies5. Source Code Analysis — TCP Client5.1 Macro Configuration5.2 WiFi Initialization (Review)5.3 vTcpClientTask() — TCP Client Core6. Operation Flow6.1 Build and Flash Flow6.2 Testing Method6.3 Normal Log — TCP Client7. Common Problems
1. TCP Overview
TCP (Transmission Control Protocol) is a connection-oriented, reliable, byte-stream transport layer protocol. It establishes connections via three-way handshake, ensuring data arrives in order and intact.
| Feature | TCP | UDP |
|---|---|---|
| Connection | Three-way handshake | Connectionless |
| Reliability | Guaranteed delivery, guaranteed order | Not guaranteed |
| Flow/ Congestion Control | Built-in sliding window, slow start | None |
| Transmission Mode | Byte stream (no message boundaries) | Datagram (has message boundaries) |
| Server API | bind → listen → accept → recv/send | bind → recvfrom/sendto |
| Client API | socket → connect → recv/send | socket → sendto/recvfrom |
TCP is the foundation of IoT communications. Whether HTTP web requests, MQTT message push, OTA firmware upgrades, or database remote connections, all rely on TCP's reliable transmission at the bottom. In industrial automation, smart home, and remote monitoring scenarios, devices report sensor data and receive control instructions—all requiring "no data loss, no order disruption"—which is TCP's core value. UDP is fast but unreliable; TCP has the overhead of three-way handshake but gains an end-to-end acknowledgment and retransmission mechanism, irreplaceable in most IoT scenarios.
This project contains both TCP client and server routines: the client connects to the server and sends data periodically; the server listens on a port, accepts client connections, sends/receives data, and supports reconnecting after client disconnection.
2. Core Concepts
2.1 TCP Three-Way Handshake
Client Server│ ││──── SYN (seq=x) ──────────────────→│ 1. Client requests connection│ ││←─── SYN+ACK (seq=y, ack=x+1) ─────│ 2. Server acknowledges + requests│ ││──── ACK (ack=y+1) ────────────────→│ 3. Client acknowledges│ ││═══════ ESTABLISHED ═══════════════│
In code, the client calls connect() to trigger the handshake, and the server calls accept() to wait for handshake completion.
2.2 TCP vs UDP API Comparison
x// === TCP Server === // === UDP Server ===socket(AF_INET, SOCK_STREAM, 0) socket(AF_INET, SOCK_DGRAM, 0)bind(fd, addr, len) bind(fd, addr, len)listen(fd, 5) // No listenclient_fd = accept(fd, ...) // No accept, use recvfrom directlyrecv(client_fd, buf, len, 0) recvfrom(fd, buf, len, 0, &addr, &len)send(client_fd, buf, len, 0) sendto(fd, buf, len, 0, &addr, len)
// === TCP Client === // === UDP Client ===socket(AF_INET, SOCK_STREAM, 0) socket(AF_INET, SOCK_DGRAM, 0)connect(fd, &addr, len) // No connectsend(fd, buf, len, 0) sendto(fd, buf, len, 0, &addr, len)recv(fd, buf, len, 0) recvfrom(fd, buf, len, 0, &addr, &len)2.3 Three Return Values of recv()
| Return Value | Meaning | Handling |
|---|---|---|
> 0 | Received n bytes of data | Process normally |
= 0 | Peer closed connection normally (sent FIN) | close() and break |
< 0 | No data available (non-blocking) or error | Ignore with MSG_DONTWAIT; check errno for others |
recv() == 0is a TCP-specific "peer closed" signal; UDP has no such concept.
3. Project Architecture and Flow
3.1 TCP Client
xxxxxxxxxxapp_main()├─ wifi_init() ← WiFi STA init (wait for IP)│└─ xTaskCreate(vTcpClientTask, ...) ← Create TCP client task└─ vTcpClientTask():├─ socket(AF_INET, SOCK_STREAM, 0) → Create TCP socket├─ connect(192.168.11.183:8080) → Three-way handshake└─ while(1):├─ send("ESP32 TCP Client Data")├─ recv(MSG_DONTWAIT) ← Non-blocking receive├─ recv==0 → server disconnected, break└─ vTaskDelay(200ms)
4. Hardware Dependencies
Hardware Connection: No external wiring, WiFi wireless communication
Required Components:
lwip/sockets,esp_wifi,esp_netif,esp_event,nvs_flash,FreeRTOS
5. Source Code Analysis — TCP Client
Full source: Source Code → ESP-IDF → 5.Network_Protocol → 4.TCP → TCP_Client
5.1 Macro Configuration
These macros define WiFi connection info and TCP server address. Modify SSID, password, and target IP according to your network environment.
xxxxxxxxxx// WiFi SSID// WiFi password// Server IP// Server port5.2 WiFi Initialization (Review)
The WiFi STA connection code in this experiment (wifi_init_sta(), event callback, NVS init, etc.) is identical to 5.2 WIFI-STA Mode. app_main() does NVS init → WiFi connection to get IP → xTaskCreate() for TCP task.
For details, review: 5. Network Protocols and Wireless Communication -> 2. WIFI-STA Mode -> WIFI-STA Mode
5.3 vTcpClientTask() — TCP Client Core
The biggest difference from UDP client: TCP is "make a call before speaking"—send()/recv() only after connect() three-way handshake succeeds. UDP is "send a letter directly"—sendto() doesn't need a connection first. Also TCP uses SOCK_STREAM (streaming), UDP uses SOCK_DGRAM (datagram).
In the send-receive loop, a key judgment—recv() returning 0 means the server normally closed the connection (sent FIN package), then break out to close socket and delete task. UDP has no this problem because UDP is connectionless, recvfrom() never returns 0.
xxxxxxxxxxvoid vTcpClientTask(void *pv){    int sock_fd;    struct sockaddr_in server_addr = {0};    char send_buf[64] = {0};    char recv_buf[64] = {0};
    // Create TCP socket    sock_fd = socket(AF_INET, SOCK_STREAM, 0);    if (sock_fd < 0) {        ESP_LOGE(TAG, "Create TCP socket failed");        vTaskDelete(NULL);        return;    }
    // Configure server address and connect    server_addr.sin_family = AF_INET;    // Port to network byte order    server_addr.sin_port = htons(TCP_SERVER_PORT);    inet_pton(AF_INET, TCP_SERVER_IP, &server_addr.sin_addr.s_addr);
    if (connect(sock_fd, (struct sockaddr*)&server_addr,                sizeof(server_addr)) < 0) {        // Connect failed        ESP_LOGE(TAG, "Connect TCP server failed");        close(sock_fd);        vTaskDelete(NULL);        return;    }    // TCP handshake complete    ESP_LOGI(TAG, "TCP server connected");
    // Send-receive loop    while (1) {        // Build send data        sprintf(send_buf, "ESP32 TCP Client Data");        // Send data        int ret = send(sock_fd, send_buf, strlen(send_buf), 0);        if (ret <= 0) {            // Send failed            ESP_LOGE(TAG, "Send failed");            break;        }        ESP_LOGI(TAG, "Send: %s", send_buf);        // Non-blocking receive        int recv_len = recv(sock_fd, recv_buf, sizeof(recv_buf) - 1,                            MSG_DONTWAIT);        if (recv_len > 0) {            recv_buf[recv_len] = '\0';            ESP_LOGI(TAG, "Recv: %s", recv_buf);        }        else if (recv_len == 0) {            // Peer closed connection            ESP_LOGE(TAG, "TCP server disconnected");            break;        }
        vTaskDelay(pdMS_TO_TICKS(200));    }
    close(sock_fd);    vTaskDelete(NULL);}
6. Operation Flow
6.1 Build and Flash Flow
ESP-IDF Flash Flow: See ESP-IDF → 1. Before Development → 3. Build and Flash.
6.2 Testing Method
Run a network debugging assistant on PC, select TCP Server mode, listen on port
8080.

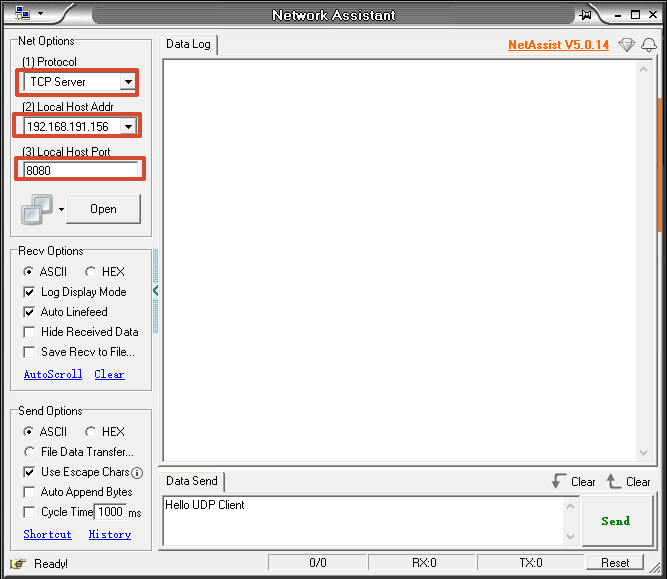
Flash TCP_Client to ESP32. Serial shows connection success → send data → receive reply.
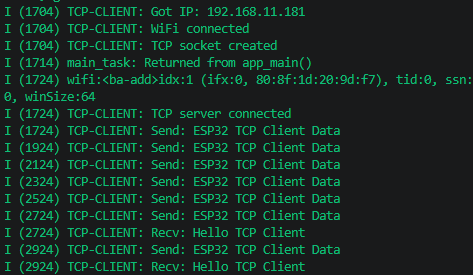
6.3 Normal Log — TCP Client
xxxxxxxxxxI (2856) TCP-CLIENT: Got IP: 192.168.11.100I (2858) TCP-CLIENT: WiFi connectedI (2860) TCP-CLIENT: TCP socket createdI (2862) TCP-CLIENT: TCP server connectedI (2864) TCP-CLIENT: Send: ESP32 TCP Client DataI (2866) TCP-CLIENT: Recv: Hello from TCP Server!
7. Common Problems
| Symptom | Cause | Solution |
|---|---|---|
connect() returns -1, connection failed | Server not started or wrong IP | Confirm PC TCP Server is listening, IP and port are correct |
Server accept() blocks and doesn't return | No client connected | Normal behavior, it's a blocking call |
Client recv() returns 0 | Server actively closed connection | Normal disconnect, break then close() |
Consecutive send() failures | Peer closed / network interrupted | TCP connection broken, need to connect() again |
bind() failed | Port in use | Use a different port / wait 2 minutes (TIME_WAIT timeout) |
recv() data "sticks" together | TCP is byte stream, no message boundaries | Define frame header+length or delimiter protocol at application layer |
| Server can only connect one client | Single-threaded sequential processing | Change to xTaskCreate for each accept() for independent tasks |
Meaning of listen() second parameter 5 | Not max connections, it's the pending connection queue length | Already-accepted connections don't count |