Welcome to ESP32 Core Board repository
10. MQTT IoT Communication Protocol
MQTT IoT Communication Protocol
MQTT IoT Communication Protocol1. MQTT Overview2. Core Concepts2.1 Publish/Subscribe Model2.2 QoS Message Quality Levels2.3 Key Role of client.loop()3. Hardware Dependencies4. Project Architecture and Flow5. Source Code Explanation5.1 Configuration and Global Variables5.2 Message Callback5.3 Reconnection and Subscription5.4 loop() — MQTT Main Loop6. Operation Flow6.1 Build and Flash6.2 Operation Steps6.3 Verification Methods7. Common Problems
1. MQTT Overview
MQTT (Message Queuing Telemetry Transport) is a lightweight publish/subscribe messaging protocol designed specifically for IoT. All communication is relayed through a Broker, completely decoupling publishers and subscribers. This experiment connects to the public Broker broker.emqx.io, subscribes to the esp32/sub topic to receive messages, and publishes messages to esp32/pub topic every 3 seconds.
Typical Application Scenarios:
| Application Type | Example |
|---|---|
| Sensor Data Reporting | Temperature/humidity published to cloud platform regularly |
| Remote Control | Mobile app publishes "turn on light" message, device subscribes to same topic |
| Smart Home | Multiple devices work together through the same Broker |
| Industrial IoT | PLC status monitoring, production line data collection |
2. Core Concepts
2.1 Publish/Subscribe Model
Publisher ──PUBLISH("esp32/temp", "25℃")──→ Broker ──forward──→ Subscriber──forward──→ Subscriber
Publishers and subscribers do not connect directly; they match through Topics. Topics are separated by /, such as home/livingroom/temperature. Wildcard subscriptions: + matches a single level, # matches all remaining levels.
2.2 QoS Message Quality Levels
| QoS | Meaning | Confirmation Mechanism |
|---|---|---|
| 0 | At most once | Fire and forget, no confirmation |
| 1 | At least once | PUBACK confirmation + retransmission, may duplicate |
| 2 | Exactly once | Four-way handshake, guaranteed no loss or duplication |
2.3 Key Role of client.loop()
client.loop() must be called frequently in loop(). Internally it handles: checking and parsing MQTT packets received from Broker → calling callback() for PUBLISH packets → automatically sending PINGREQ to maintain Keep Alive → handling QoS 1/2 acknowledgment retransmission.
3. Hardware Dependencies
Pure software experiment. Requires connecting to router via WIFI-STA first, and the router must have internet access (experiment uses public Broker broker.emqx.io).
| Dependency | Description |
|---|---|
| Network Connection | WiFi 2.4GHz, WIFI-STA mode, router must have internet access |
| Protocol Stack | TCP/IP (lwIP), MQTT based on TCP connection (port 1883) |
| Flash Usage | PubSubClient library approximately 30KB, no problem for ESP32-S3 |
| Bandwidth Requirement | Extremely low, Keep Alive heartbeat only 2 bytes, PUBLISH packet is dozens of bytes |
| RAM Requirement | PubSubClient default buffer 256 bytes (MQTT_MAX_PACKET_SIZE), can be increased in library header file |
| Library Dependency | PubSubClient by Nick O'Leary (search and install in Arduino IDE library manager) |
| Broker | broker.emqx.io:1883 (EMQX public test Broker, no registration required) |
MQTT is specifically designed for low bandwidth, low power, unreliable networks. Protocol header is minimum only 2 bytes, supports QoS level confirmation and will message, very suitable for NB-IoT, LoRa gateway behind narrowband links and battery-powered sensor nodes.
4. Project Architecture and Flow
xsetup()├─ connectWiFi()├─ client.setServer(broker, 1883) // Set Broker address└─ client.setCallback(callback) // Register message callbackloop()├─ if not connected → reconnect() // CONNECT + SUBSCRIBE├─ client.loop() // Handle receive + maintain heartbeat└─ every 3 seconds: client.publish(topic, msg)
5. Source Code Explanation
Complete source code: Source code → Arduino → 3.Network Communication → MQTT → MQTT.ino
5.1 Configuration and Global Variables
PubSubClient must be bound to a WiFiClient instance, so create WiFiClient first then create PubSubClient. MQTT default port 1883 (unencrypted), encrypted MQTT uses 8883.
xxxxxxxxxxWiFiClient espClient;PubSubClient client(espClient); // MQTT over TCP
const char* MQTT_SERVER = "broker.emqx.io";const int MQTT_PORT = 1883;const char* TOPIC_SUB = "esp32/sub";const char* TOPIC_PUB = "esp32/pub";5.2 Message Callback
When receiving a PUBLISH packet for a subscribed topic from the Broker, client.loop() calls this function. payload is not guaranteed to be null-terminated, must use length parameter to limit read range.
xxxxxxxxxxvoid callback(char* topic, byte* payload, unsigned int length) { Serial.printf("Received [%s]: ", topic); for (int i = 0; i < length; i++) Serial.print((char)payload[i]); Serial.println();}5.3 Reconnection and Subscription
Automatically reconnect after losing connection, re-subscribe after successful reconnection (Broker does not remember subscription relationships by default).
xxxxxxxxxxvoid reconnect() { while (!client.connected()) { if (client.connect("MQTT_Client")) { // Send CONNECT packet Serial.println("MQTT Connected!"); client.subscribe(TOPIC_SUB); // Re-subscribe } else { Serial.printf("Failed, rc=%d retry in 5s\n", client.state()); delay(5000); } }}
client.state()returns disconnection reason: -4 connection timeout, 2 Client ID rejected, 4 username/password error, etc.
5.4 loop() — MQTT Main Loop
loop() does three things: check connection (reconnect if disconnected), call client.loop() to handle packet reception and heartbeat, publish a message to esp32/pub every 3 seconds.
xxxxxxxxxxvoid loop() {  if (!client.connected()) reconnect();  client.loop();   // Handle receive + maintain Keep Alive
  static unsigned long last = 0;  if (millis() - last > 3000) {    last = millis();    client.publish(TOPIC_PUB, "Hello MQTT from ESP32-S3");  }}
6. Operation Flow
6.1 Build and Flash
Arduino flash flow: See Arduino → 1. Before Development → 2. Build and Flash.
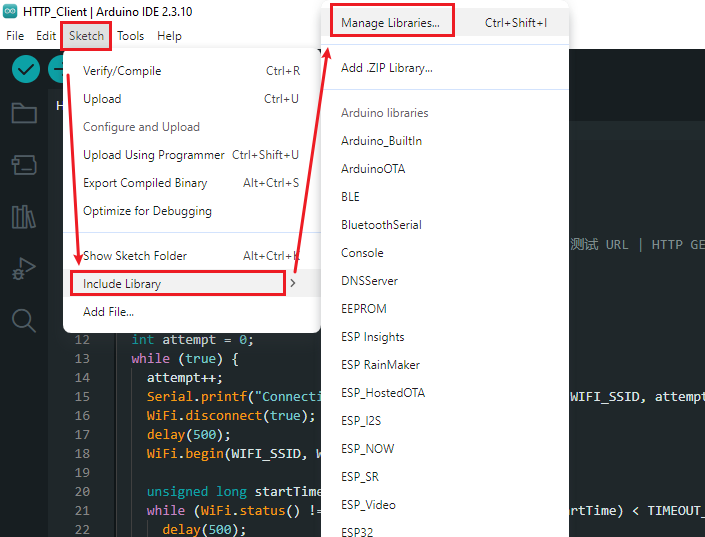
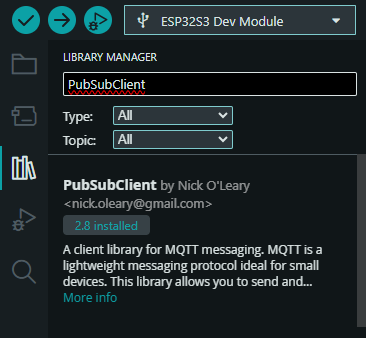
Install library: Arduino IDE → Library Manager → Search "PubSubClient" → Install
Build and flash
6.2 Operation Steps
Step 1: Install PubSubClient Library
Arduino IDE → Sketch → Include Library → Manage Libraries → Search PubSubClient → Install (author Nick O'Leary).
Step 2: Build and Flash, Open Serial Monitor
Build and flash to ESP32-S3 development board. Open serial monitor (baud rate 115200), wait for WiFi connection success, ESP32 automatically connects to public Broker and subscribes to esp32/sub topic:
xxxxxxxxxxMQTT Connected!Sent: Hello MQTT from ESP32-S3
Serial port prints a Sent: message every 3 seconds, indicating the publish channel is working.
Step 3: Verify Bidirectional Communication with MQTTX
Open MQTTX client on PC , configure and connect with the following parameters:
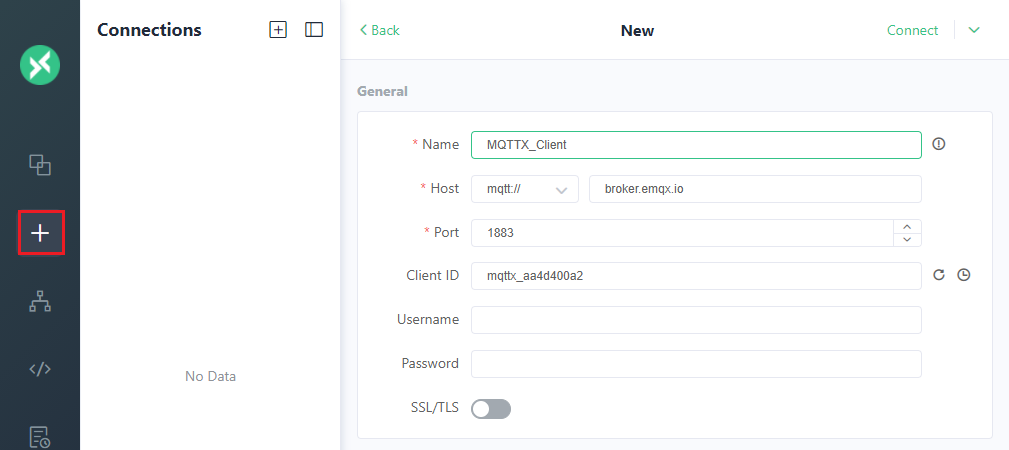
| Parameter | Value |
|---|---|
| Broker | broker.emqx.io |
| Port | 1883 |
| Client ID | Arbitrary (e.g., PC_Client) |
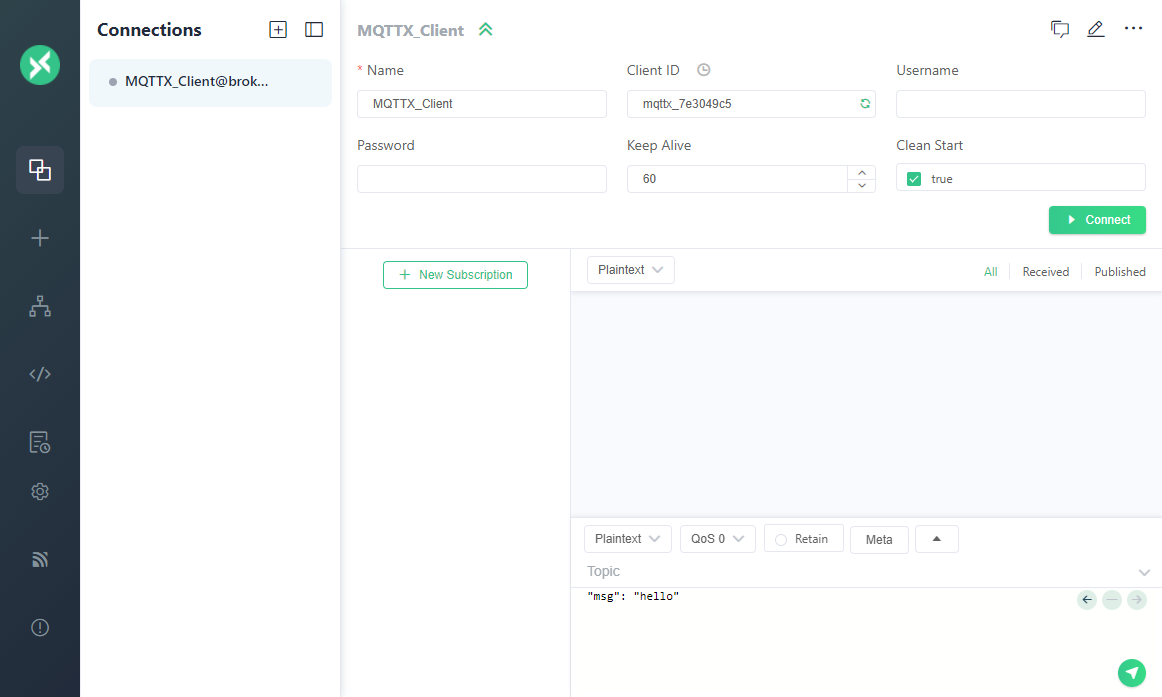
Create Publish: Click (New Subscription) on the MQTT server side - server subscription == client publish
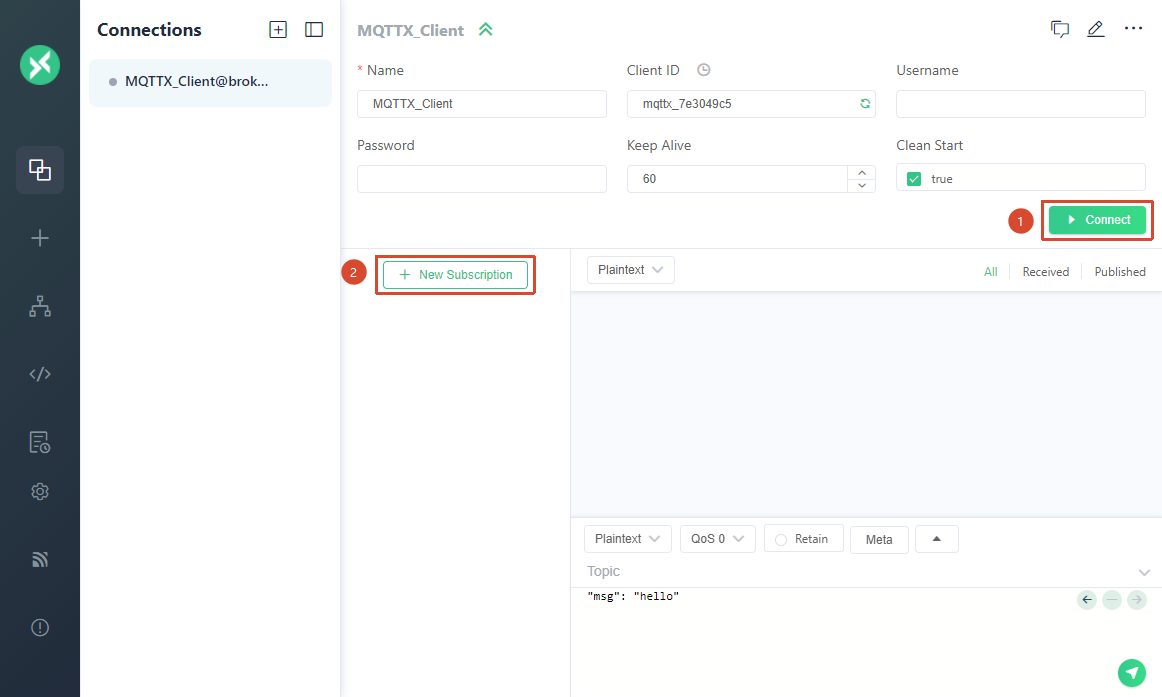
Select publish topic: (example:
esp32/pub), select service level (QoS 0)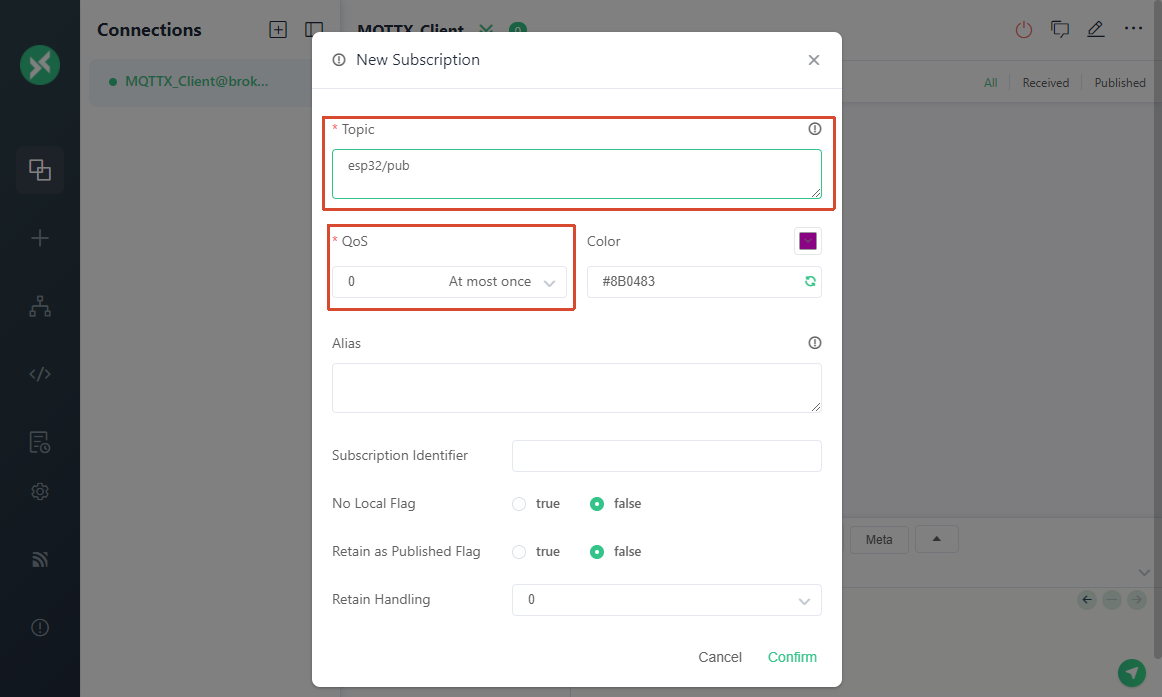
Create Subscription: Click to input the server's publish topic (client's subscription topic):
esp32/sub, service level is also QoS 0.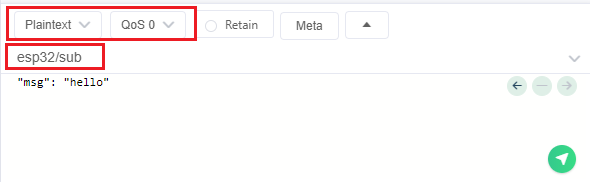
Verify Publish: After MQTTX is connected to the same Broker, subscribe to
esp32/pubtopic, should receiveHello MQTT from ESP32-S3sent by ESP32 every 3 seconds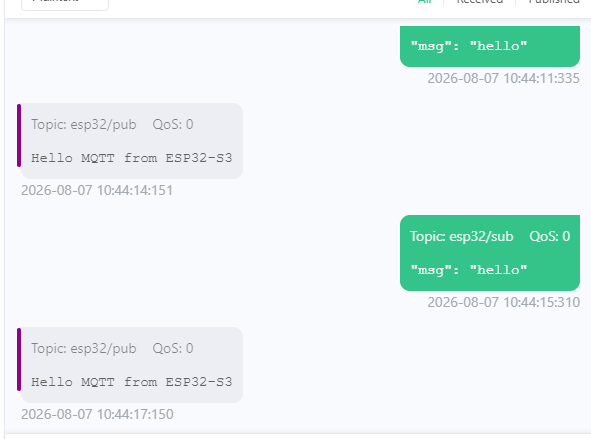
Verify Subscription: Send
Hello from MQTTXtoesp32/subtopic in MQTTX, ESP32 serial monitor prints:
xxxxxxxxxxReceived [esp32/sub]: "msg": "hello"

6.3 Verification Methods
| Operation | Expected Result |
|---|---|
| Power on | Connect to Broker, start timed publishing |
Use MQTT client (e.g., MQTTX) to publish to esp32/sub | Serial port prints received message |
7. Common Problems
| Phenomenon | Cause | Solution |
|---|---|---|
connect() returns status 2 | Client ID occupied | Use unique ID, such as ESP32_<MAC address> |
| Not receiving messages | client.loop() not called frequently enough | Ensure no long delay() in loop() |
Compilation error, cannot find PubSubClient.h | Library not installed | Install PubSubClient in library manager |
| Cannot receive messages from MQTTX | Publish topic and subscription topic may not match the code | Verify publish and subscription topics match |