Welcome to ESP32 Core Board repository
4. UDP Client Experiment
UDP Client Experiment
UDP Client Experiment1. UDP Client Overview2. Core Concepts2.1 UDP Communication Model2.2 Command Table2.3 Core API3. Hardware Dependencies4. Project Architecture and Flow5. Source Code Explained5.1 Creating a UDP Socket and Handshake5.2 Non-Blocking Reception5.3 Command Dispatch5.4 Main Entry6. Operating Procedures6.1 Environment Preparation6.2 Flashing and Running6.3 Serial Output Example6.4 Verification Methods7. Common Problems
1. UDP Client Overview
UDP (User Datagram Protocol) is a connectionless, unreliable but efficient transport layer protocol. Unlike TCP, UDP does not establish connections, does not guarantee delivery, and does not guarantee ordering, but it has low overhead and low latency, making it very suitable for scenarios with high real-time requirements where occasional packet loss is acceptable.
In IoT applications, UDP is widely used for high-frequency sensor data reporting (such as temperature and humidity sampled 100 times per second where losing a few frames doesn't matter), LAN device discovery (broadcast/multicast probing for online devices on the same subnet), DNS resolution (small query volume, timeout-retry is enough), and real-time audio/video streaming (latency takes priority over image quality). Mastering UDP's sendto()/recvfrom() programming model is the foundation for later advanced experiments such as custom protocol packaging, real-time data reporting, and LAN device discovery.
In this experiment the ESP32-S3 acts as a UDP client, communicating bidirectionally with the PC network debugging assistant — active handshake, non-blocking command reception, periodic heartbeat, and support for commands such as ping / status / led on / led off / who.
Typical application scenarios:
| Application Type | Example |
|---|---|
| Real-time data streams | High-frequency sensor sampling reporting (losing a few frames doesn't matter) |
| LAN discovery | mDNS / SSDP device discovery protocols |
| Voice/video | VoLTE, real-time audio/video (low latency > reliability) |
| Broadcast/multicast | Sending one message to multiple devices |
UDP requires no connection; you can send directly with
sendto(). The peer address is obtained in eachrecvfrom().
2. Core Concepts
2.1 UDP Communication Model
┌──────────┐ sendto() ┌──────────┐│ ESP32-S3 │ ──────────────→ │ PC ││ (Client) │ ←────────────── │ │└──────────┘ recvfrom() └──────────┘
- UDP is connectionless; no
connect()is needed; you send directly to the target address - Each packet is independent; the sender and receiver do not need to maintain connection state
sendto(data, (ip, port))sends,recvfrom(bufsize)receives and obtains the source address
2.2 Command Table
| PC Command | ESP32 Reply | Description |
|---|---|---|
ping | pong | Connectivity test |
status | Runtime + free memory | Device status |
led on | LED ON (OK) | Turn on GPIO48 LED |
led off | LED OFF (OK) | Turn off GPIO48 LED |
who | ESP32-S3 UID | Device unique ID |
| Other text | echo: <original> | Echo |
2.3 Core API
ximport socketsock = socket.socket(socket.AF_INET, socket.SOCK_DGRAM) # UDP socketsock.bind(("0.0.0.0", 8080)) # bind local portsock.sendto(b"hello", ("192.168.11.183", 8080)) # senddata, addr = sock.recvfrom(256) # recv + get sender3. Hardware Dependencies
The ESP32-S3 has built-in WiFi. The PC network debugging assistant selects UDP mode, listens on port 8080, and the target port is 8080 (the ESP32 bind port).
4. Project Architecture and Flow
xxxxxxxxxxScript execution (single-file .py)||- wifi_connect(): connect to WiFi (STA mode)|- udp_socket(): create UDP socket -> bind(8080)|- udp_send(): handshake -> HELLO|`- while True:|- WiFi disconnect watchdog -> auto reconnect|- udp_recv(): non-blocking receive (0.3s timeout)|- handle_command(): command dispatch`- send heartbeat every 30s
5. Source Code Explained
Full source code: Source Code -> MicroPython -> 4.Network Protocols -> UDP_Client -> UDP_Client.py
5.1 Creating a UDP Socket and Handshake
SOCK_DGRAM = UDP; bind specifies the local port and then sends a HELLO handshake packet to the PC.
xxxxxxxxxxESP32_PORT = 8080 # local bind portPC_IP = "192.168.11.183" # PC IP addressPC_PORT = 8080 # PC listen portsock = socket.socket(socket.AF_INET, socket.SOCK_DGRAM)sock.bind(("0.0.0.0", ESP32_PORT))sock.settimeout(0.3) # non-blocking pollingudp_send(sock, PC_IP, PC_PORT, f"HELLO from ESP32-S3 [{esp_ip}]")5.2 Non-Blocking Reception
settimeout(0.3) implements non-blocking behavior — if no data arrives within 0.3s, an OSError is raised; catching it returns None and continues the main loop.
xxxxxxxxxxdef udp_recv(sock, bufsize=256): try: data, addr = sock.recvfrom(bufsize) return data, addr except OSError: return None, None # timeout, no data5.3 Command Dispatch
Supports five commands ping/status/led on/led off/who; unmatched commands echo the original content.
xxxxxxxxxxdef handle_command(sock, addr, cmd): if cmd == "ping": udp_send(sock, *addr, "pong") elif cmd == "status": import gc reply = f"ESP32 up {time.time():.0f}s | free heap: {gc.mem_free()} B" udp_send(sock, *addr, reply) elif cmd == "led on": from machine import Pin; Pin(48, Pin.OUT, value=1) udp_send(sock, *addr, "LED ON (OK)") elif cmd == "who": import machine, ubinascii uid = ubinascii.hexlify(machine.unique_id()).decode() udp_send(sock, *addr, f"ESP32-S3 UID: {uid}") else: udp_send(sock, *addr, f"echo: {cmd}")Command set:
| Command | Reply | Description |
|---|---|---|
ping | pong | Connectivity test |
status | ESP32 up Xs / free heap: X B | Running status |
led on | LED ON (OK) | Turn on GPIO48 |
led off | LED OFF (OK) | Turn off GPIO48 |
who | ESP32-S3 / UID: xxx | Device unique ID |
| Other text | echo: <original> | Echo if unmatched |
5.4 Main Entry
wifi_connect connects to WiFi -> udp_socket creates and binds -> HELLO handshake -> main loop: receive commands + reconnect on disconnect + 30s heartbeat.
xxxxxxxxxxdef main(): wlan = wifi_connect(WIFI_SSID, WIFI_PASSWORD) # connect to WiFi esp_ip = wlan.ifconfig()[0] sock = udp_socket(ESP32_PORT) # create socket udp_send(sock, PC_IP, PC_PORT, f"HELLO from ESP32-S3 [{esp_ip}]") while True: if not wlan.isconnected(): # WiFi watchdog wlan = wifi_connect(WIFI_SSID, WIFI_PASSWORD) data, addr = udp_recv(sock) # non-blocking recv if data: handle_command(sock, addr, fmt(data)) # dispatch if time.time() - last_hb >= 30: # heartbeat every 30s udp_send(sock, PC_IP, PC_PORT, f"heartbeat [{esp_ip}]")6. Operating Procedures
6.1 Environment Preparation
Thonny IDE steps: See MicroPython -> 1. Before Development -> 3.Thonny IDE.
PC network debugging assistant
 UDP mode, listen on port
 8080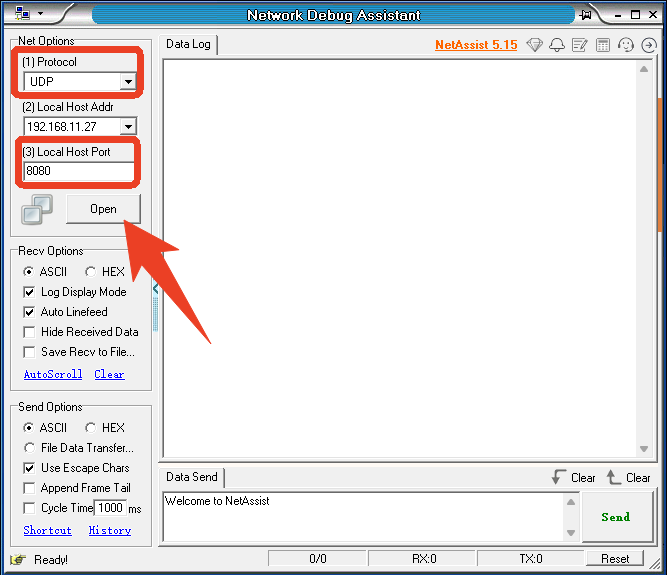
Modify
WIFI_SSID/WIFI_PASS/PC_IP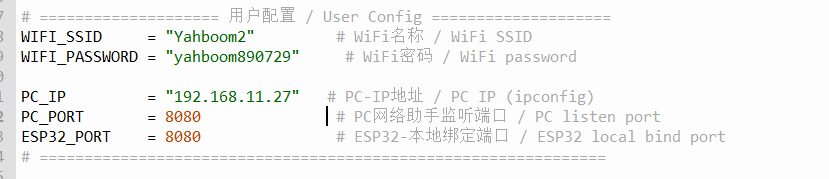
6.2 Flashing and Running
Run UDP_Client.py; the ESP32 sends HELLO to the PC. The PC sends commands and the ESP32 replies.
6.3 Serial Output Example
xxxxxxxxxx==================================================ESP32-S3 UDP Client <--> PC Network Assistant==================================================[WiFi] Already connected. IP: 192.168.11.229[SOCK] UDP bound to 0.0.0.0:8080[TX] -> 192.168.11.27:8080 | HELLO from ESP32-S3 [192.168.11.229]--------------------------------------------------PC listen : 192.168.11.27:8080ESP32 bind : 192.168.11.229:8080--------------------------------------------------[RX] <- 192.168.11.27:8080 | led off[TX] -> 192.168.11.27:8080 | LED OFF (OK) # GPIO44=1[RX] <- 192.168.11.27:8080 | led on[TX] -> 192.168.11.27:8080 | LED ON (OK) # GPIO44=0[TX] -> 192.168.11.27:8080 | heartbeat [192.168.11.229][RX] <- 192.168.11.27:8080 | who[TX] -> 192.168.11.27:8080 | ESP32-S3 | UID: a4cb8fc6b864[RX] <- 192.168.11.27:8080 | ping[TX] -> 192.168.11.27:8080 | pong[RX] <- 192.168.11.27:8080 | status[TX] -> 192.168.11.27:8080 | ESP32 up 838500500s | free heap: 120352 B
Network debugging assistant print:
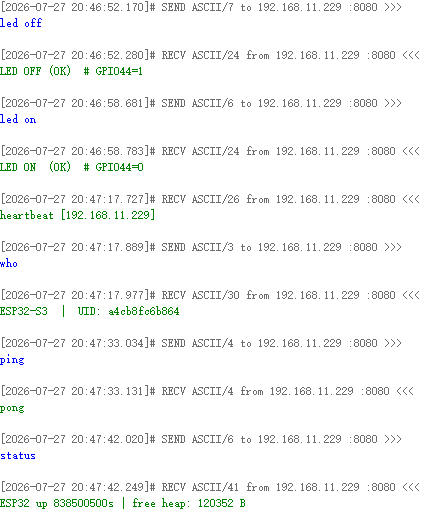
6.4 Verification Methods
| Operation | Expected Result |
|---|---|
PC sends ping | Replies pong |
PC sends led on | GPIO48 LED turns on, replies LED ON (OK) |
PC sends who | Replies the ESP32-S3 unique ID |
7. Common Problems
| Symptom | Cause | Solution |
|---|---|---|
| PC cannot receive HELLO | Target IP/port mismatch | Confirm PC_IP and PC_PORT match the PC |
| ESP32 cannot receive commands | Wrong target port when the PC sends | The target port should be 8080 (the ESP32 bind port) |
| Occasional packet loss | UDP does not guarantee delivery | Normal; handle resending at the application layer |