yahboom
HomeLearn
Solution
Blog
Online Store
About Us
EN/中文
ROSMASTER M1📖
01.Robot Configuration and Operation Guide
  • 0. Assembly video
  • 1. Servo PTZ calibration
  • 2. Quick start guide handle control
  • 3. First trial
  • 4. Enter Docker (For JETSON Nano and RPi 5)
  • 1.5 Quick Start video
02.AI Model Preparation
  • AI Model Preparation
03.AI Model Basics course
  • 1.AI large model types and principles
  • 2.RAG retrieval enhancement and model training samples
  • 3.Embodied intelligent robot system architecture
  • 4.Embodied intelligent functions core source code
04.AI Model Developmentnew
  • 1.Register a model service provider account
  • 2. Configuring API-KEY
  • 3. Introduction to Dify
  • 4. Basic Dify Features
  • 5. Deploy the RAG knowledge base
  • 6. AI Large Model Development - chatbot
  • 7. RAG knowledge base + chatbot
  • 8. AI agent workflow
  • 9. Custom wake-up response
  • 10. Core module testing tools
05.AI Model - Text Version
  • 1.Semantic understand and command follow
  • 2.Multimodal visual understand
  • 3.Multimodal visual understand + PTZ tracking
  • 4.Multimodal visual understand + visual following
  • 5.Multimodal visual understand + visual line patroling
  • 6.Multimodal visual understand + Depth Camera Distance Question Answering
  • 7.Multimodal visual understand+SLAM navigation
  • 8.Multimodal visual understand+SLAM navigation + visual line patroling
  • 9.Intention estimation + Multimodal visual understand + SLAM navigation + visual functions
06.AI Model - Voice Version
  • 1.Semantic understand and command follow
  • 2.Multimodal visual understand
  • 3.Multimodal visual understand + PTZ tracking
  • 4.Multimodal visual understand + visual following
  • 5.Multimodal visual understand + visual line patroling
  • 6.Multimodal visual understand + Depth Camera Distance Question Answering
  • 7.Multimodal visual understand+SLAM navigation
  • 8.Multimodal visual understand+SLAM navigation + visual line patroling
  • 9.Intention estimation + Multimodal visual understand + SLAM navigation + visual functions
07.Chassis Control Course
  • 1. ROS control
  • 2. Handle control
  • 3. Keyboard control
  • 4. Linear velocity calibration
  • 5. Angular velocity calibration
  • 6. URDF model
08.Mediapipe Visual Course
  • 1.Hand detection
  • 2.Posture detection
  • 3.Overall detection
  • 4.Facial landmark detection
  • 5.Face detection
  • 6.Face special effects
  • 7.3D object recognition
  • 8.Brush
  • 9.Finger control
  • 10.Gesture recognition
  • 11.Palm target positioning
  • 12.Fingertip trajectory recognition
09.Advanced Vision Course
  • 1.QR code
  • 2.Human Pose Estimation
  • 3.Object Detection
  • 4.AR Vision
  • 5.ROS+Opencv Basics
  • 6.Yolov8 Object Detection (ORIN)
  • 7.Deep Learning Object Tracking (ORIN)
10.HD Camera Vision Course(Standard Version)
  • 01.Color tracking
  • 02.Face Tracking
  • 03.AprilTag machine code tracking
  • 04.KCF Object Tracking
  • 05.QR code tracking
  • 06.Mediapipe gesture tracking
  • 07.Meidpipe human posture tracking
  • 08.Color Follow
  • 09.Face Following
  • 10.AprilTag machine code following
  • 11.QR code follow
  • 12.Mediapipe gesture recognition and following
  • 13.Meidpipe human posture following
  • 14.Visual tracking autonomous driving
  • 15.QR code motion control
  • 16.Gesture motion control
11.Depth Camera Vision Course(Superior Version)
  • 1.Basic use of depth camera
  • 2.Deep pseudo-color image
  • 3.Depth camera ranging
  • 4.Color block volume measurement
  • 5.Color Following
  • 6.Face Following
  • 7.QR code follow
  • 8.Machine code following
  • 9.KCF Object Following
  • 10.Mediapipe gesture following
  • 11.Mediapipe Posture Following
  • 12.Visual tracking autonomous driving
  • 13.Edge Detection
12.LiDAR Course
  • 1.Basic use of Lidar
  • 2.Lidar obstacle avoidance
  • 3.Lidar following
  • 4.Lidar patrol
  • 5.Gmapping-SLAM mapping
  • 6.Cartographer-SLAM mapping
  • 7.slam_toolbox mapping
  • 8.Navigation2 single-point navigation avoid
  • 9.Navigation2 multi-point navigation avoid
  • 10.Cartographer Repositioning navigation
  • 11.RTAB-Map mapping
  • 12.RTAB-Map navigation
  • 13.APP mapping navigation
13.Multi-Vehicle Course
  • 1.Multi-vehicle control
  • 2.Multi-vehicle navigation
  • 3.Multi-vehicle platoon
14.Autonomous Driving expand(Need purchase track map)
【Track Map】Multimodal visual understand+SLAM navigation
  • 1. Multimodal visual understand+SLAM navigation
【Track Map】Autonomous driving (RDKX5 & Orin)
  • 1. Venue placement and precautions
  • 2. Start testing
  • 3. Identify and debug
  • 4. Lane keeping
  • 5. Road sign detection
  • 6. Traffic light recognition
  • 7. Fixed point parking
  • 8. Steering decision
  • 9. Horn sounding
  • 10. Deceleration
  • 11. Speed limit
  • 12. Autonomous parking
  • 13. Comprehensive application
  • 14. Unmanned driving integrated AI large model
【Track Map】Autonomous driving (Jetson Nano)
  • 1. Venue placement and precautions
  • 2. Start testing
  • 3. Identify and debug
  • 4. Lane keeping
  • 5. Road sign detection
  • 6. Traffic light recognition
  • 7. Fixed point parking
  • 8. Steering decision
  • 9. Horn sounding
  • 10. Deceleration
  • 11. Speed limit
  • 12. Autonomous parking
  • 13. Comprehensive application
【Track Map】Road network planning
  • 1. Introduction to Road Network Planning and Navigation
  • 2. Constructing a Pose Map
  • 3. Road Network Labelling
  • 4. Road Network Planning Combined with Sand Table Map
  • 5. Path Replanning
【Track Map】Model Training
  • 1. Data Collection
  • 2. Dataset Annotation
  • 3. YOLOv11 Model Training
  • 4. Model Format Conversion
15.YOLOV11 development course (ORIN)
  • 1.YOLO environment construction
  • 2.CLI use
  • 3.Object detection
  • 4.Instance segmentation
  • 5.Pose estimation
  • 6.Image classification
  • 7.Oriented object detection
  • 8.Model conversion
  • 9.Dataset annotation
  • 10.Model Training_Conversion
  • 11.Model prediction
16.YOLOV11 development course(RPi&Jetson NANO)
  • 1.YOLO environment construction
  • 2.CLI use
  • 3.Object detection
  • 4.Instance segmentation
  • 5.Pose estimation
  • 6.Image classification
  • 7.Oriented object detection
  • 8.Model conversion
  • 9.Model prediction
17.YOLOV11 development course(RDK X5)
  • 1.YOLO environment construction
  • 2.CLI use
  • 3.Object detection
  • 4.Instance segmentation
  • 5.Pose estimation
  • 6.Image classification
  • 7.Oriented object detection
  • 8.Model prediction
  • 9.Model Quantization
18.Main control board course
Jetson Nano B01
  • 1. Introduction to the Jetson Nano B01 SUB Board
  • 2. Burn the system image
  • 3. Re-read the memory card or USB drive that has been burned
  • 4. Startup system
  • 5. Jetson Nano B01 System and Desktop Introduction
  • 6. Memory card or USB flash drive expansion
  • 7. Network Configuration
  • 8. SSH remote login & file transfer
  • 9. VNC Remote Login
  • 10. Jetson Nano B01 system backup
  • 11. Jetson Nano Swap space increased
  • 12. Installation and use of Jtop
  • 13. Third-party board + USB drive to start the car
Jetson Orin Nano_NX
  • 1.Jetson Orin board introduction
  • 2.Restore the factory image system
  • 3.Backup SSD system
  • 4.SSD expansion
  • 5.Network configuration
  • 6.SSH remote login
  • 7.VNC remote control
  • 8.Remote file transfer
  • 9.Jtop tool
  • 10.Exchange space expansion
Raspberry Pi
  • 1. Introduction to Raspberry PI 5
  • 2. Raspberry PI system installation and backup
  • 3. Powering the Raspberry PI 5
  • 4. Startup of Raspberry PI 5
  • 5. Update and upgrade operating system
  • 6. Introduction to raspi-config tool
  • 7. config.txt file description
  • 8. Network Configuration
  • 9. remote access
  • 10. Transfer files remotely
  • 11. Set display resolution and rotation
  • 12. Set screen to sleep
  • 13. Play audio and video
  • 14. Using USB camera
  • 15. Using MIPI camera
  • 16. Get real-time temperature of Raspberry Pi
RDK X5
  • 1.Introduction to RDK X5 board
  • 2.Write system file
  • 3.Hardware interface description
  • 4.Install case and other accessories
  • 5.Network configuration
  • 6.Remote login
  • 7.Update system
  • 8.srpi-config user guide
  • 9.config. txt configuration file
  • 10.Self-startup setting
  • 11.RDK exclusive command usage
  • 12.Linux command usage
  • 13.GPIO readwrite operation
  • 14.Image classification algorithm
  • 15.Use USB camera
  • 16.Use MIPI camera
  • 17.Binocular camera depth algorithm
19.AI large model course(ORIN-Pi-RDK X5)
Offline large model (Text Interaction)
  • 0. AI Large Model Mirroring Explanation
  • 1. Deployment of large-scale AI models
  • 2.Installation of the large-scale model dialogue platform
  • 3. Meta AI Llama 3.2 model
  • 4. Alibaba Cloud Qwen3 Model
  • 5. Microsoft Phi-4 mini model
  • 6. DeepSeek DeepSeek-R1 model
  • 7. Alibaba Cloud Qwen2.5vl Visual Multimodal Large Model
  • 8. Google Gemma3 Visual Multimodal Large Model
  • 9. Llava Visual Multimodal Large Model
  • 10.MiniCPM-V Visual Multimodal Large Model
  • 11. Multimodal Visual Understanding Applications
  • 12. Multimodal Text-Based Image Application
  • 13. Multimodal Video Analysis Application
  • 14. Multimodal visual positioning applications
  • 15. Multimodal table scanning application
  • 16. Multimodal Autonomous Agent Application
Offline large model (Voice Interaction)
  • 0. Voice Interaction Hardware Connection (Must Read)
  • 1. Offline speech-to-text (ASR)
  • 2. Offline Text-to-Speech (TTS)
  • 3. AI large model voice interaction
  • 4. Multimodal visual understanding and voice interaction
  • 5. Multimodal Text-Based Image Application
  • 6. Multimodal Video Analysis Application
  • 7. Multimodal visual positioning applications
  • 8. Multimodal table scanning application
  • 9. Multimodal Autonomous Agent Applications
  • 10. AI large model offline voice assistant
Online large model (Text Interaction)
  • 1. OpenRouter Large Model API Aggregation Platform
  • 2. Multimodal visual understanding applications
  • 3. Multimodal visual positioning applications
  • 4. Multimodal table scanning application
  • 5. Multimodal Autonomous Agent Applications
Online large model (Voice Interaction)
  • 0. Voice Interaction Hardware Connection (Must Read)
  • 1. Online speech-to-text (ASR)
  • 2. Online Text-to-Speech (TTS)
  • 3. AI large model voice interaction
  • 4. Multimodal visual and voice interaction
  • 5. Multimodal visual positioning applications
  • 6. Multimodal table scanning application
  • 7. Multimodal Autonomous Agent Applications
  • 8. AI large model online voice assistant
20.AI large model course(Jetson NANO)
Offline large model (Text Interaction)
  • 4.Multimodal visual understand speech interaction
  • 0.AI large model system image instructions
  • 1.AI large model environment deployment
  • 2.Install large model dialogue platform
  • 3.Meta AI llama 3.2 model
  • 4.Alibaba Cloud Qwen2 model
  • 5.Alibaba Cloud Qwen3 model
  • 6.SUTD TinyLlama
  • 7.DeepSeek DeepSeek-R1 model
  • 8.Microsoft Phi-3
  • 9.Microsoft Orca Mini
  • 10.NVIDIA StarCoder2
  • 11.Google Gemma3 Visual Multimodal Large Model
  • 12.Offline Text to Speech (TTS)
  • 13.Offline Speech to Text (ASR)
Online large model (Text Interaction)
  • 1.OpenRouter large model API aggregation platform
  • 2.Multimodal visual understand application
  • 3.Multimodal visual localization application
  • 4.Multimodal table scanning application
  • 5.Multimodal autonomous proxy application
Online large model (Voice Interaction)
  • 0.Voice interaction hardware connection (ReadMe)
  • 1.Online speech-to-text (ASR)
  • 2.Online Text-to-Speech (TTS)
  • 3.AI large model voice interaction
  • 5.Multimodal visual position application
  • 6.Multimodal table scanning application
  • 7.Multimodal autonomous proxy application
  • 8.AI large model online voice assistant
21.Linux operating system course
  • 1.Introduction to Linux system
  • 2.Ubuntu file system
  • 3.Ubuntu common commands
  • 4.Ubuntu common editors
  • 5.Ubuntu software operation commands
  • 6.Virtual machine installation
  • 7.SSH remote control
  • 8.VNC remote control
  • 9.Transfer files remotely
  • 10.Driver library and communication
  • 11.Static IP and hotspot mode
  • 12.Bind device ID
  • 13.Capacity expansion and resource allocation
  • 14.Update system software sources
  • 15.Set root user password
  • 16.sudo free password
  • 17.Connect to WiFi network
  • 18.View system version
  • 19.Customized service management
  • 20.Back up system image
22.Docker course
  • 1.Docker Introduction and Installation
  • 2.Docker basic commands
  • 3.Docker Submission and Multi-Terminal Access
  • 4.Docker Startup Script
  • 5.Docker-Vscode environment construction
23.ROS2 basic course
  • 1.Introduction to ROS2
  • 2.ROS2 install Humble
  • 3.ROS2 development environment
  • 4.ROS2 workspace
  • 5.ROS2 function package
  • 6.ROS2 node
  • 7.ROS2 topic communication
  • 8.ROS2 service communication
  • 9.ROS2 action communication
  • 10.ROS2 custom interface message
  • 11.ROS2 parameter service case
  • 12.ROS2 meta-function package
  • 13.ROS2 distributed communication
  • 14.ROS2 DDS
  • 15.ROS2 time related API
  • 16.ROS2 common command tools
  • 17.ROS2 rviz2 use
  • 18.ROS2 rqt toolbox
  • 19.ROS2 Launch startup file configuration
  • 20.ROS2 recording and playback tool
  • 21.ROS2 URDF model
  • 22.ROS2 Gazebo simulation platform
  • 23.ROS2 TF2 coordinate transformation
24.Image processing course
  • 1. Introduction to Open Source CV
  • 2. Image reading and display
  • 3. Image writing
  • 4. Image quality
  • 5. Pixel Operation
  • 6. Image zoom
  • 7. Image cutting
  • 8. Image translation
  • 9. Image Mirroring
  • 10. Affine Transformation
  • 11. Image Rotation
  • 12. Perspective Transformation
  • 13. Grayscale processing
  • 14. Image Binarization
  • 15. Edge Detection
  • 16. Line drawing
  • 17. Rectangle and circle drawing
  • 18. Drawing text and pictures
25.STM32 driver course
  • 0. Notes (must read)
  • 1. About expansion board
  • 2. STM32 Development environment
  • 3. Button control
  • 4. FreeRTOS application
  • 5. Serial communication
  • 6. SBUS model aircraft remote control
  • 7. CAN bus communication
  • 8. RGB colorful light bar
  • 9. Timer interrupt to control PWM servo
  • 10. Control serial port servos
  • 11. Nine-axis attitude sensor to obtain data
  • 12. Control motor
  • 13. Timer captures the encoder data
  • 14. Robot kinematics analysis theory
  • 15. PID control robot movement
26.Main control communication course
  • 1. Update the expansion board firmware
  • 2. Install Rosmaster driver library
  • 3. Jupyter lab basic usage tutorial
  • 4. Buzzer whistle
  • 5. Control PWM servo
  • 6. RGB colorful light bar special effects display
  • 7. Control motor
  • 8. Control robot movement
  • 9. Control Serial Servo
Download
  • Mapping_APP(iOS_Android)
  • Robot_Image_System_File
  • Code-Firmware
  • Instruction_Manual
  • MainBoard_AI_Pure_System
  • VM_File
  • Software_Tools
  • Hardware_Info
  • 3D_Model_File
Download ZIP

Welcome to ROSMASTER M1 repository

3.Embodied intelligent robot system architecture

Multi-Agent Embodied Architecture

Multi-Agent Embodied Architecture1. Course Content2. Introduction to multi_brains3. Dual-Model Inference Architecture3.1 Advantages of Dual-Model Inference3.1.1 Decoupling of Task Decision-Making and Action Transformation3.1.2 Improving the Success Rate of Long-Flow Tasks3.2 Decision-Making Layer AI3.3 Execution Layer AI4. Task Cycle5. Historical Context6. Map Mapping7. Action Function Library

1. Course Content

Understanding the ROSMASTER-M1 Multi-Agent Embodied Architecture (multi_brains) Framework

2. Introduction to multi_brains

  • multi_brains is an embodied intelligence framework developed by Yahboom, adapted to general-purpose large AI models. It avoids the problems associated with VLA models and end-to-end models, which require dedicated machines, local computing power, and long data collection and training times. By simply connecting to general-purpose AI models from cloud model providers, edge robots can achieve powerful embodied intelligence effects.
  • multi_brains expands training examples through the RAG knowledge base, quickly enabling robots to adapt to different scenario tasks. It can be deployed on most small master control devices, allowing large-scale model inference to be placed in the cloud or on local servers.
  • The core idea of ​​multi_brains is to decouple different stages of a task through multiple AI models in a layered manner. This is a comprehensive improvement upon the first-generation self-developed dual-model inference framework. Its main enhancements include:
  • A smoother recording experience with inertial tail sound detection and adjustable tail sound detection duration.
  • A more flexible decision-making mechanism, adding task routing. The AI ​​agent can autonomously choose between dual-model and single-model inference based on task difficulty, giving the AI ​​greater autonomy and a better user experience.
  • An easily understandable visual architecture process. Multi_brains uses Dify to build a visual agent, allowing real-time observation of the AI ​​agent's data flow during debugging, providing users with a more intuitive understanding of the specific process of dual-model inference.
  • A fully localized RAG knowledge base, eliminating concerns about data sensitivity.
  • Seamless access to most global AI models. Through Dify's model vendor plugins, hundreds of global AI models can be quickly and seamlessly integrated (local models can also be integrated if needed).
  • Traceable historical records. By querying Dify's backend access history, users can view the steps and history of all task instruction execution.
  • Personalized response voice. Users can customize random response voices. Built-in speech synthesis commands make it simple and easy to use.
  • A comprehensive testing toolkit allows for quick verification of core functional modules.
  • Simpler onboarding process, streamlining most operations and providing shortcut configurations.

3. Dual-Model Inference Architecture

  • The design of dual-model inference and dynamic feedback inference provides stronger system robustness compared to a single-model architecture.
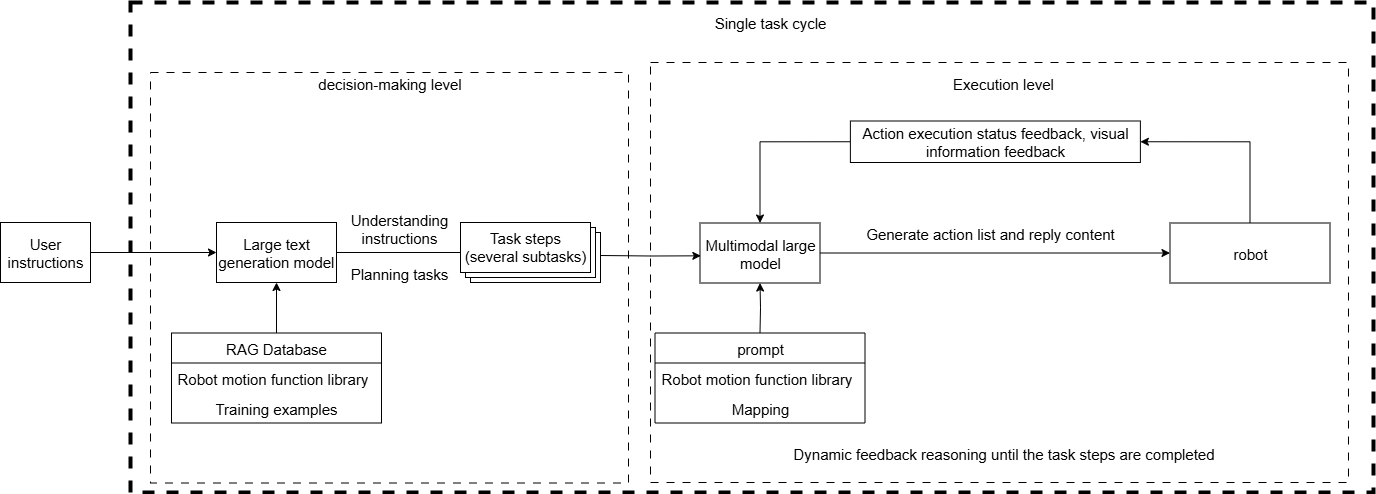
yahboom_m3 large model inference architecture.drawio

3.1 Advantages of Dual-Model Inference

3.1.1 Decoupling of Task Decision-Making and Action Transformation

  • The decision-making layer AI focuses on thinking, planning, and breaking down task instructions.
  • The execution layer AI focuses on chat replies and converting task steps into JSON text.

3.1.2 Improving the Success Rate of Long-Flow Tasks

When using a single model for inference, it is necessary to simultaneously perform "natural language understanding + environmental perception + process decomposition + action function output," which is prone to modal interference (language ambiguity or excessively long instructions leading to misunderstandings). The dual-model approach, through phased processing, allows the decision-making layer to focus on task planning, and the execution layer to focus on action execution.

3.2 Decision-Making Layer AI

  • The large decision-making layer model is mainly responsible for task planning. It can understand complex human instructions and decompose them into specific task steps. For example, when receiving the instruction "Can you get me a bottle of mineral water from the kitchen?", the large language model will break it down into several tasks, as shown in the diagram below.
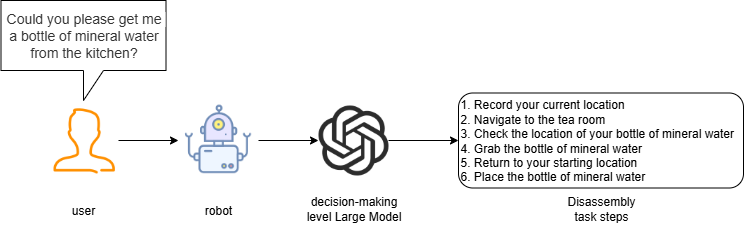
decision-making level Large Model.drawio

3.3 Execution Layer AI

  • The execution layer model is mainly responsible for chat replies, converting task steps into JSON text, continuously receiving feedback (success/failure) and images from the robot's action results, and providing instructions for the next action based on the success or failure of the action execution.
  • The execution layer model acts as a supervisor, continuously monitoring the robot's progress in executing task steps, and considering the feedback after the robot's actions and environmental information to determine the next action to be performed, until the task is successfully completed or terminated early due to special circumstances.
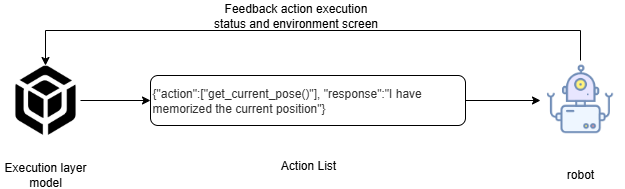
Execution layer model.drawio

4. Task Cycle

  • After waking up the robot, a task cycle begins. All user commands and robot responses are stored in the AI ​​model's historical context, essentially the robot's temporary memory, allowing it to "remember" previous events.
  • When the user requests to end the current task and allow the robot to rest, the robot resets the AI ​​model's historical context, essentially causing the robot to "forget" previous events.
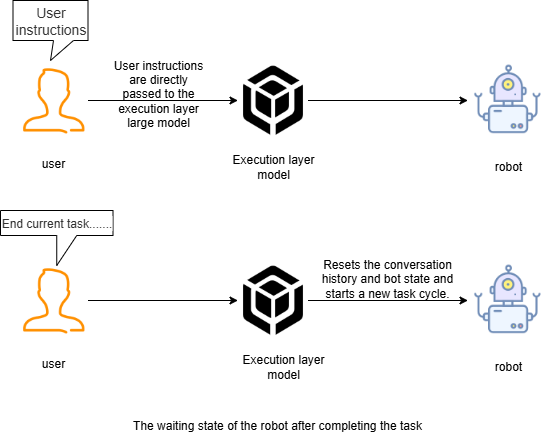
The robot's waiting state.drawio

5. Historical Context

  • The robot's dialogue history is stored in DIfy's AI application variables, with a default maximum dialogue memory of 50 rounds.

Conversation History Context.drawio

6. Map Mapping

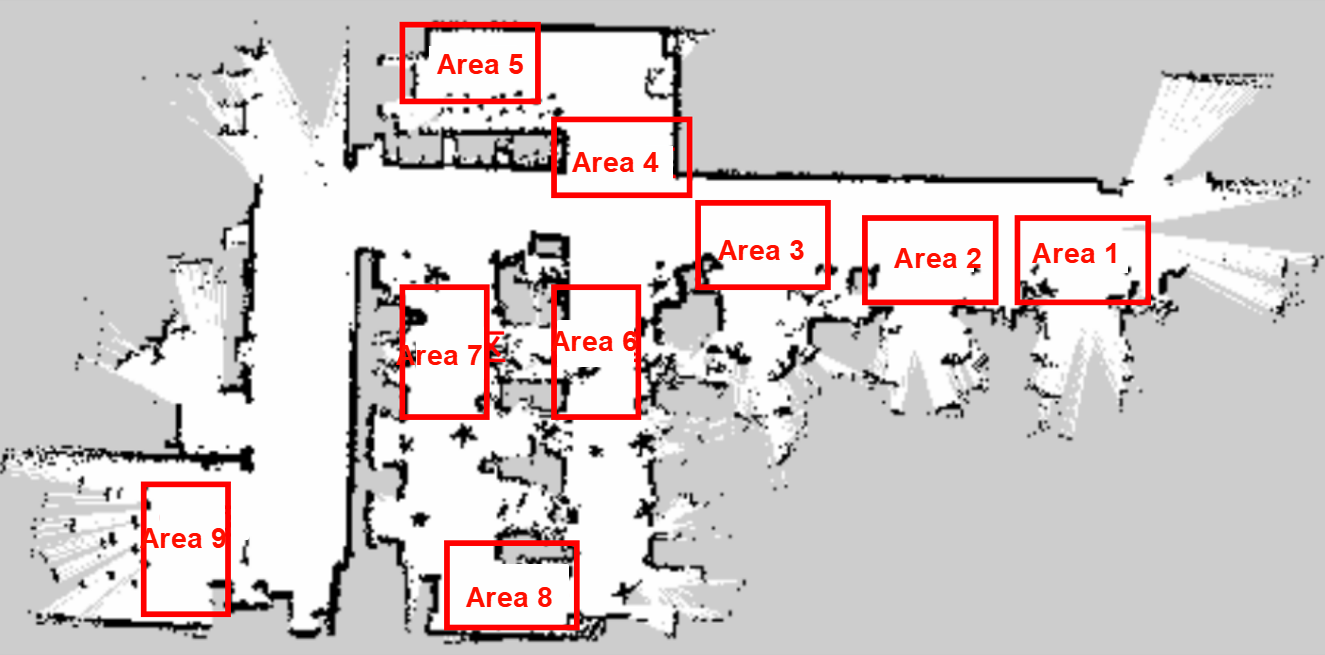
  • Robots use grid maps for navigation. If the robot needs to understand its location in the real world, a mapping relationship needs to be established between the grid map and the real-world environment. This relationship is called map mapping.
  • Suppose we use a robot to generate a grid map using SLAM in a factory environment. The real factory has several manually divided areas, as shown in the image below:
1

We establish a one-to-one correspondence between these real-world areas and letter symbols:

A: "Area 1", B: "Area 2", C: "Area 3", D: "Area 4", E: "Area 5", F: "Area 6", G: "Area 7", H: "Area 8", I: "Area 9"

Then we write the map coordinates for the letter symbols in a YAML file, for example:

A: 
  name: '1号区'
  position:
    x: 4.4034953117370605
    y: 0.4879316985607147
  orientation:
    x: 0.0
    y: 0.0
    z: 0.701498621044694
    w: 0.7126708108744126

When we ask the robot to go to a certain actual area, we only need to convert the large model into the corresponding letter symbols, so that the robot can understand the location of the area in the real environment.

7. Action Function Library

  • The API functions in the robot action function library are the bridge for the large model to control the robot to interact with the real world.
  • These API functions define the minimum actions that the physical robot can perform in the physical world.
  • The AI large model converts the actions to be performed into JSON text and sends it to the robot, which then parses the JSON text and executes the corresponding actions.
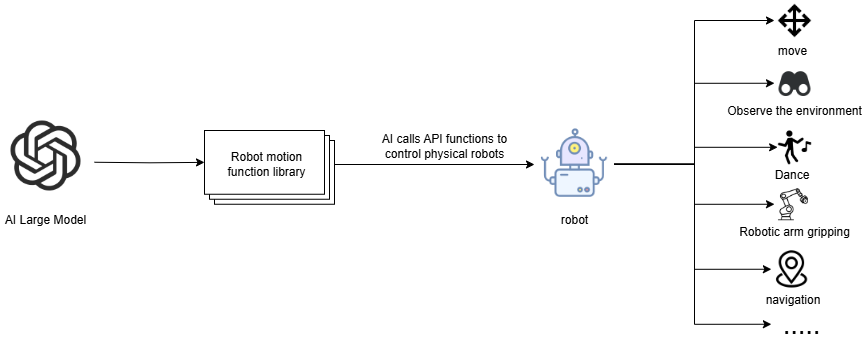
Action Function Library


All action functions and their corresponding functionalities are shown in the table below:

Common Functions

Function NameParametersFunctionalityCalling Command
move_left(x, angular_speed)x: rotation angle, angular_speed: angular velocityRotate left by x degrees / Rotate counterclockwise one turnTurn left x degrees
move_right(x, angular_speed)x: rotation angle, angular_speed: angular velocityRotate right by x degrees / Rotate clockwise one turnTurn right x degrees
set_cmdvel(linear_x, linear_y, angular_z, duration)linear_x: x-axis linear velocity, linear_y: y-axis linear velocity, angular_z: z-axis angular velocity, duration: topic publishing durationControl the robot chassis movement by setting linear and angular velocitiesMove forward, backward
navigation(x)x: the symbol corresponding to the target point in the map mappingControl the robot to navigate to the target pointNavigate to a location
navigation(zero)zero: the recorded coordinate pointNavigate back to the previously recorded coordinate pointReturn to origin, starting position
get_current_pose()-Record the current coordinates in the global map to the zero parameterRemember the current position
seewhat()-Take an image of the robot's current view and upload it to the execution layer modelObserve the environment
wait(x)x: time, unit: secondsWait for a period of time without performing any operationsWait x seconds
finishtask()-Automatically called after the robot completes the task, used to stop providing status feedback to the execution layer model-
finish_dialogue()-The robot ends this round of dialogue and starts a new cycle-
drift()-Car driftingCar drifting
dance()-Car dancingCar dancing

Nuwa Depth Camera Proprietary

Function NameParametersFunction DescriptionCommand Example
face_follow()-Face Tracking FunctionStart face tracking
qrFollow()-QR Code Tracking FunctionStart QR code tracking
apriltagFollow()-AprilTag Tracking FunctionStart AprilTag tracking
color_follow(color)color values: 'red', 'green', 'blue', 'yellow'Color Tracking FunctionStart yellow tracking
KCF_follow(x1,y1,x2,y2)Resolution 640×480 pixels, (x1,y1) is the top-left corner coordinate of the object's bounding box, (x2,y2) is the bottom-right corner coordinateObject Tracking FunctionStart tracking the object in my hand
gestureFollow()-Gesture Tracking FunctionStart gesture tracking
poseFollow ()-Pose Tracking FunctionStart pose tracking
stop_follow()-Stop all running tracking activitiesStop tracking
follow_line(color)Automatic line following of the specified color, color values: 'red', 'green', 'blue', 'yellow'Color Line Following FunctionStart following the green line
get_dist(x,y)Get the distance information of the center coordinates (x,y) of the specified objectGet the distance of the specified objectPlease tell me the distance between you and the fan in front of you

USB Gimbal Camera Exclusive

Function NameParametersFunction DescriptionCommand
servo_nod()-Gimbal servo nodsPlease nod
servo_shake()-Gimbal servo shakes its headPlease shake your head
servo1_move(x)x represents the angle to rotateControls servo 1 to rotate back and forth to the set angleServo 1 rotates to x degrees
servo2_move(x)x represents the angle to rotateControls servo 2 to rotate back and forth to the set angle.Servo 2 rotates to x degrees
servo_init()-Initializes gimbal positionServo initial position, return to initial position, gimbal position reset
apriltagTracker()-Gimbal tracking AprilTag functionStart AprilTag tracking, ID code tracking
faceTracker()-Gimbal tracking face functionStart face tracking
gestureTracker()-Gimbal tracking gesture functionStart gesture tracking
poseTracker()-Gimbal tracking pose functionStart human pose tracking
qrTracker()-Gimbal tracking QR code functionStart QR code tracking
stop_track()-Stop all tracking functionsStop tracking
colorTrack(color)Tracks the specified color, color values: 'red', 'green', 'blue', 'yellow'Color tracking functionStart yellow tracking
monoTracker(x1,y1,x2,y2)Resolution 640×480 pixels, (x1,y1) is the top-left coordinate of the bounding box of the tracked object, (x2,y2) is the bottom-right coordinateGimbal tracking objectPlease track the object in my hand
faceFollow()-Face following functionStart face following
qrFollow()-QR code following functionStart QR code following
apriltagFollow()-AprilTag following functionStart AprilTag following
colorFollow(color)Follows the specified color, color values: 'red', 'green', 'blue', 'yellow'Color following functionStart yellow following
poseFollow()-Pose following functionStart human pose following
gestureFollow()-Gesture following functionStart gesture following
follow_line(color)Automatically follows the specified color line, color values: 'red', 'green', 'blue', 'yellow'Color line following functionStart following the green line
RAG retrieval enhancement and model training samples
Embodied intelligent functions core source code

COMPANY

  • About us
  • Team Style
  • Blog

LEARNING & EXPLORATION

  • Tutorials
  • Edge AI hardware
  • Educational robots
  • Embedded intelligent hardware

WHERE TO BUY

  • Yahboom Online Store
  • Amazon
  • Alibaba
  • AliExpress
  • Mercado

TECHNOLOGY SUPPORT

  • Email: support@yahboom.com

BE A DISTRIBUTOR

  • Email: sales@yahboom.com
QR Code

Copyright © 2017-2026 Yahboom. All Rights Reserved.

EN/中文