Welcome to ROSMASTER M1 repository
8.Brush
Brush
1. Content Description
This course implements color image acquisition and finger detection using the mediapipe framework. It then selects a color and draws a trajectory on the image based on the detected finger movement. This section requires entering commands in a terminal. The terminal you open depends on your board type. This lesson uses the Raspberry Pi as an example.
For Raspberry Pi and Jetson-Nano boards, you need to open a terminal on the host computer and enter the command to enter the Docker container. Once inside the Docker container, enter the commands mentioned in this lesson in the terminal. For instructions on entering the Docker container from the host computer, refer to [01. Robot Configuration and Operation Guide] -- [4.Enter Docker (For JETSON Nano and RPi 5)].
For RDKX5 and Orin boards, simply open a terminal and enter the commands mentioned in this lesson.
2. Program Startup
For Raspberry Pi and Jetson-Nano boards, you need to enter the Docker container first. For RDKX5 and Orin controllers, this is not necessary.
Enter the Docker container (see [Docker course] --- [4. Docker Startup Script] for steps).
All the following commands must be executed within the same Docker container (see [Docker course] --- [3. Docker Submission and Multi-Terminal Access] for steps).
First, enter the following command in the terminal to start the camera.
xxxxxxxxxx#usb cameraros2 launch usb_cam camera.launch.py#nuwa cameraros2 launch ascamera hp60c.launch.pyAfter successfully starting the camera, open another terminal and enter the following command to start the paintbrush program.
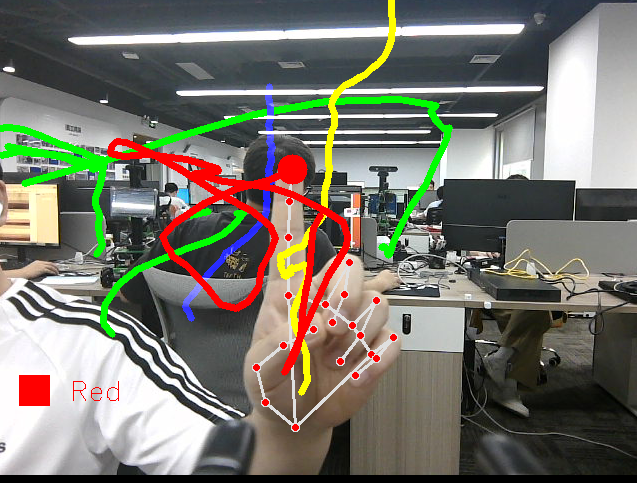
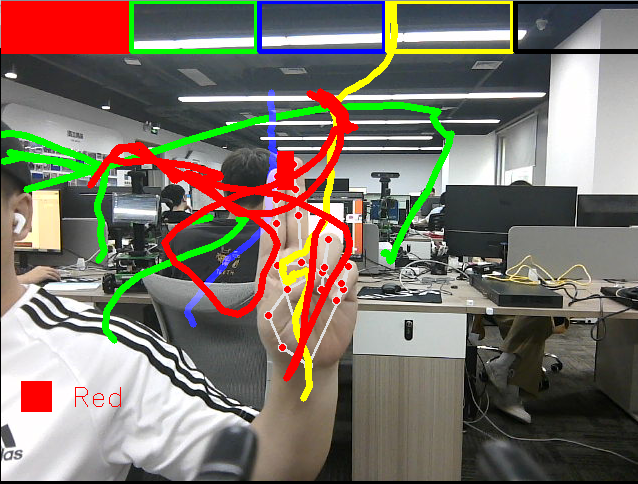
xxxxxxxxxxros2 run yahboomcar_mediapipe 08_VirtualPaintAfter running the program, as shown in the image below, the default fingertip color is red. When you move your right index and middle fingers together, you're in the selection mode, and a color selection box pops up. Move your fingertips to the corresponding color position to select that color (black acts as an eraser). When you move your index and middle fingers apart, you're in the drawing mode, allowing you to draw freely on the canvas.
The index and middle fingers start drawing separately.
Put your index and middle fingers together to enter color selection mode.
3. Core Code Analysis
Program Code Path:
Raspberry Pi 5 and Jetson Nano Board
The program code is running in Docker. The path in Docker is
/root/yahboomcar_ros2_ws/yahboomcar_ws/src/yahboomcar_mediapipe/yahboomcar_mediapipe/08_VirtualPaint.pyOrin board
The program code path is
/home/jetson/yahboomcar_ros2_ws/yahboomcar_ws/src/yahboomcar_mediapipe/yahboomcar_mediapipe/08_VirtualPaint.pyRDK X5
The program code path is
/home/sunrise/yahboomcar_ros2_ws/yahboomcar_ws/src/yahboomcar_mediapipe/yahboomcar_mediapipe/08_VirtualPaint.py
Import the library files used.
xxxxxxxxxximport mathimport timeimport cv2 as cvimport numpy as npimport mediapipe as mpimport rclpyfrom rclpy.node import Nodefrom sensor_msgs.msg import Imagefrom cv_bridge import CvBridgeimport osInitialize data and define publishers and subscribers,
xdef __init__(self): super().__init__('hand_painting_node') #Create an empty image with a resolution of 480*640 self.imgCanvas = np.zeros((480, 640, 3), np.uint8) #Define the thickness of the brush (red, green, blue and yellow) self.brushThickness = 5 #Define the thickness of the eraser (black) self.eraserThickness = 100 #The y-coordinate threshold at the bottom of the color selection box. If it is less than this value, it means entering the color selection mode. self.top_height = 50 self.Color = "Red" #Define the brush color list followed by the RGB value of each color self.ColorList = { 'Red': (0, 0, 255), 'Green': (0, 255, 0), 'Blue': (255, 0, 0), 'Yellow': (0, 255, 255), 'Black': (0, 0, 0), } #Define the ID of each fingertip, which will be used later to determine which fingers are straightened self.tipIds = [4, 8, 12, 16, 20] #Use the class in the mediapipe library to define a hand object self.mpHand = mp.solutions.hands self.mpDraw = mp.solutions.drawing_utils self.hands = self.mpHand.Hands( static_image_mode=False, max_num_hands=2, min_detection_confidence=0.85, min_tracking_confidence=0.5 ) #Define the properties of the joint connection line, which will be used in the subsequent joint point connection function self.lmDrawSpec = mp.solutions.drawing_utils.DrawingSpec(color=(0, 0, 255), thickness=-1, circle_radius=15) self.drawSpec = mp.solutions.drawing_utils.DrawingSpec(color=(0, 255, 0), thickness=10, circle_radius=10) self.bridge = CvBridge() #Define subscribers for the color image topic camera_type = os.getenv('CAMERA_TYPE', 'usb') topic_name = '/ascamera_hp60c/camera_publisher/rgb0/image' if camera_type == 'nuwa' else '/usb_cam/image_raw' self.subscription = self.create_subscription( Image, topic_name, self.image_callback, 10)Color image callback function,
xxxxxxxxxxdef image_callback(self, msg): #Use CvBridge to convert color image message data into image data frame = self.bridge.imgmsg_to_cv2(msg, desired_encoding='bgr8') #Get the size of the color image to facilitate subsequent color selection based on the coordinates of the fingertip h, w, c = frame.shape frame, lmList = self.hand_detector.findHands(frame, draw=False) if len(lmList) != 0: # print(lmList) # tip of index and middle fingers #Get the coordinate values of the index and middle finger tips x1, y1 = lmList[8][1:] x2, y2 = lmList[12][1:] #Call the fingersUp function to return a list of extended fingers fingers = self.fingersUp() #If the index and middle fingers are straight if fingers[1] and fingers[2]: # print("Seclection mode") if y1 < self.top_height: #Determine the selected color based on the coordinates of the index finger and the size of the image if 0 < x1 < int(w / 5) - 1: self.boxx = 0 self.Color = "Red" if int(w / 5) < x1 < int(w * 2 / 5) - 1: self.boxx = int(w / 5) self.Color = "Green" elif int(w * 2 / 5) < x1 < int(w * 3 / 5) - 1: self.boxx = int(w * 2 / 5) self.Color = "Blue" elif int(w * 3 / 5) < x1 < int(w * 4 / 5) - 1: self.boxx = int(w * 3 / 5) self.Color = "Yellow" elif int(w * 4 / 5) < x1 < w - 1: self.boxx = int(w * 4 / 5) self.Color = "Black" cv.rectangle(frame, (x1, y1 - 25), (x2, y2 + 25), self.ColorList[self.Color], cv.FILLED) cv.rectangle(frame, (self.boxx, 0), (self.boxx + int(w / 5), self.top_height), self.ColorList[self.Color], cv.FILLED) #Draw a color selection box for each color cv.rectangle(frame, (0, 0), (int(w / 5) - 1, self.top_height), self.ColorList['Red'], 3) cv.rectangle(frame, (int(w / 5) + 2, 0), (int(w * 2 / 5) - 1, self.top_height), self.ColorList['Green'], 3) cv.rectangle(frame, (int(w * 2 / 5) + 2, 0), (int(w * 3 / 5) - 1, self.top_height), self.ColorList['Blue'], 3) cv.rectangle(frame, (int(w * 3 / 5) + 2, 0), (int(w * 4 / 5) - 1, self.top_height), self.ColorList['Yellow'], 3) cv.rectangle(frame, (int(w * 4 / 5) + 2, 0), (w - 1, self.top_height), self.ColorList['Black'], 3) #If the index finger and middle finger are not straightened at the same time and the distance between the fingertips is greater than 50 pixels, it means they are in the open state and enter the drawing mode. if fingers[1] and fingers[2] == False and math.hypot(x2 - x1, y2 - y1) > 50: # print("Drawing mode") if self.xp == self.yp == 0: self.xp, self.yp = x1, y1 #If black, it is an eraser model that erases the painted track; if not, it draws the track on the image according to the selected color if self.Color == 'Black': cv.line(frame, (self.xp, self.yp), (x1, y1), self.ColorList[self.Color], self.eraserThickness) cv.line(self.imgCanvas, (self.xp, self.yp), (x1, y1), self.ColorList[self.Color], self.eraserThickness) else: cv.line(frame, (self.xp, self.yp), (x1, y1), self.ColorList[self.Color], self.brushThickness) #Draw a line of the selected color on the created canvas cv.line(self.imgCanvas, (self.xp, self.yp), (x1, y1), self.ColorList[self.Color], self.brushThickness) cv.circle(frame, (x1, y1), 15, self.ColorList[self.Color], cv.FILLED) self.xp, self.yp = x1, y1 else: self.xp = self.yp = 0 #Convert the canvas's color space to grayscale for easier image processing imgGray = cv.cvtColor(self.imgCanvas, cv.COLOR_BGR2GRAY) #Thresholding is a process that divides the pixel values ••of a grayscale image into two categories (for example, foreground and background) based on a set threshold. It is one of the core methods of image binarization. _, imgInv = cv.threshold(imgGray, 50, 255, cv.THRESH_BINARY_INV) #Convert the color space to convert the grayscale image into a color BGR image space imgInv = cv.cvtColor(imgInv, cv.COLOR_GRAY2BGR) #Perform AND and OR operations on images to combine them frame = cv.bitwise_and(frame, imgInv) frame = cv.bitwise_or(frame, self.imgCanvas) #Draws the currently selected color box and color cv.rectangle(frame, (20, h - 100), (50, h - 70), self.ColorList[self.Color], cv.FILLED) cv.putText(frame, self.Color, (70, h - 75), cv.FONT_HERSHEY_SIMPLEX, 0.9, (0, 0, 255), 1) cv.imshow('frame', frame)fingersUp finger straightening finger detection function,
xxxxxxxxxxdef fingersUp(self): fingers=[] # Thumb: Check whether the angle of each joint of the thumb is greater than 150 degrees. If so, the thumb is considered straight. if (self.calc_angle(self.tipIds[0], self.tipIds[0] - 1, self.tipIds[0] - 2) > 150.0) and ( self.calc_angle( self.tipIds[0] - 1, self.tipIds[0] - 2, self.tipIds[0] - 3) > 150.0): fingers.append(1) else: fingers.append(0) # 4 finger The remaining four fingers for id in range(1, 5): #Here we check whether the y value of the fingertip joint is smaller than that of the middle joint. If so, the finger is straight (the origin of the image is in the upper left, the y value increases as it goes down, and the x value increases as it goes to the right) if self.lmList[self.tipIds[id]][2] < self.lmList[self.tipIds[id] - 2][2]: fingers.append(1) else: fingers.append(0) return fingersAs shown in the image below, the IDs for each finger joint are:
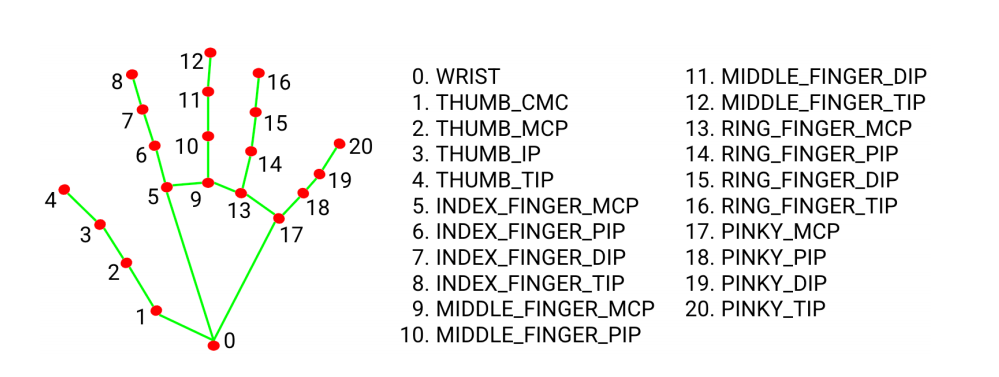
The findHands function detects palms.
def findHands(self, frame, draw=True): #Create a test list and store the test results self.lmList = [] img_RGB = cv.cvtColor(frame, cv.COLOR_BGR2RGB) #Call the process function in the mediapipe library to process the image. During init, the self.hands object is created and initialized. self.results = self.hands.process(img_RGB) if self.results.multi_hand_landmarks: for handLms in self.results.multi_hand_landmarks: if draw: self.mpDraw.draw_landmarks(frame, handLms, self.mpHand.HAND_CONNECTIONS, self.lmDrawSpec, self.drawSpec) else: self.mpDraw.draw_landmarks(frame, handLms, self.mpHand.HAND_CONNECTIONS) #Traverse the detection results and add them to the self.lmList list, which represents the ID of each person's joint and the xy coordinates of the joint. for id, lm in enumerate(self.results.multi_hand_landmarks[0].landmark): h, w, c = frame.shape cx, cy = int(lm.x * w), int(lm.y * h) # print(id, cx, cy) self.lmList.append([id, cx, cy]) return frame, self.lmList