Welcome to ROSMASTER M1 repository
9.Finger control
Finger control
1. Content Description
This course implements color imaging and uses the MediaPipe framework to detect fingers. It then calculates the angle between the thumb tip, wrist joint, and index finger tip to modify the image processing effect.This lesson uses the Raspberry Pi as an example.
For Raspberry Pi and Jetson-Nano boards, you need to open a terminal on the host computer and enter the command to enter the Docker container. Once inside the Docker container, enter the commands mentioned in this lesson in the terminal. For instructions on entering the Docker container from the host computer, refer to [01. Robot Configuration and Operation Guide] -- [4.Enter Docker (For JETSON Nano and RPi 5)].
For RDKX5 and Orin boards, simply open a terminal and enter the commands mentioned in this lesson.
2. Program Startup
For Raspberry Pi and Jetson-Nano boards, you need to enter the Docker container first. For RDKX5 and Orin controllers, this is not necessary.
Enter the Docker container (see [Docker course] --- [4. Docker Startup Script] for steps).
All the following commands must be executed within the same Docker container (see [Docker course] --- [3. Docker Submission and Multi-Terminal Access] for steps).
First, enter the following command in the terminal to start the camera.
#usb cameraros2 launch usb_cam camera.launch.py#nuwa cameraros2 launch ascamera hp60c.launch.pyAfter successfully starting the camera, open another terminal and enter the following command to start the finger-controlled program.
xxxxxxxxxxros2 run yahboomcar_mediapipe 09_FingerCtrl
After running the program, press the F key to toggle the image processing effect. Then, adjust the angle between your thumb and index finger to control the image processing effect.
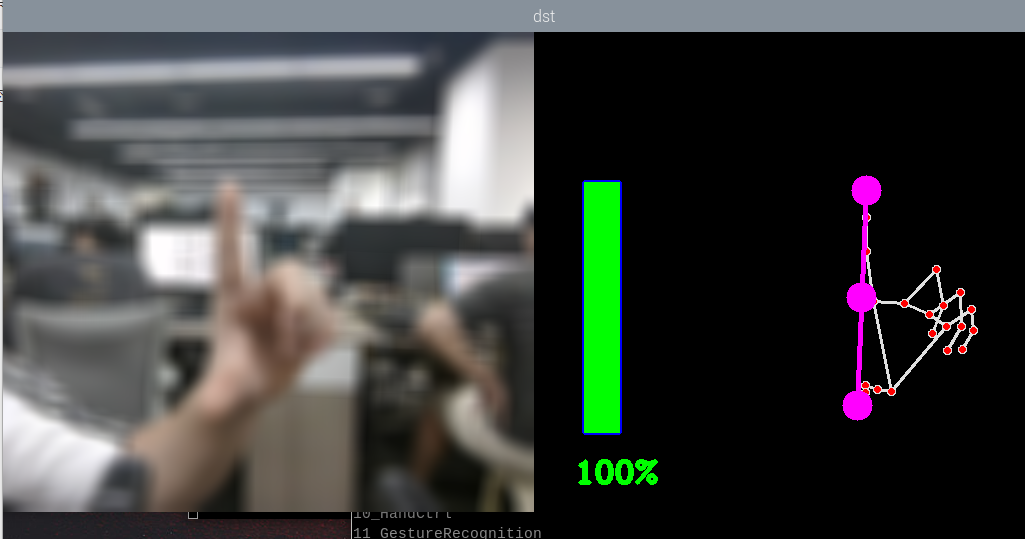
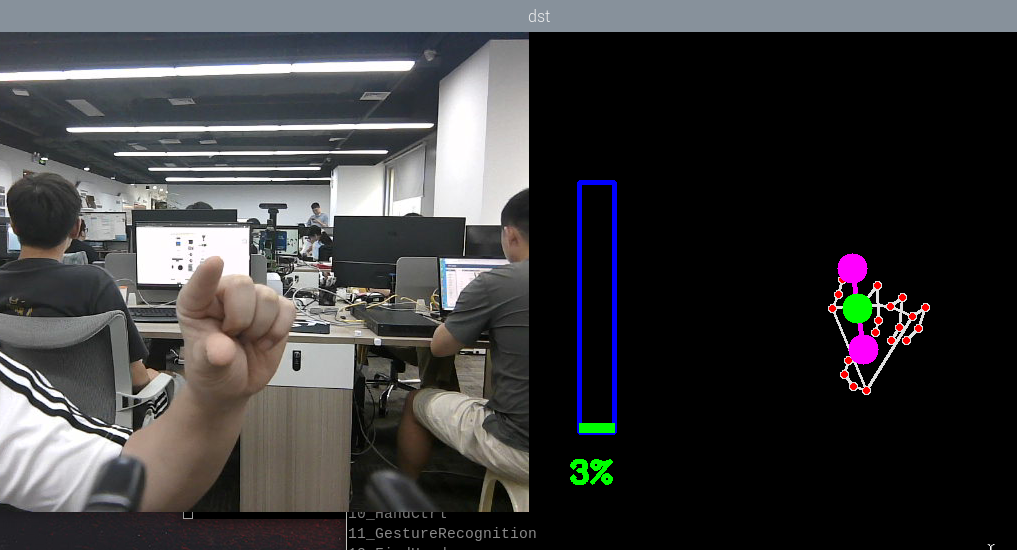
3. Core Code Analysis
Program Code Path:
Raspberry Pi 5 and Jetson Nano Board
The program code is running in Docker. The path in Docker is
/root/yahboomcar_ros2_ws/yahboomcar_ws/src/yahboomcar_mediapipe/yahboomcar_mediapipe/09_FingerCtrl.pyOrin board
The program code path is
/home/jetson/yahboomcar_ros2_ws/yahboomcar_ws/src/yahboomcar_mediapipe/yahboomcar_mediapipe/09_FingerCtrl.pyRDK X5
The program code path is
/home/sunrise/yahboomcar_ros2_ws/yahboomcar_ws/src/yahboomcar_mediapipe/yahboomcar_mediapipe/09_FingerCtrl.py
Import the necessary library files.
xxxxxxxxxximport mathimport timeimport cv2 as cvimport numpy as npimport mediapipe as mpimport rclpyfrom rclpy.node import Nodefrom cv_bridge import CvBridgefrom sensor_msgs.msg import Imagefrom arm_msgs.msg import ArmJointsimport cv2Initialize data and define publishers and subscribers,
xdef __init__(self): super().__init__('hand_effects_node') #Define a list of image processing effects self.effect = ["color", "thresh", "blur", "hue", "enhance"] self.volBar = 400 self.pTime = self.cTime = self.volPer = self.value = self.index = 0 #Use the class in the mediapipe library to define a hand object self.mpHand = mp.solutions.hands self.mpDraw = mp.solutions.drawing_utils self.hands = self.mpHand.Hands( static_image_mode=False, max_num_hands=2, min_detection_confidence=0.5, min_tracking_confidence=0.5 ) #Define the properties of the joint connection line, which will be used in the subsequent joint point connection function self.lmDrawSpec = mp.solutions.drawing_utils.DrawingSpec(color=(0, 0, 255), thickness=-1, circle_radius=15) self.drawSpec = mp.solutions.drawing_utils.DrawingSpec(color=(0, 255, 0), thickness=10, circle_radius=10) self.bridge = CvBridge() #Define subscribers for the color image topic camera_type = os.getenv('CAMERA_TYPE', 'usb') topic_name = '/ascamera_hp60c/camera_publisher/rgb0/image' if camera_type == 'nuwa' else '/usb_cam/image_raw' self.subscription = self.create_subscription( Image, topic_name, self.image_callback, 10)Color image callback function,
xxxxxxxxxxdef image_callback(self,msg): #Use CvBridge to convert color image message data into image data frame = self.bridge.imgmsg_to_cv2(msg, desired_encoding='bgr8') action = cv.waitKey(1) & 0xFF #Call the function to detect the palm and draw the palm joint connection diagram img = self.hand_detector.findHands(frame) #Call findPosition to get the coordinates of the finger joint list lmList = self.hand_detector.findPosition(frame, draw=False) if len(lmList) != 0: #Calculate the angle angle = self.calc_angle(4, 0, 8) x1, y1 = lmList[4][1], lmList[4][2] x2, y2 = lmList[8][1], lmList[8][2] cx, cy = (x1 + x2) // 2, (y1 + y2) // 2 cv.circle(img, (x1, y1), 15, (255, 0, 255), cv.FILLED) cv.circle(img, (x2, y2), 15, (255, 0, 255), cv.FILLED) cv.line(img, (x1, y1), (x2, y2), (255, 0, 255), 3) cv.circle(img, (cx, cy), 15, (255, 0, 255), cv.FILLED) if angle <= 10: cv.circle(img, (cx, cy), 15, (0, 255, 0), cv.FILLED) #calculate self.volBar = np.interp(angle, [0, 70], [400, 150]) self.volPer = np.interp(angle, [0, 70], [0, 100]) self.value = np.interp(angle, [0, 70], [0, 255]) # print("angle: {},value: {}".format(angle, value)) #Perform a threshold binarization operation. Values ••greater than the threshold value are represented by 255, and values less than the threshold value are represented by 0. if self.effect[self.index]=="thresh": gray = cv.cvtColor(frame, cv.COLOR_BGR2GRAY) frame = cv.threshold(gray, self.value, 255, cv.THRESH_BINARY)[1] # Perform Gaussian filtering, (21, 21) means that the length and width of the Gaussian matrix are both 21, and the standard deviation is value elif self.effect[self.index]=="blur": frame = cv.GaussianBlur(frame, (21, 21), np.interp(self.value, [0, 255], [0, 11])) # Color space conversion, HSV to BGR elif self.effect[self.index]=="hue": frame = cv.cvtColor(frame, cv.COLOR_BGR2HSV) frame[:, :, 0] += int(self.value) frame = cv.cvtColor(frame, cv.COLOR_HSV2BGR) # Adjust contrast elif self.effect[self.index]=="enhance": enh_val = self.value / 40 clahe = cv.createCLAHE(clipLimit=enh_val, tileGridSize=(8, 8)) lab = cv.cvtColor(frame, cv.COLOR_BGR2LAB) lab[:, :, 0] = clahe.apply(lab[:, :, 0]) frame = cv.cvtColor(lab, cv.COLOR_LAB2BGR) #Press the F key to switch the processing effect if action == ord('f'): self.index += 1 if self.index >= len(self.effect): self.index = 0 cv.rectangle(img, (50, 150), (85, 400), (255, 0, 0), 3) cv.rectangle(img, (50, int(self.volBar)), (85, 400), (0, 255, 0), cv.FILLED) cv.putText(img, f'{int(self.volPer)}%', (40, 450), cv.FONT_HERSHEY_COMPLEX, 1, (0, 255, 0), 3) #Merge images dst = self.hand_detector.frame_combine(frame, img) cv.imshow('dst', dst)findPosition obtains the id of each joint and the xy coordinates of each joint.
xxxxxxxxxxdef findPosition(self, frame, draw=True): #Create a test list and store the test results self.lmList = [] if self.results.multi_hand_landmarks: #Traverse the test results and add the test results to the self.lmList list, which represents the ID of each person's joint and the xy coordinates of the joint detected for id, lm in enumerate(self.results.multi_hand_landmarks[0].landmark): # print(id,lm) h, w, c = frame.shape cx, cy = int(lm.x * w), int(lm.y * h) # print(id, lm.x, lm.y, lm.z) self.lmList.append([id, cx, cy]) if draw: cv.circle(frame, (cx, cy), 15, (0, 0, 255), cv.FILLED) return self.lmListAs shown in the image below, the IDs for each finger joint are:
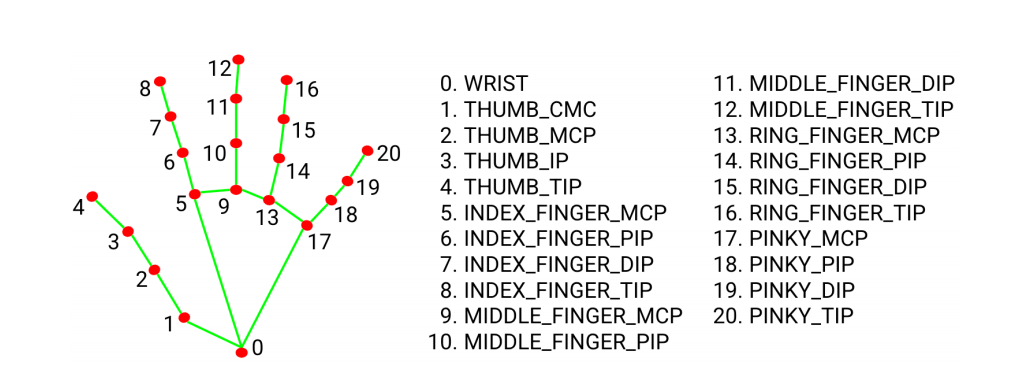
calc_angle calculates the angle between the thumb tip, wrist joint, and index finger tip.
xxxxxxxxxxdef calc_angle(self, pt1, pt2, pt3): point1 = self.lmList[pt1][1], self.lmList[pt1][2] point2 = self.lmList[pt2][1], self.lmList[pt2][2] point3 = self.lmList[pt3][1], self.lmList[pt3][2] a = self.get_dist(point1, point2) b = self.get_dist(point2, point3) c = self.get_dist(point1, point3) try: radian = math.acos((math.pow(a, 2) + math.pow(b, 2) - math.pow(c, 2)) / (2 * a * b)) angle = radian / math.pi * 180 except: angle = 0 return abs(angle)