yahboom
HomeLearn
Solution
Blog
Online Store
About Us
EN/中文
ROSMASTER M1📖
01.Robot Configuration and Operation Guide
  • 0. Assembly video
  • 1. Servo PTZ calibration
  • 2. Quick start guide handle control
  • 3. First trial
  • 4. Enter Docker (For JETSON Nano and RPi 5)
  • 1.5 Quick Start video
02.AI Model Preparation
  • AI Model Preparation
03.AI Model Basics course
  • 1.AI large model types and principles
  • 2.RAG retrieval enhancement and model training samples
  • 3.Embodied intelligent robot system architecture
  • 4.Embodied intelligent functions core source code
04.AI Model Developmentnew
  • 1.Register a model service provider account
  • 2. Configuring API-KEY
  • 3. Introduction to Dify
  • 4. Basic Dify Features
  • 5. Deploy the RAG knowledge base
  • 6. AI Large Model Development - chatbot
  • 7. RAG knowledge base + chatbot
  • 8. AI agent workflow
  • 9. Custom wake-up response
  • 10. Core module testing tools
05.AI Model - Text Version
  • 1.Semantic understand and command follow
  • 2.Multimodal visual understand
  • 3.Multimodal visual understand + PTZ tracking
  • 4.Multimodal visual understand + visual following
  • 5.Multimodal visual understand + visual line patroling
  • 6.Multimodal visual understand + Depth Camera Distance Question Answering
  • 7.Multimodal visual understand+SLAM navigation
  • 8.Multimodal visual understand+SLAM navigation + visual line patroling
  • 9.Intention estimation + Multimodal visual understand + SLAM navigation + visual functions
06.AI Model - Voice Version
  • 1.Semantic understand and command follow
  • 2.Multimodal visual understand
  • 3.Multimodal visual understand + PTZ tracking
  • 4.Multimodal visual understand + visual following
  • 5.Multimodal visual understand + visual line patroling
  • 6.Multimodal visual understand + Depth Camera Distance Question Answering
  • 7.Multimodal visual understand+SLAM navigation
  • 8.Multimodal visual understand+SLAM navigation + visual line patroling
  • 9.Intention estimation + Multimodal visual understand + SLAM navigation + visual functions
07.Chassis Control Course
  • 1. ROS control
  • 2. Handle control
  • 3. Keyboard control
  • 4. Linear velocity calibration
  • 5. Angular velocity calibration
  • 6. URDF model
08.Mediapipe Visual Course
  • 1.Hand detection
  • 2.Posture detection
  • 3.Overall detection
  • 4.Facial landmark detection
  • 5.Face detection
  • 6.Face special effects
  • 7.3D object recognition
  • 8.Brush
  • 9.Finger control
  • 10.Gesture recognition
  • 11.Palm target positioning
  • 12.Fingertip trajectory recognition
09.Advanced Vision Course
  • 1.QR code
  • 2.Human Pose Estimation
  • 3.Object Detection
  • 4.AR Vision
  • 5.ROS+Opencv Basics
  • 6.Yolov8 Object Detection (ORIN)
  • 7.Deep Learning Object Tracking (ORIN)
10.HD Camera Vision Course(Standard Version)
  • 01.Color tracking
  • 02.Face Tracking
  • 03.AprilTag machine code tracking
  • 04.KCF Object Tracking
  • 05.QR code tracking
  • 06.Mediapipe gesture tracking
  • 07.Meidpipe human posture tracking
  • 08.Color Follow
  • 09.Face Following
  • 10.AprilTag machine code following
  • 11.QR code follow
  • 12.Mediapipe gesture recognition and following
  • 13.Meidpipe human posture following
  • 14.Visual tracking autonomous driving
  • 15.QR code motion control
  • 16.Gesture motion control
11.Depth Camera Vision Course(Superior Version)
  • 1.Basic use of depth camera
  • 2.Deep pseudo-color image
  • 3.Depth camera ranging
  • 4.Color block volume measurement
  • 5.Color Following
  • 6.Face Following
  • 7.QR code follow
  • 8.Machine code following
  • 9.KCF Object Following
  • 10.Mediapipe gesture following
  • 11.Mediapipe Posture Following
  • 12.Visual tracking autonomous driving
  • 13.Edge Detection
12.LiDAR Course
  • 1.Basic use of Lidar
  • 2.Lidar obstacle avoidance
  • 3.Lidar following
  • 4.Lidar patrol
  • 5.Gmapping-SLAM mapping
  • 6.Cartographer-SLAM mapping
  • 7.slam_toolbox mapping
  • 8.Navigation2 single-point navigation avoid
  • 9.Navigation2 multi-point navigation avoid
  • 10.Cartographer Repositioning navigation
  • 11.RTAB-Map mapping
  • 12.RTAB-Map navigation
  • 13.APP mapping navigation
13.Multi-Vehicle Course
  • 1.Multi-vehicle control
  • 2.Multi-vehicle navigation
  • 3.Multi-vehicle platoon
14.Autonomous Driving expand(Need purchase track map)
【Track Map】Multimodal visual understand+SLAM navigation
  • 1. Multimodal visual understand+SLAM navigation
【Track Map】Autonomous driving (RDKX5 & Orin)
  • 1. Venue placement and precautions
  • 2. Start testing
  • 3. Identify and debug
  • 4. Lane keeping
  • 5. Road sign detection
  • 6. Traffic light recognition
  • 7. Fixed point parking
  • 8. Steering decision
  • 9. Horn sounding
  • 10. Deceleration
  • 11. Speed limit
  • 12. Autonomous parking
  • 13. Comprehensive application
  • 14. Unmanned driving integrated AI large model
【Track Map】Autonomous driving (Jetson Nano)
  • 1. Venue placement and precautions
  • 2. Start testing
  • 3. Identify and debug
  • 4. Lane keeping
  • 5. Road sign detection
  • 6. Traffic light recognition
  • 7. Fixed point parking
  • 8. Steering decision
  • 9. Horn sounding
  • 10. Deceleration
  • 11. Speed limit
  • 12. Autonomous parking
  • 13. Comprehensive application
【Track Map】Road network planning
  • 1. Introduction to Road Network Planning and Navigation
  • 2. Constructing a Pose Map
  • 3. Road Network Labelling
  • 4. Road Network Planning Combined with Sand Table Map
  • 5. Path Replanning
【Track Map】Model Training
  • 1. Data Collection
  • 2. Dataset Annotation
  • 3. YOLOv11 Model Training
  • 4. Model Format Conversion
15.YOLOV11 development course (ORIN)
  • 1.YOLO environment construction
  • 2.CLI use
  • 3.Object detection
  • 4.Instance segmentation
  • 5.Pose estimation
  • 6.Image classification
  • 7.Oriented object detection
  • 8.Model conversion
  • 9.Dataset annotation
  • 10.Model Training_Conversion
  • 11.Model prediction
16.YOLOV11 development course(RPi&Jetson NANO)
  • 1.YOLO environment construction
  • 2.CLI use
  • 3.Object detection
  • 4.Instance segmentation
  • 5.Pose estimation
  • 6.Image classification
  • 7.Oriented object detection
  • 8.Model conversion
  • 9.Model prediction
17.YOLOV11 development course(RDK X5)
  • 1.YOLO environment construction
  • 2.CLI use
  • 3.Object detection
  • 4.Instance segmentation
  • 5.Pose estimation
  • 6.Image classification
  • 7.Oriented object detection
  • 8.Model prediction
  • 9.Model Quantization
18.Main control board course
Jetson Nano B01
  • 1. Introduction to the Jetson Nano B01 SUB Board
  • 2. Burn the system image
  • 3. Re-read the memory card or USB drive that has been burned
  • 4. Startup system
  • 5. Jetson Nano B01 System and Desktop Introduction
  • 6. Memory card or USB flash drive expansion
  • 7. Network Configuration
  • 8. SSH remote login & file transfer
  • 9. VNC Remote Login
  • 10. Jetson Nano B01 system backup
  • 11. Jetson Nano Swap space increased
  • 12. Installation and use of Jtop
  • 13. Third-party board + USB drive to start the car
Jetson Orin Nano_NX
  • 1.Jetson Orin board introduction
  • 2.Restore the factory image system
  • 3.Backup SSD system
  • 4.SSD expansion
  • 5.Network configuration
  • 6.SSH remote login
  • 7.VNC remote control
  • 8.Remote file transfer
  • 9.Jtop tool
  • 10.Exchange space expansion
Raspberry Pi
  • 1. Introduction to Raspberry PI 5
  • 2. Raspberry PI system installation and backup
  • 3. Powering the Raspberry PI 5
  • 4. Startup of Raspberry PI 5
  • 5. Update and upgrade operating system
  • 6. Introduction to raspi-config tool
  • 7. config.txt file description
  • 8. Network Configuration
  • 9. remote access
  • 10. Transfer files remotely
  • 11. Set display resolution and rotation
  • 12. Set screen to sleep
  • 13. Play audio and video
  • 14. Using USB camera
  • 15. Using MIPI camera
  • 16. Get real-time temperature of Raspberry Pi
RDK X5
  • 1.Introduction to RDK X5 board
  • 2.Write system file
  • 3.Hardware interface description
  • 4.Install case and other accessories
  • 5.Network configuration
  • 6.Remote login
  • 7.Update system
  • 8.srpi-config user guide
  • 9.config. txt configuration file
  • 10.Self-startup setting
  • 11.RDK exclusive command usage
  • 12.Linux command usage
  • 13.GPIO readwrite operation
  • 14.Image classification algorithm
  • 15.Use USB camera
  • 16.Use MIPI camera
  • 17.Binocular camera depth algorithm
19.AI large model course(ORIN-Pi-RDK X5)
Offline large model (Text Interaction)
  • 0. AI Large Model Mirroring Explanation
  • 1. Deployment of large-scale AI models
  • 2.Installation of the large-scale model dialogue platform
  • 3. Meta AI Llama 3.2 model
  • 4. Alibaba Cloud Qwen3 Model
  • 5. Microsoft Phi-4 mini model
  • 6. DeepSeek DeepSeek-R1 model
  • 7. Alibaba Cloud Qwen2.5vl Visual Multimodal Large Model
  • 8. Google Gemma3 Visual Multimodal Large Model
  • 9. Llava Visual Multimodal Large Model
  • 10.MiniCPM-V Visual Multimodal Large Model
  • 11. Multimodal Visual Understanding Applications
  • 12. Multimodal Text-Based Image Application
  • 13. Multimodal Video Analysis Application
  • 14. Multimodal visual positioning applications
  • 15. Multimodal table scanning application
  • 16. Multimodal Autonomous Agent Application
Offline large model (Voice Interaction)
  • 0. Voice Interaction Hardware Connection (Must Read)
  • 1. Offline speech-to-text (ASR)
  • 2. Offline Text-to-Speech (TTS)
  • 3. AI large model voice interaction
  • 4. Multimodal visual understanding and voice interaction
  • 5. Multimodal Text-Based Image Application
  • 6. Multimodal Video Analysis Application
  • 7. Multimodal visual positioning applications
  • 8. Multimodal table scanning application
  • 9. Multimodal Autonomous Agent Applications
  • 10. AI large model offline voice assistant
Online large model (Text Interaction)
  • 1. OpenRouter Large Model API Aggregation Platform
  • 2. Multimodal visual understanding applications
  • 3. Multimodal visual positioning applications
  • 4. Multimodal table scanning application
  • 5. Multimodal Autonomous Agent Applications
Online large model (Voice Interaction)
  • 0. Voice Interaction Hardware Connection (Must Read)
  • 1. Online speech-to-text (ASR)
  • 2. Online Text-to-Speech (TTS)
  • 3. AI large model voice interaction
  • 4. Multimodal visual and voice interaction
  • 5. Multimodal visual positioning applications
  • 6. Multimodal table scanning application
  • 7. Multimodal Autonomous Agent Applications
  • 8. AI large model online voice assistant
20.AI large model course(Jetson NANO)
Offline large model (Text Interaction)
  • 4.Multimodal visual understand speech interaction
  • 0.AI large model system image instructions
  • 1.AI large model environment deployment
  • 2.Install large model dialogue platform
  • 3.Meta AI llama 3.2 model
  • 4.Alibaba Cloud Qwen2 model
  • 5.Alibaba Cloud Qwen3 model
  • 6.SUTD TinyLlama
  • 7.DeepSeek DeepSeek-R1 model
  • 8.Microsoft Phi-3
  • 9.Microsoft Orca Mini
  • 10.NVIDIA StarCoder2
  • 11.Google Gemma3 Visual Multimodal Large Model
  • 12.Offline Text to Speech (TTS)
  • 13.Offline Speech to Text (ASR)
Online large model (Text Interaction)
  • 1.OpenRouter large model API aggregation platform
  • 2.Multimodal visual understand application
  • 3.Multimodal visual localization application
  • 4.Multimodal table scanning application
  • 5.Multimodal autonomous proxy application
Online large model (Voice Interaction)
  • 0.Voice interaction hardware connection (ReadMe)
  • 1.Online speech-to-text (ASR)
  • 2.Online Text-to-Speech (TTS)
  • 3.AI large model voice interaction
  • 5.Multimodal visual position application
  • 6.Multimodal table scanning application
  • 7.Multimodal autonomous proxy application
  • 8.AI large model online voice assistant
21.Linux operating system course
  • 1.Introduction to Linux system
  • 2.Ubuntu file system
  • 3.Ubuntu common commands
  • 4.Ubuntu common editors
  • 5.Ubuntu software operation commands
  • 6.Virtual machine installation
  • 7.SSH remote control
  • 8.VNC remote control
  • 9.Transfer files remotely
  • 10.Driver library and communication
  • 11.Static IP and hotspot mode
  • 12.Bind device ID
  • 13.Capacity expansion and resource allocation
  • 14.Update system software sources
  • 15.Set root user password
  • 16.sudo free password
  • 17.Connect to WiFi network
  • 18.View system version
  • 19.Customized service management
  • 20.Back up system image
22.Docker course
  • 1.Docker Introduction and Installation
  • 2.Docker basic commands
  • 3.Docker Submission and Multi-Terminal Access
  • 4.Docker Startup Script
  • 5.Docker-Vscode environment construction
23.ROS2 basic course
  • 1.Introduction to ROS2
  • 2.ROS2 install Humble
  • 3.ROS2 development environment
  • 4.ROS2 workspace
  • 5.ROS2 function package
  • 6.ROS2 node
  • 7.ROS2 topic communication
  • 8.ROS2 service communication
  • 9.ROS2 action communication
  • 10.ROS2 custom interface message
  • 11.ROS2 parameter service case
  • 12.ROS2 meta-function package
  • 13.ROS2 distributed communication
  • 14.ROS2 DDS
  • 15.ROS2 time related API
  • 16.ROS2 common command tools
  • 17.ROS2 rviz2 use
  • 18.ROS2 rqt toolbox
  • 19.ROS2 Launch startup file configuration
  • 20.ROS2 recording and playback tool
  • 21.ROS2 URDF model
  • 22.ROS2 Gazebo simulation platform
  • 23.ROS2 TF2 coordinate transformation
24.Image processing course
  • 1. Introduction to Open Source CV
  • 2. Image reading and display
  • 3. Image writing
  • 4. Image quality
  • 5. Pixel Operation
  • 6. Image zoom
  • 7. Image cutting
  • 8. Image translation
  • 9. Image Mirroring
  • 10. Affine Transformation
  • 11. Image Rotation
  • 12. Perspective Transformation
  • 13. Grayscale processing
  • 14. Image Binarization
  • 15. Edge Detection
  • 16. Line drawing
  • 17. Rectangle and circle drawing
  • 18. Drawing text and pictures
25.STM32 driver course
  • 0. Notes (must read)
  • 1. About expansion board
  • 2. STM32 Development environment
  • 3. Button control
  • 4. FreeRTOS application
  • 5. Serial communication
  • 6. SBUS model aircraft remote control
  • 7. CAN bus communication
  • 8. RGB colorful light bar
  • 9. Timer interrupt to control PWM servo
  • 10. Control serial port servos
  • 11. Nine-axis attitude sensor to obtain data
  • 12. Control motor
  • 13. Timer captures the encoder data
  • 14. Robot kinematics analysis theory
  • 15. PID control robot movement
26.Main control communication course
  • 1. Update the expansion board firmware
  • 2. Install Rosmaster driver library
  • 3. Jupyter lab basic usage tutorial
  • 4. Buzzer whistle
  • 5. Control PWM servo
  • 6. RGB colorful light bar special effects display
  • 7. Control motor
  • 8. Control robot movement
  • 9. Control Serial Servo
Download
  • Mapping_APP(iOS_Android)
  • Robot_Image_System_File
  • Code-Firmware
  • Instruction_Manual
  • MainBoard_AI_Pure_System
  • VM_File
  • Software_Tools
  • Hardware_Info
  • 3D_Model_File
Download ZIP

Welcome to ROSMASTER M1 repository

4. Model Format Conversion

Model Format Conversion

Model Format Conversion1. Model Format IntroductionCommon Model Formats2. Course Content3. Convert Model3.1 Model Conversion Program3.1 Start Conversion4. Source Code Analysis4.1 Model Conversion Program

[!IMPORTANT]

  • The factory image already includes converted format traffic sign and lane detection models. This tutorial is provided for users who need to master model conversion methods
  • If you want to experience the complete autonomous driving functionality directly, you can skip this section!!!


1. Model Format Introduction

  • The ultimate goal of training models is to deploy them in practical applications. The export modes in YOLOv11 provide multiple options to export trained models into different formats, making them deployable on various platforms and devices.
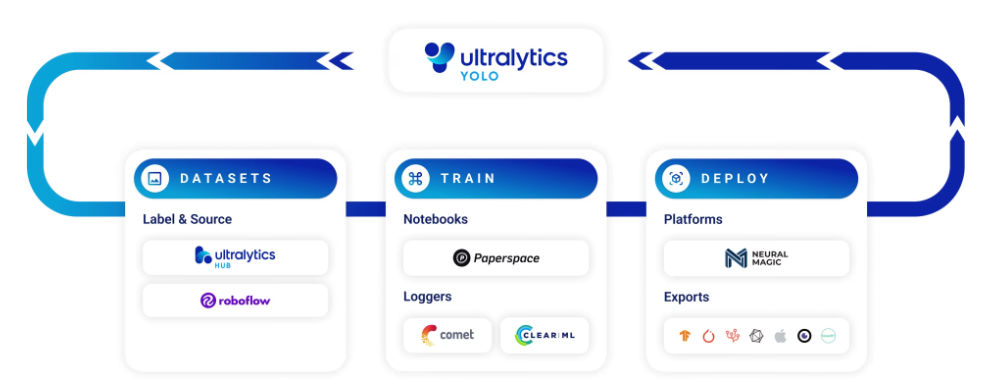
image-20251118093550905

Common Model Formats

  • PyTorch(.pt):Default native format, containing complete model structure and weights. Applicable scenarios: Model training, fine-tuning, foundation for subsequent format export, not suitable for direct deployment.

  • TorchScript(.torchscript):Serialized format of PyTorch models, stripped of Python dependencies.

    Applicable scenarios: Production environment deployment in PyTorch ecosystem (such as server-side inference), supports C++ calling.

  • ONNX(.onnx):Open Neural Network Exchange format, the core standard for cross-framework compatibility. Applicable scenarios: CPU/GPU universal deployment, can achieve 3x CPU acceleration with ONNX Runtime.

  • TensorRT(.engine):NVIDIA exclusive optimized format, GPU-based inference engine. Applicable scenarios: Real-time inference on NVIDIA GPUs (such as Jetson development boards), can achieve 5x GPU acceleration.

  • OpenVINO(openvino_model):Intel exclusive format, optimized for Intel CPU/GPU/VPU. Applicable scenarios: Deployment on Intel hardware (such as PCs, edge computing devices).

  • TF Lite(.tflite):TensorFlow lightweight format, targeting mobile/edge devices. Applicable scenarios: Android devices, embedded hardware (such as Raspberry Pi), supports INT8 quantization compression.

  • RKNN(rknn_model):Rockchip exclusive format, adapted to its AI chips. Applicable scenarios: Deployment on Rockchip RK series chips (such as development boards, smart hardware).

  • Comparison of Different Format Models

ComparisonUniversal Format (ONNX)Accelerated Format (TensorRT)Edge Format (TF Lite)Native Format (.pt)
Inference SpeedMedium (CPU/GPU Universal)Extremely Fast (GPU Exclusive)Low - Medium (Lightweight)Low (Python Dependent)
Model SizeMediumMedium (supports quantization compression)Extremely Small (INT8 Quantization)Large
Hardware DependencyNoneNVIDIA GPUMobile / Embedded DevicesPyTorch Environment
Applicable ScenariosUniversal Deployment, Cross-FrameworkReal-time High-Concurrency InferenceLow-Power Edge DevicesTraining / Fine-Tuning
Precision SupportFP32/FP16FP32/FP16/INT8FP32/FP16/INT8Full Precision

2. Course Content

  1. Convert pt model (native format exported by YOLOv11) to TensorRT format model and compare the inference speed differences between the two

What are the benefits of using TensorRT to export models?

Using TensorRT to export models on the Jetson platform can significantly improve model inference performance. YOLO11 models exported to TensorRT can achieve up to 5x GPU acceleration

  • Speed: Faster inference through advanced optimizations.
  • Compatibility: Smooth integration with NVIDIA hardware.


3. Convert Model

[!NOTE]

  • Only Orin boards are recommended for on-board model training. The training source code is in the yolo_train folder under Model Training in the source code summary. If training is needed, you can place the yolo_train folder programs in the root directory of the board
  • RDK Mainboard Conversion Model Reference [YOLOV11 Development (RDKX5)] - [Model Quantization]

3.1 Model Conversion Program

Model format conversion program path:

/home/jetson/yolo_train/conver_model.py

Optional Launch Parameters Description:

  • format: Model format to export, default is engine (TensorRT format)
  • MODEL_PATH Original pt format model path
  • data Calibration dataset, only needed when performing int8 quantization on the model
  • device Running device number, default is 0
  • int8 Whether to use int8 quantization to further compress model size, default is False

3.1 Start Conversion

xxxxxxxxxx
cd ~/yolo_train
  • Here we use the traffic sign recognition model trained in the previous section as an example for conversion (here replace the --MODEL_PATH path with your actual named .pt model path):
xxxxxxxxxx
python3 conver_model.py --MODEL_PATH /home/jetson/yolo_train/yolo11n.pt 
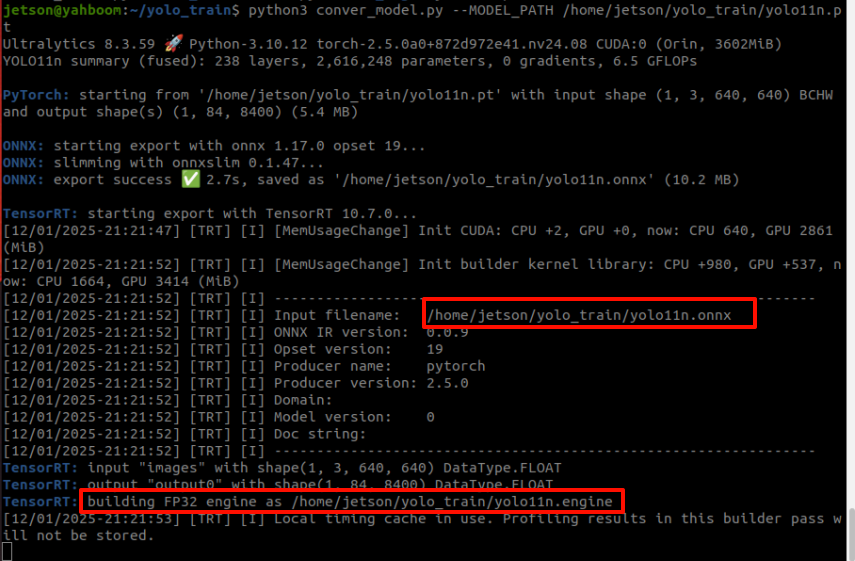
  • After model conversion and export is completed, the terminal prompts Export complete and the exported model path

image-20251201212255516

  • The best.engine in the output directory here is the exported TensorRT format model file

image-20251201221342241


[!WARNING]

  • Attention!!! TensorRT format models converted and exported on different GPU platforms are not universal due to different TensorRT versions.
  • For example, TensorRT format models converted and exported on Jetson Orin NX cannot be used on Jetson Nano because the TensorRT versions on the two platforms are different.


4. Source Code Analysis

4.1 Model Conversion Program

The program source code is located at /home/jetson/yolo_train/conver_model.py

The program process is divided into:

  • Parse parameters: args = get_args() reads parameters passed from command line, such as model path, export format, etc.
  • Load model: model = YOLO(args.MODEL_PATH) loads YOLO pre-trained model from specified path.
  • Export model: Call different export configurations based on whether INT8 quantization is enabled
​x
import argparse
from ultralytics import YOLO
​
def get_args():
    '''
    '''
    parser = argparse.ArgumentParser()
    parser.add_argument('--project', default='./project', help='Project file output directory', type=str)
    parser.add_argument('--MODEL_PATH',default='/home/jetson/MODELS/yolov11/yolo11n.pt' ,help='原始模型权重文件路径Original model weight file path', type=str)
    parser.add_argument('--epochs', default=100, help='训练轮次Training rounds', type=int)
    parser.add_argument('--imgsz', default=640, help='图像大小Image size', type=int)
    parser.add_argument('--train_config', default='', help='配置文件路径Configuration file path', type=str)
    return parser.parse_args()
​
​
if __name__ == "__main__":
    args = get_args()
    model = YOLO(args.MODEL_PATH)  # load a pretrained model 
​
    results = model.train(data=args.train_config, epochs=args.epochs, imgsz=args.imgsz,project=args.project)#start training
​
​


YOLOv11 Model Training
YOLO environment construction

COMPANY

  • About us
  • Team Style
  • Blog

LEARNING & EXPLORATION

  • Tutorials
  • Edge AI hardware
  • Educational robots
  • Embedded intelligent hardware

WHERE TO BUY

  • Yahboom Online Store
  • Amazon
  • Alibaba
  • AliExpress
  • Mercado

TECHNOLOGY SUPPORT

  • Email: support@yahboom.com

BE A DISTRIBUTOR

  • Email: sales@yahboom.com
QR Code
QR Code

Copyright © 2017-2026 Yahboom. All Rights Reserved.

EN/中文