Welcome to ROSMASTER M1 repository
6.Face Following
Face Following
This lesson uses the Raspberry Pi as an example. For Raspberry Pi and Jetson-Nano boards, you need to open a terminal on the host computer and enter the command to enter the Docker container. Once inside the Docker container, enter the commands mentioned in this lesson in the terminal. For instructions on entering the Docker container from the host computer, refer to [01. Robot Configuration and Operation Guide] -- [4.Enter Docker (For JETSON Nano and RPi 5)]. For RDKX5 and Orin boards, simply open a terminal and enter the commands mentioned in this lesson.
1. Program Functionality
After the program starts, the robot will recognize a face and select it. The robot will then continuously follow the face, maintaining a 0.4-meter distance from the recognized face and centered on the screen. Press the
q/Q keyto exit the program.
2. Program Code Reference Path
/root/yahboomcar_ros2_ws/yahboomcar_ws/src/yahboomcar_depth/yahboomcar_depth/Advanced/faceFollow.py
- faceFollow.py
Mainly performs face detection, calculates the vehicle's forward distance and turning angle based on the face center coordinates and the distance from the face to the vehicle, and publishes the forward and turning data to the vehicle.
3. Program Startup
3.1. Startup Commands
For Raspberry Pi and Jetson-Nano boards, you need to enter the Docker container first. For RDKX5 and Orin controllers, this is not necessary.
Enter the Docker container (see [Docker course] --- [4. Docker Startup Script] for steps).
All the following commands must be executed within the same Docker container (see [Docker course] --- [3. Docker Submission and Multi-Terminal Access] for steps).
Enter the terminal.
xxxxxxxxxx# Start the depth camera dataros2 launch ascamera hp60c.launch.py# Start the car chassisros2 launch yahboomcar_bringup yahboomcar_bringup_M1_launch.py# Start the color tracking programros2 run yahboomcar_depth depth_faceFollowWhen a face is detected, the face area is automatically framed and the car begins following. (Note: If the robot is jerking and experiencing poor performance, try replacing the image with a face that has better depth information. This is because the robot will stop if the depth information is zero.)
After starting the program, the following screen will appear.
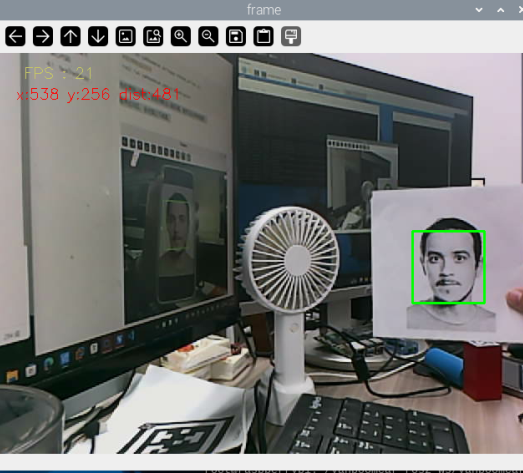
When you select a face and have depth information, the robot will follow it.
3.2 Dynamic Parameter Adjustment
In the terminal, enter:
xxxxxxxxxxros2 run rqt_reconfigure rqt_reconfigure
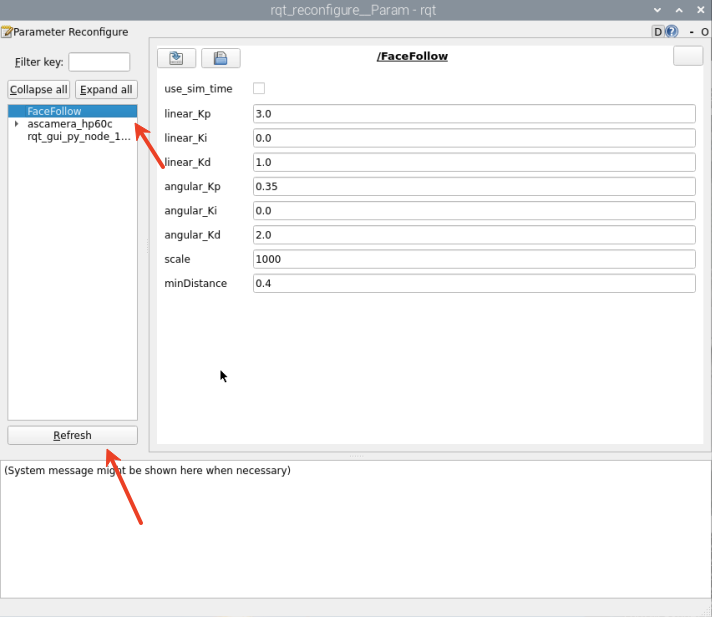
☑️ After modifying the parameters, click a blank area in the GUI to write the parameter values. Note that this will only take effect for the current startup. To permanently take effect, you need to modify the parameters in the source code.
Parameter Analysis:
[linear_Kp], [linear_Ki], [linear_Kd]: Linear velocity PID control during the car following process.
[angular_Kp], [angular_Ki], [angular_Kd]: Angular velocity PID control during the car following process.
[minDist]: Following distance, which is always maintained.
[scale]: PID scaling.
4. Core Code
4.1. depth_faceFollow.py
This program has the following main functions:
- Subscribes to the depth camera topic and obtains topic images;
- Detects faces using OpenCV's face detector;
- Processes the image to obtain the center coordinates and depth distance information of the face image.
- Calculates the distance PID and center coordinate PID to obtain the car's forward speed, distance, and turning angle.
Some of the core code is as follows.
xxxxxxxxxx#获取检测到人脸的方框大小#Get the size of the box where the face is detectedfaces = self.face_patterns.detectMultiScale(result_image , scaleFactor=1.2, minNeighbors=10, minSize=(50, 50))#单人脸处理逻辑#Single face processing logicif len(faces) == 1: #人脸中心计算 #Face center calculation for (x, y, w, h) in faces: self.Center_x = x + w // 2 # X中心点 X center point self.Center_y = y + h // 2 # Y中心点 Y center point self.Center_r = w * h // 100 # 面积半径 Area radius cv.rectangle(result_image, (x, y), (x+w, y+h), (0,255,0), 2) # 绘制绿框 Draw a green frame #深度信息获取 Deep information acquisition points = [ (int(self.Center_y), int(self.Center_x)), # 中心点 Center Point (int(self.Center_y-1), int(self.Center_x-1)), # 右下偏移点 Lower right offset point (int(self.Center_y-3), int(self.Center_x-3)) # 左上偏移点 Upper left offset point] valid_depths = [] for y, x in points: depth_val = depth_image_info[y][x] if depth_val != 0: valid_depths.append(depth_val) #机器人控制 Robot control if dist > 0.2: # 有效距离阈值 Effective distance threshold self.execute(self.Center_x, dist) # 执行控制逻辑 Execution control logic # 根据x值、y值,使用PID算法,计算运动速度,转弯角度# Calculate the movement speed and turning angle using the PID algorithm based on the x and y valuesdef execute(self, rgb_img, action): #PID计算偏差 PID calculation deviation linear_x = self.linear_pid.compute(dist, self.minDist) angular_z = self.angular_pid.compute(point_x,320) # 小车停车区间,速度为0 The car is in the parking area and the speed is 0 if abs(dist - self.minDist) < 30: linear_x = 0 if abs(point_x - 320.0) < 30: angular_z = 0 twist = Twist() ... # 将计算后的速度信息发布 Publish the calculated speed information self.pub_cmdVel.publish(twist)