yahboom
HomeLearn
Solution
Blog
Online Store
About Us
EN/中文
ROSMASTER M1📖
01.Robot Configuration and Operation Guide
  • 0. Assembly video
  • 1. Servo PTZ calibration
  • 2. Quick start guide handle control
  • 3. First trial
  • 4. Enter Docker (For JETSON Nano and RPi 5)
  • 1.5 Quick Start video
02.AI Model Preparation
  • AI Model Preparation
03.AI Model Basics course
  • 1.AI large model types and principles
  • 2.RAG retrieval enhancement and model training samples
  • 3.Embodied intelligent robot system architecture
  • 4.Embodied intelligent functions core source code
04.AI Model Developmentnew
  • 1.Register a model service provider account
  • 2. Configuring API-KEY
  • 3. Introduction to Dify
  • 4. Basic Dify Features
  • 5. Deploy the RAG knowledge base
  • 6. AI Large Model Development - chatbot
  • 7. RAG knowledge base + chatbot
  • 8. AI agent workflow
  • 9. Custom wake-up response
  • 10. Core module testing tools
05.AI Model - Text Version
  • 1.Semantic understand and command follow
  • 2.Multimodal visual understand
  • 3.Multimodal visual understand + PTZ tracking
  • 4.Multimodal visual understand + visual following
  • 5.Multimodal visual understand + visual line patroling
  • 6.Multimodal visual understand + Depth Camera Distance Question Answering
  • 7.Multimodal visual understand+SLAM navigation
  • 8.Multimodal visual understand+SLAM navigation + visual line patroling
  • 9.Intention estimation + Multimodal visual understand + SLAM navigation + visual functions
06.AI Model - Voice Version
  • 1.Semantic understand and command follow
  • 2.Multimodal visual understand
  • 3.Multimodal visual understand + PTZ tracking
  • 4.Multimodal visual understand + visual following
  • 5.Multimodal visual understand + visual line patroling
  • 6.Multimodal visual understand + Depth Camera Distance Question Answering
  • 7.Multimodal visual understand+SLAM navigation
  • 8.Multimodal visual understand+SLAM navigation + visual line patroling
  • 9.Intention estimation + Multimodal visual understand + SLAM navigation + visual functions
07.Chassis Control Course
  • 1. ROS control
  • 2. Handle control
  • 3. Keyboard control
  • 4. Linear velocity calibration
  • 5. Angular velocity calibration
  • 6. URDF model
08.Mediapipe Visual Course
  • 1.Hand detection
  • 2.Posture detection
  • 3.Overall detection
  • 4.Facial landmark detection
  • 5.Face detection
  • 6.Face special effects
  • 7.3D object recognition
  • 8.Brush
  • 9.Finger control
  • 10.Gesture recognition
  • 11.Palm target positioning
  • 12.Fingertip trajectory recognition
09.Advanced Vision Course
  • 1.QR code
  • 2.Human Pose Estimation
  • 3.Object Detection
  • 4.AR Vision
  • 5.ROS+Opencv Basics
  • 6.Yolov8 Object Detection (ORIN)
  • 7.Deep Learning Object Tracking (ORIN)
10.HD Camera Vision Course(Standard Version)
  • 01.Color tracking
  • 02.Face Tracking
  • 03.AprilTag machine code tracking
  • 04.KCF Object Tracking
  • 05.QR code tracking
  • 06.Mediapipe gesture tracking
  • 07.Meidpipe human posture tracking
  • 08.Color Follow
  • 09.Face Following
  • 10.AprilTag machine code following
  • 11.QR code follow
  • 12.Mediapipe gesture recognition and following
  • 13.Meidpipe human posture following
  • 14.Visual tracking autonomous driving
  • 15.QR code motion control
  • 16.Gesture motion control
11.Depth Camera Vision Course(Superior Version)
  • 1.Basic use of depth camera
  • 2.Deep pseudo-color image
  • 3.Depth camera ranging
  • 4.Color block volume measurement
  • 5.Color Following
  • 6.Face Following
  • 7.QR code follow
  • 8.Machine code following
  • 9.KCF Object Following
  • 10.Mediapipe gesture following
  • 11.Mediapipe Posture Following
  • 12.Visual tracking autonomous driving
  • 13.Edge Detection
12.LiDAR Course
  • 1.Basic use of Lidar
  • 2.Lidar obstacle avoidance
  • 3.Lidar following
  • 4.Lidar patrol
  • 5.Gmapping-SLAM mapping
  • 6.Cartographer-SLAM mapping
  • 7.slam_toolbox mapping
  • 8.Navigation2 single-point navigation avoid
  • 9.Navigation2 multi-point navigation avoid
  • 10.Cartographer Repositioning navigation
  • 11.RTAB-Map mapping
  • 12.RTAB-Map navigation
  • 13.APP mapping navigation
13.Multi-Vehicle Course
  • 1.Multi-vehicle control
  • 2.Multi-vehicle navigation
  • 3.Multi-vehicle platoon
14.Autonomous Driving expand(Need purchase track map)
【Track Map】Multimodal visual understand+SLAM navigation
  • 1. Multimodal visual understand+SLAM navigation
【Track Map】Autonomous driving (RDKX5 & Orin)
  • 1. Venue placement and precautions
  • 2. Start testing
  • 3. Identify and debug
  • 4. Lane keeping
  • 5. Road sign detection
  • 6. Traffic light recognition
  • 7. Fixed point parking
  • 8. Steering decision
  • 9. Horn sounding
  • 10. Deceleration
  • 11. Speed limit
  • 12. Autonomous parking
  • 13. Comprehensive application
  • 14. Unmanned driving integrated AI large model
【Track Map】Autonomous driving (Jetson Nano)
  • 1. Venue placement and precautions
  • 2. Start testing
  • 3. Identify and debug
  • 4. Lane keeping
  • 5. Road sign detection
  • 6. Traffic light recognition
  • 7. Fixed point parking
  • 8. Steering decision
  • 9. Horn sounding
  • 10. Deceleration
  • 11. Speed limit
  • 12. Autonomous parking
  • 13. Comprehensive application
【Track Map】Road network planning
  • 1. Introduction to Road Network Planning and Navigation
  • 2. Constructing a Pose Map
  • 3. Road Network Labelling
  • 4. Road Network Planning Combined with Sand Table Map
  • 5. Path Replanning
【Track Map】Model Training
  • 1. Data Collection
  • 2. Dataset Annotation
  • 3. YOLOv11 Model Training
  • 4. Model Format Conversion
15.YOLOV11 development course (ORIN)
  • 1.YOLO environment construction
  • 2.CLI use
  • 3.Object detection
  • 4.Instance segmentation
  • 5.Pose estimation
  • 6.Image classification
  • 7.Oriented object detection
  • 8.Model conversion
  • 9.Dataset annotation
  • 10.Model Training_Conversion
  • 11.Model prediction
16.YOLOV11 development course(RPi&Jetson NANO)
  • 1.YOLO environment construction
  • 2.CLI use
  • 3.Object detection
  • 4.Instance segmentation
  • 5.Pose estimation
  • 6.Image classification
  • 7.Oriented object detection
  • 8.Model conversion
  • 9.Model prediction
17.YOLOV11 development course(RDK X5)
  • 1.YOLO environment construction
  • 2.CLI use
  • 3.Object detection
  • 4.Instance segmentation
  • 5.Pose estimation
  • 6.Image classification
  • 7.Oriented object detection
  • 8.Model prediction
  • 9.Model Quantization
18.Main control board course
Jetson Nano B01
  • 1. Introduction to the Jetson Nano B01 SUB Board
  • 2. Burn the system image
  • 3. Re-read the memory card or USB drive that has been burned
  • 4. Startup system
  • 5. Jetson Nano B01 System and Desktop Introduction
  • 6. Memory card or USB flash drive expansion
  • 7. Network Configuration
  • 8. SSH remote login & file transfer
  • 9. VNC Remote Login
  • 10. Jetson Nano B01 system backup
  • 11. Jetson Nano Swap space increased
  • 12. Installation and use of Jtop
  • 13. Third-party board + USB drive to start the car
Jetson Orin Nano_NX
  • 1.Jetson Orin board introduction
  • 2.Restore the factory image system
  • 3.Backup SSD system
  • 4.SSD expansion
  • 5.Network configuration
  • 6.SSH remote login
  • 7.VNC remote control
  • 8.Remote file transfer
  • 9.Jtop tool
  • 10.Exchange space expansion
Raspberry Pi
  • 1. Introduction to Raspberry PI 5
  • 2. Raspberry PI system installation and backup
  • 3. Powering the Raspberry PI 5
  • 4. Startup of Raspberry PI 5
  • 5. Update and upgrade operating system
  • 6. Introduction to raspi-config tool
  • 7. config.txt file description
  • 8. Network Configuration
  • 9. remote access
  • 10. Transfer files remotely
  • 11. Set display resolution and rotation
  • 12. Set screen to sleep
  • 13. Play audio and video
  • 14. Using USB camera
  • 15. Using MIPI camera
  • 16. Get real-time temperature of Raspberry Pi
RDK X5
  • 1.Introduction to RDK X5 board
  • 2.Write system file
  • 3.Hardware interface description
  • 4.Install case and other accessories
  • 5.Network configuration
  • 6.Remote login
  • 7.Update system
  • 8.srpi-config user guide
  • 9.config. txt configuration file
  • 10.Self-startup setting
  • 11.RDK exclusive command usage
  • 12.Linux command usage
  • 13.GPIO readwrite operation
  • 14.Image classification algorithm
  • 15.Use USB camera
  • 16.Use MIPI camera
  • 17.Binocular camera depth algorithm
19.AI large model course(ORIN-Pi-RDK X5)
Offline large model (Text Interaction)
  • 0. AI Large Model Mirroring Explanation
  • 1. Deployment of large-scale AI models
  • 2.Installation of the large-scale model dialogue platform
  • 3. Meta AI Llama 3.2 model
  • 4. Alibaba Cloud Qwen3 Model
  • 5. Microsoft Phi-4 mini model
  • 6. DeepSeek DeepSeek-R1 model
  • 7. Alibaba Cloud Qwen2.5vl Visual Multimodal Large Model
  • 8. Google Gemma3 Visual Multimodal Large Model
  • 9. Llava Visual Multimodal Large Model
  • 10.MiniCPM-V Visual Multimodal Large Model
  • 11. Multimodal Visual Understanding Applications
  • 12. Multimodal Text-Based Image Application
  • 13. Multimodal Video Analysis Application
  • 14. Multimodal visual positioning applications
  • 15. Multimodal table scanning application
  • 16. Multimodal Autonomous Agent Application
Offline large model (Voice Interaction)
  • 0. Voice Interaction Hardware Connection (Must Read)
  • 1. Offline speech-to-text (ASR)
  • 2. Offline Text-to-Speech (TTS)
  • 3. AI large model voice interaction
  • 4. Multimodal visual understanding and voice interaction
  • 5. Multimodal Text-Based Image Application
  • 6. Multimodal Video Analysis Application
  • 7. Multimodal visual positioning applications
  • 8. Multimodal table scanning application
  • 9. Multimodal Autonomous Agent Applications
  • 10. AI large model offline voice assistant
Online large model (Text Interaction)
  • 1. OpenRouter Large Model API Aggregation Platform
  • 2. Multimodal visual understanding applications
  • 3. Multimodal visual positioning applications
  • 4. Multimodal table scanning application
  • 5. Multimodal Autonomous Agent Applications
Online large model (Voice Interaction)
  • 0. Voice Interaction Hardware Connection (Must Read)
  • 1. Online speech-to-text (ASR)
  • 2. Online Text-to-Speech (TTS)
  • 3. AI large model voice interaction
  • 4. Multimodal visual and voice interaction
  • 5. Multimodal visual positioning applications
  • 6. Multimodal table scanning application
  • 7. Multimodal Autonomous Agent Applications
  • 8. AI large model online voice assistant
20.AI large model course(Jetson NANO)
Offline large model (Text Interaction)
  • 4.Multimodal visual understand speech interaction
  • 0.AI large model system image instructions
  • 1.AI large model environment deployment
  • 2.Install large model dialogue platform
  • 3.Meta AI llama 3.2 model
  • 4.Alibaba Cloud Qwen2 model
  • 5.Alibaba Cloud Qwen3 model
  • 6.SUTD TinyLlama
  • 7.DeepSeek DeepSeek-R1 model
  • 8.Microsoft Phi-3
  • 9.Microsoft Orca Mini
  • 10.NVIDIA StarCoder2
  • 11.Google Gemma3 Visual Multimodal Large Model
  • 12.Offline Text to Speech (TTS)
  • 13.Offline Speech to Text (ASR)
Online large model (Text Interaction)
  • 1.OpenRouter large model API aggregation platform
  • 2.Multimodal visual understand application
  • 3.Multimodal visual localization application
  • 4.Multimodal table scanning application
  • 5.Multimodal autonomous proxy application
Online large model (Voice Interaction)
  • 0.Voice interaction hardware connection (ReadMe)
  • 1.Online speech-to-text (ASR)
  • 2.Online Text-to-Speech (TTS)
  • 3.AI large model voice interaction
  • 5.Multimodal visual position application
  • 6.Multimodal table scanning application
  • 7.Multimodal autonomous proxy application
  • 8.AI large model online voice assistant
21.Linux operating system course
  • 1.Introduction to Linux system
  • 2.Ubuntu file system
  • 3.Ubuntu common commands
  • 4.Ubuntu common editors
  • 5.Ubuntu software operation commands
  • 6.Virtual machine installation
  • 7.SSH remote control
  • 8.VNC remote control
  • 9.Transfer files remotely
  • 10.Driver library and communication
  • 11.Static IP and hotspot mode
  • 12.Bind device ID
  • 13.Capacity expansion and resource allocation
  • 14.Update system software sources
  • 15.Set root user password
  • 16.sudo free password
  • 17.Connect to WiFi network
  • 18.View system version
  • 19.Customized service management
  • 20.Back up system image
22.Docker course
  • 1.Docker Introduction and Installation
  • 2.Docker basic commands
  • 3.Docker Submission and Multi-Terminal Access
  • 4.Docker Startup Script
  • 5.Docker-Vscode environment construction
23.ROS2 basic course
  • 1.Introduction to ROS2
  • 2.ROS2 install Humble
  • 3.ROS2 development environment
  • 4.ROS2 workspace
  • 5.ROS2 function package
  • 6.ROS2 node
  • 7.ROS2 topic communication
  • 8.ROS2 service communication
  • 9.ROS2 action communication
  • 10.ROS2 custom interface message
  • 11.ROS2 parameter service case
  • 12.ROS2 meta-function package
  • 13.ROS2 distributed communication
  • 14.ROS2 DDS
  • 15.ROS2 time related API
  • 16.ROS2 common command tools
  • 17.ROS2 rviz2 use
  • 18.ROS2 rqt toolbox
  • 19.ROS2 Launch startup file configuration
  • 20.ROS2 recording and playback tool
  • 21.ROS2 URDF model
  • 22.ROS2 Gazebo simulation platform
  • 23.ROS2 TF2 coordinate transformation
24.Image processing course
  • 1. Introduction to Open Source CV
  • 2. Image reading and display
  • 3. Image writing
  • 4. Image quality
  • 5. Pixel Operation
  • 6. Image zoom
  • 7. Image cutting
  • 8. Image translation
  • 9. Image Mirroring
  • 10. Affine Transformation
  • 11. Image Rotation
  • 12. Perspective Transformation
  • 13. Grayscale processing
  • 14. Image Binarization
  • 15. Edge Detection
  • 16. Line drawing
  • 17. Rectangle and circle drawing
  • 18. Drawing text and pictures
25.STM32 driver course
  • 0. Notes (must read)
  • 1. About expansion board
  • 2. STM32 Development environment
  • 3. Button control
  • 4. FreeRTOS application
  • 5. Serial communication
  • 6. SBUS model aircraft remote control
  • 7. CAN bus communication
  • 8. RGB colorful light bar
  • 9. Timer interrupt to control PWM servo
  • 10. Control serial port servos
  • 11. Nine-axis attitude sensor to obtain data
  • 12. Control motor
  • 13. Timer captures the encoder data
  • 14. Robot kinematics analysis theory
  • 15. PID control robot movement
26.Main control communication course
  • 1. Update the expansion board firmware
  • 2. Install Rosmaster driver library
  • 3. Jupyter lab basic usage tutorial
  • 4. Buzzer whistle
  • 5. Control PWM servo
  • 6. RGB colorful light bar special effects display
  • 7. Control motor
  • 8. Control robot movement
  • 9. Control Serial Servo
Download
  • Mapping_APP(iOS_Android)
  • Robot_Image_System_File
  • Code-Firmware
  • Instruction_Manual
  • MainBoard_AI_Pure_System
  • VM_File
  • Software_Tools
  • Hardware_Info
  • 3D_Model_File
Download ZIP

Welcome to ROSMASTER M1 repository

10.Cartographer Repositioning navigation

Cartographer Repositioning navigation

1. Course Content

  1. Learn the robot's rapid relocalization and navigation capabilities
  2. When you run the program, a real-time map and robot model will load into RVIZ. The robot can quickly locate its position on the map and perform real-time SLAM mapping and navigation.

2. Principle Overview

2.1 Introduction

  • Navigation 2 (Nav 2) is the navigation framework included with ROS 2. Its purpose is to safely move mobile robots from point A to point B.
  • The default localization algorithm for Navigation 2 is AMCL (Adaptive Monte Carlo Localization). This will replace the default AMCL localization method with Cartographer localization, while other navigation functions remain unchanged.

2.2 Differences Between the Two Localization Methods

  • AMCL: Suitable for scenarios with a known map. For example, in a mapped indoor environment, a robot can use AMCL to determine its position when performing repetitive tasks or navigating.
  • Cartographer: More suitable for scenarios in unknown environments where a robot needs to simultaneously build a map and localize itself. For example, when a robot enters a new area for the first time and needs to quickly build a map and determine its position, Cartographer is more effective.

3. Preparation

3.1 Content Description

This lesson uses the Raspberry Pi as an example.

For Raspberry Pi and Jetson-Nano boards, you need to open a terminal on the host computer and enter the command to enter the Docker container. Once inside the Docker container, enter the commands mentioned in this lesson in the terminal. For instructions on entering the Docker container from the host computer, refer to [01. Robot Configuration and Operation Guide] -- [4.Enter Docker (For JETSON Nano and RPi 5)].

For RDKX5 and Orin boards, simply open a terminal and enter the commands mentioned in this lesson.

3.2 Map Preparation

  • The fast relocation navigation in this course requires you to first follow the tutorial [11.LiDAR Course] - [6. Cartographer Mapping] to save a pbstream format map and a yaml file. The pbstream and yaml files will be saved in

    xxxxxxxxxx
    ~/yahboomcar_ros2_ws/yahboomcar_ws/src/yahboomcar_nav/maps/yahboomcar.pbstream
    ~/yahboomcar_ros2_ws/yahboomcar_ws/src/yahboomcar_nav/maps/yahboomcar.yaml

    Directory (Raspberry Pi and Jetson Nano are saved in the same directory in Docker).
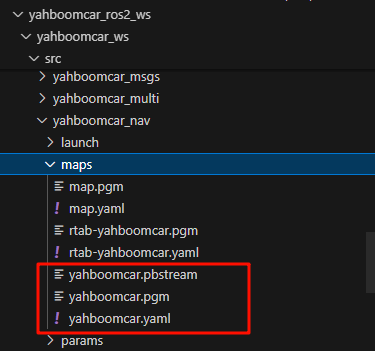
image-20250814175820462

3.3 Navigation Function

Note:

For Raspberry Pi and Jetson-Nano boards, you need to enter the Docker container first. For RDKX5 and Orin controllers, this is not necessary.

Enter the Docker container (see [Docker course] --- [4. Docker Startup Script] for steps).

All the following commands must be executed within the same Docker container (see [Docker course] --- [3. Docker Submission and Multi-Terminal Access] for steps).

The robot vehicle terminal activates the underlying sensor command:

xxxxxxxxxx
ros2 launch yahboomcar_nav laser_bringup_launch.py
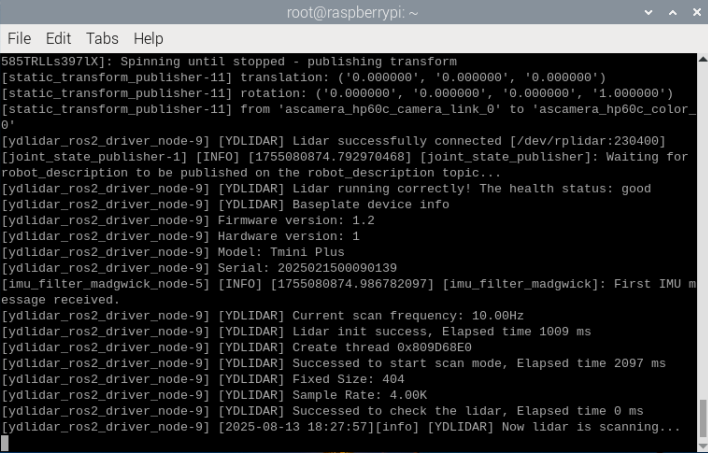
image-20250813182807068

Enter the command to start RViz visualization for mapping. Then start the cartographer node for localization; change use_rviz:=true to true to enable RViz visualization.

x
#Raspberry Pi, Jetson Nano
ros2 launch yahboomcar_nav localization_imu_odom.launch.py use_rviz:=true 
load_state_filename:=/root/yahboomcar_ros2_ws/yahboomcar_ws/src/yahboomcar_nav/maps/yahboomcar.pbstream 
#ORIN
ros2 launch yahboomcar_nav localization_imu_odom.launch.py use_rviz:=true load_state_filename:=/home/jetson/yahboomcar_ros2_ws/yahboomcar_ws/src/yahboomcar_nav/maps/yahboomcar.pbstream
#RDK X5
ros2 launch yahboomcar_nav localization_imu_odom.launch.py use_rviz:=true load_state_filename:=/home/sunrise/yahboomcar_ros2_ws/yahboomcar_ws/src/yahboomcar_nav/maps/yahboomcar.pbstream

Parameter Description

xxxxxxxxxx
# Select whether to enable rviz. True to enable, false to disable.
use_rviz:=true
# Replace the target map file.
# .pbstream map files refer to the cartograph mapping algorithm to save the map.
load_state_filename:=/root/yahboomcar_ros2_ws/yahboomcar_ws/src/yahboomcar_nav/maps/yahboomcar.pbstream 

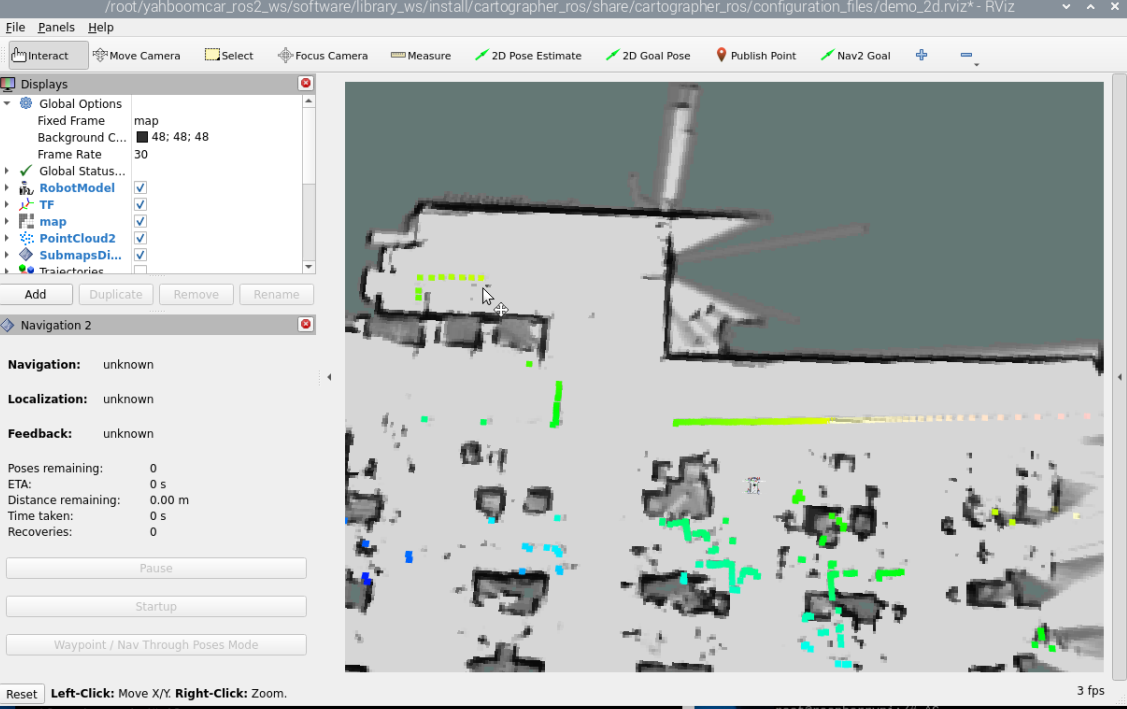
image-20250813183106894

You'll see the map has loaded, but the car's positioning isn't accurate. Click [2D Pose Estimate] to set the car's initial pose. Based on the car's approximate position in the real environment, click and drag the mouse in rviz to quickly locate it on the map. As shown below, the radar scan area roughly overlaps with the actual obstacle.

Note: If positioning is still not possible, the car may be in an obstruction area. Place it in a clear area with no obstacles nearby and restart the car. Alternatively, leave the terminal open, restart the car, and wait for the data to automatically recover before relocating. Alternatively, the map may have too few feature points during construction, requiring more detailed mapping.
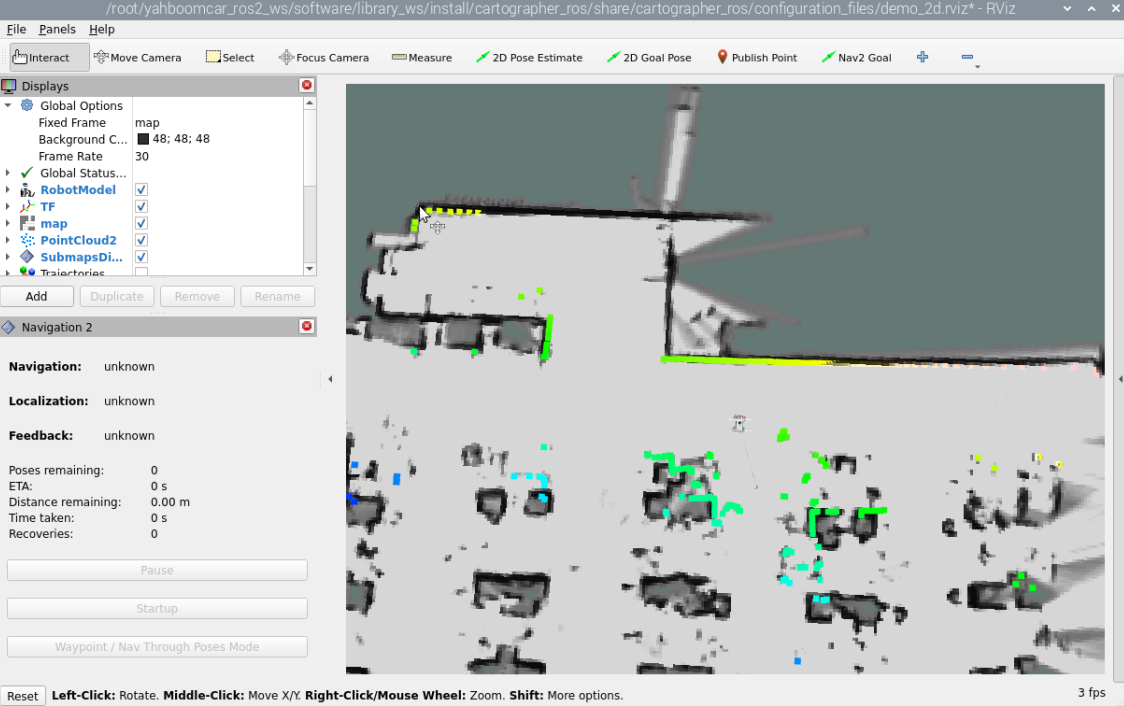
image-20250813183136557

Finally, launch Navigation 2.

x
#Raspberry Pi, Jetson Nano 
ros2 launch yahboomcar_nav navigation_cartodwb_launch.py maps:=/root/yahboomcar_ros2_ws/yahboomcar_ws/src/yahboomcar_nav/maps/yahboomcar.yaml
#ORIN 
ros2 launch yahboomcar_nav navigation_cartodwb_launch.py maps:=/home/jetson/yahboomcar_ros2_ws/yahboomcar_ws/src/yahboomcar_nav/maps/yahboomcar.yaml
#RDK X
ros2 launch yahboomcar_nav navigation_cartodwb_launch.py maps:=/home/sunrise/yahboomcar_ros2_ws/yahboomcar_ws/src/yahboomcar_nav/maps/yahboomcar.yaml

Parameter Description

xxxxxxxxxx
# Load map parameters: (Can replace the target map)
maps:=/root/yahboomcar_ros2_ws/yahboomcar_ws/src/yahboomcar_nav/maps/yahboomcar.yaml
# The .pgm file must be in the same directory as the .yaml file.

Note: The yahboomcar.yaml file and the yahboomcar.pbstream file must be created at the same time, meaning they are the same map. Refer to the cartograph mapping algorithm for saving maps.
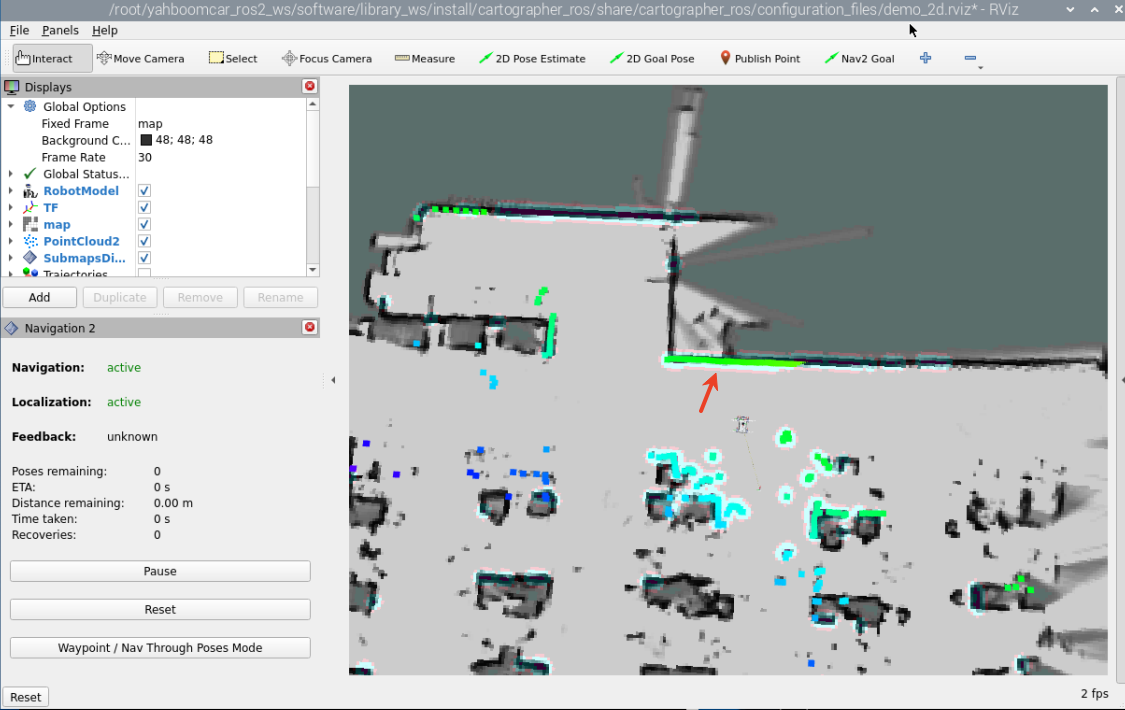
image-20250813183329084

Navigation can begin when an expansion area appears.

For single-point navigation, click the 【2D Goal Pose】 tool and select a target point in rviz. The robot will calculate a path based on the surroundings and move along it to the target point.
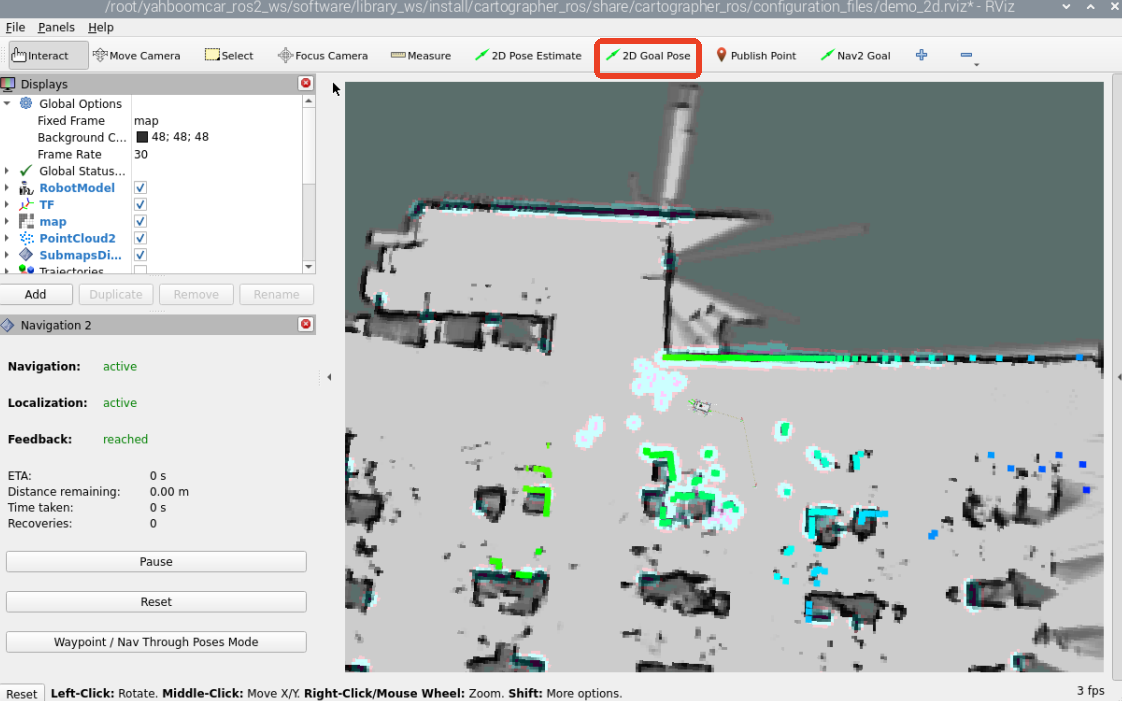
image-20250813183804282

To enable multi-point navigation, you need to add the nav2 plugin.
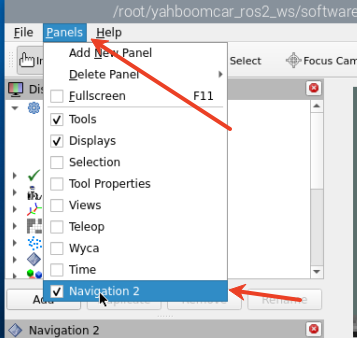
image-20250813183839534

After adding this, rviz displays the following:
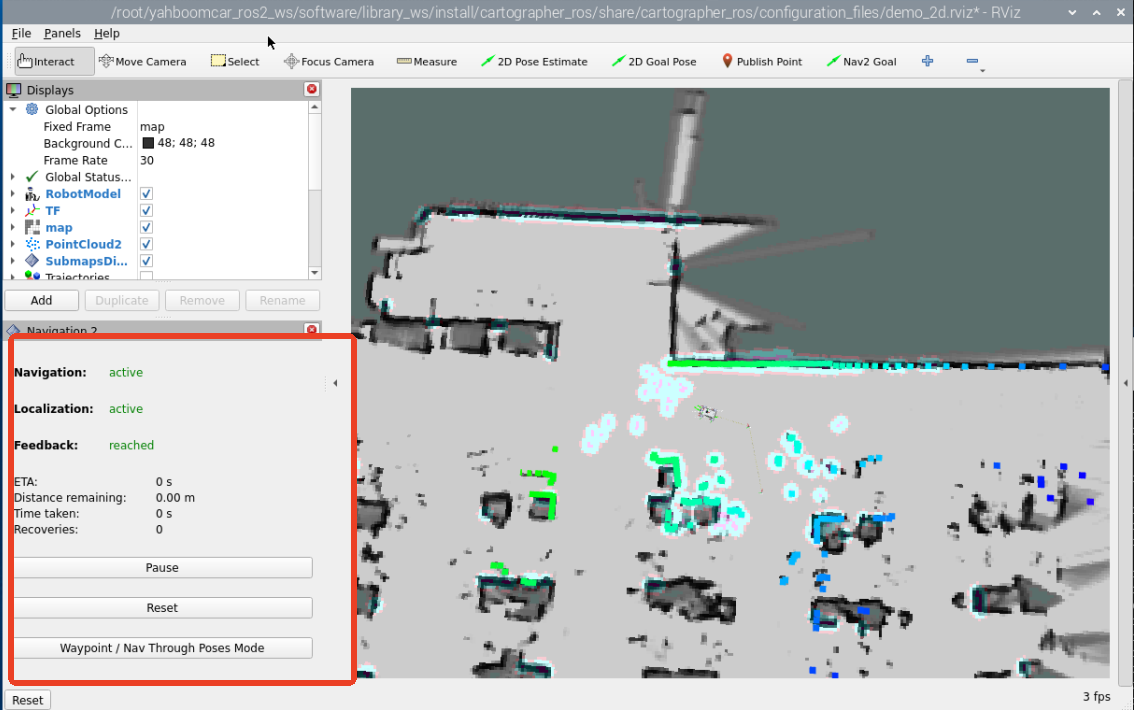
image-20250813183857460

Then click 【Waypoint/Nav Through Poses Mode】 and use【Nav2 Goal】 in the rivz toolbar to set any target point.
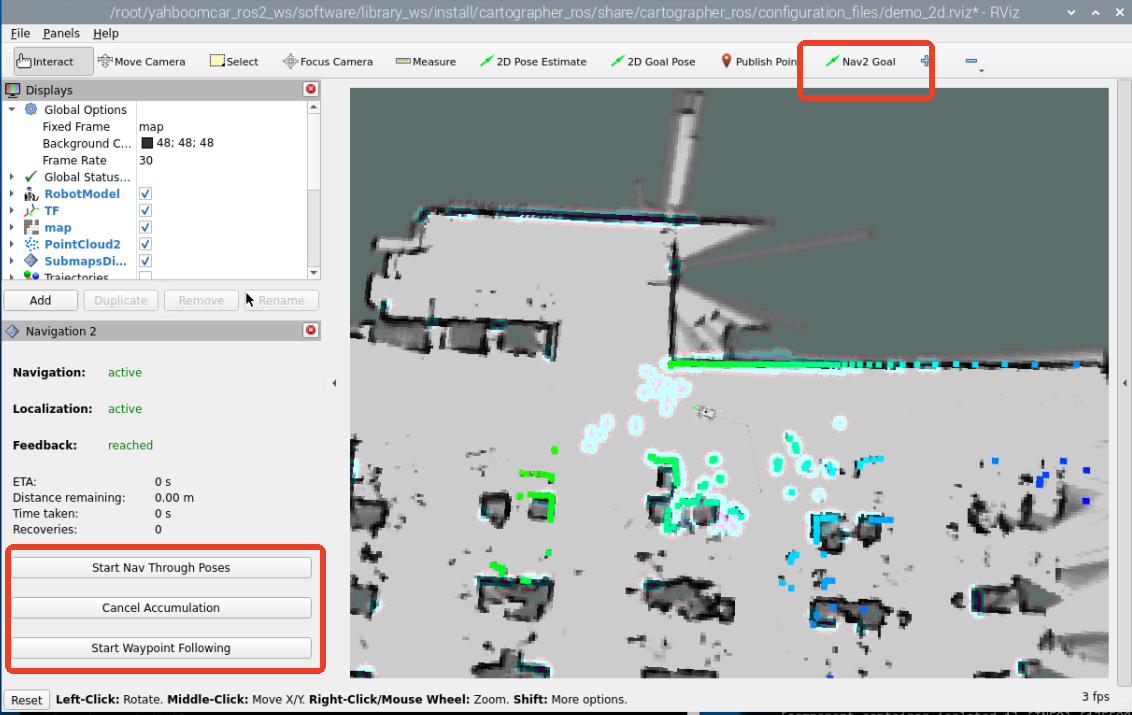
image-20250813183919689

Then click 【Start Waypoint Following】 to begin route navigation. The car will automatically proceed to the next point after reaching the target point, according to the order of the selected points. No operation is required. After reaching the last point, the car stops and waits for the next instruction.image-20250813184023770
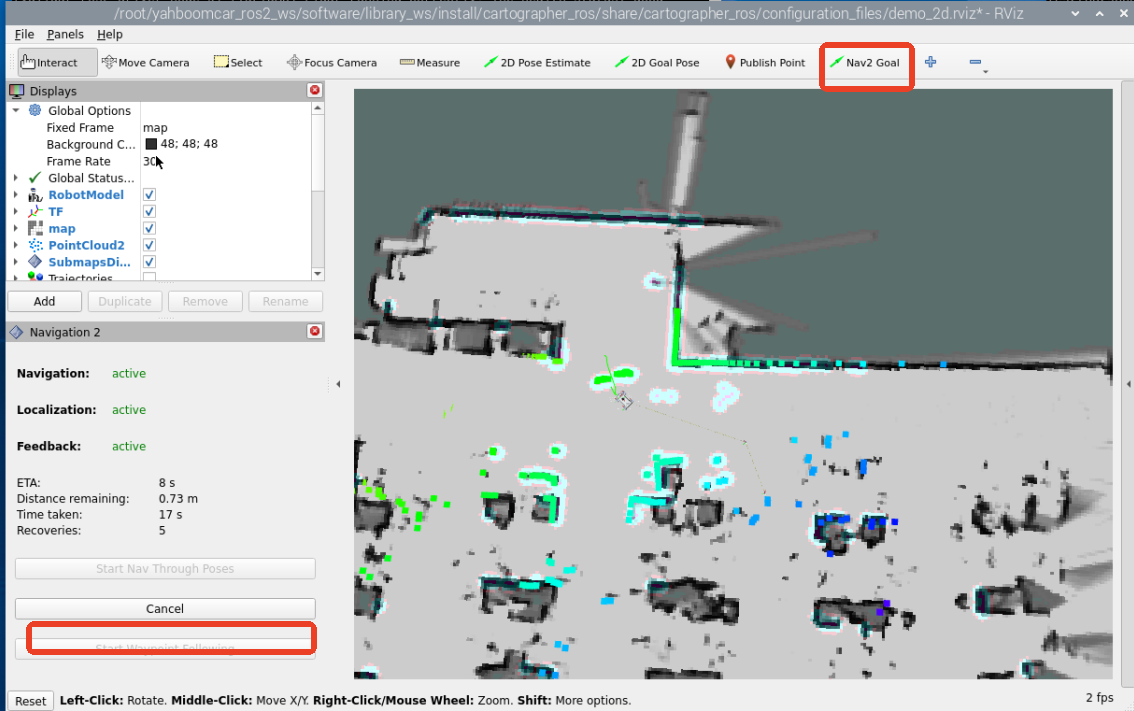
4. View the Node Communication Graph

Enter in the terminal:

xxxxxxxxxx
ros2 run rqt_graph rqt_graph

If the graph doesn't appear initially, select [Nodes/Topics (all)] and click the refresh button in the upper left corner.

rosgraph

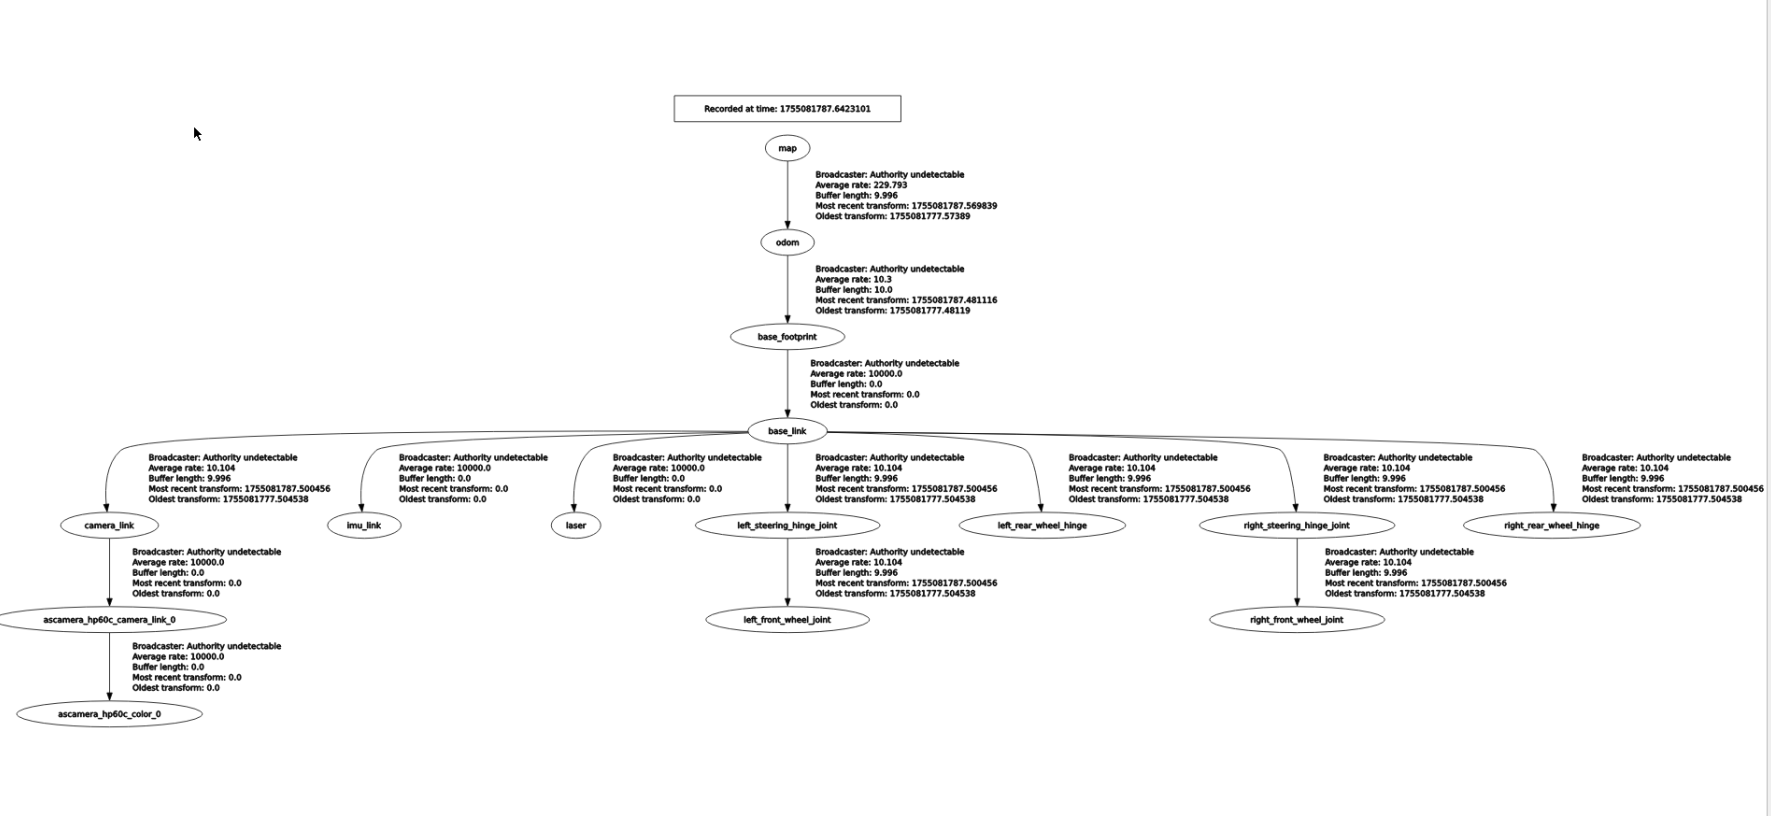
5. View the TF tree

Enter the terminal:

xxxxxxxxxx
ros2 run rqt_tf_tree rqt_tf_tree

image-20250813184320326

6. Principle Explanation

The key to fast re-localization navigation is replacing the default amcl positioning method in navigation2 with Cartographer's positioning method. All other details remain unchanged. The following explains the replacement method.

Source code location:

xxxxxxxxxx
~/yahboomcar_ros2_ws/yahboomcar_ws/src/yahboomcar_nav/launch/

Find the cartographer_localization.launch.py file in the launch directory, and its contents are as follows:

  • This file starts the cartographer node, replacing the default positioning method in navigation2. The default navigation2 startup file has been modified to remove the node that originally started the amcl positioning method, while the rest of the navigation stack remains unchanged.
xxxxxxxxxx
# Copyright (c) 2018 Intel Corporation
#
# Licensed under the Apache License, Version 2.0 (the "License");
# you may not use this file except in compliance with the License.
# You may obtain a copy of the License at
#
#     http://www.apache.org/licenses/LICENSE-2.0
#
# Unless required by applicable law or agreed to in writing, software
# distributed under the License is distributed on an "AS IS" BASIS,
# WITHOUT WARRANTIES OR CONDITIONS OF ANY KIND, either express or implied.
# See the License for the specific language governing permissions and
# limitations under the License.
​
import os
​
from ament_index_python.packages import get_package_share_directory
​
from launch import LaunchDescription
from launch.actions import DeclareLaunchArgument, GroupAction, SetEnvironmentVariable
from launch.conditions import IfCondition
from launch.substitutions import LaunchConfiguration, PythonExpression
from launch_ros.actions import LoadComposableNodes
from launch_ros.actions import Node
from launch_ros.descriptions import ComposableNode, ParameterFile
from nav2_common.launch import RewrittenYaml
​
​
def generate_launch_description():
    # Get the launch directory
    bringup_dir = get_package_share_directory('nav2_bringup')
​
    namespace = LaunchConfiguration('namespace')
    map_yaml_file = LaunchConfiguration('map')
    use_sim_time = LaunchConfiguration('use_sim_time')
    autostart = LaunchConfiguration('autostart')
    params_file = LaunchConfiguration('params_file')
    use_composition = LaunchConfiguration('use_composition')
    container_name = LaunchConfiguration('container_name')
    container_name_full = (namespace, '/', container_name)
    use_respawn = LaunchConfiguration('use_respawn')
    log_level = LaunchConfiguration('log_level')
​
    # Remove 'amcl' from lifecycle_nodes
    lifecycle_nodes = ['map_server']
​
    # Map fully qualified names to relative ones so the node's namespace can be prepended.
    # In case of the transforms (tf), currently, there doesn't seem to be a better alternative
    # https://github.com/ros/geometry2/issues/32
    # https://github.com/ros/robot_state_publisher/pull/30
    # TODO(orduno) Substitute with `PushNodeRemapping`
    #              https://github.com/ros2/launch_ros/issues/56
    remappings = [('/tf', 'tf'),
                  ('/tf_static', 'tf_static')]
​
    # Create our own temporary YAML files that include substitutions
    param_substitutions = {
        'use_sim_time': use_sim_time,
        'yaml_filename': map_yaml_file}
​
    configured_params = ParameterFile(
        RewrittenYaml(
            source_file=params_file,
            root_key=namespace,
            param_rewrites=param_substitutions,
            convert_types=True),
        allow_substs=True)
​
    stdout_linebuf_envvar = SetEnvironmentVariable(
        'RCUTILS_LOGGING_BUFFERED_STREAM', '1')
​
    declare_namespace_cmd = DeclareLaunchArgument(
        'namespace',
        default_value='',
        description='Top-level namespace')
​
    declare_map_yaml_cmd = DeclareLaunchArgument(
        'map',
        description='Full path to map yaml file to load')
​
    declare_use_sim_time_cmd = DeclareLaunchArgument(
        'use_sim_time',
        default_value='false',
        description='Use simulation (Gazebo) clock if true')
​
    declare_params_file_cmd = DeclareLaunchArgument(
        'params_file',
        default_value=os.path.join(bringup_dir, 'params', 'nav2_params.yaml'),
        description='Full path to the ROS2 parameters file to use for all launched nodes')
​
    declare_autostart_cmd = DeclareLaunchArgument(
        'autostart', default_value='true',
        description='Automatically startup the nav2 stack')
​
    declare_use_composition_cmd = DeclareLaunchArgument(
        'use_composition', default_value='False',
        description='Use composed bringup if True')
​
    declare_container_name_cmd = DeclareLaunchArgument(
        'container_name', default_value='nav2_container',
        description='the name of conatiner that nodes will load in if use composition')
​
    declare_use_respawn_cmd = DeclareLaunchArgument(
        'use_respawn', default_value='False',
        description='Whether to respawn if a node crashes. Applied when composition is disabled.')
​
    declare_log_level_cmd = DeclareLaunchArgument(
        'log_level', default_value='info',
        description='log level')
​
    load_nodes = GroupAction(
        condition=IfCondition(PythonExpression(['not ', use_composition])),
        actions=[
            Node(
                package='nav2_map_server',
                executable='map_server',
                name='map_server',
                output='screen',
                respawn=use_respawn,
                respawn_delay=2.0,
                parameters=[configured_params],
                arguments=['--ros-args', '--log-level', log_level],
                remappings=remappings),
            Node(
                package='nav2_lifecycle_manager',
                executable='lifecycle_manager',
                name='lifecycle_manager_localization',
                output='screen',
                arguments=['--ros-args', '--log-level', log_level],
                parameters=[{'use_sim_time': use_sim_time},
                            {'autostart': autostart},
                            {'node_names': lifecycle_nodes}])
        ]
    )
​
    load_composable_nodes = LoadComposableNodes(
        condition=IfCondition(use_composition),
        target_container=container_name_full,
        composable_node_descriptions=[
            ComposableNode(
                package='nav2_map_server',
                plugin='nav2_map_server::MapServer',
                name='map_server',
                parameters=[configured_params],
                remappings=remappings),
            ComposableNode(
                package='nav2_lifecycle_manager',
                plugin='nav2_lifecycle_manager::LifecycleManager',
                name='lifecycle_manager_localization',
                parameters=[{'use_sim_time': use_sim_time,
                             'autostart': autostart,
                             'node_names': lifecycle_nodes}]),
        ],
    )
​
    # Create the launch description and populate
    ld = LaunchDescription()
​
    # Set environment variables
    ld.add_action(stdout_linebuf_envvar)
​
    # Declare the launch options
    ld.add_action(declare_namespace_cmd)
    ld.add_action(declare_map_yaml_cmd)
    ld.add_action(declare_use_sim_time_cmd)
    ld.add_action(declare_params_file_cmd)
    ld.add_action(declare_autostart_cmd)
    ld.add_action(declare_use_composition_cmd)
    ld.add_action(declare_container_name_cmd)
    ld.add_action(declare_use_respawn_cmd)
    ld.add_action(declare_log_level_cmd)
​
    # Add the actions to launch all of the localiztion nodes
    ld.add_action(load_nodes)
    ld.add_action(load_composable_nodes)
​
    return ld

Find the navigation_cartodwb_launch.py file in the launch directory. The contents are as follows:

The following nodes are started here:

  • base_link_to_laser_tf: Publishes static TF transforms;
  • map_yaml_path: Loads the map file. The default value is /root/yahboomcar_ros2_ws/yahboomcar_ws/src/yahboomcar_navmaps/yahboom_map.yaml, which specifies the path to the map file to load;
  • cartographer_bringup_launch.py: Launches the Cartographer positioning-only launch file. The file is located at /root/yahboomcar_ros2_ws/yahboomcar_ws/src/yahboomcar_nav/launch/cartographer_bringup_launch.py
  • ORIN , located in /home/jetson/
  • RDK X5 , located in /home/sunrise/

A navigation parameter configuration file, cartoteb_nav_params.yaml, is also loaded.

xxxxxxxxxx
import os
from ament_index_python.packages import get_package_share_directory
from launch import LaunchDescription
from launch.actions import DeclareLaunchArgument
from launch.actions import IncludeLaunchDescription
from launch.launch_description_sources import PythonLaunchDescriptionSource
from launch.substitutions import LaunchConfiguration
from launch_ros.actions import Node
​
def generate_launch_description():
    package_path = get_package_share_directory('yahboomcar_nav')
​
    use_sim_time = LaunchConfiguration('use_sim_time', default='false')
    namespece = LaunchConfiguration('namespece', default='')
    map_yaml_path = LaunchConfiguration(
        'maps', default=os.path.join('/root/yahboomcar_ros2_ws/yahboomcar_ws/src/yahboomcar_nav', 'maps', 'yahboomcar.yaml')) 
    nav2_param_path = LaunchConfiguration('params_file', default=os.path.join(
        package_path, 'params', 'cartoteb_nav_params.yaml'))
​
    return LaunchDescription([
        DeclareLaunchArgument('use_sim_time', default_value=use_sim_time,
                              description='Use simulation (Gazebo) clock if true'),
        DeclareLaunchArgument('namespece', default_value=namespece,
                              description='Use simulation (Gazebo) clock if true'),
        DeclareLaunchArgument('maps', default_value=map_yaml_path,
                              description='Full path to map file to load'),
        DeclareLaunchArgument('params_file', default_value=nav2_param_path,
                              description='Full path to param file to load'),
​
        IncludeLaunchDescription(
            PythonLaunchDescriptionSource(
                [package_path, '/launch', '/cartographer_bringup_launch.py']),
            launch_arguments={
                'map': map_yaml_path,
                'use_sim_time': use_sim_time,
                'namespece': namespece,
                'params_file': nav2_param_path}.items(),
        ),
    ])
​


Navigation2 multi-point navigation avoid
RTAB-Map mapping

COMPANY

  • About us
  • Team Style
  • Blog

LEARNING & EXPLORATION

  • Tutorials
  • Edge AI hardware
  • Educational robots
  • Embedded intelligent hardware

WHERE TO BUY

  • Yahboom Online Store
  • Amazon
  • Alibaba
  • AliExpress
  • Mercado

TECHNOLOGY SUPPORT

  • Email: support@yahboom.com

BE A DISTRIBUTOR

  • Email: sales@yahboom.com
QR Code

Copyright © 2017-2026 Yahboom. All Rights Reserved.

EN/中文