yahboom
HomeLearn
Solution
Blog
Online Store
About Us
EN/中文
ROSMASTER M3 PRO📖
0.Configuration and Operation Guide
  • 1. Quick start handle to control the car
  • 2. Log in to the car and view the code
  • 3. Robotic Arm Calibration
  • 4. Enter the Docker (Jetson-Nano and Raspberry Pi 5 users, see here)
  • 5. Assembly video
  • 6. Modify the firmware parameters of the car control board
  • 7. Frequently Asked Questions and Precautions
  • 8. Precautions for DIY Robotic Arm
1.Chassis Control Course
  • 1.ROS control
  • 2.Handle control
  • 3.Keyboard control
  • 4.Angular velocity calibration
  • 5.Line velocity calibration
  • 6.Line patrol automatic driving
  • 7.Patrol
2.Lidar Course
  • 1.Lidar introduction and use
  • 2.Dual Lidar fusion
  • 3.Lidar obstacle avoidance
  • 4.Lidar tracking
  • 5.Lidar guard
  • 6.Gmapping-SLAM mapping
  • 7.Cartographer-SLAM mapping
  • 8.slam_toolbox mapping
  • 9.Navigation2 single-point navigation avoid
  • 10.Navigation2 multi-point navigation avoid
  • 11.Repositioning navigation
  • 12.RTAB-Map mapping
  • 13.RTAB-Map navigation
  • 14.APP mapping navigation
  • 15.Machine code handling
  • 16.Color block transport
  • 17.Navigation via Pose-Constrained Visual Relocalizationnew
3.Depth Camera Course
  • 1.Dabai_DCW2 camera introduction
  • 2.Depth pseudo-color image
  • 3.Depth camera distance measurement
  • 4.Wood block volume measurement
  • 5.Mediapipe gesture recognition
  • 6.Edge detection
  • 7.YOLOv8 object detection
  • 8.Deep learning object tracking
  • 9. Transformer Model Tracking Algorithmnew
4.Robotic Arm and 3D Space Gripping Course
  • 1.Robotic arm solution
  • 2.Robotic arm chassis linkage control
  • 3.Machine code ID sorting
  • 4.Sorting height abnormality machine code
  • 5.Tracking and gripping machine code
  • 6.Color block color sorting
  • 7.Sorting height abnormality color block
  • 8.Tracking and gripping color block
  • 9.Wood block shape sorting
  • 10.KCF tracking and gripping objects
  • 11.Medipipe gesture ID sorting machine code
  • 12.Mediapipe gesture height sorting machine code
  • 13.Desktop tracking and gripping machine code
  • 14.3D tracking machine code
  • 15.Line patrol and obstacle removal
5.Road network planning and navigationnew
  • 1. Introduction To Road Network Planning
  • 2. Build A Pose Map
  • 3. Road Network Annotation
  • 4. Planning And Navigation Between Waypoints
  • 5. Road Network Navigation In Any Pose
  • 6. Path Re-planning
6.OpenClaw Basic Coursenew
  • 1. Introduction to OpenClaw
  • 2. OpenClaw Core Concepts
  • 3. OpenClaw API-KEY Configuration
  • 4. OpenClaw Switch Models
  • 5. OpenClaw System Prompt Words
  • 6. OpenClaw Common CLI Commands
7.OpenClaw Interaction Methodnew
  • 1. OpenClaw Webchat Interaction
  • 2. OpenClaw Tui Interaction
  • 3. OpenClaw Voice Dialogue Interaction
  • 4. OpenClaw WhatsApp Interaction
8.OpenClaw Developmentnew
  • 1. OpenClaw connects to the MCP interface of the robot
  • 2. Robot CLI Command Tool
  • 3. Robot control plugin tool
  • 4. Reply bridge plugin tool
  • 5. OpenClaw multimodal vision
  • 6. OpenClaw chassis control
  • 7. OpenClaw robotic arm control
  • 8. OpenClaw skills development
  • 9. OpenClaw timed tasks
  • 10. OpenClaw multi-agent intelligent agent
  • 11. OpenClaw active interaction
  • 12. OpenClaw vector memory
9.OpenClaw Embodied intelligent applicationnew
  • 1. OpenClaw target tracking
  • 2. OpenClaw robotic arm tracking and grasping
  • 3. OpenClaw robotic arm fixed-point placement
  • 4. OpenClaw garbage sorting
  • 5. OpenClaw slam mapping and navigation
  • 6. OpenClaw navigation transfer
  • 7. OpenClaw machine code clip
  • 8. OpenClaw color line patrol
  • 9. OpenClaw visual distance measurement
10.OpenClaw scenario sandboxnew
  • 1. Map description and prop placement
  • 2. Build sand table map
  • 3. Visual relocation markers
  • 4. Map mapping markers
  • 5. OpenClaw scenario sandbox comprehensive case
11.AI Model Basics
  • 1.AI large model types and principles
  • 2.RAG retrieval enhancement and model training samples
  • 3.Embodied intelligent robot system architecture
  • 4.Embodied intelligent functions core source code
12.AI Model Development
  • 01.Register a model service provider account
  • 02. Configuring API-KEY
  • 03. Introduction to Dify
  • 04. Basic Dify Features
  • 05. AI Large Model Development - chatbot
  • 06. Deploy the RAG knowledge base
  • 07. RAG knowledge base + chatbot
  • 08. AI agent workflow
  • 09. Custom wake-up response
  • 10. Core module testing tools
13.AI Large Model (Text Version)
  • 1.Semantic understand instruction following
  • 2.Multimodal visual understand
  • 3.Multimodal visual understand+robotic arm grab
  • 4.Multimodal visual understand+SLAM navigation
  • 5.Robotic arm grab+Multimodal visual understand+SLAM navigation
  • 6.Intention estimation
14.AI Large Model(Voice Version)
  • 1.Semantic understand instruction following
  • 2.Multimodal visual understand
  • 3.Multimodal visual understand+robotic arm grab
  • 4.Multimodal visual understand+SLAM navigation
  • 5.Robotic arm grab+Multimodal visual understand+SLAM navigation
  • 6.Intention estimation
15.Mediapipe Visual Course
  • 1.Hand detection
  • 2.Posture detection
  • 3.Overall detection
  • 4.Facial Landmark Detection
  • 5.Face detection
  • 6.Face special effects
  • 7.3D object recognition
  • 8.Brush
  • 9.Finger control
  • 10.Palm target positioning
  • 11.Fingertip trajectory recognition
  • 12.Fingertip gesture control robotic arm
  • 13.Gesture grabbing and releasing objects
  • 14.Finger control robotic arm
  • 15.Medipipe gesture control robotic arm action group
16.MoveIt2 Simulation Course
  • 1.MovelT2 configuration
  • 2.MovelT2 simulation-reality linkage
  • 3.Random movement
  • 4.Forward kinematics design
  • 5.Inverse kinematics design
  • 6.Cartesian path
  • 7.Trajectory planning
  • 8.Collision detection
  • 9.Scene design
17.Multi-vehicle Course
  • 1.Multi-vehicle chassis control
  • 2.Multi-vehicle robotic arm control
  • 3.Multi-vehicle navigation
  • 4.Multi-vehicle formation
18.Control Board Course
  • 1.Development environment setup
  • 2.Control board STM32 basic routine
  • 3.Control board micro_ros basic routine
19.Docker Course
  • 1、Docker overview and docker installation
  • 2、Common commands for docker image containers
  • 3、Docker images deeply understand and publish images
  • 4、Docker hardware interaction and data processing
  • 5、Enter the bot's docker container
  • 6、Robot development environment construction in Docker
20.Image Processing Basics Course
  • 1. Introduction to Open Source CV
  • 2. Image reading and display
  • 3. Image writing
  • 4. Image quality
  • 5. Pixel Operation
  • 6. Image zoom
  • 7. Image cutting
  • 8. Image translation
  • 9. Image Mirroring
  • 10. Affine Transformation
  • 11. Image Rotation
  • 12. Perspective Transformation
  • 13. Grayscale processing
  • 14. Image Binarization
  • 15. Edge Detection
  • 16. Line drawing
  • 17. Rectangle and circle drawing
  • 18. Drawing text and pictures
21.Main Control Course
Jetson Nano B01
  • 1. Introduction to the Jetson Nano B01 SUB Board
  • 2. Burn the system image
  • 3. Re-read the memory card or USB drive that has been burned
  • 4. Startup system
  • 5. Jetson Nano B01 System and Desktop Introduction
  • 6. Memory card or USB flash drive expansion
  • 7. Network Configuration
  • 8. SSH remote login & file transfer
  • 9. VNC Remote Login
  • 10. Jetson Nano B01 system backup
  • 11. Jetson Nano Swap space increased
  • 12. Installation and use of Jtop
Jetson Orin Nano_NX
  • 1.Jetson Orin board introduction
  • 2.Restore the factory image system
  • 3.Backup SSD system
  • 4.SSD expansion
  • 5.Network configuration
  • 6.SSH remote login
  • 7.VNC remote control
  • 8.Remote file transfer
  • 9.Jtop tool
  • 10.Exchange space expansion
Raspberry Pi
  • 1. Introduction to Raspberry PI 5
  • 2. Raspberry PI system installation and backup
  • 3. Powering the Raspberry PI 5
  • 4. Startup of Raspberry PI 5
  • 5. Update and upgrade operating system
  • 6. Introduction to raspi-config tool
  • 7. config.txt file description
  • 8. Network Configuration
  • 9. remote access
  • 10. Transfer files remotely
  • 11. Set display resolution and rotation
  • 12. Set screen to sleep
  • 13. Play audio and video
  • 14. Using USB camera
  • 15. Using MIPI camera
  • 16. Get real-time temperature of Raspberry Pi
22.Linux System Course
  • 1.Introduction to Linux system
  • 2.Ubuntu file system
  • 3.Ubuntu common commands
  • 4.Ubuntu common editors
  • 5.Ubuntu software operation commands
  • 6.Virtual machine installation
  • 7.SSH remote control
  • 8.VNC remote control
  • 9.Transfer files remotely
  • 10.Driver library and communication
  • 11.Static IP and hotspot mode
  • 12.Bind device ID
  • 13.Capacity expansion and resource allocation
  • 14.Update system software sources
  • 15.Set root user password
  • 16.sudo free password
  • 17.Connect to WiFi network
  • 18.View system version
  • 19.Customized service management
  • 20.Back up system image
23.ROS2 Basic Course
  • 1.Introduction to ROS2
  • 2.ROS2 install Humble
  • 3.ROS2 development environment
  • 4.ROS2 workspace
  • 5.ROS2 function package
  • 6.ROS2 node
  • 7.ROS2 topic communication
  • 8.ROS2 service communication
  • 9.ROS2 action communication
  • 10.ROS2 custom interface message
  • 11.ROS2 parameter service case
  • 12.ROS2 meta-function package
  • 13.ROS2 distributed communication
  • 14.ROS2 DDS
  • 15.ROS2 time related API
  • 16.ROS2 common command tools
  • 17.ROS2 rviz2 use
  • 18.ROS2 rqt toolbox
  • 19.ROS2 Launch startup file configuration
  • 20.ROS2 recording and playback tool
  • 21.ROS2 URDF model
  • 22.ROS2 Gazebo simulation platform
  • 23.ROS2 TF2 coordinate transformation
Download
  • Mapping_APP(iOS_Android)
  • Robot_Image_System_File
  • Code-Firmware
  • Instruction_Manual
  • VM_File
  • Software_Tools
  • Firmware_DriverFile
  • 3D_Model_File
  • ROS2_Basic_VM
  • Other_Annex
Download ZIP

Welcome to ROSMASTER M3 PRO repository

12.RTAB-Map mapping

RTAB-Map Mapping

RTAB-Map Mapping1. Contents1.1 Introduction to RTAB-Map1.2. RTAB-Map Working Principle2. Preparation3. Program Startup4. Instruction analysis

1. Contents

This section explains how to combine a vehicle chassis, LiDAR, and a depth camera to implement RTAB-Map mapping.

1.1 Introduction to RTAB-Map

RTAB-MAP (Real-Time Appearance-Based Mapping) is a vision-based real-time simultaneous localization and mapping (SLAM) algorithm primarily used for mapping and navigation tasks in fields such as robotics and augmented reality. RTAB-Map has the following features.

  • Appearance-based loop closure detection: Primarily uses visual features for location recognition
  • Real-time performance: Real-time performance is ensured through memory management
  • Multi-sensor support: Supports RGB-D cameras, stereo cameras, and monocular cameras
  • 3D map construction: Creates dense 3D point cloud maps

1.2. RTAB-Map Working Principle

  • Front-end processing
  • Acquire image data from sensors
  • Extract visual features (such as SIFT, SURF, ORB, etc.)
  • Calculate the pose transformation between the current frame and the previous frame
  • Back-end optimization
  • Optimize the pose graph using graph optimization techniques (such as g2o)
  • Detect loop closures (when the robot returns to a previously visited location)
  • Memory management
  • Utilizes a working memory (WM) and long-term memory (LTM) mechanism
  • Recent data is stored in the WM, while older data is transferred to the LTM
  • When a loop closure is detected, the relevant data is transferred from the LTM back to the WM

This section requires entering commands in the terminal. The terminal you open depends on your motherboard type. This lesson uses the Raspberry Pi 5 as an example. For Raspberry Pi and Jetson-Nano boards, you need to open a terminal on the host computer and enter the command to enter the Docker container. Once inside the Docker container, enter the commands mentioned in this section in the terminal. For instructions on entering the Docker container from the host computer, refer to this product tutorial [Configuration and Operation Guide]--[Enter the Docker (Jetson Nano and Raspberry Pi 5 users, see here)].

For Orin boards, simply open a terminal and enter the commands mentioned in this lesson.

2. Preparation

Due to performance limitations, the Raspberry Pi 5 and Jetson Nano cannot smoothly run the RTAB-Map algorithm in Docker on the motherboard. Therefore, a virtual machine is required to facilitate this. To enable distributed communication between the vehicle and the virtual machine, two steps are required:

  • Both systems must be on the same local area network. This is most easily achieved by connecting to the same Wi-Fi network.
  • Both systems must have the same ROS_DOMAIN_ID. The default ROS_DOMAIN_ID for the vehicle is 30, and the default ROS_DOMAIN_ID for the virtual machine is also 30. If they are different, you need to modify the virtual machine's ROS_DOMAIN_ID. To do this, modify the ~/.bashrc file and change the ROS_DOMAIN_ID value to match the vehicle's. Save and exit the file, then enter the command source ~/.bashrc to refresh the environment variables.
  • To verify distributed communication between the two systems, enter ros2 node list on the virtual machine. If you see /YB_Node, communication is established.

The Orin motherboard can be run directly on the motherboard.

3. Program Startup

First, enter the following command in the robot terminal to start the chassis, radar, and camera.

xxxxxxxxxx
ros2 launch M3Pro_navigation rtab_bringup.launch.py

Then, open a terminal in the virtual machine and enter the following command to control the robotic arm to move to the mapping pose.

xxxxxxxxxx
ros2 topic pub /arm6_joints arm_msgs/msg/ArmJoints {"joint1: 90,joint2: 180,joint3: 5,joint4: 0,joint5: 90,joint6: 0,time: 1500"} --once

Open a terminal in the virtual machine and enter the following command to start RTAB-Map mapping.

xxxxxxxxxx
ros2 launch rtabmap_launch rtabmap.launch.py rgb_topic:=/camera/color/image_raw depth_topic:=/camera/depth/image_raw camera_info_topic:=/camera/color/camera_info odom_topic:=/odom frame_id:=base_link use_sim_time:=false rviz:=true rtabmap_viz:=false approx_sync:=true approx_sync_max_interval:=0.01 qos:=2 visual_odometry:=false icp_odometry:=false subscribe_scan:=true sync_queue_size:=50 topic_queue_size:=50 rtabmap_args:="--delete_db_on_start"

After successful startup, the image below appears.
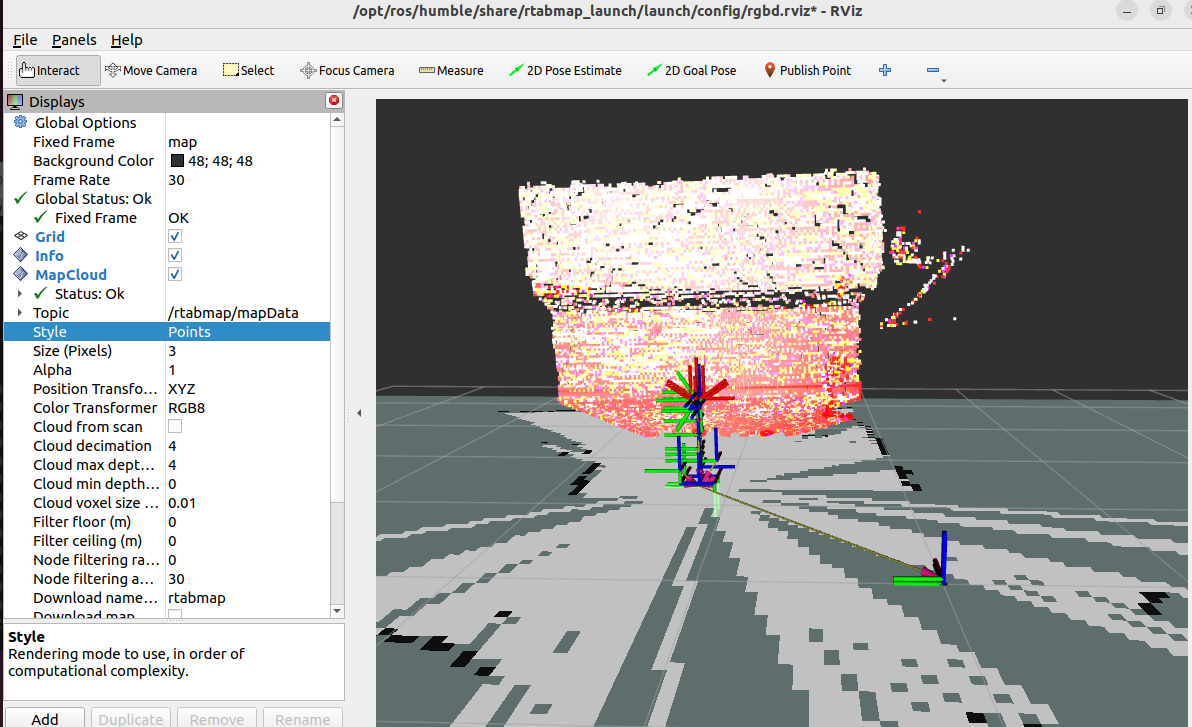
image-20250702104455365

Modify the settings in rviz to change the point cloud display to RGB, as shown below.
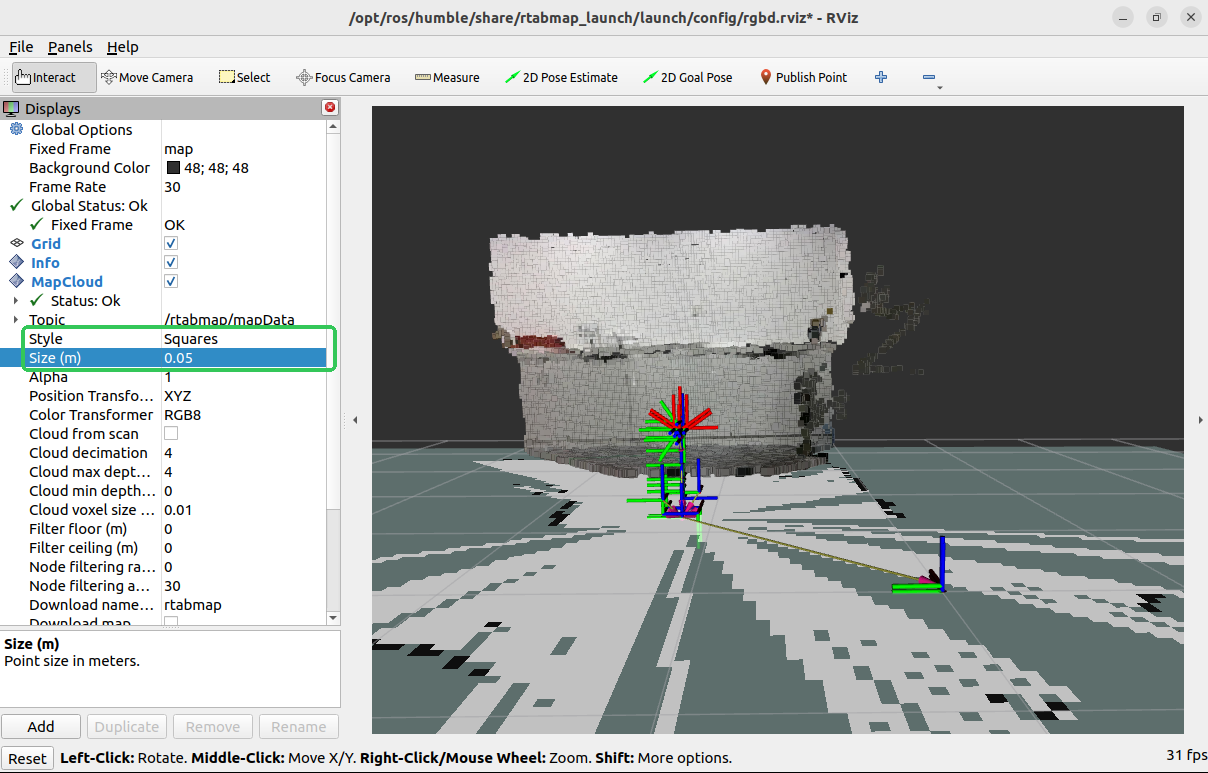
image-20250702104421539

Finally, open a terminal in the virtual machine and enter the following command to enable keyboard control of the car's movement and mapping.

xxxxxxxxxx
ros2 run yahboomcar_ctrl yahboom_keyboard

Here, control the car's movement as slowly as possible. Press the [z] key to reduce the linear velocity and deceleration. Then, press the [i] key to move the car forward, the [,] key to move it backward, the [j] key to rotate the car left, and the [l] key to rotate the car right.

As shown below, the map is complete.
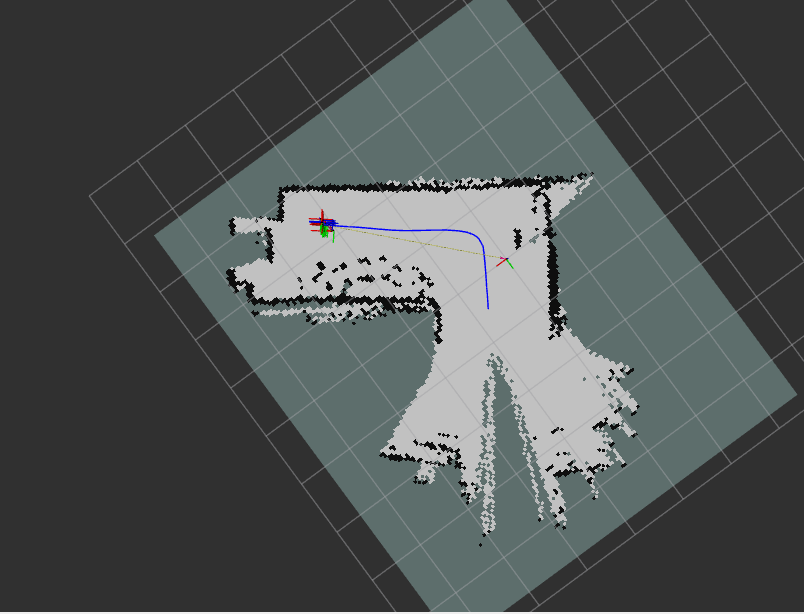
image-20250702115425093

After the map is created, press Ctrl+C in the terminal where you launched rtabmap.launch.py to close the program. The map will be saved in /home/yahboom/.ros/rtabmap.db.

4. Instruction analysis

RTAB-Map mapping instructions are as follows:

xxxxxxxxxx
ros2 launch rtabmap_launch rtabmap.launch.py rgb_topic:=/camera/color/image_raw depth_topic:=/camera/depth/image_raw camera_info_topic:=/camera/color/camera_info odom_topic:=/odom frame_id:=base_link use_sim_time:=false rviz:=true rtabmap_viz:=false approx_sync:=true approx_sync_max_interval:=0.01 qos:=2 visual_odometry:=false icp_odometry:=false subscribe_scan:=true sync_queue_size:=50 topic_queue_size:=50 rtabmap_args:="--delete_db_on_start"
  • rgb_topic: Color image topic

  • depth_topic: Depth image topic

  • camera_info_topic: Color camera internal reference topic

  • odom_topic: Odometry topic

  • frame_id: Robot base coordinate system name

  • use_sim_time: Whether to use simulation time

  • rviz: Whether to enable rviz display

  • rtabmap_viz: Whether to enable rtabmap plugin display

  • approx_sync: Whether to enable approximate time synchronization

  • approx_sync_max_interval: Maximum allowed synchronization time difference

  • visual_odometry: Whether to enable visual odometry

  • icp_odometry: Whether to enable ICP point cloud matching odometry

  • subscribe_scan: Whether to subscribe to lidar data

  • sync_queue_size: Time synchronization queue size

  • topic_queue_size: Single topic subscription queue size

  • rtabmap_args: Parameters passed directly to the RTAB-MAP core. Optional parameters include the following:

    • --delete_db_on_start:Clears the previous map database at startup.
    • --Mem/IncrementalMemory false:Disables incremental memory mode (for pure positioning).
    • --Rtabmap/DetectionRate 2:Sets the closed-loop detection rate (Hz).
  • qos:Quality of Service (QoS policy). Optional parameters include:

    • 0: SYSTEM_DEFAULT
    • 1: RELIABLE (guaranteed delivery)
    • 2: BEST_EFFORT (possible loss).
Repositioning navigation
RTAB-Map navigation

COMPANY

  • About us
  • Team Style
  • Blog

LEARNING & EXPLORATION

  • Tutorials
  • Edge AI hardware
  • Educational robots
  • Embedded intelligent hardware

WHERE TO BUY

  • Yahboom Online Store
  • Amazon
  • Alibaba
  • AliExpress
  • Mercado

TECHNOLOGY SUPPORT

  • Email: support@yahboom.com

BE A DISTRIBUTOR

  • Email: sales@yahboom.com
QR Code

Copyright © 2017-2026 Yahboom. All Rights Reserved.

EN/中文