Welcome to ROSMASTER M3 PRO repository
1.MovelT2 configuration
MoveIt2 Configuration
Preface: Raspberry Pi 5 and Jetson Nano run ROS in Docker, so the performance of running MoveIt2 is generally poor. Users of Raspberry Pi 5 and Jetson Nano boards are advised to run MoveIt2 examples in a virtual machine. Orin motherboards run ROS directly on the motherboard, so users of Orin boards can run MoveIt2 examples directly on the motherboard, using the same instructions as running in a virtual machine. This section uses running in a virtual machine as an example.
1. Content Description
This section explains how to configure MoveIt2 and generate the parameter files and launch files required for simulation.
2. Introduction to MoveIt2
MoveIt 2 is the next generation of MoveIt , designed for ROS 2 (Robot Operating System 2) . It is an open-source framework for robot motion planning, manipulation, 3D perception, kinematics, collision detection, and mission planning. It is widely used in industrial robots, service robots, mobile manipulators, as well as in scientific research and education.
2.1. Differences from MoveIt
| characteristic | MoveIt | MoveIt2 |
|---|---|---|
| ROS version | ROS1 | ROS2 |
| Real-time | Limited support | Better real-time performance |
| Cross-platform support | Main Linux | Supports Linux, Windows, and macOS (ROS 2 feature) |
| Motion Planning Interface | ActionLib (ROS 1) | Action (ROS 2) |
| Default planner | OMPL | OMPL + More optimization options |
2.2. MoveIt2 Core Functions
- Motion Planning : Supports multiple planning algorithms (such as OMPL, CHOMP, STOMP, etc.) to generate collision-free motion trajectories.
- Inverse Kinematics (IK) : Calculates the robot's joint angles to achieve the target pose.
- Collision Checking : Real-time collision detection based on FCL (Flexible Collision Library) .
- 3D Perception Integration : Supports point cloud and depth camera (such as RealSense, Kinect) data.
- Manipulation : Provides a high-level interface for grabbing and placing objects.
- Task Planning : Combines Behavior Trees for high-level task orchestration.
2.3. Install MoveIt2
MoveIt2 has been installed in the virtual machine, so there is no need to install it here. If you need to install MoveIt2 in a new environment, enter the following command to install it.
xxxxxxxxxx#Change the <distro> below to your own ROS version. It is recommended to use humble (22.04) or Rolling (24.04)sudo apt install ros-<distro>-moveit -y
2.4. Reference Websites
MoveIt2 source code:
GitHub - moveit/moveit2: 🤖 MoveIt for ROS 2
Official tutorial documentation:
MoveIt 2 Documentation — MoveIt Documentation: Humble documentation
3. Program startup
First, create a folder under the src folder of the ros workspace to store the files generated after MoveIt configuration. Taking the moveit2_ws workspace in the virtual machine as an example, enter the virtual machine terminal.
xxxxxxxxxxcd moveit2_ws/srcmkdir test_config
Enter the following command in the virtual machine terminal to start MoveIt2 configuration,
xxxxxxxxxxros2 run moveit_setup_assistant moveit_setup_assistant
After the program starts, the following configuration screen appears.
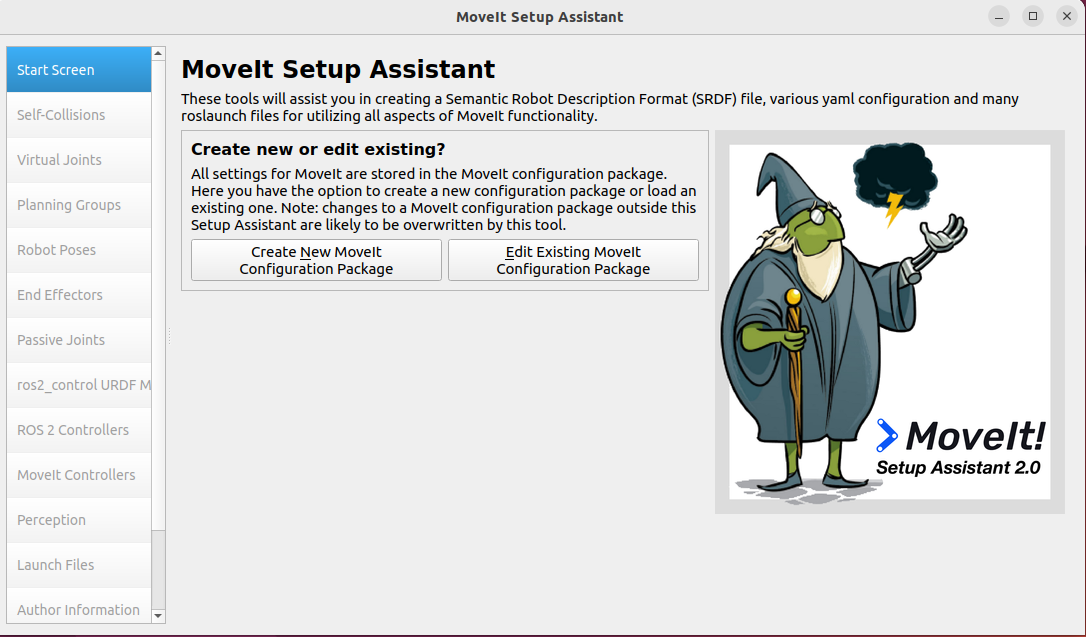
Click [Create New MoveIt Configuration Package] and the following screen will appear.
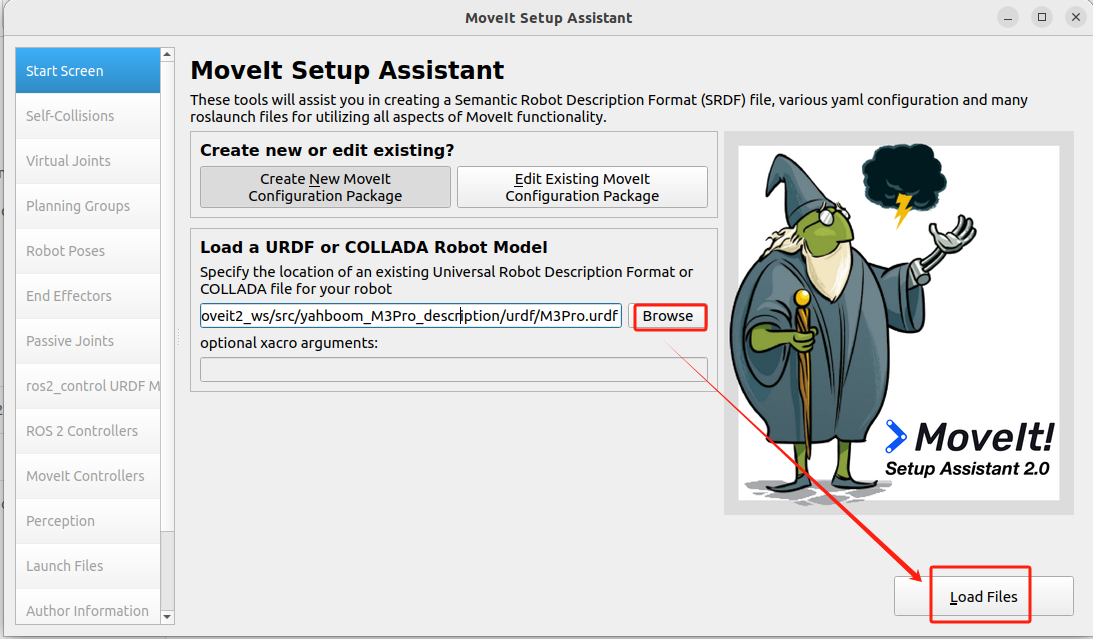
Click [Browse] and select the M3Pro URDF file. The file directory is in /home/yahboom/moveit2_ws/src/yahboom_M3Pro_description/urdf. After selecting, click [Load Files]. The program will then load the selected URDF file. After loading, the following screen will appear, with the loaded M3Pro car model displayed on the right.
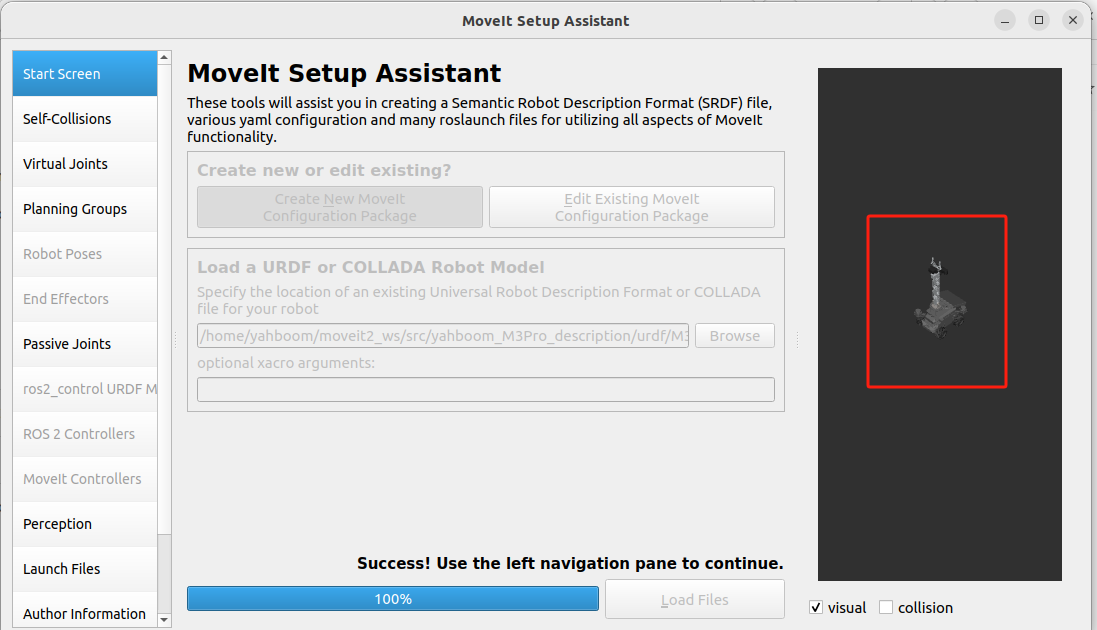
Then click [Self-Collisions] in the left configuration bar. This step is to configure self-collision detection, as shown in the figure below. Click [Generate Collisions Matrix] to complete the configuration.
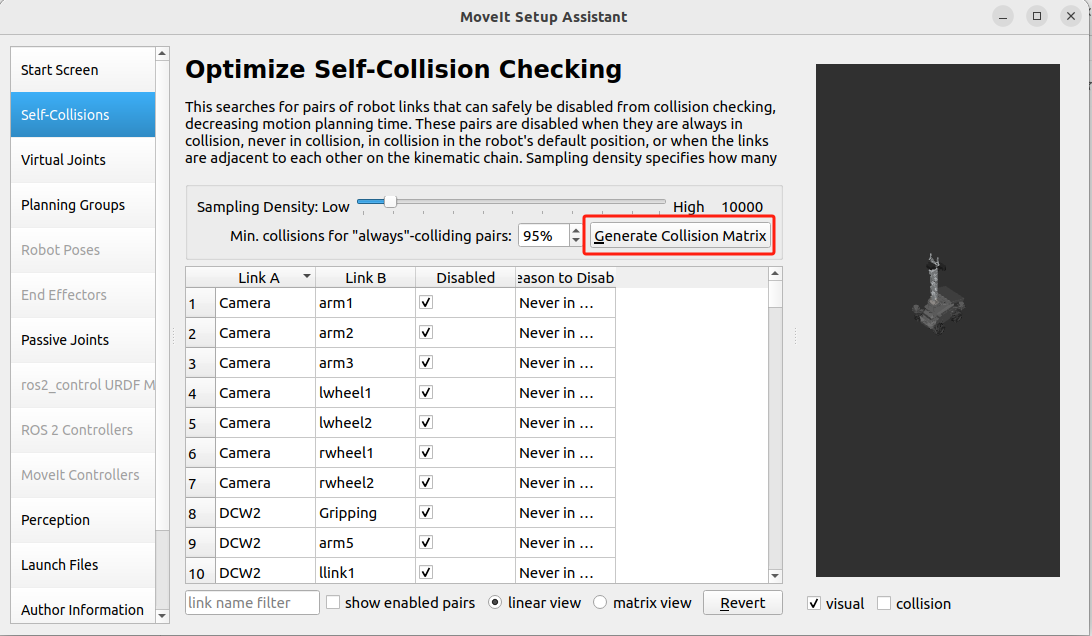
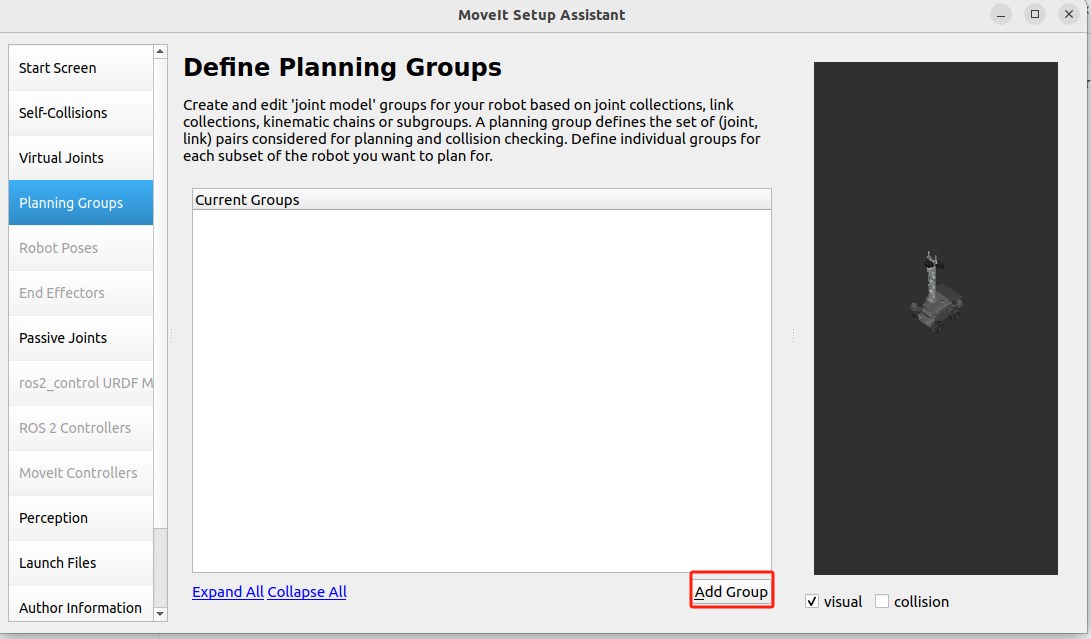
Next, click [Planning Groups] in the left configuration bar. This step is to create a planning group. Click [Add Group] to create the first planning group, as shown below.
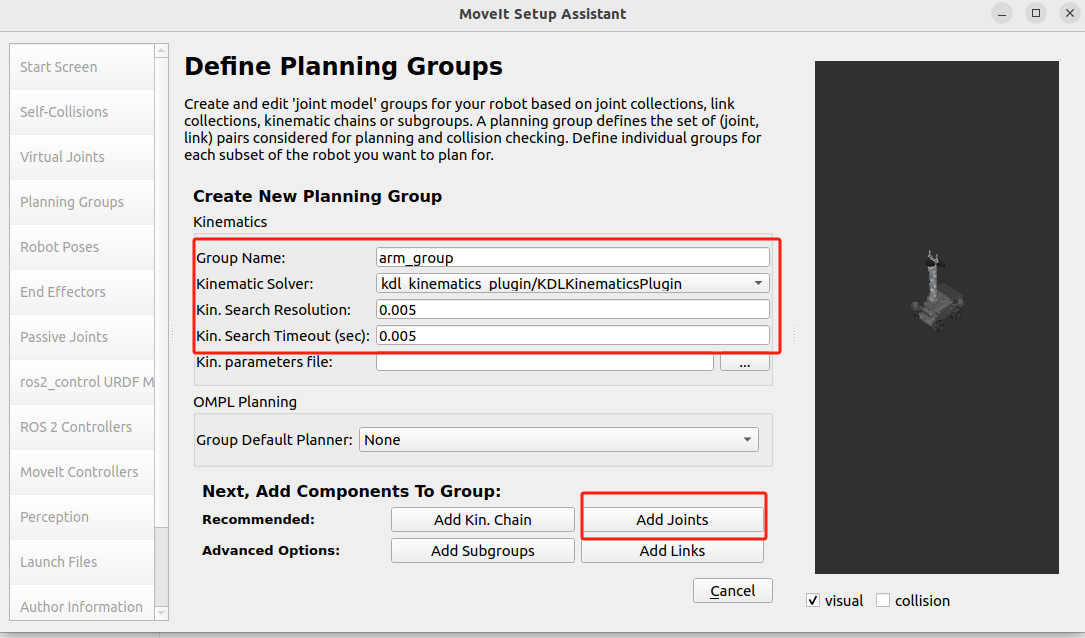
Then create the arm_group planning group to control the robotic arm, as shown in the figure below.
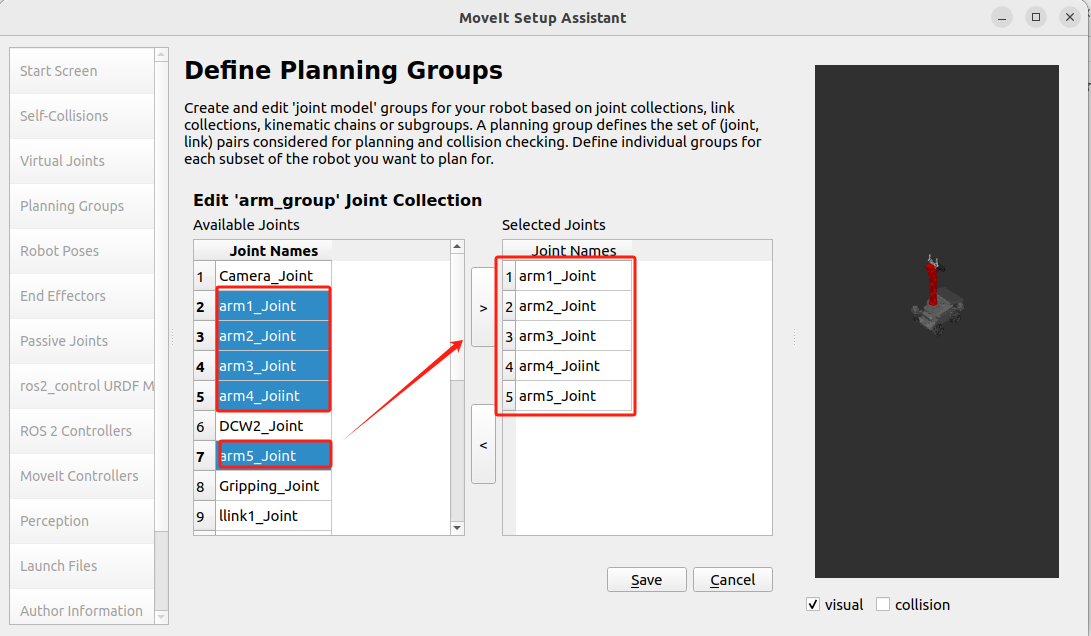
Then, we need to add this planning group. Click [Add Joints] below to enter the adding interface. In the adding interface, we select arm_Joint1 to arm_Joint5 on the left, click > to complete the addition, and click [Save] to save and exit.
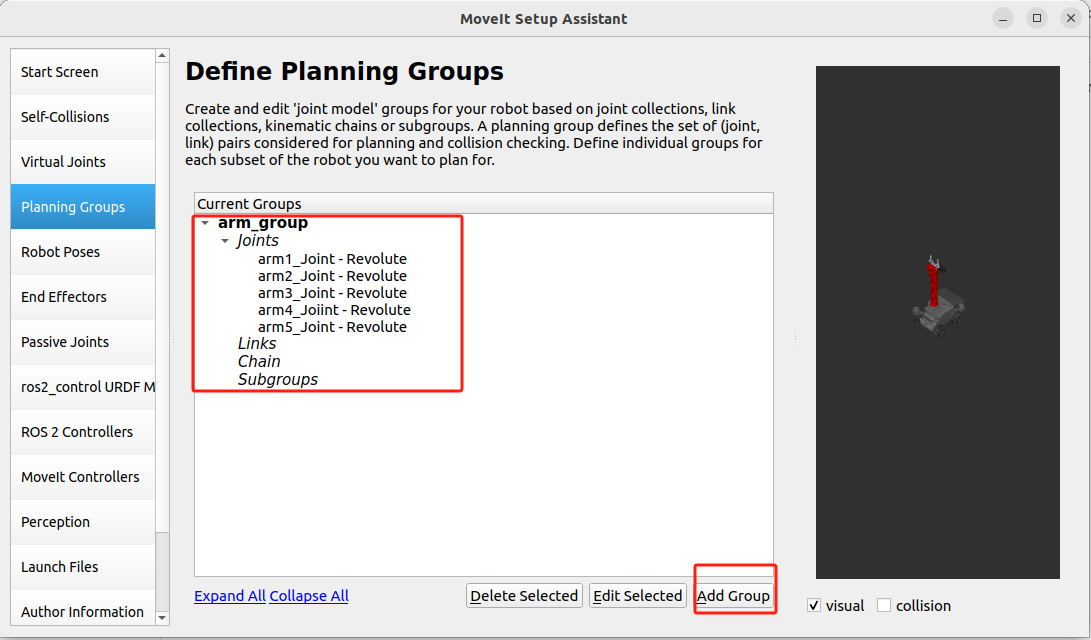
Complete the arm_group planning group settings as shown below, then click [Add Group] to add the planning group of the gripper.
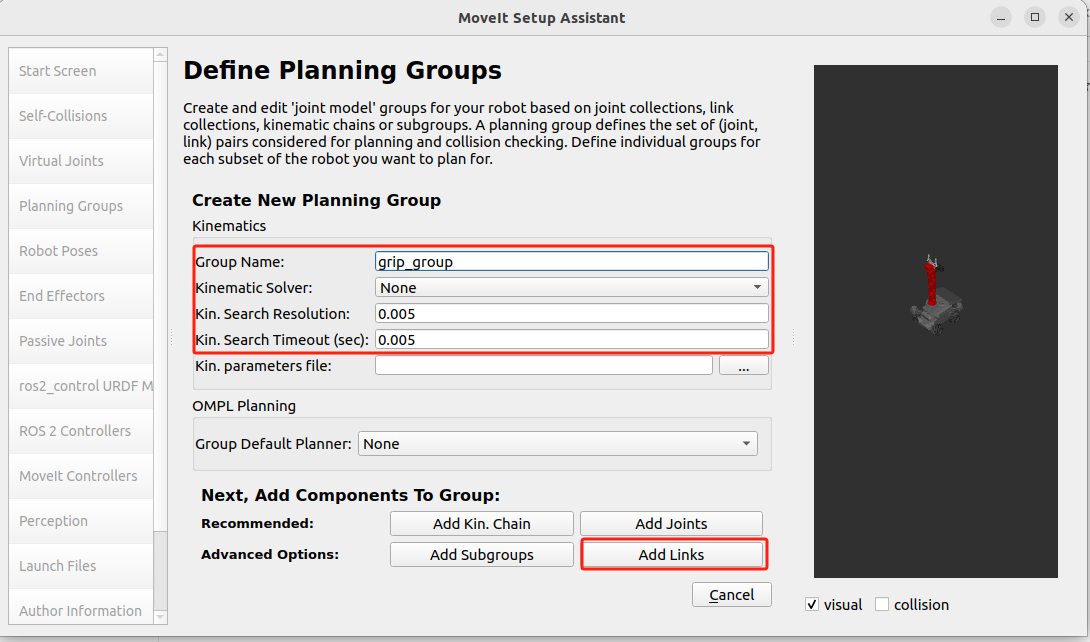
The parameters are shown in the figure below, then click [Add Links] to enter the Links selection interface.
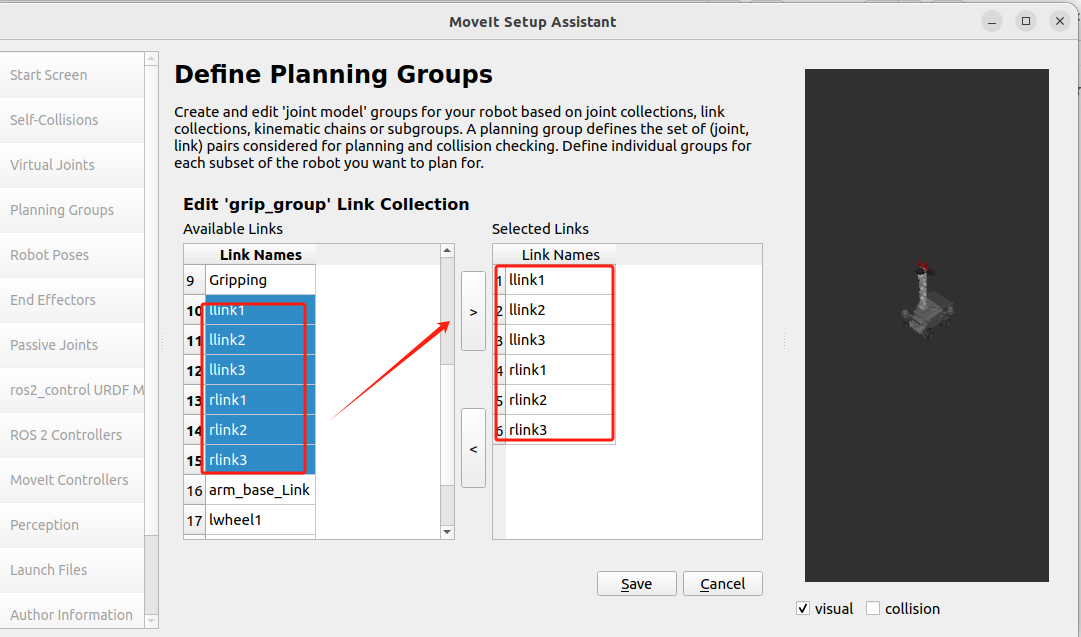
On the Links selection interface, select llink1, llink2, llink3, rlink1, rlink2, rlink3 on the left, click > to complete the addition, and then click [Save] to save and exit.
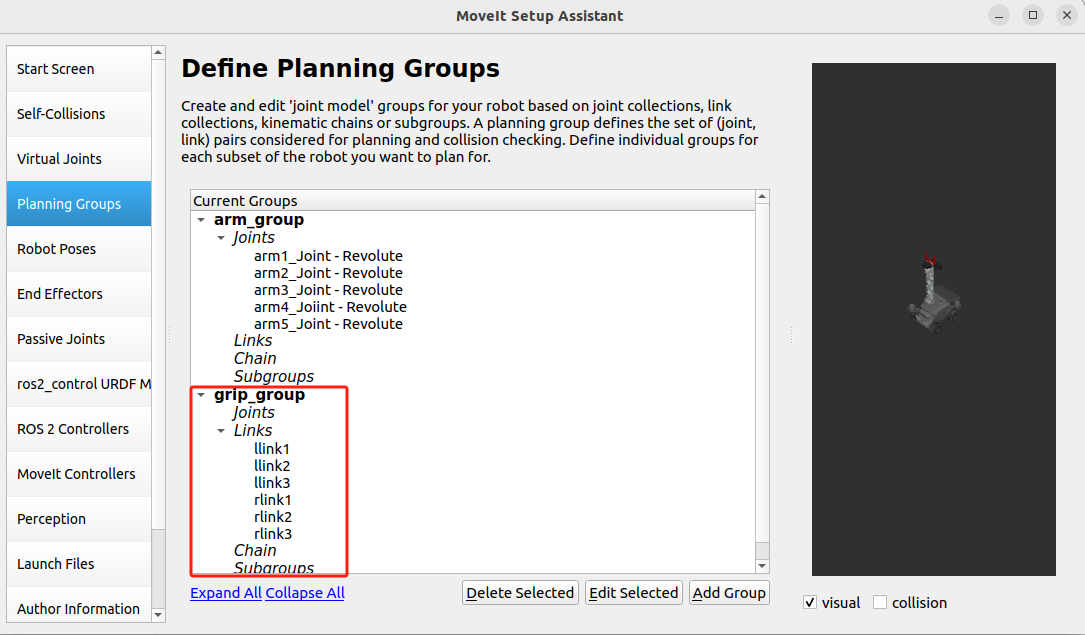
The completed gripper planning group is shown in the figure below.
At this point, the planning group settings are complete. Next, click [Robot Groups] in the left setting column. This step is to set the preset posture of the robot arm and gripper.
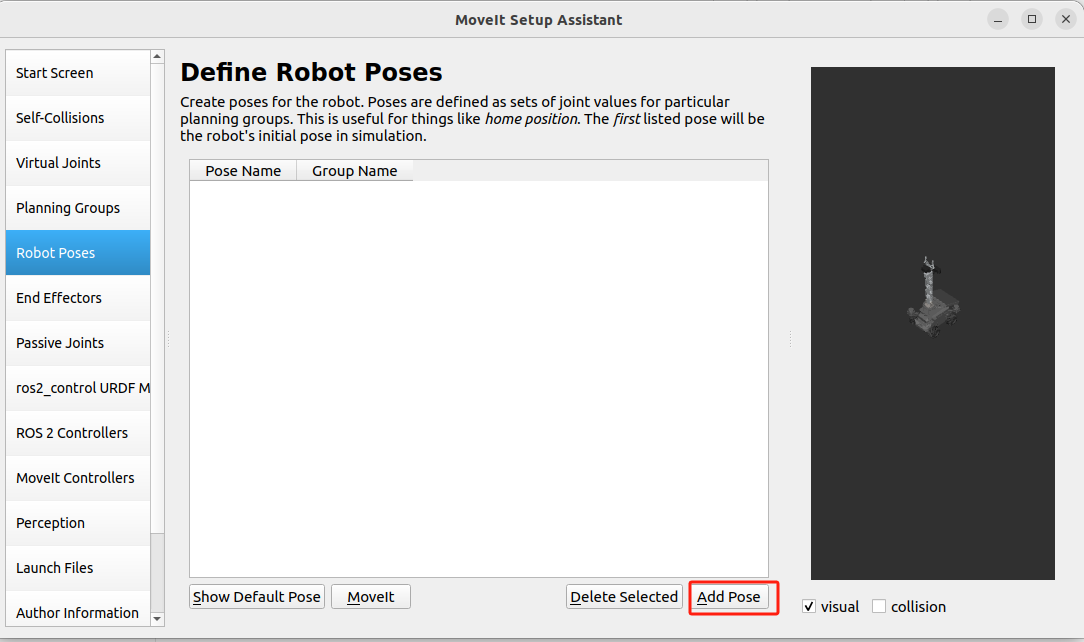
As shown in the figure below, click [Add Pose],
Then set it as shown in the figure below, set the up posture of the arm_group planning group, the middle slider can set the posture, and the urdf on the right will also display the set posture. After the setting is completed, click [Save] to complete the setting.
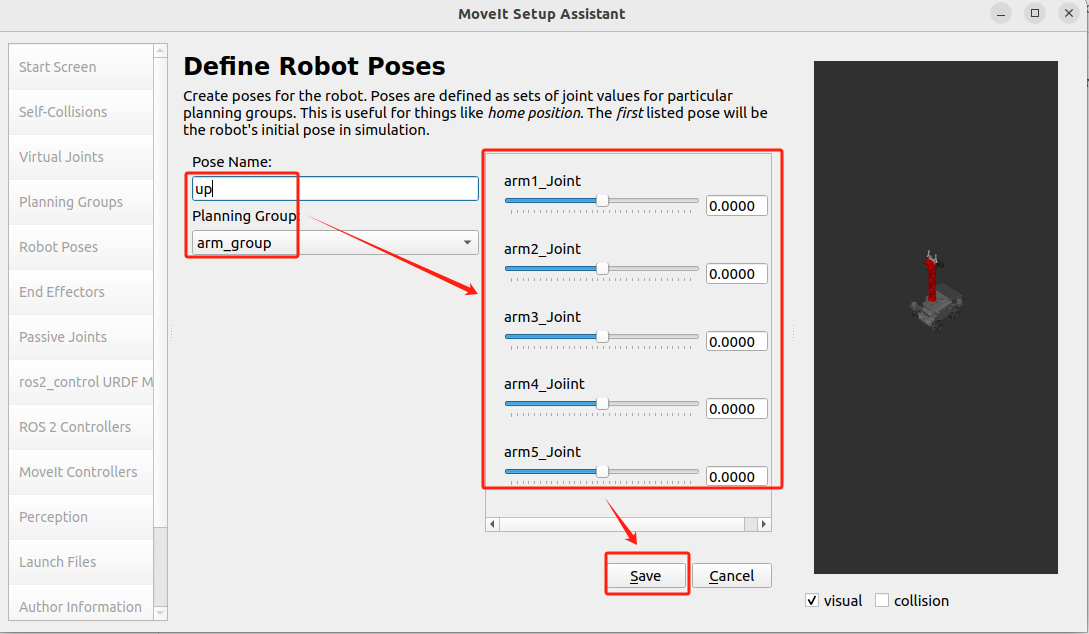
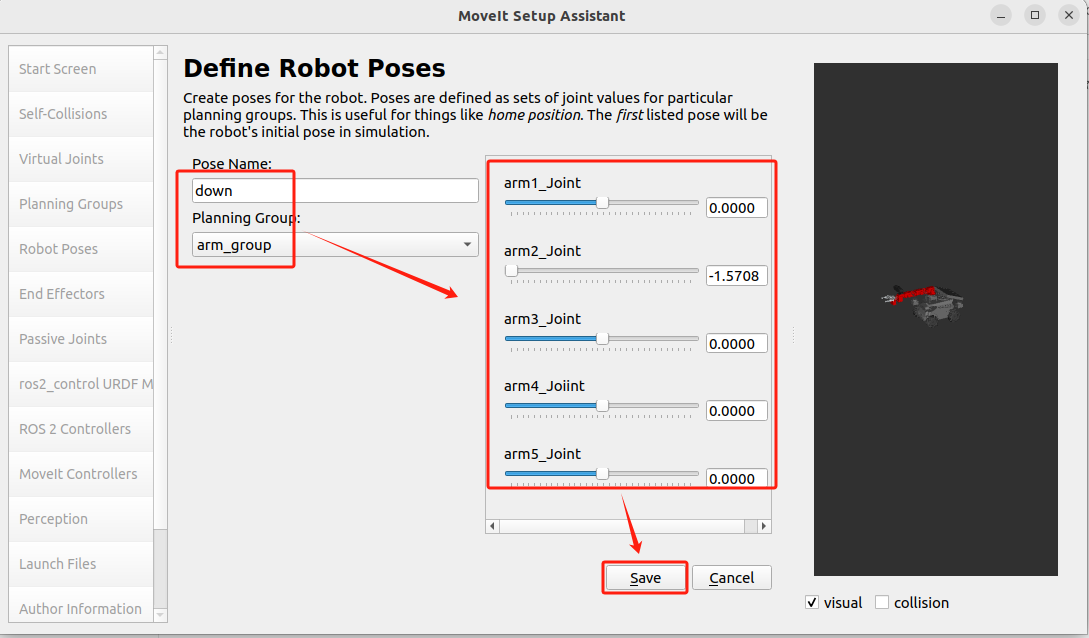
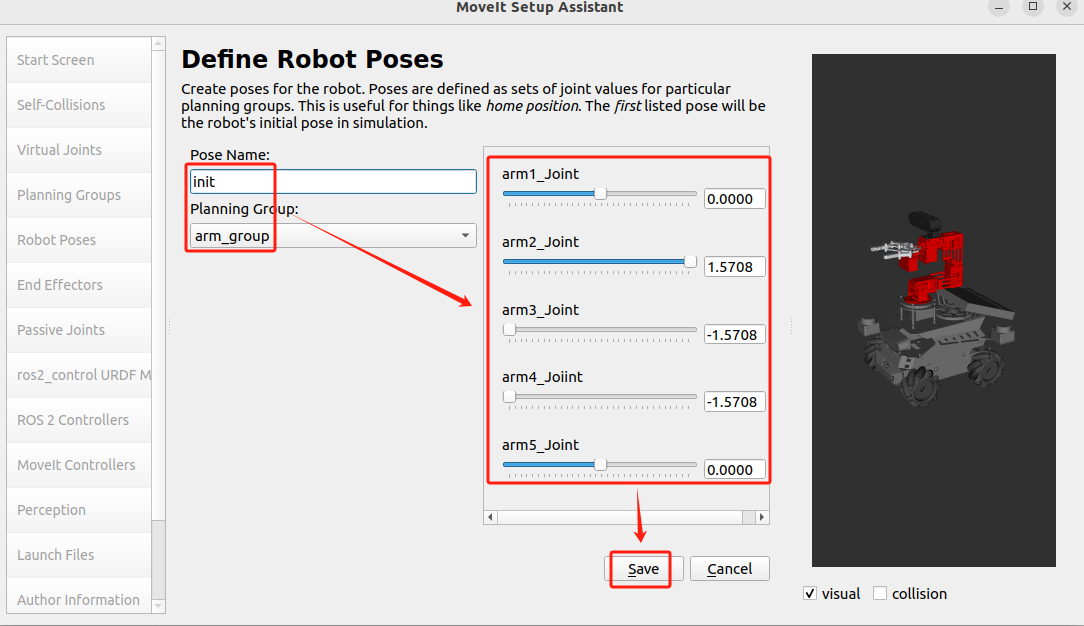
Next, we follow the steps to set the up posture, set the down posture and init posture of the arm_group planning group, and refer to the figure below for the settings.
Down posture:
init posture:
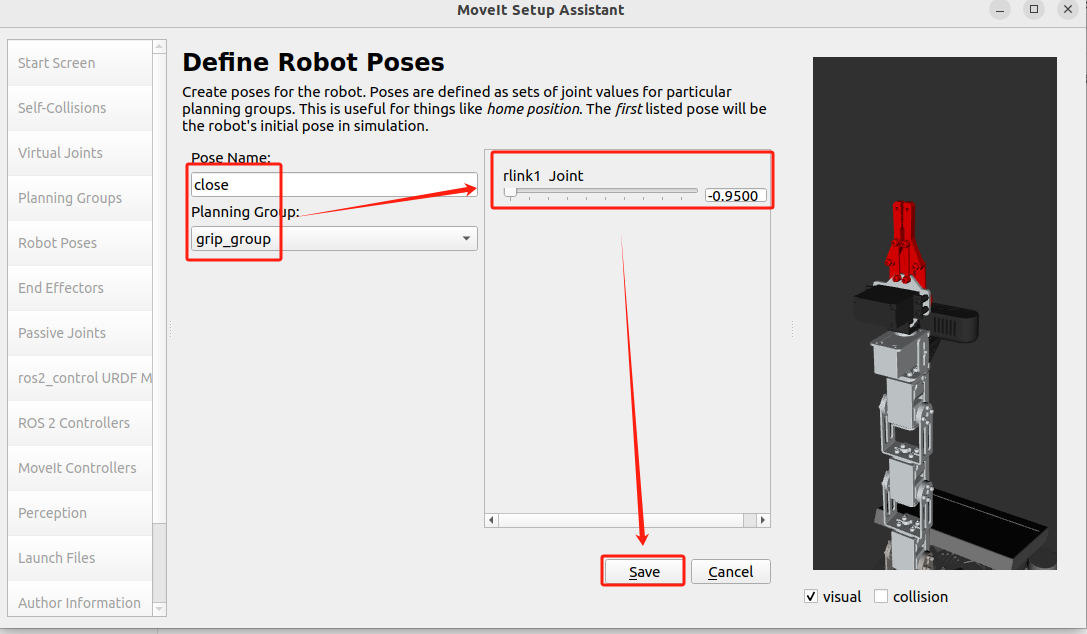
After setting the three postures of the arm_group group, set the two postures of the grip_group group to close and open. The main thing is that the [Planning Group] here needs to be changed to grip_group. The settings are as follows.
Close posture:
Open posture:
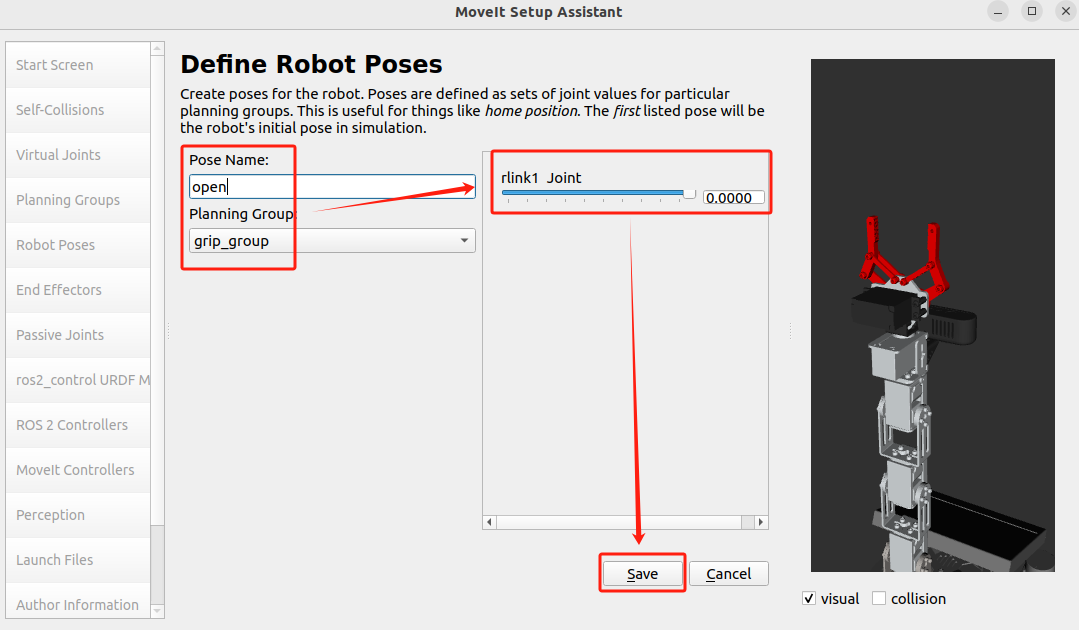
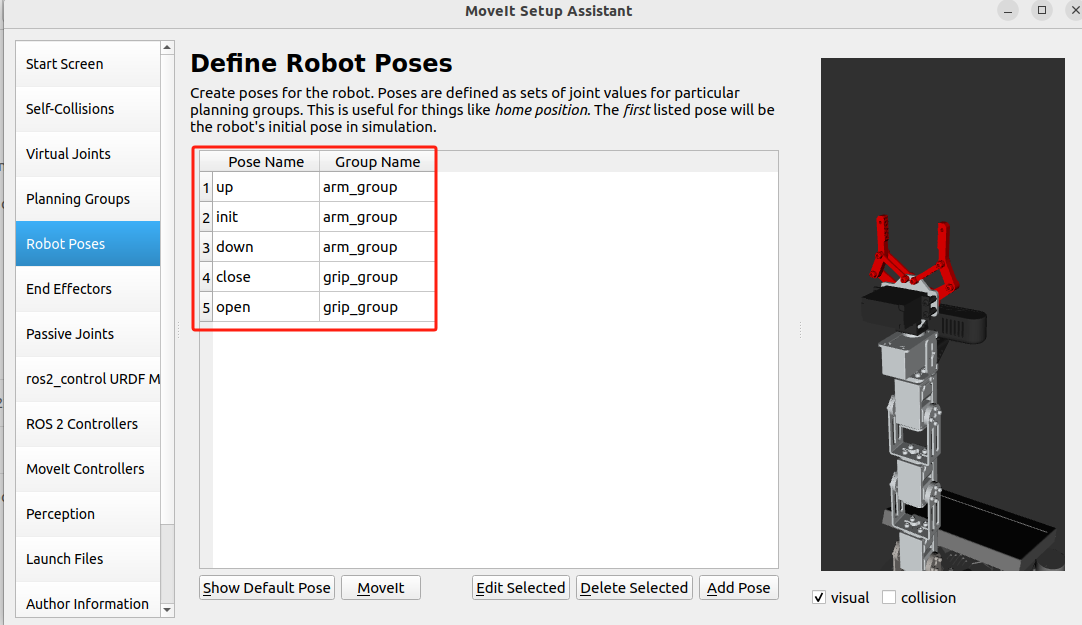
After setting up [Robot Poses], as shown below:
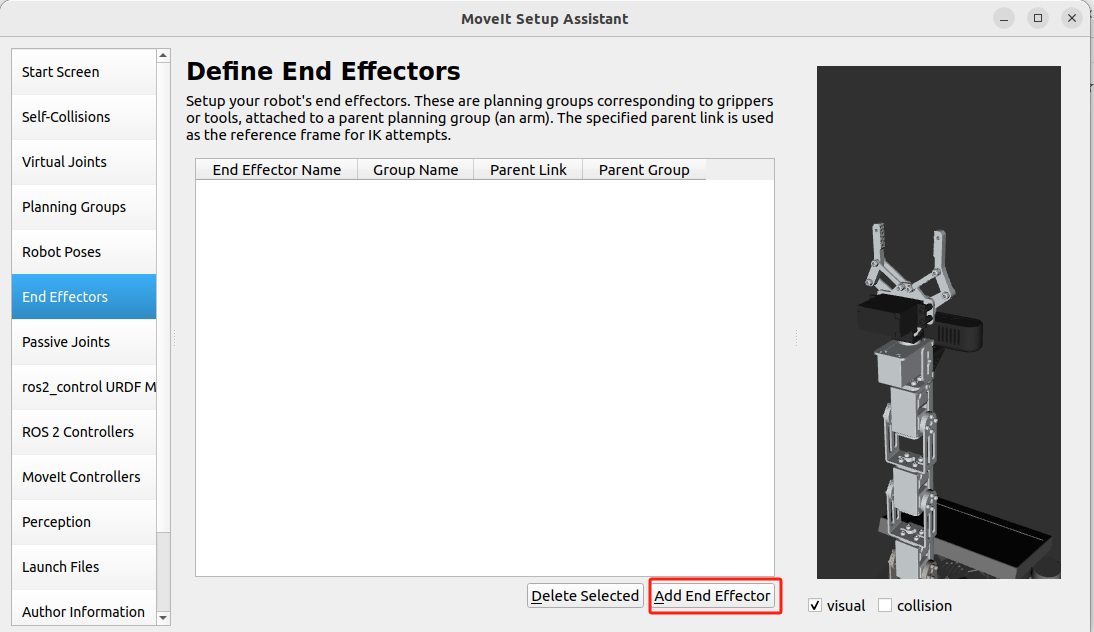
Next, click [End Effectors] in the left setting column to configure the end effector, as shown in the figure below, and click [Add End Effector] to enter the setting interface.
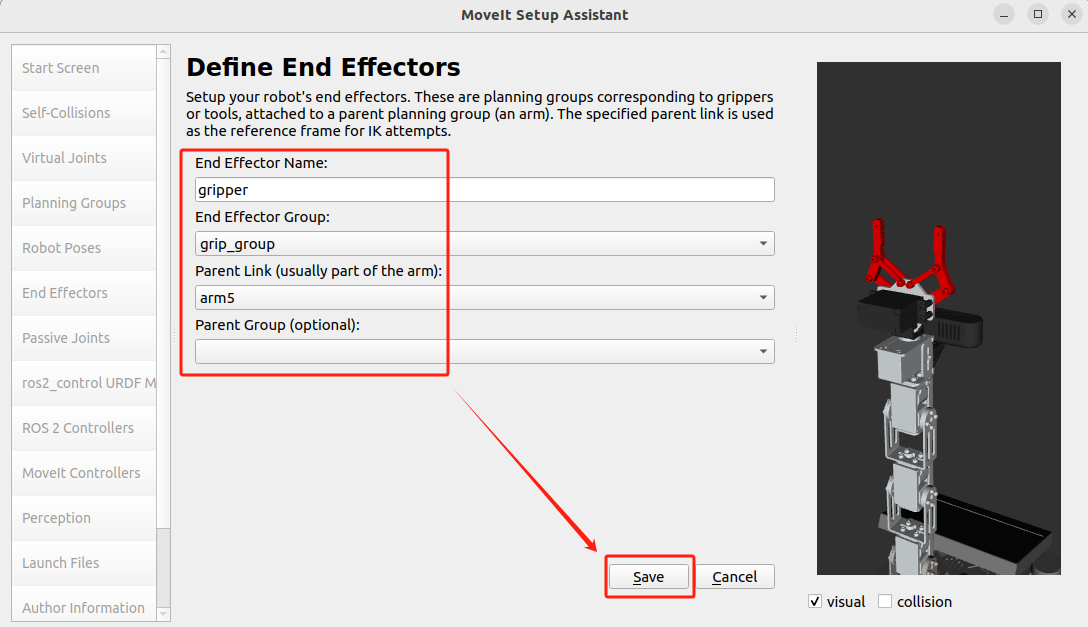
In the settings interface, make settings as shown in the figure below. After completing the settings, click [Save] to save and exit.
The settings of [End Effectors] are as shown below.
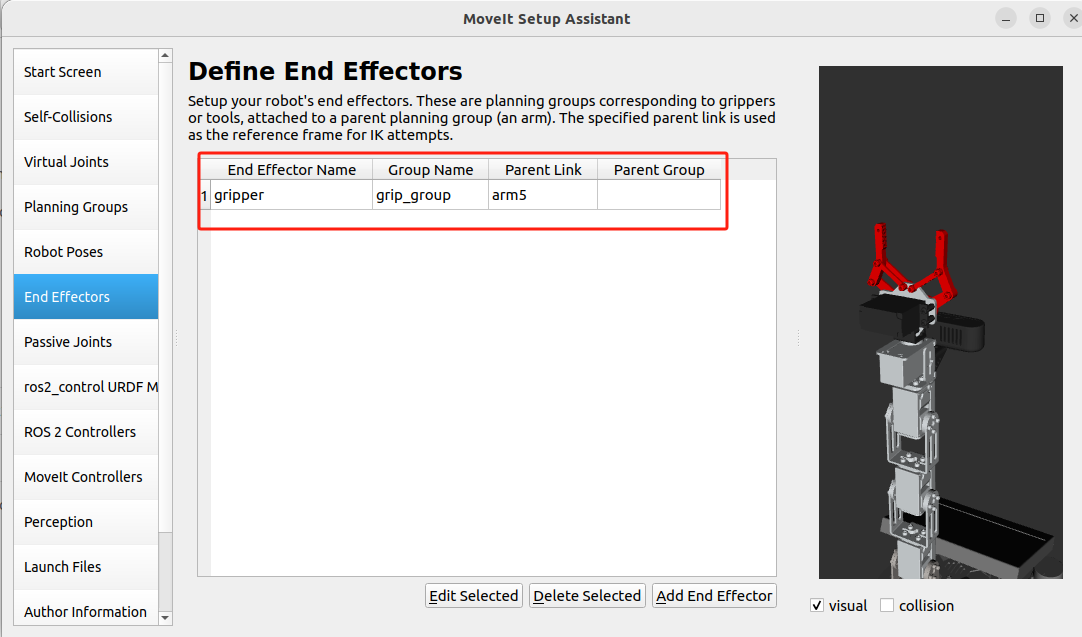
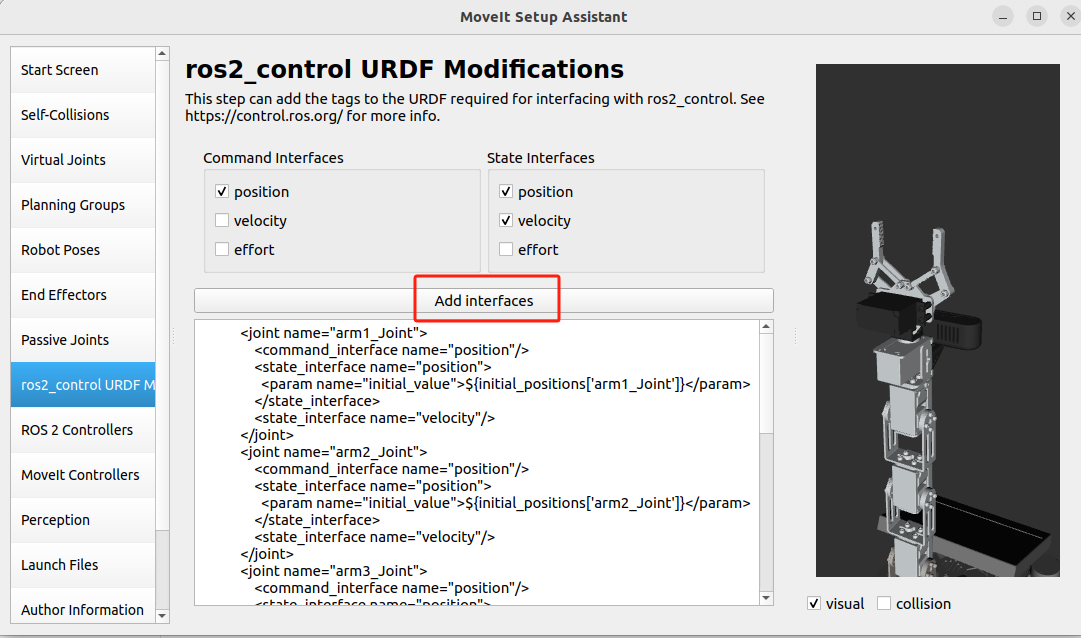
Next, click [ros2_control URDF Modifications] in the left setting column. This step is to set the URDF model. We do not need to modify the URDF model. Just click [Add interfaces], as shown below.
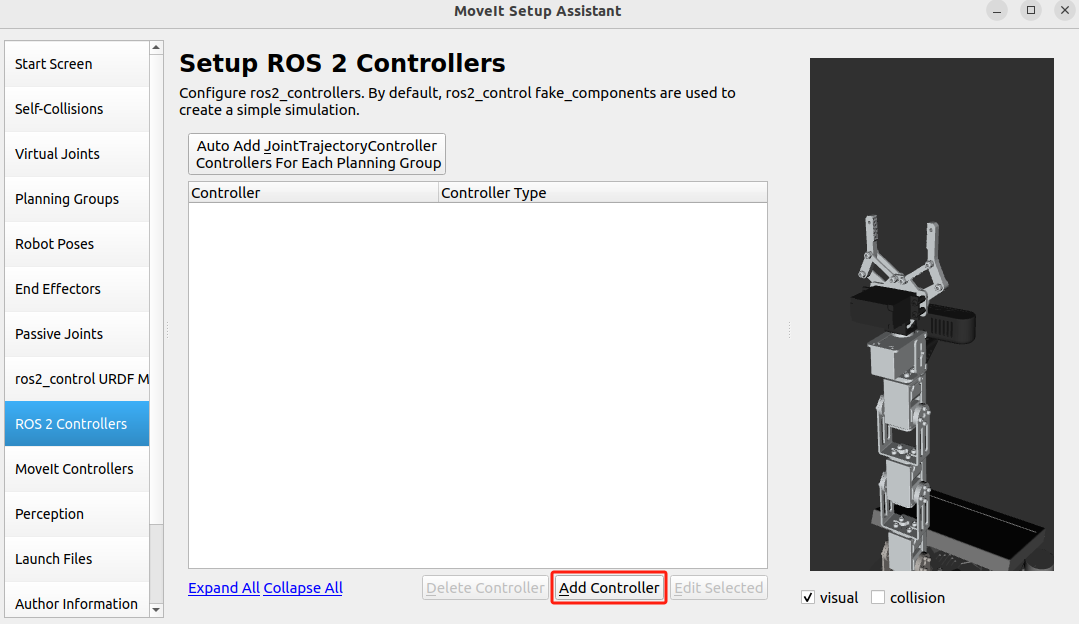
Click [ROS2 Controllers] in the left setting column. This step is to set up the robot motion control. Click [Add Controller] to add a controller, as shown below.
After entering the settings, add the arm_group_controller controller as shown below.
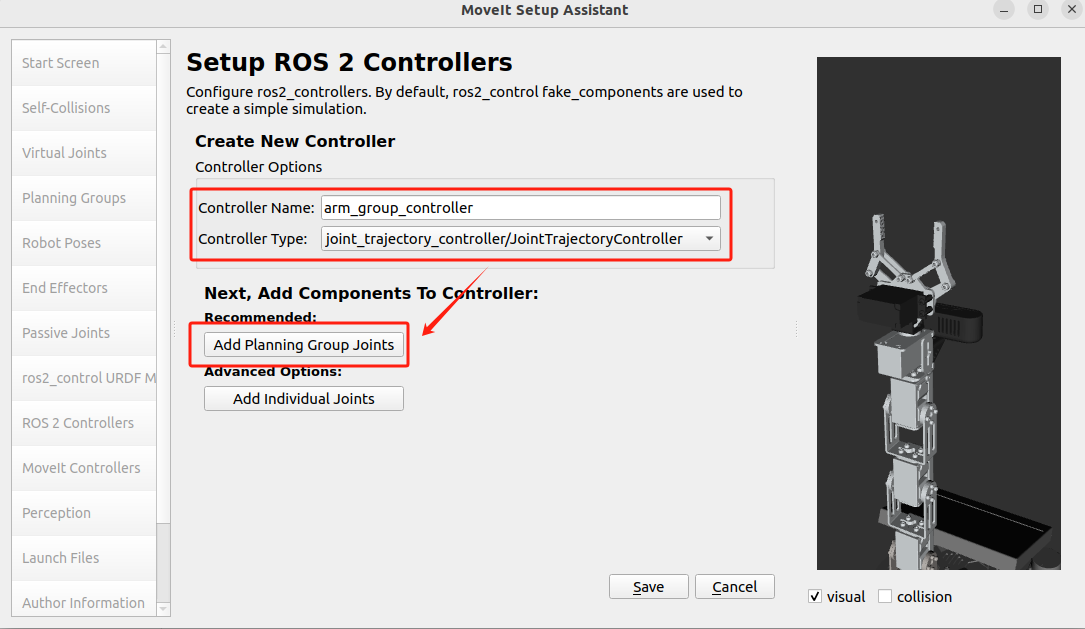
Then click [Add Planning Group Joints] to add the joints of the control group, as shown in the figure below, add the arm_group control group, select the arm_group on the left and click > to complete the addition, and finally click [Save] to save and exit.
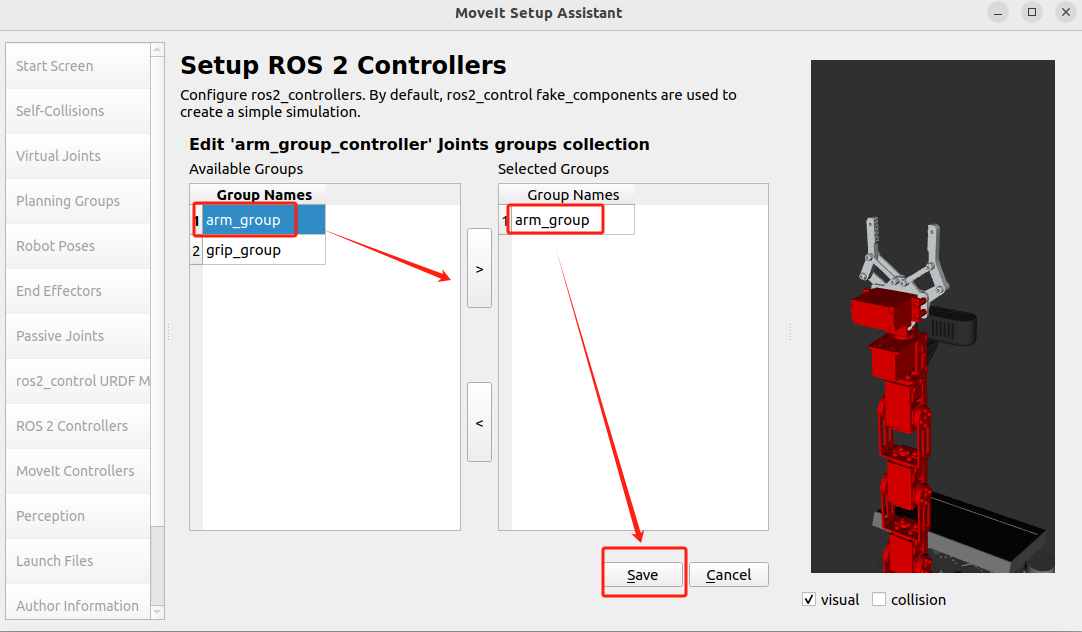
The first controller after setting up is shown in the figure below.
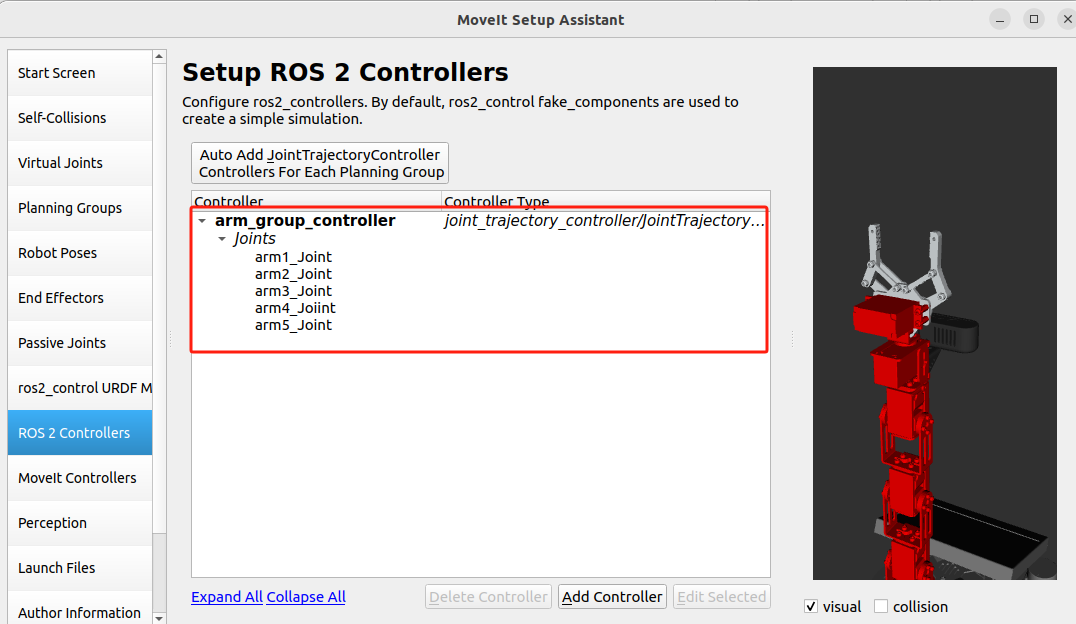
Then, we add a second controller. Click [Add Controller] to enter the add interface, and then set it up as shown in the figure below.
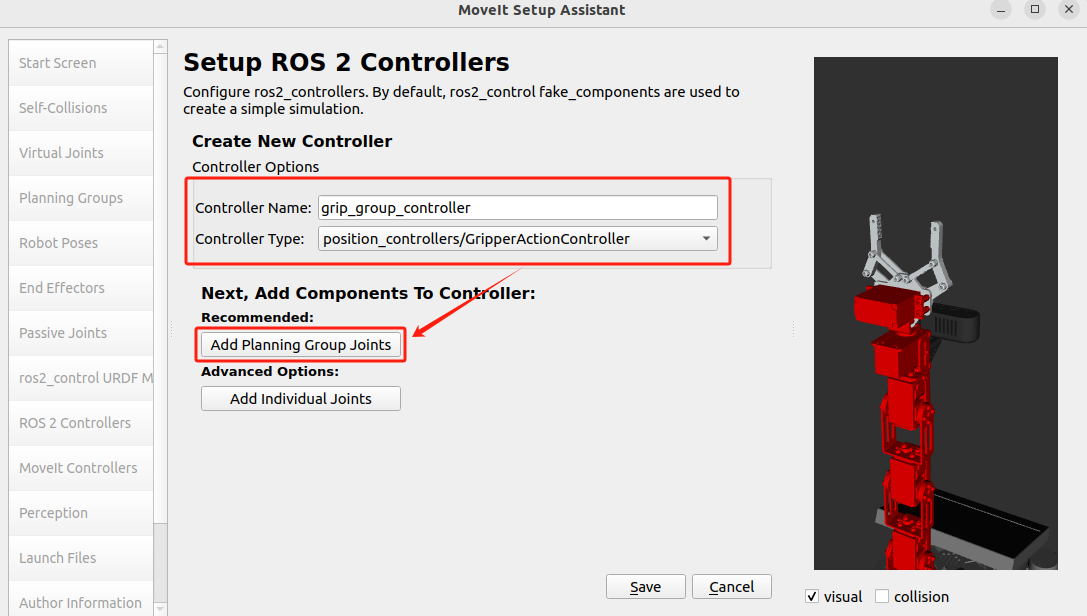
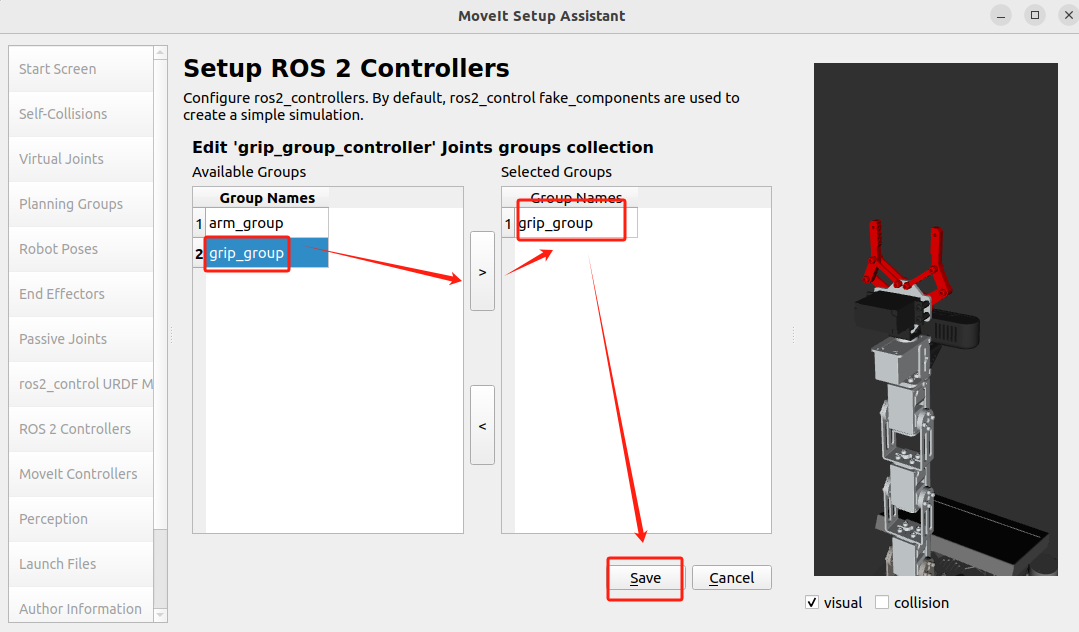
Then click [Add Planning Group Joints] to add joints, as shown in the figure below, select grip_group on the left, and then click > to complete the addition. Finally, click [Save] to complete the setting.
After completing the [ROS2 Controllers] settings, as shown below,
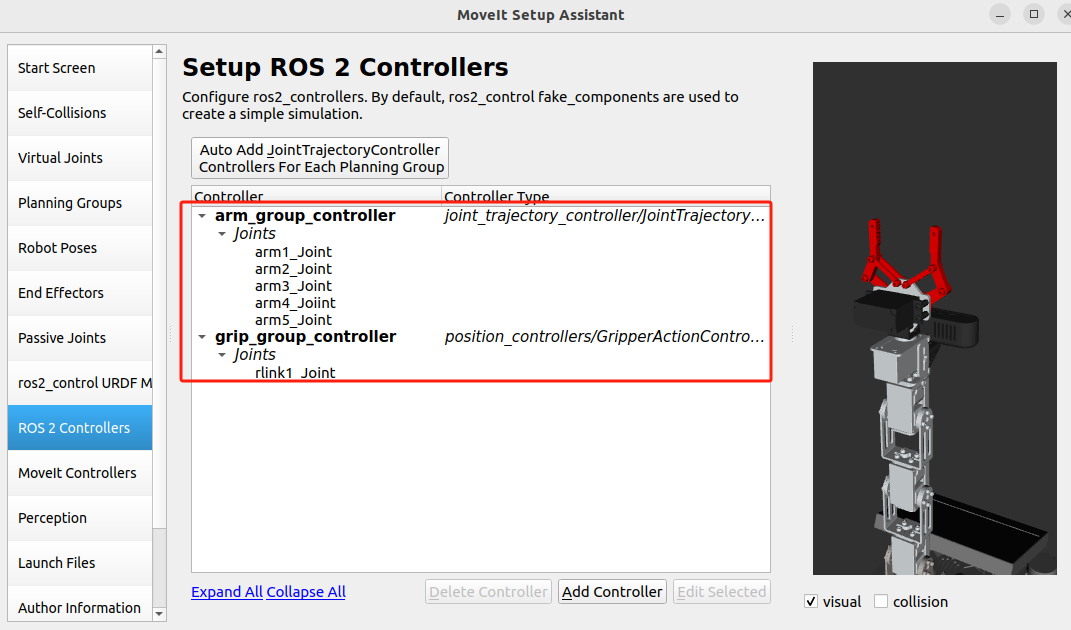
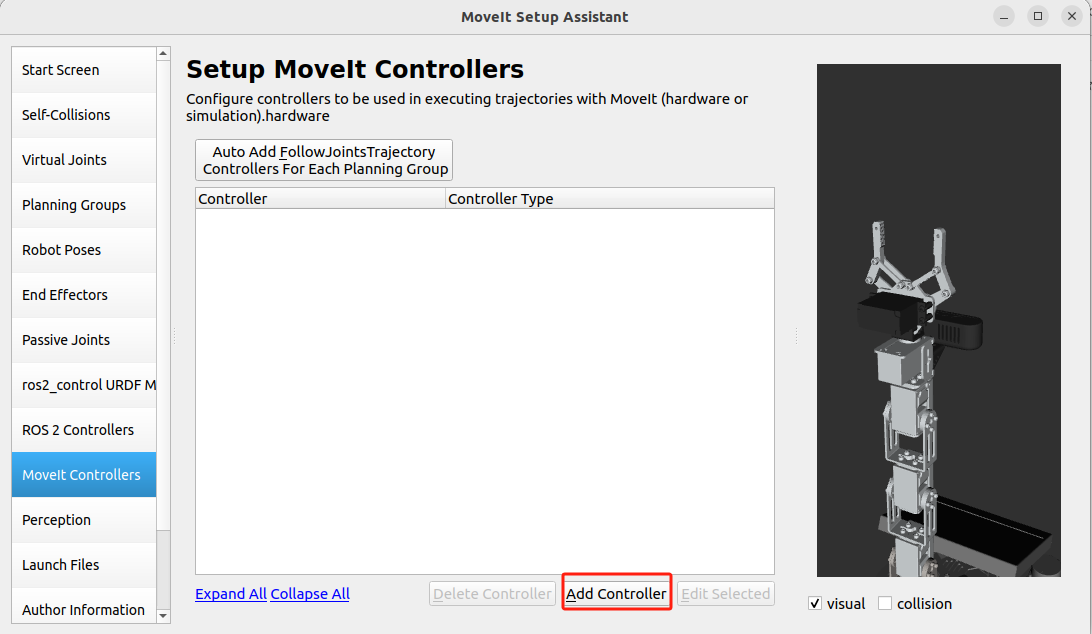
Next, click [MoveIt Controllers] in the left setting column. This step is to set the trajectory controller to execute the planned trajectory.
The trajectory is sent to the robot ROS2 controller. Click [Add Controller] to add a trajectory controller, as shown below.
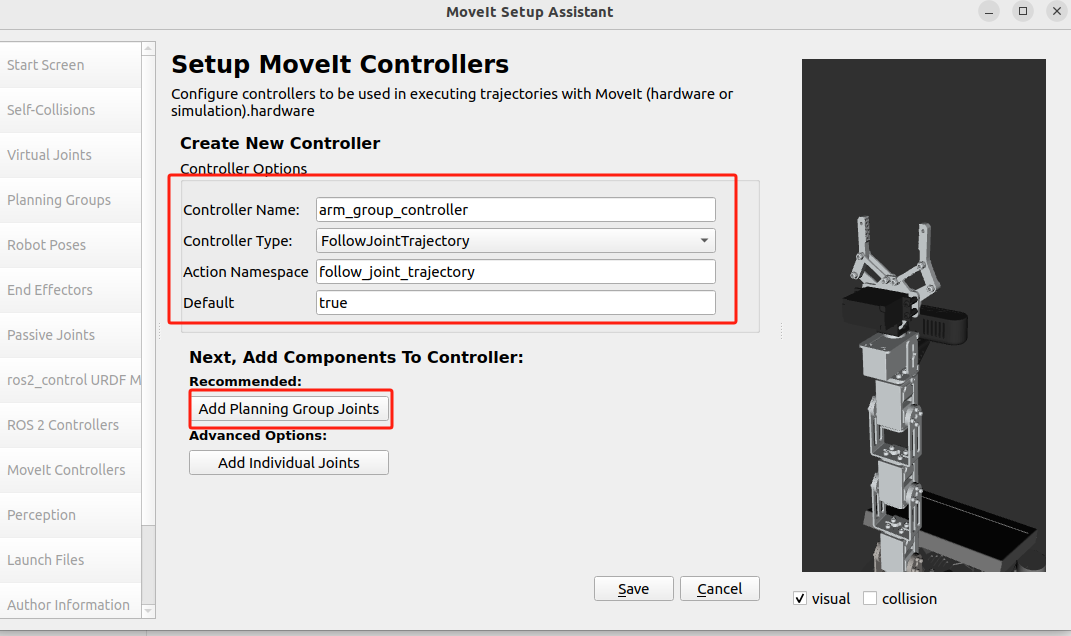
Enter the settings interface and set it up as shown below. Note that the [Controller Name] here should be the same as the [ROS2 Controller] set in the previous step, then click [Add Planning Group Joints] to add control joints.
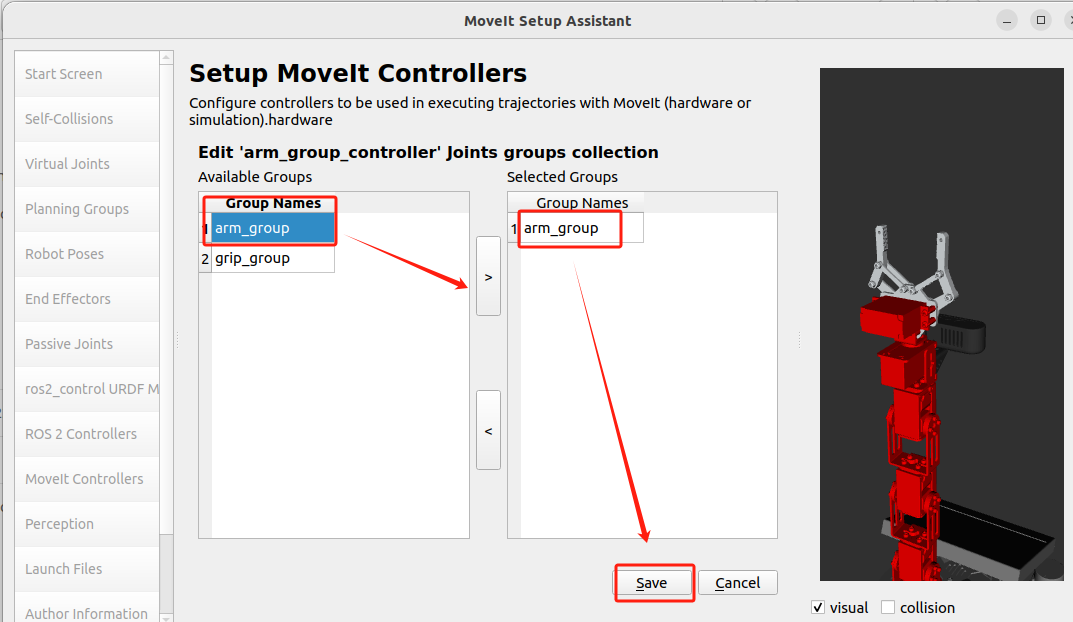
As shown in the figure below, add the arm_group control group, select arm_group on the left and click > to complete the addition, and finally click [Save] to save and exit.
After the settings are completed, the following figure will be shown:
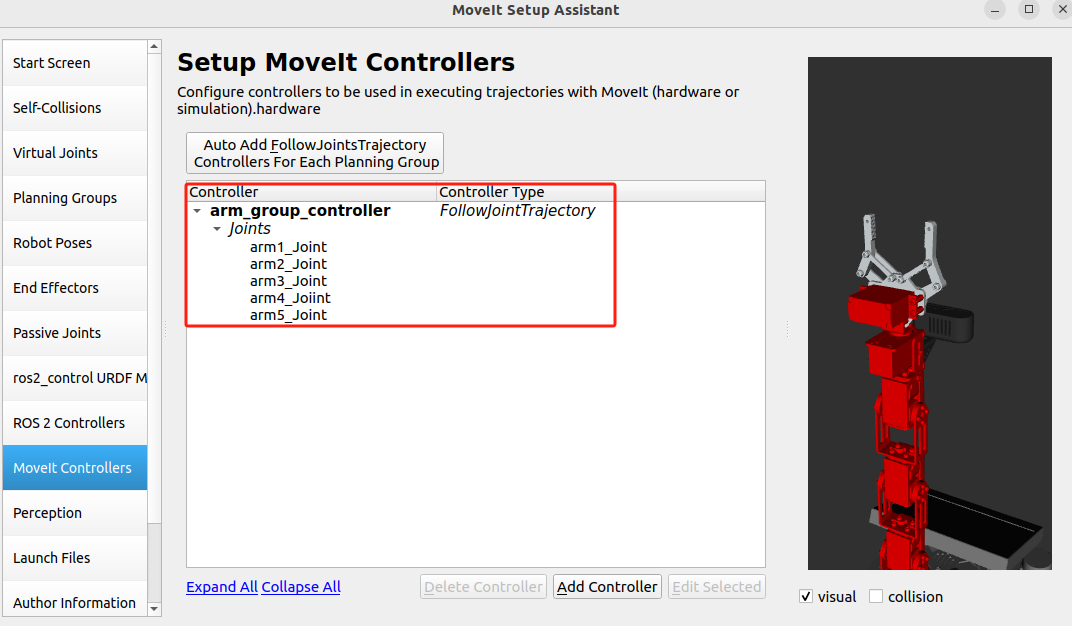
Next, add the trajectory controller of the gripper. Click [Add Controller] to enter the settings interface. Set it up as shown in the figure below, and then click [Add Planning Group Joints] to add the control joints.
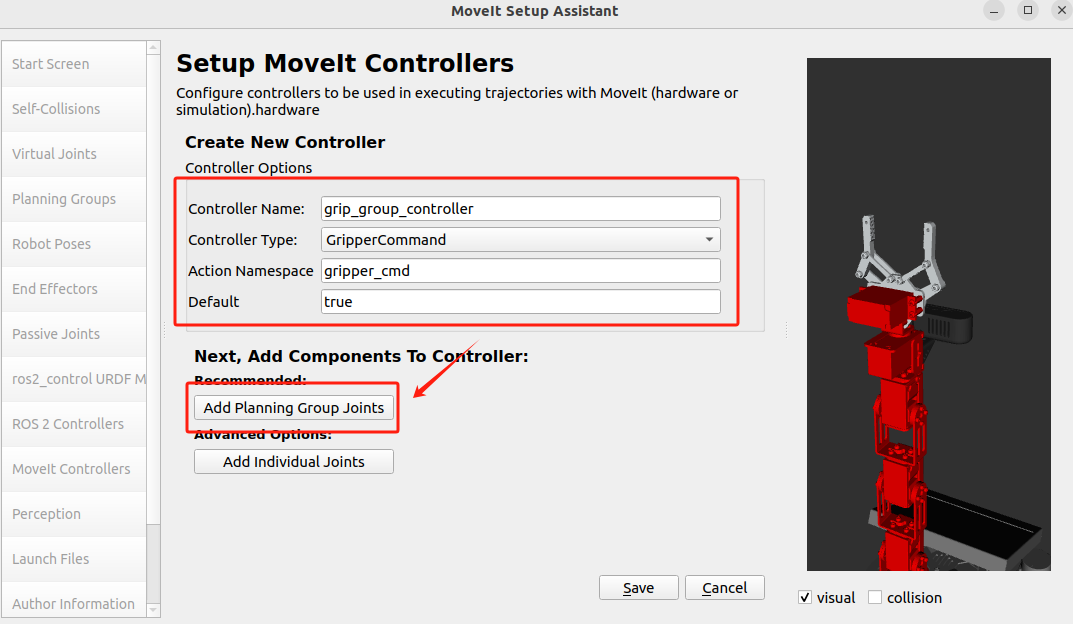
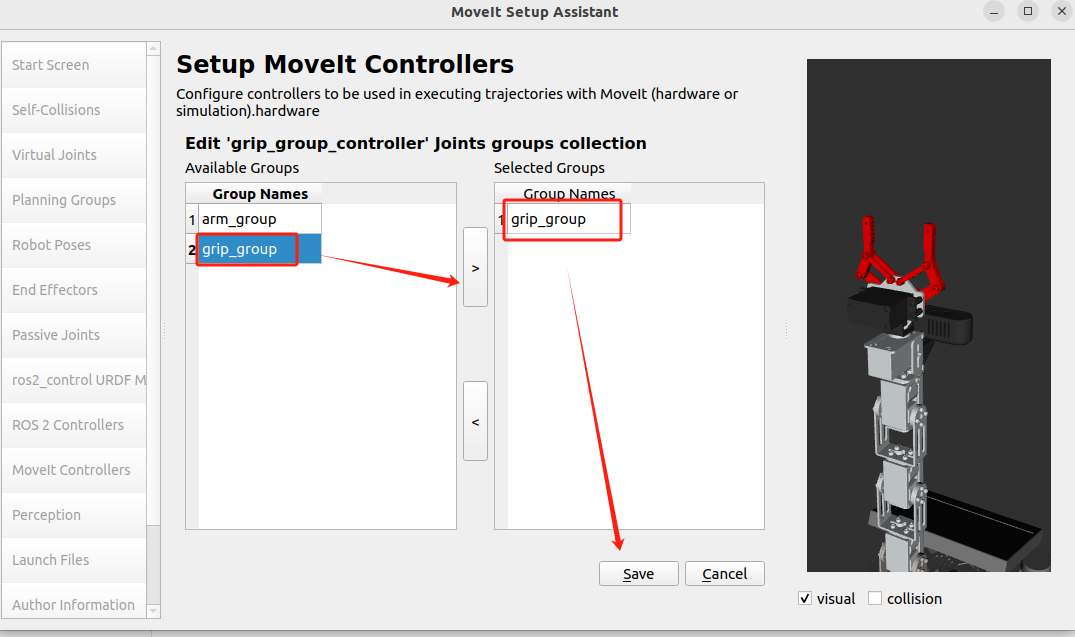
Then click [Add Planning Group Joints] to add joints, as shown in the figure below, select grip_group on the left, and then click > to complete the addition. Finally, click [Save] to complete the setting.
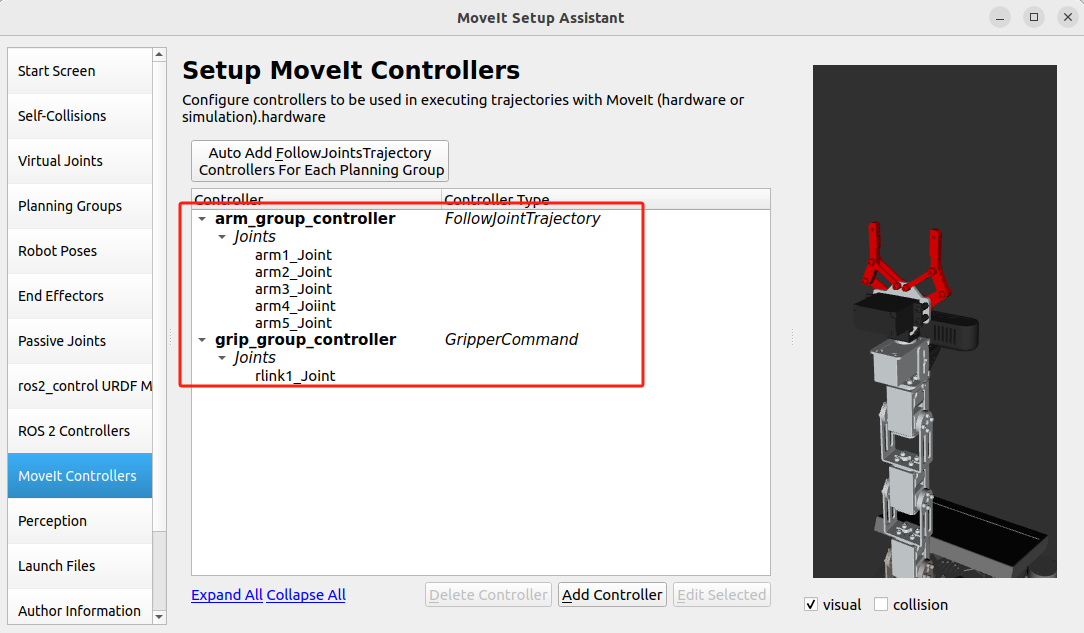
Complete the [MoveIt Controllers] settings as shown below.
Next, click [Author Information] in the settings column on the left, and then fill in your name and email address, as shown below.
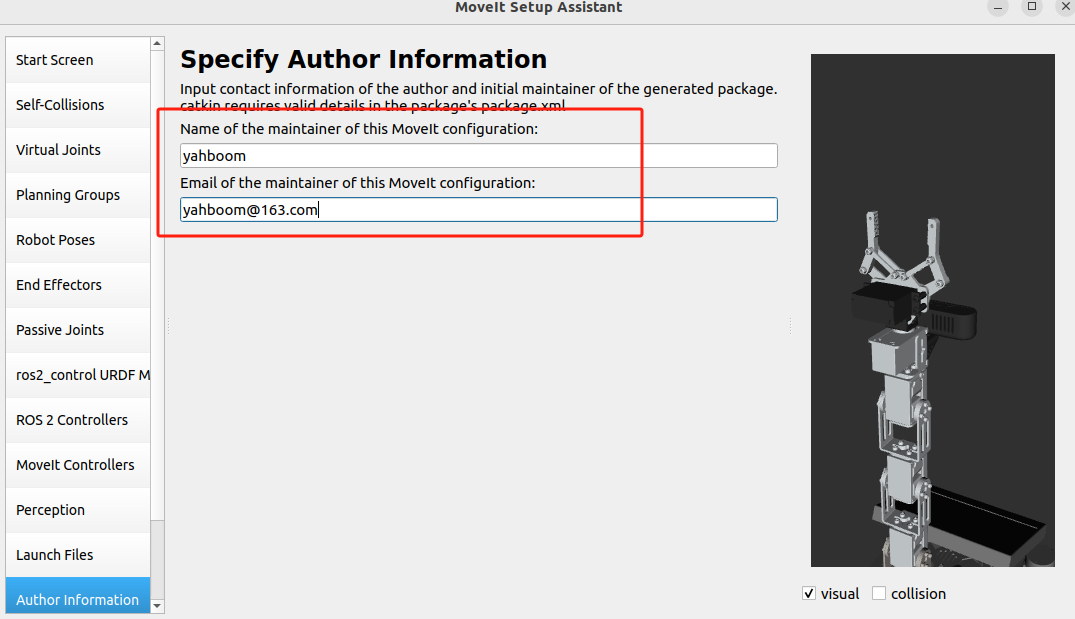
Finally, click [Configuration Files] in the settings column on the left, click [Browse], find the folder we created earlier, select here /home/yahboom/moveit2_ws/src/test_moveit_config, and click [OK] when the following message appears
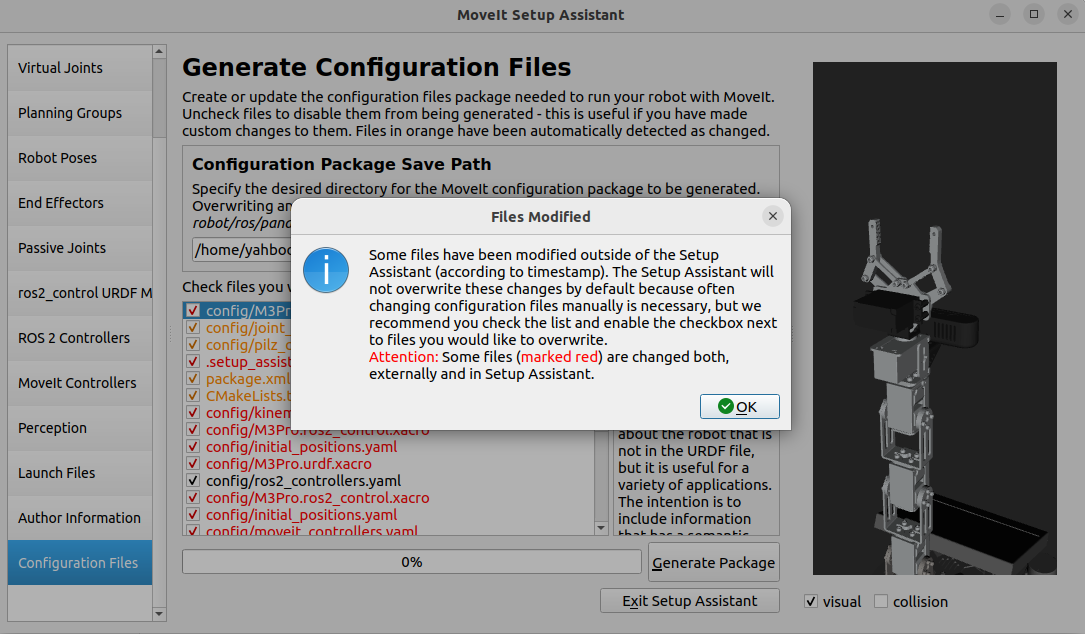
Then click [Generate Package] below to generate the function package, as shown in the figure below. Click [OK] when the prompt message appears.
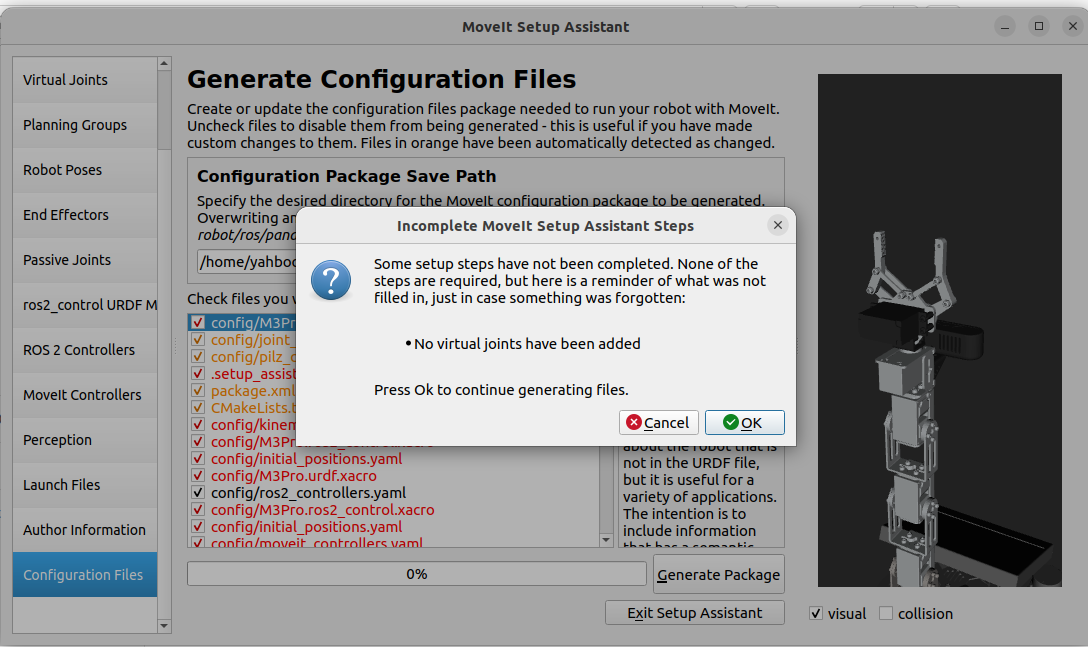
When the prompt message appears, click [OK].
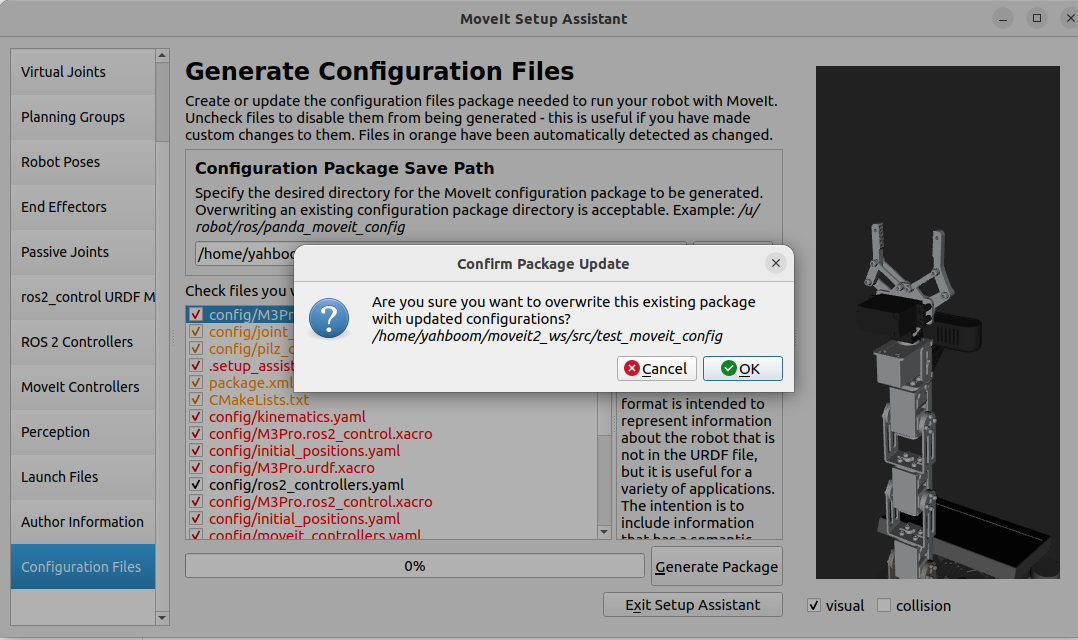
As shown in the figure below, the Configuration package generated successfully appears . Click [Exit Setup Assistant] to complete all settings.
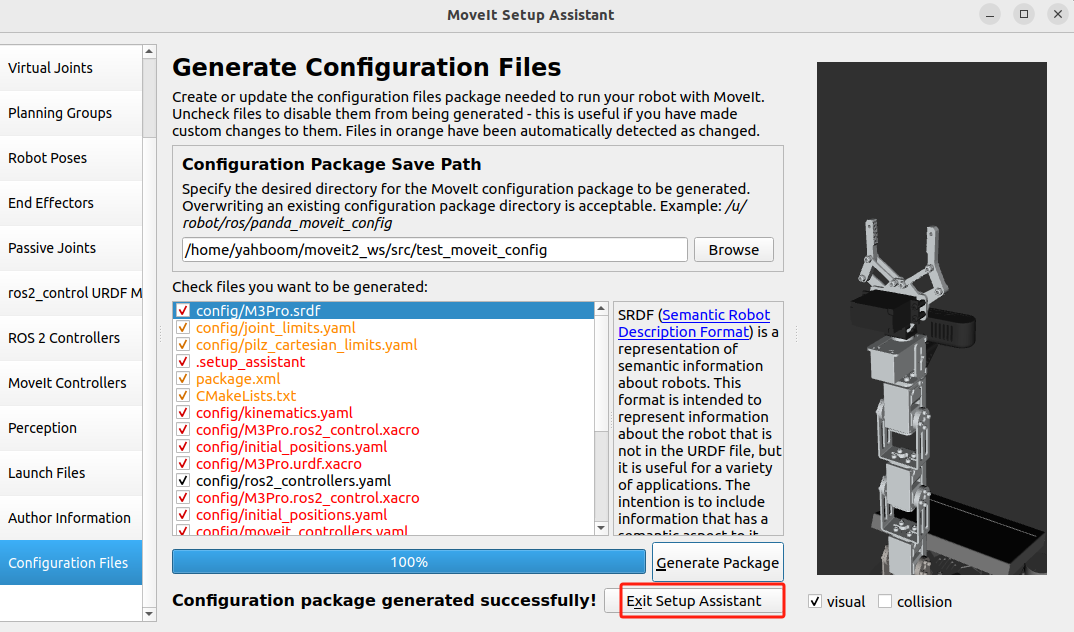
In the test_moveit_config package, all the settings just made are saved. Then, we need to modify the joint_limits.yaml file in the /home/yahboom/moveit2_ws/src/test_moveit_config/config directory. We only need to change the integers in it to decimals, and the values remain unchanged. The modified file is as follows:
xxxxxxxxxx# joint_limits.yaml allows the dynamics properties specified in the URDF to be overwritten or augmented as needed# For beginners, we downscale velocity and acceleration limits.# You can always specify higher scaling factors (<= 1.0) in your motion requests. # Increase the values below to 1.0 to always move at maximum speed.default_velocity_scaling_factor0.1default_acceleration_scaling_factor0.1# Specific joint properties can be changed with the keys [max_position, min_position, max_velocity, max_acceleration]# Joint limits can be turned off with [has_velocity_limits, has_acceleration_limits]joint_limits arm1_Joint has_velocity_limitstrue max_velocity1.0 has_acceleration_limitsfalse max_acceleration0.0 arm2_Joint has_velocity_limitstrue max_velocity1.0 has_acceleration_limitsfalse max_acceleration0.0 arm3_Joint has_velocity_limitstrue max_velocity1.0 has_acceleration_limitsfalse max_acceleration0.0 arm4_Joiint has_velocity_limitstrue max_velocity1.0 has_acceleration_limitsfalse max_acceleration0.0 arm5_Joint has_velocity_limitstrue max_velocity1.0 has_acceleration_limitsfalse max_acceleration0.0 llink1_Joint has_velocity_limitsfalse max_velocity0.0 has_acceleration_limitsfalse max_acceleration0.0 llink2_Joint has_velocity_limitsfalse max_velocity0.0 has_acceleration_limitsfalse max_acceleration0.0 llink3_Joint has_velocity_limitsfalse max_velocity0.0 has_acceleration_limitsfalse max_acceleration0.0 rlink1_Joint has_velocity_limitstrue max_velocity1.0 has_acceleration_limitsfalse max_acceleration0.0 rlink2_Joint has_velocity_limitsfalse max_velocity0.0 has_acceleration_limitsfalse max_acceleration0.0 rlink3_Joint has_velocity_limitsfalse max_velocity0.0 has_acceleration_limitsfalse max_acceleration0.0Save and exit, then return to the workspace directory, use colcon build to compile, and enter in the terminal,
xxxxxxxxxxcd moveit2_wscolcon build --packages-select test_moveit_config
After the compilation is complete, refresh the environment variables and enter the terminal source ~/.bashrc. Then enter the following command in the terminal to start moveit2. Enter the terminal,
xxxxxxxxxxros2 launch test_moveit_config demo.launch.py
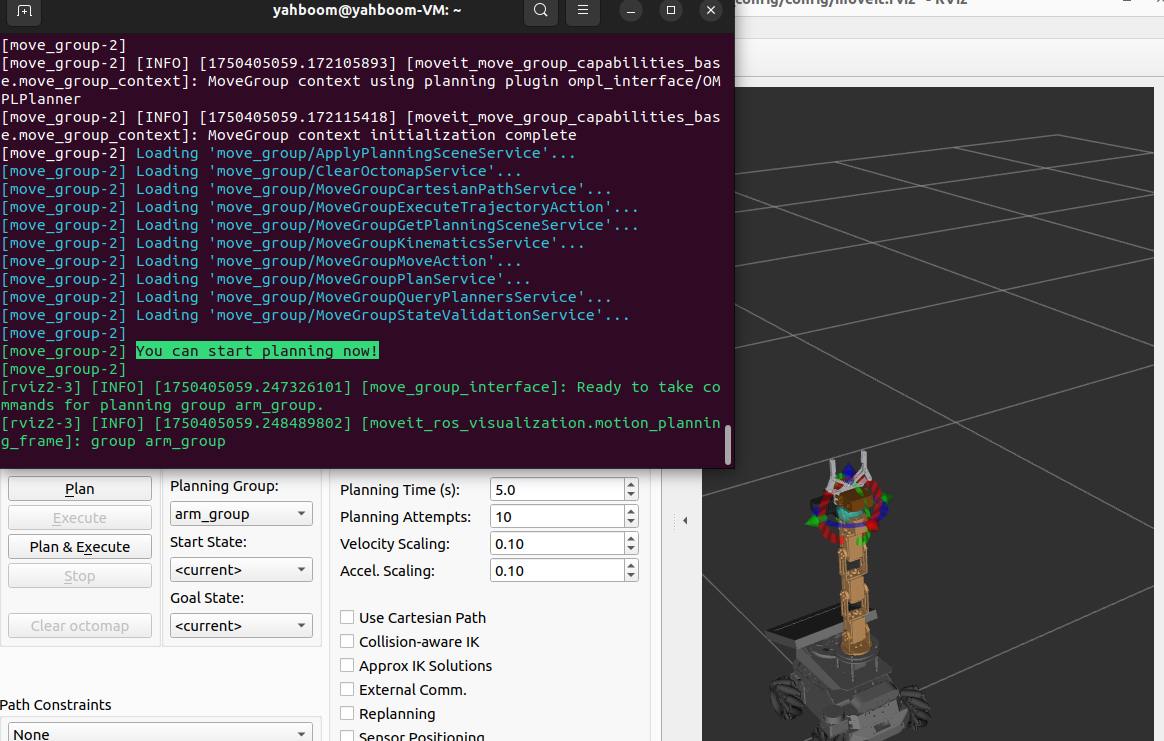
After the program is started, when the terminal displays "You can start planning now!" , it indicates that the program has been successfully started, as shown in the figure below.
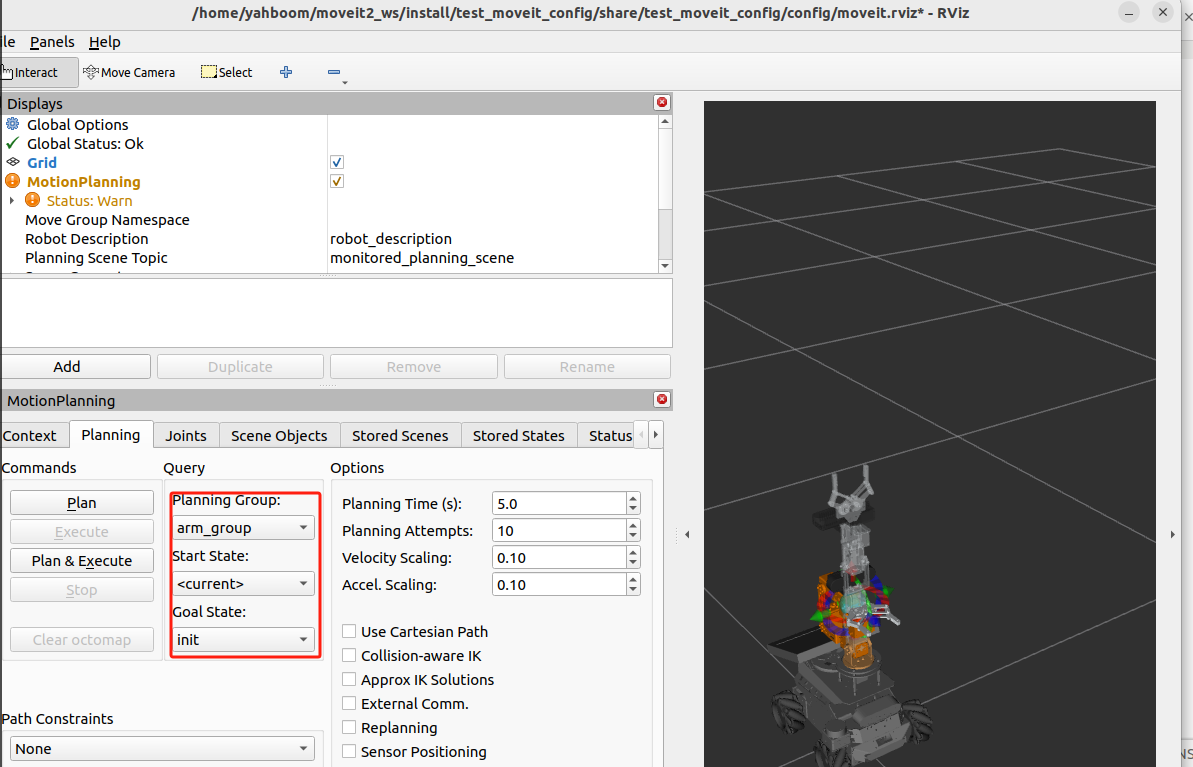
Then we test Plan and Execute. Let's test arm_grou first. As shown in the figure below, select [Planning Group] as arm_group, select [Start State] as、Select【Goal State】,We let the posture of the robot arm change from the current up ,motion planning to the previously set init,
Then click [Plan & Execute] on the left to let the robot plan run to init, as shown in the figure below.
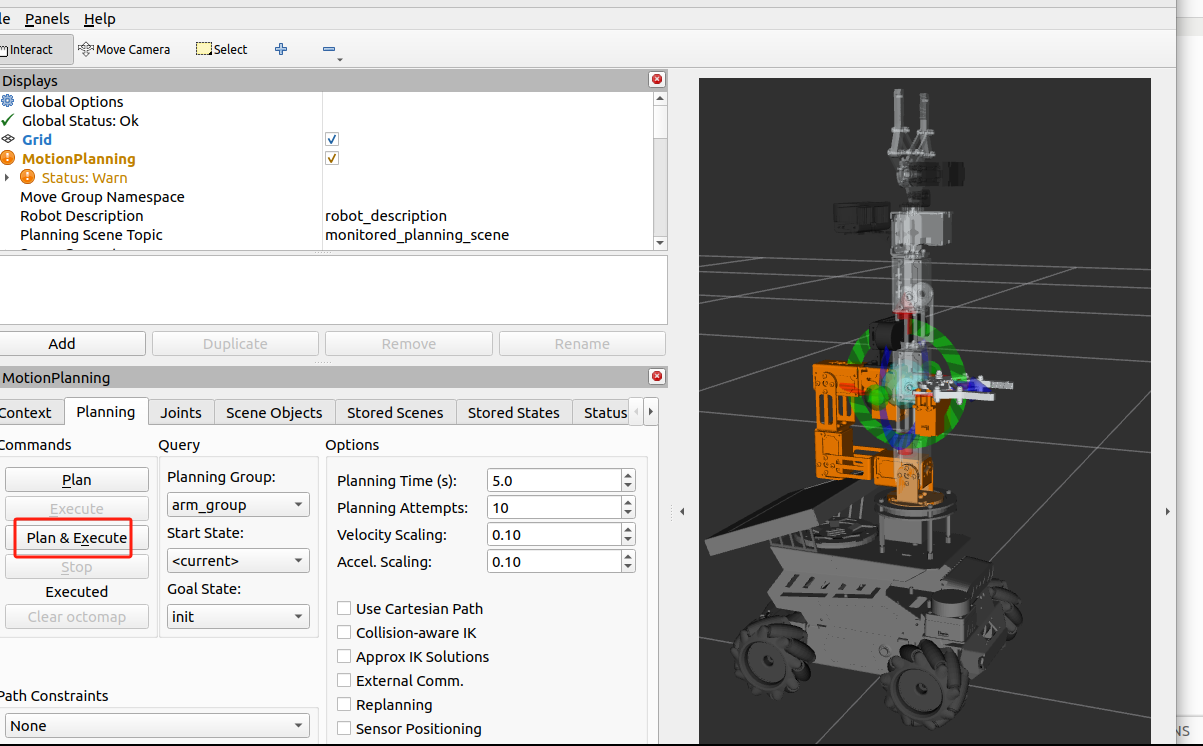
After the motion planning is completed, as shown in the figure below,
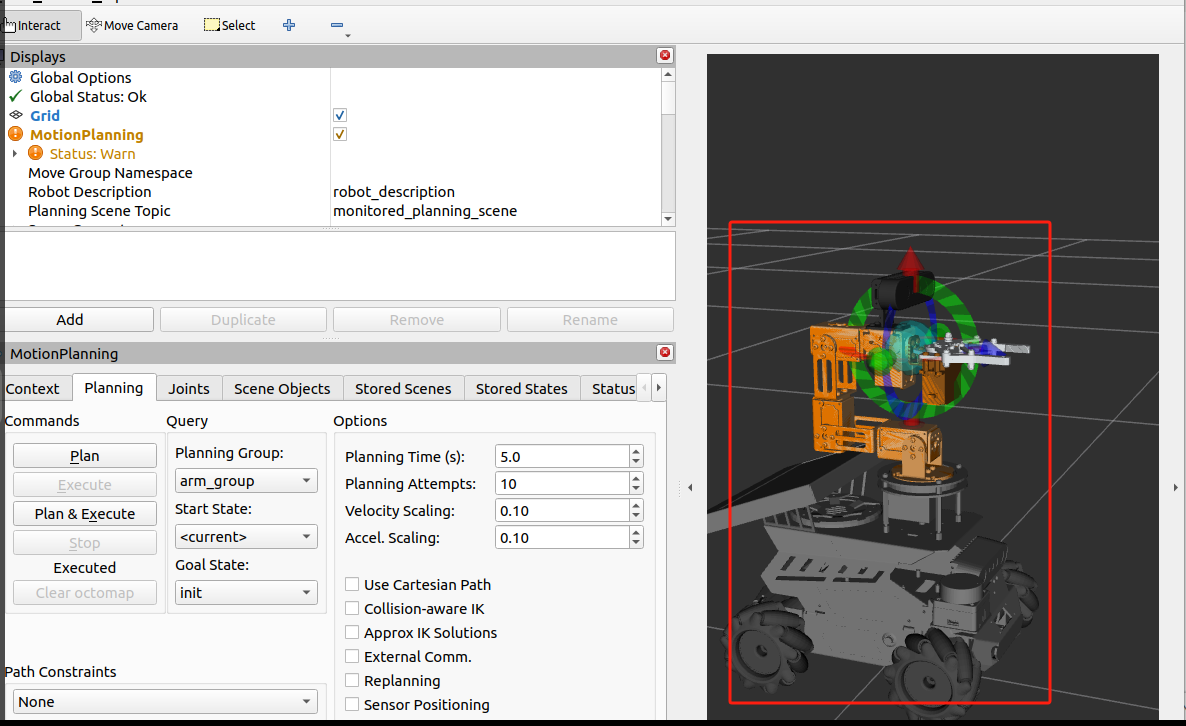
If the plan and execution are successful, it means that the arm_group configuration is successful. Next, test the grip_group. Set it as shown below, set [Planning Group] to grip_group, select [Start State] to、Select【Goal State】,
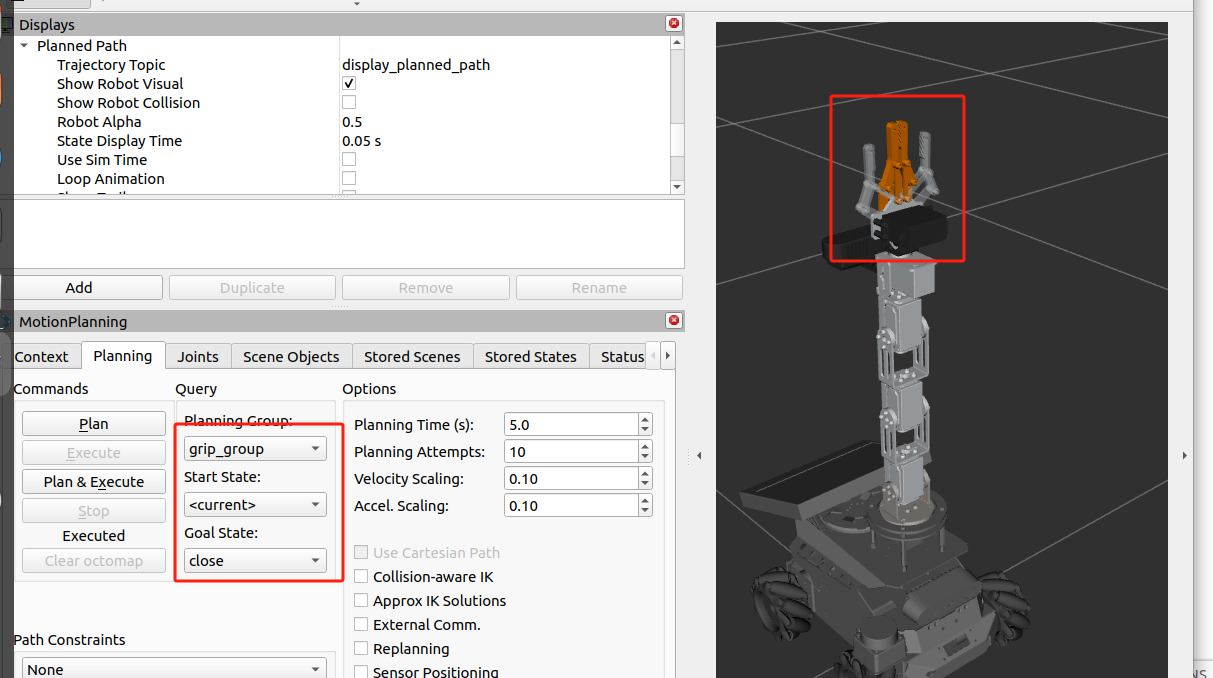
Click [Plan & Execute] on the left to run the gripper planning to the close state, as shown in the figure below.
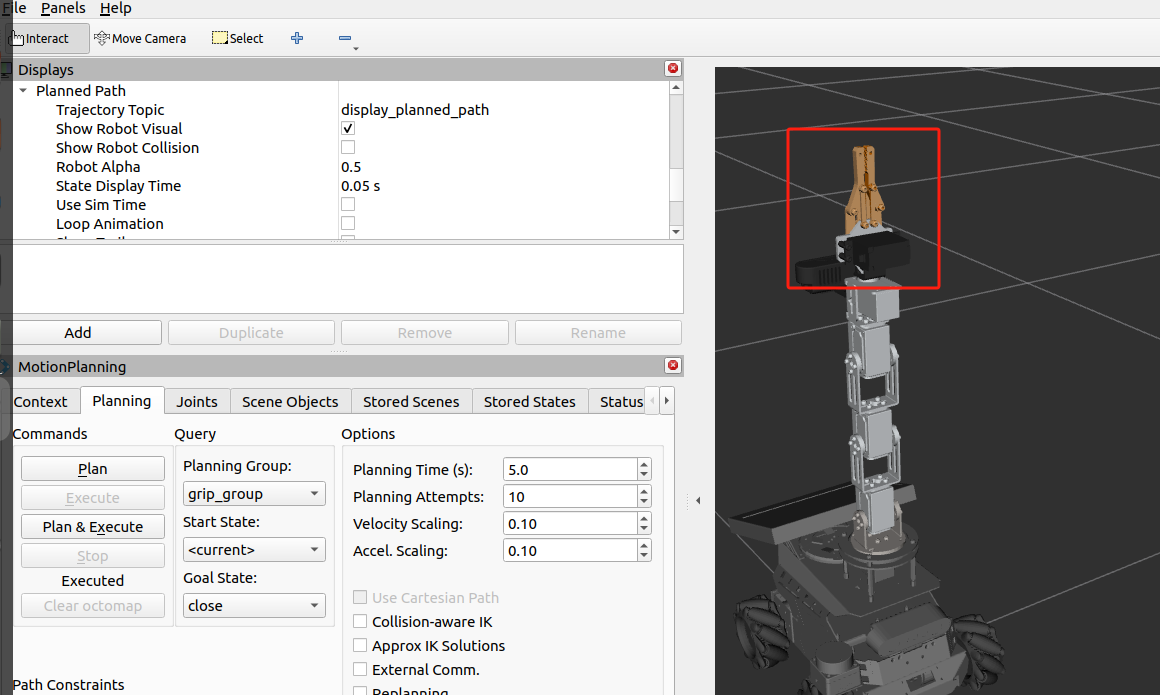
If the gripper closes successfully, the plan is executed successfully.
4. Set up RVIZ
When running MoveIt2, the robot arm may repeat the planned operation. This is because the loop animation is enabled . To disable this option, go to [Display], find [MotionPlanning] -> [Planned Path] -> [Loop Animation], and click the √ here to disable the loop animation.
When running MoveIt2, the orange part represents the target pose. If we do not want to display the target pose, we can find [MotionPlanning]->[Query Goal State] and click the √ here to cancel the display of the target pose.
After modifying the rviz settings here, you need to press ctrl and s to save .