Welcome to ROSMASTER M3 PRO repository
3.Embodied intelligent robot system architecture
Multi-Agent Embodied Architecture: multi_brains
Multi-Agent Embodied Architecture: multi_brains1. Course Content2. Introduction to multi_brains3. Dual-Model Inference Architecture3.1 Advantages of Dual-Model Inference3.1.1 Decoupling of Task Decision-Making and Action Translation3.1.2 Enhanced Success Rates for Long-Process Tasks3.2 Decision Layer AI3.3 Execution Layer AI4. Task Cycle5. Historical Context6. Map Mapping7. Action Function Library
1. Course Content
Gain an understanding of the multi-agent embodied architecture framework—multi_brains—as implemented on the ROSMASTER-M3 Pro.
2. Introduction to multi_brains
- multi_brains is a proprietary embodied intelligence framework developed by Yabo Intelligence, designed to be compatible with general-purpose large AI models. It circumvents the limitations typically associated with VLA (Vision-Language-Action) and end-to-end models—specifically, the requirement for dedicated hardware, the need for substantial local computing power, and the lengthy timeframes involved in data collection and training. By simply integrating with general-purpose AI models provided by cloud-based vendors, the framework enables edge-side robots to achieve powerful embodied intelligence capabilities.
- multi_brains utilizes a Retrieval-Augmented Generation (RAG) knowledge base to expand its training examples, thereby allowing the robot to rapidly adapt to diverse scenarios and tasks. It can be deployed on the vast majority of compact main control units, offloading the computationally intensive model inference processes to the cloud or a local server.
- The core philosophy behind multi_brains lies in employing multiple AI models to hierarchically decouple the various stages of a task. It represents a comprehensive upgrade to our first-generation proprietary dual-model inference framework, featuring the following key enhancements:
- Smoother Audio Recording Experience: Features inertia-aware end-of-speech detection with adjustable duration settings.
- More Flexible Decision-Making Mechanism: Includes a task routing function that allows the AI agent to autonomously select between dual-model and single-model inference strategies based on the complexity of the task, thereby granting the AI greater autonomy and enhancing the user experience.
- Intuitive Visual Architecture Workflow: multi_brains leverages Dify to construct a visual representation of the agent's architecture. During debugging, users can observe the AI agent's operations and data flow in real-time, providing a more intuitive understanding of the specific processes involved in dual-model inference.
- Fully Localized RAG Knowledge Base: Eliminates concerns regarding data sensitivity and privacy issues.
- Seamless Integration with Global AI Models: Through Dify's model provider plugins, users can quickly and seamlessly integrate with hundreds of AI models available worldwide (support is also available for integrating locally deployed models, should that be a requirement).
- Traceable Historical Records: By querying the backend access logs within Dify, users can review a complete history of all task instructions issued and the specific steps executed by the robot.
- Personalized Voice Responses: Users can customize the random voice responses generated by the robot. Configuration is handled via built-in speech synthesis commands, making the process simple and easy to master.
- Comprehensive Testing Toolkit: Provides a robust set of tools for rapidly validating the core functional modules of the system. - Simplified onboarding process: Streamlined most operational steps and configured quick commands.
3. Dual-Model Inference Architecture
- The design features dual-model inference and dynamic feedback inference, offering superior system robustness compared to a single-model architecture.
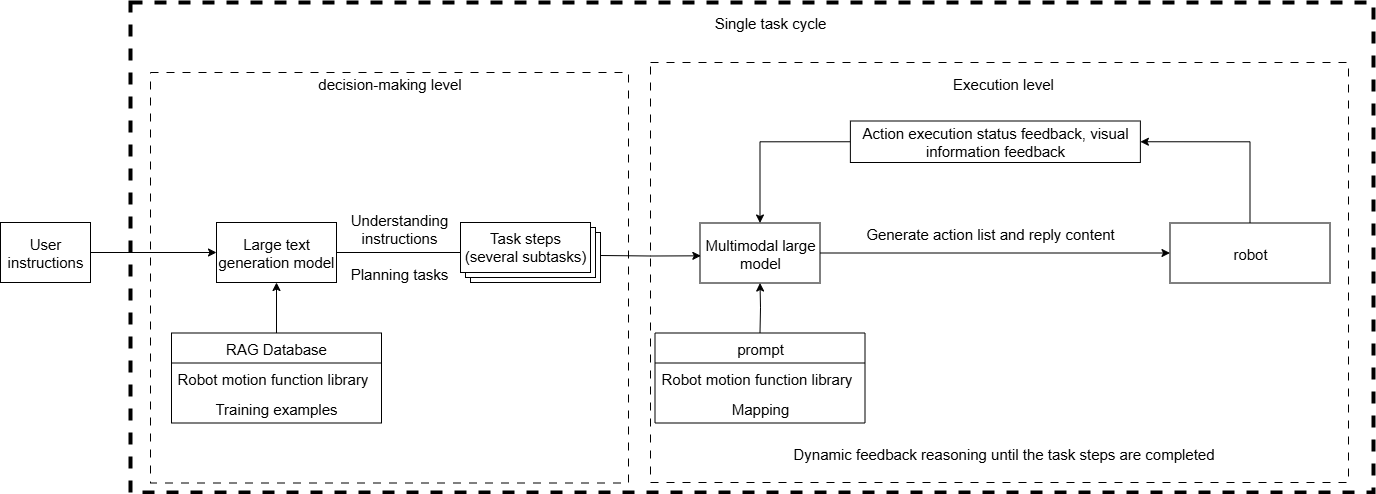
3.1 Advantages of Dual-Model Inference
3.1.1 Decoupling of Task Decision-Making and Action Translation
- The Decision Layer AI focuses on reasoning, planning, and breaking down task instructions.
- The Execution Layer AI focuses on generating chat responses and translating task steps into JSON text.
3.1.2 Enhanced Success Rates for Long-Process Tasks
When using a single-model approach for inference, the system must simultaneously handle "natural language understanding + environmental perception + process decomposition + action function output." This often leads to modal interference (e.g., comprehension errors caused by linguistic ambiguity or excessively long instructions). By processing tasks in distinct stages, the dual-model architecture allows the Decision Layer to focus exclusively on task planning, while the Execution Layer focuses on action execution.
3.2 Decision Layer AI
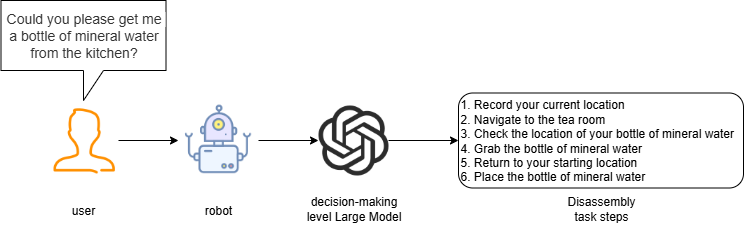
- The large model within the Decision Layer is primarily responsible for task planning; it interprets complex human instructions and decomposes them into specific, actionable task steps. For instance, upon receiving the instruction, "Could you go to the kitchen and fetch me a bottle of mineral water?", the large language model breaks it down into several distinct tasks, as illustrated in the figure below.
3.3 Execution Layer AI
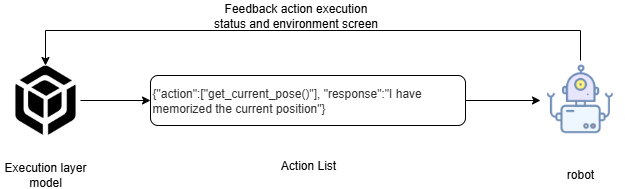
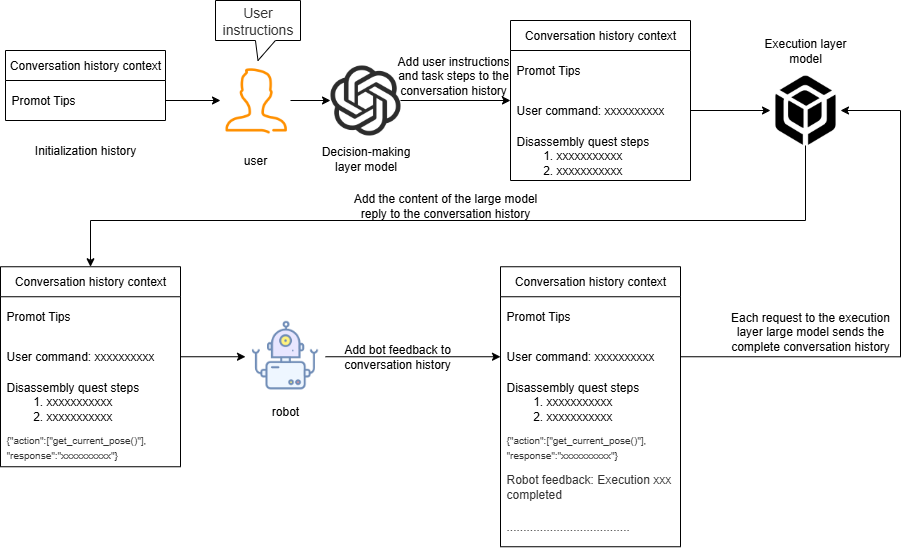
- The large model within the Execution Layer is primarily responsible for generating chat responses and translating task steps into JSON text. It continuously receives feedback regarding the robot's actions—including success/failure status and visual data—and issues instructions for the next action based on the outcome of the preceding step.
- The Execution Layer large model functions as a supervisor, constantly monitoring the robot's progress through the task steps. Based on the feedback received from the robot's actions and the current environmental information, it determines the appropriate subsequent action to take—continuing this process until the task is successfully completed or is terminated early due to unforeseen circumstances.
4. Task Cycle
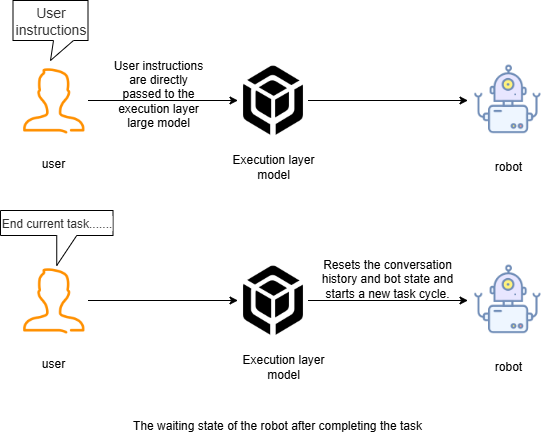
- Upon waking up the robot, a "task cycle" begins. All user commands and robot responses are stored within the AI model's historical context—effectively serving as the robot's temporary memory—enabling it to "remember" events that occurred previously.
- When a user requests to terminate the current task and dismiss the robot to rest, the robot resets the AI model's historical context. This is akin to the robot experiencing "amnesia," causing it to forget everything that transpired during the previous interaction.
5. Historical Context
- The robot's conversation history is stored within Dify's AI application variables; the default setting allows for a maximum conversation memory of 50 turns.
6. Map Mapping
- The robot utilizes a grid map for navigation. If the robot is required to comprehend specific locations or zones within the real world, a mapping relationship must be established between the grid map and the actual physical environment. This relationship is referred to as Map Mapping. - Let's assume we use a robot in a factory environment to generate a grid map using SLAM mapping. Within this real-world factory, there are several manually defined zones, as illustrated in the figure below:
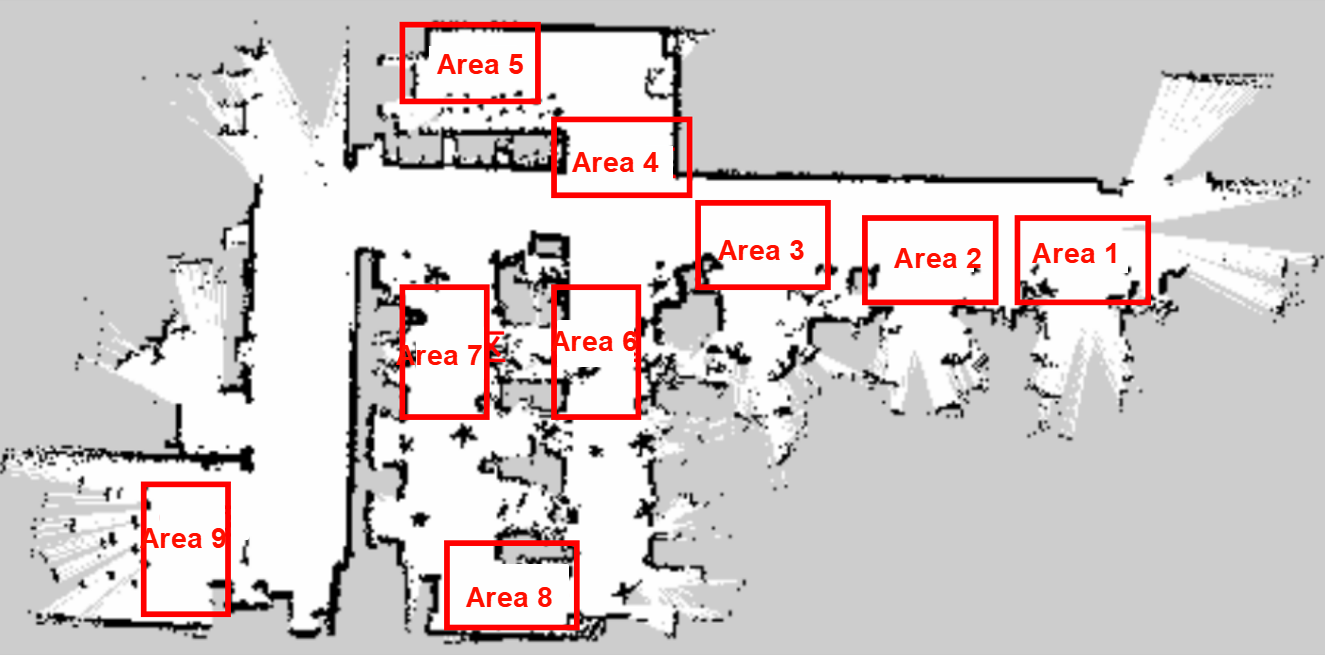
We establish a one-to-one correspondence between these real-world zones and specific alphabetical symbols:
A: "Zone 1", B: "Zone 2", C: "Zone 3", D: "Zone 4", E: "Zone 5", F: "Zone 6", G: "Zone 7", H: "Zone 8", I: "Zone 9"
Subsequently, we record the corresponding map coordinates for these alphabetical symbols within a YAML configuration file—for example:
Aname'Zone 1'positionx4.4034953117370605y0.4879316985607147orientationx0.0y0.0z0.701498621044694w0.7126708108744126When we instruct the robot to navigate to a specific physical zone, the Large Language Model (LLM) simply needs to translate this request into the corresponding alphabetical symbol; this allows the robot to correctly interpret and locate the designated zone within the real-world environment.
7. Action Function Library
- The API functions within the robot's action function library serve as the bridge enabling the Large Language Model to interact with the real world.
- These API functions define the atomic actions—the most fundamental operations—that the physical robot is capable of performing within the physical environment.
- The AI Large Language Model initiates actions by translating the required operation into a JSON text string, which is then transmitted to the robot; the robot subsequently parses this JSON text to execute the corresponding action.
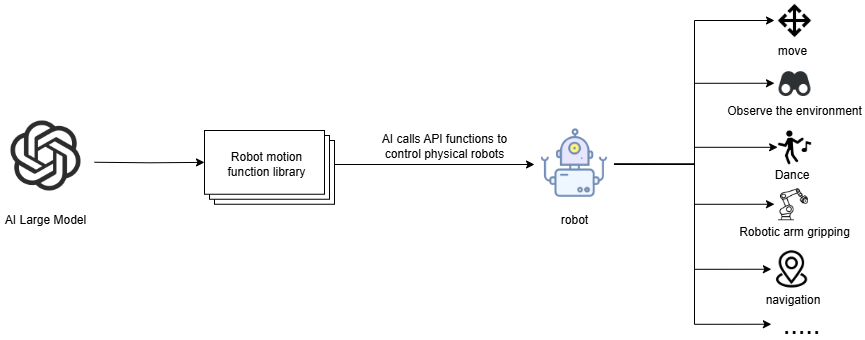
All atomic action functions and their corresponding functionalities are listed in the table below:
| Function Name | Parameters | Functionality | Invocation Commands |
|---|---|---|---|
| move_left(x, angular_speed) | x: Rotation Angle; angular_speed: Angular Velocity | Rotate left by x degrees | Turn left x degrees |
| move_right(x, angular_speed) | x: Rotation Angle; angular_speed: Angular Velocity | Rotate right by x degrees | Turn right x degrees |
| dance() | - | Trigger the robot's preset dance movements | Dance, Perform a dance, etc. |
| set_cmdvel(linear_x, linear_y, angular_z, duration) | linear_x: X-axis Linear Velocity; linear_y: Y-axis Linear Velocity; angular_z: Z-axis Angular Velocity; duration: Topic publishing duration | Control the robot chassis movement by setting linear and angular velocities | Move forward, Move backward, Strafe left/right |
| navigation(x) | x: Symbol corresponding to the target point in the map mapping | Control the robot to navigate to a target point | Navigate to [Location] |
| navigation(zero) | zero: A previously recorded coordinate point | Navigate back to the last recorded coordinate point | Return to origin, Return to starting position |
| get_current_pose() | - | Record the current coordinates within the global map into the 'zero' parameter | Remember current location |
| arm_up() | - | Raise the robotic arm upwards | Arm up |
| arm_down() | - | Move the robotic arm downwards | Arm down |
| arm_nod() | - | Perform a nodding motion with the arm | Nod |
| arm_shake() | - | Perform a head-shaking motion with the arm | Shake head |
| arm_applaud() | - | Perform an applauding motion with the arm | Applaud |
| grasp_obj(x1, y1, x2, y2) | (x1, y1, x2, y2): Coordinates of the top-left and bottom-right corners of the target object's bounding box | Use the robotic arm to grasp a specific object | Grasp [Object] |
| putdown() | - | The robotic arm puts down the currently gripped object | |
| apriltag_sort(x) | x: AprilTag ID | Sorts out the AprilTag with the specified ID | Sort out AprilTag #x |
| track(x1, y1, x2, y2) | (x1, y1, x2, y2): Coordinates of the top-left and bottom-right corners of the target object's bounding box | Tracks the specified object within the field of view | Track xx |
| apriltag_remove_higher(x) | x: Height | Removes AprilTags at or above the specified height | Remove AprilTags taller than x cm |
| color_remove_higher(color, target_high) | color: Color; target_high: Height | Removes color blocks at or above the specified height | Remove color blocks of 'color' taller than target_high cm |
| seewhat() | - | Captures an image from the robot's current perspective and uploads it to the execution-layer large model | Observe the environment |
| follow_line_clear() | - | Moves along a patrol line and clears AprilTag obstacles from the path | Start line-following and clearing obstacles |
| finish_dialogue() | - | Resets historical context and initiates a new task cycle | - |
| finish() | - | Automatically called after the robot completes a task; used to stop providing status feedback to the execution-layer model | - |
| get_dist() | (x1, y1, x2, y2): Coordinates of the top-left and bottom-right corners of the target object's bounding box | Retrieves the distance to the target object within the camera's field of view | Check: How far away is the xx in front of you? |