Welcome to ROSMASTER M3 PRO repository
8.Deep learning object tracking
Deep Learning Object Tracking
1. Content Description
This section is exclusive to the Orin motherboard and primarily introduces optimizing the Yolov8 object detection framework using TensorRT. Users control the robot to track a target by selecting a track_id.
1.1 Introduction to TensorRT
TensorRT is a high-performance deep learning inference optimization SDK (Software Development Kit) released by NVIDIA. It is primarily used to optimize trained deep learning models to improve their inference efficiency (speed and throughput) on NVIDIA GPUs. It is widely used in real-time inference scenarios in fields such as computer vision and natural language processing, such as autonomous driving, robotics, and video analysis.
Core Features and Benefits:
- Model Optimization
- Operator Fusion: Combines multiple consecutive operations (such as convolution + activation function) into a single optimized operator, reducing computational overhead and memory access. - Precision Calibration: Supports converting models from FP32 (single-precision floating point) to FP16 (half-precision) or INT8 (integer) with minimal loss of accuracy, significantly improving computation speed and reducing memory usage.
- Inter-Layer Optimization: Adjusts the execution order and computational methods of layers based on GPU hardware features (such as Tensor Cores) to maximize hardware utilization.
- Efficient Inference Engine
Optimized models are converted to a TensorRT-specific inference engine. This engine is binary code compiled for specific GPU hardware and can run directly and efficiently on the GPU, avoiding the redundant computation and overhead of general-purpose frameworks.
- Multi-Framework Support
Models trained in various deep learning frameworks can be imported, including PyTorch, TensorFlow, and ONNX. (ONNX is a common intermediate format; most frameworks can be exported as ONNX models and then imported into TensorRT.)
- Low Latency and High Throughput
TensorRT-optimized models typically achieve several times or even dozens of times faster inference speeds. They also support batch inference and concurrent processing, making them ideal for scenarios with high real-time requirements, such as real-time object detection in autonomous driving.
In this lesson, converting the YOLOv8 .pt model to the TensorRT engine significantly improves inference speed on the Orin motherboard, meeting real-time requirements.
2. Program Startup
Enter the following commands in the terminal to start the camera and radar:
xxxxxxxxxxros2 launch yahboom_yolov8 yolov8_deep_track.launch.pyOpen another terminal and enter the following command to start the tracking program:
xxxxxxxxxxros2 run yahboom_yolov8 yolov8_track
Then, open a third terminal and enter the following command to start rqt_image_view to view the image:
xxxxxxxxxxros2 run rqt_image_view rqt_image_view
Select the topic /detect_image in the upper left corner and click the refresh button on the right to view the detected image, as shown below.
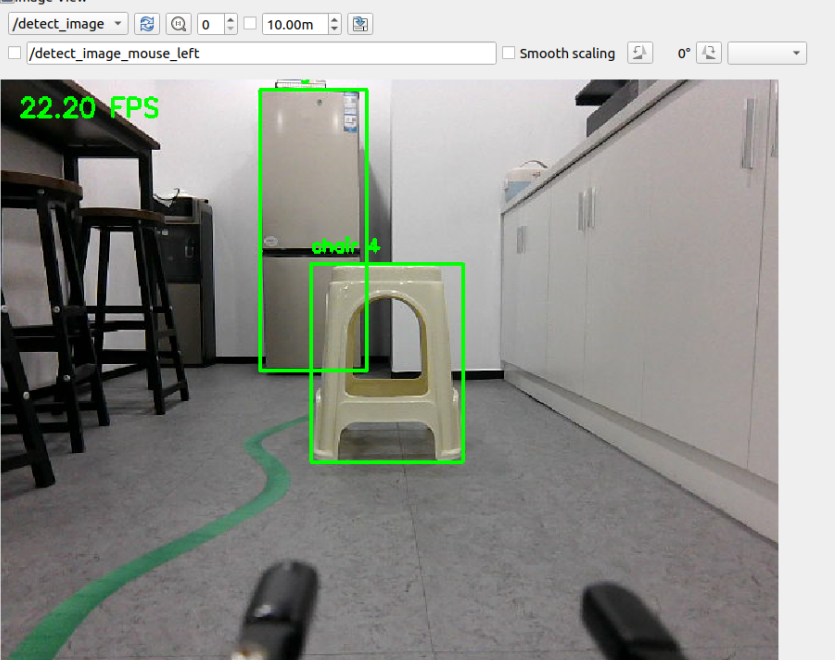
Then, based on the ID in the image, enter the following command to publish to the target topic /track_id. For example, if we want to track an object with ID 4, enter the following command and press Enter to publish the message.
xxxxxxxxxxros2 topic pub /tracker_id std_msgs/msg/Int16 "data: 4" --onceAfter publishing, the tracked object will be outlined in a blue box, as shown below.
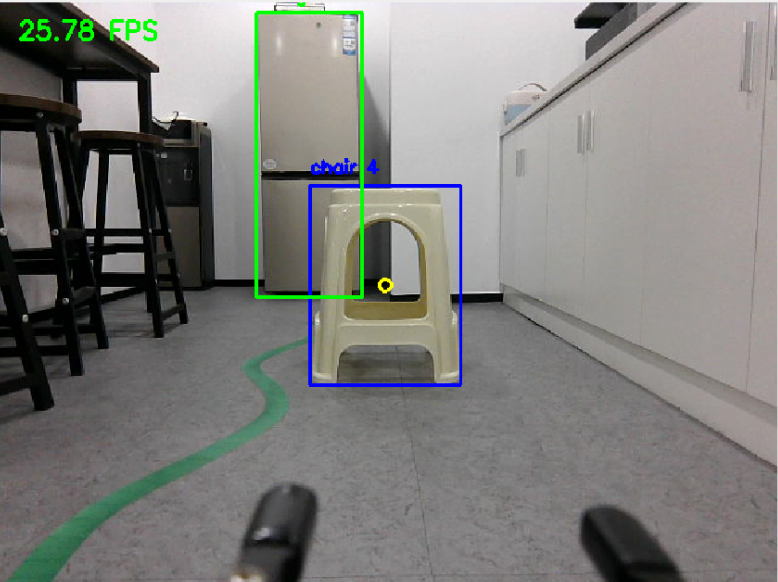
Then slowly move the object, and the robot will slowly follow it. The program will adjust the robot so that the center point of the tracked object (yellow circle) is near the center of the screen. After completing left and right tracking, the robot will maintain a distance of 1.2 meters from the object based on radar information.
3. Core Code Analysis
Import the necessary library files.
xxxxxxxxxximport cv2import numpy as npfrom collections import OrderedDict, namedtupleimport timeimport torchimport syssys.path.append('/home/jetson/yahboomcar_ws/src/yahboom_yolov8/yahboom_yolov8/yolov8')import tracker_trtfrom ultralytics.utils.ops import non_max_suppression, scale_boxesimport tensorrt as trtimport rclpyfrom rclpy.node import Nodefrom sensor_msgs.msg import Imagefrom std_msgs.msg import Int16from cv_bridge import CvBridgefrom yahboom_yolov8.Robot_Move import *from yahboom_yolov8.common import *from geometry_msgs.msg import Twistfrom arm_msgs.msg import ArmJointsfrom sensor_msgs.msg import LaserScanimport mathimport osThe image preprocessing function letterbox returns the processed image im, the scaling factor r, and the padding (dw, dh) (which can be used to map the coordinates of the model output back to the original image).
xxxxxxxxxxdef letterbox(im, new_shape=(640, 640), color=(114, 114, 114), auto=False, scaleup=True, stride=32): # Resize and pad image while meeting stride-multiple constraints shape = im.shape[:2] # current shape [height, width] if isinstance(new_shape, int): new_shape = (new_shape, new_shape) # Scale ratio (new / old) r = min(new_shape[0] / shape[0], new_shape[1] / shape[1]) if not scaleup: # only scale down, do not scale up (for better val mAP) r = min(r, 1.0) # Compute padding new_unpad = int(round(shape[1] * r)), int(round(shape[0] * r)) dw, dh = new_shape[1] - new_unpad[0], new_shape[0] - new_unpad[1] # wh padding if auto: # minimum rectangle dw, dh = np.mod(dw, stride), np.mod(dh, stride) # wh padding dw /= 2 # divide padding into 2 sides dh /= 2 if shape[::-1] != new_unpad: # resize im = cv2.resize(im, new_unpad, interpolation=cv2.INTER_LINEAR) top, bottom = int(round(dh - 0.1)), int(round(dh + 0.1)) left, right = int(round(dw - 0.1)), int(round(dw + 0.1)) im = cv2.copyMakeBorder(im, top, bottom, left, right, cv2.BORDER_CONSTANT, value=color) # add border return im, r, (dw, dh)The image preprocessing function preprocess is used to convert the original input image into an input format acceptable to the model, and returns the processed model input tensor img, the original image image, the padding dw and dh (dw/dh are used to subsequently map the bounding box predicted by the model from the processed image back to the original image).
xxxxxxxxxxdef preprocess(image, imgsz=640): img, ratio, (dw, dh) = letterbox(image, imgsz, stride=32, auto=False) img = cv2.cvtColor(img, cv2.COLOR_BGR2RGB) img = img.transpose((2, 0, 1)) img = np.ascontiguousarray(img) img = torch.from_numpy(img).to(torch.device('cuda:0')).float() img /= 255.0 return img, image, dw, dhThe post-processing function post_process is mainly used to process the detection results output by the model (such as coordinate mapping) and organize the results into a format that is convenient for subsequent use. At the same time, it prepares for drawing bounding boxes on the original image and returns the original image img and the organized detection results list detections.
xxxxxxxxxxdef post_process(img, det, frames): """ Draw bounding boxes on the input image. """ detections = [] if len(det): # Rescale boxes from img_size to im0 size det[:, :4] = scale_boxes(frames.shape[2:], det[:, :4], img.shape).round() for *xyxy, conf, cls in reversed(det): label = f'{names[int(cls)]} {conf:.2f}' cls_id = int(cls) cls1 = names[int(cls)] detections.append((int(xyxy[0]), int(xyxy[1]), int(xyxy[2]), int(xyxy[3]), cls1, conf.item())) return img, detectionsThe program initializes and creates publishers and subscribers,
xxxxxxxxxxdef __init__(self, weight, thres=0.60, size=640, video_path='', batch_size=3) -> None: super().__init__('yolov8_node') # ½ÚµãÃû³Æ self.video_path = video_path self.imgsz = size #Engine file, the file address is /home/jetson/yahboomcar_ws/src/yahboom_yolov8/yahboom_yolov8/yolov8/weights/yolov8s.trt self.weight = weight self.iou_thres = thres self.batch_size = batch_size #Specify the device used for PyTorch calculations as NVIDIA GPU number 0 self.device = torch.device('cuda:0') #Initialize the engine self.init_engine() self.frame = None self.rgb_bridge = CvBridge() self.msg2img_bridge = CvBridge() self.TargetAngle_pub = self.create_publisher(ArmJoints, "arm6_joints", 10) self.yolov8_img_pub = self.create_publisher(Image,"detect_image",1) self.cmd_pub = self.create_publisher(Twist,"/cmd_vel",1) self.sub_rgb = self.create_subscription(Image,"/camera/color/image_raw",self.get_RGBImageCallBack,1) self.sub_laser = self.create_subscription(LaserScan,"/scan",self.registerScan,1) self.trackered_id = None self.sub_t_id = self.create_subscription(Int16,"/tracker_id",self.get_IDCallBack,100) self.vel = Twist() self.angular_PID = (0.5, 0.0, 0.3) self.lin_pid = SinglePID(0.5, 0.0, 0.1) self.angular_pid = simplePID(self.angular_PID[0] / 100.0, self.angular_PID[1] / 100.0, self.angular_PID[2] / 100.0) self.found = False self.joy_ctrl = False self.init_joints = [90, 178, 0, 0, 90, 90] while not self.TargetAngle_pub.get_subscription_count(): self.pubSix_Arm(self.init_joints) time.sleep(0.1) self.pubSix_Arm(self.init_joints) self.img_list = [] self.original_frames = [] self.LaserAngle = 5 self.depth_image_info = [] self.depth_bridge = CvBridge() self.rotation_done = False self.ResponseDist = 1.2Initialize the engine init_engine, the method to initialize the TensorRT reasoning engine, its main function is to load the precompiled TensorRT engine file, parse the engine's input and output information, and complete the initialization of the reasoning environment to prepare for subsequent efficient reasoning.
xxxxxxxxxxdef init_engine(self): # Infer TensorRT Engine self.Binding = namedtuple('Binding', ('name', 'dtype', 'shape', 'data', 'ptr')) self.logger = trt.Logger(trt.Logger.INFO) trt.init_libnvinfer_plugins(self.logger, namespace="") with open(self.weight, 'rb') as self.f, trt.Runtime(self.logger) as self.runtime: self.model = self.runtime.deserialize_cuda_engine(self.f.read()) self.bindings = OrderedDict() for index in range(self.model.num_io_tensors): self.name = self.model.get_tensor_name(index) self.dtype = trt.nptype(self.model.get_tensor_dtype(self.name)) self.shape = tuple(self.model.get_tensor_shape(self.name)) self.data = torch.from_numpy(np.empty(self.shape, dtype=np.dtype(self.dtype))).to(self.device) self.bindings[self.name] = self.Binding(self.name, self.dtype, self.shape, self.data, int(self.data.data_ptr())) self.context_ = self.model.create_execution_context() # Set the addresses of input and output tensors for name, binding in self.bindings.items(): self.context_.set_tensor_address(name, binding.ptr)Image processing function process,
xxxxxxxxxxdef process(self): #Convert received image topic messages into image data frame = self.msg2img_bridge.imgmsg_to_cv2(self.frame, "rgb8") # Preprocessing frames frame_tensor, _, dw, dh = preprocess(frame, imgsz=self.imgsz) self.img_list.append(frame_tensor) self.original_frames.append(frame) if len(self.img_list) == self.batch_size: #Concatenate multiple single-frame tensors into a batch tensor frames = torch.stack(self.img_list, 0) t1 = time.perf_counter() # Calling the model for batch inference (using the TensorRT engine) outputs = self.predict(frames) t2 = time.perf_counter() infer_time = (t2 - t1) / self.batch_size #Filter duplicate detection boxes by IoU (Intersection over Union) threshold and retain the best result outputs = non_max_suppression(outputs, 0.25, self.iou_thres, classes=None, agnostic=False) for i in range(self.batch_size): t3 = time.perf_counter() #Post-processing using raw frames result,det_infos = post_process(self.original_frames[i], outputs[i], frames) # Target tracking: Update the tracker and obtain target information with tracking ID list_bbox = tracker_trt.update(det_infos,frame) # Draw the bounding box for (x1, y1, x2, y2, cls, track_id) in list_bbox: color = [0, 255, 0] #Draw a green box cv2.rectangle(result, (int(x1), int(y1)), (int(x2), int(y2)), color, 2) cv2.putText(result, f'{cls} {track_id}', (int(x1), int(y1) - 10), cv2.FONT_HERSHEY_SIMPLEX, 0.5, color, 2) #If the current detection id value is equal to the tracking id value if track_id == self.trackered_id: self.found = True color = [0, 0, 255] self.cx = (x1 + x2)/2 self.cy = (y1 + y2)/2 cv2.circle(result, (int(self.cx), int(self.cy)), 5, (255, 255, 0), 2) #Draw a blue box cv2.rectangle(result, (int(x1), int(y1)), (int(x2), int(y2)), color, 2) #Plotting category and tracking ID labels cv2.putText(result, f'{cls} {track_id}', (int(x1), int(y1) - 10), cv2.FONT_HERSHEY_SIMPLEX, 0.5, color, 2) t4 = time.perf_counter() fps = 1 / (infer_time + t4 - t3) cv2.putText(result, f"{fps:.2f} FPS", (15, 30), cv2.FONT_HERSHEY_SIMPLEX, 0.7, (0, 255, 0), 2) ros_image = self.rgb_bridge.cv2_to_imgmsg(result, encoding='rgb8') self.yolov8_img_pub.publish(ros_image) #If the target tracking object is found and the current handle control is not enabled if self.found == True and self.joy_ctrl == False: #If the x coordinate of the tracking target center is not between [315,325] if abs(self.cx - 320 )>5: #Calculating angular velocity angular_z = self.angular_pid.compute(320, self.cx) #Determine whether the absolute value of the calculated angular velocity is less than 0.1. If so, the angular velocity is assigned to 0 and self.rotation_done is assigned to True, indicating that the front and rear distances can be adjusted according to the lidar test in the next stage; if not, the angular velocity is taken as the calculated angular velocity. if abs(angular_z) < 0.1: angular_z = 0.0 self.rotation_done = True self.vel.angular.z = angular_z self.cmd_pub.publish(self.vel) else: self.rotation_done = False print("angular_z: ",angular_z) self.vel.angular.z = angular_z self.cmd_pub.publish(self.vel) else: self.cmd_pub.publish(Twist()) else: self.cmd_pub.publish(Twist()) self.img_list = [] self.original_frames = [] self.found = False LiDAR topic callback function registerScan,
xxxxxxxxxxdef registerScan(self, scan_data): if not isinstance(scan_data, LaserScan): return ranges = np.array(scan_data.ranges) minDistList = [] minDistIDList = [] for i in range(len(ranges)): #Radians angle = (scan_data.angle_min + scan_data.angle_increment * i) * RAD2DEG #The radar detection range is self.LaserAngle, which is set to 5 degrees to the left and right of 0 degrees, that is, 10 degrees in front of the radar, and the distance of the current angle is not 0 if abs(angle) < self.LaserAngle and ranges[i] !=0.0 : minDistList.append(ranges[i]) minDistIDList.append(angle) if len(minDistList) == 0: return #Get the current minimum distance minDist = min(minDistList) minDistID = minDistIDList[minDistList.index(minDist)] #print("minDistID: ",minDistID) print("minDist: ",minDist) #Determine whether the left and right rotation tracking is completed. if self.rotation_done == True: #Determine whether the absolute value of the difference between the minimum distance and the set distance 1.2 is less than 0.2. If so, issue a stop command; if not, it means that adjustment is needed if abs(minDist - self.ResponseDist) < 0.2: minDist = self.ResponseDist self.cmd_pub.publish(Twist()) else: #print("Adjust dist.") if not math.isinf(minDist): #PID calculation of linear speed linear_x = -self.lin_pid.pid_compute(self.ResponseDist, minDist) print("linear_x: ",linear_x) self.vel.linear.x = linear_x self.cmd_pub.publish(self.vel)