Welcome to ROSMASTER M3 PRO repository
8. Image translation
Image panning
The original image src is converted to the target image dst through the transformation matrix M:
dst(x, y) = src(M11x + M12y+M13, M21x+M22y+M23)
If the original image src is moved 200 pixels to the right and 100 pixels downward, the corresponding relationship is:
xxxxxxxxxxdst(x, y) = src(x+200, y+100)
Complete the above expression:
dst(x, y) = src(1·x + 0·y + 200, 0·x + 1·y + 100)
According to the above expression, the values of each element in the corresponding transformation matrix M can be determined as:
M11=1
M12=0
M13=200
M21=0
M22=1
M23=100
Substituting the above values into the transformation matrix M, we get:
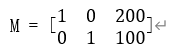
Next, we directly use the transformation matrix M to call the function cv2.warpAffine() to complete the image translation.
Code path:
xxxxxxxxxxopencv/opencv_basic/02_OpenCV Transform/03Picture Pan.ipynb
xxxxxxxxxximport cv2import numpy as npimg = cv2.imread('yahboom.jpg',1)#cv2.imshow('src',img)imgInfo = img.shapeheight = imgInfo[0]width = imgInfo[1]####matShift = np.float32([[1,0,200],[0,1,100]])# 2*3dst = cv2.warpAffine(img, matShift, (height, width)) #1 data 2 mat 3 info# Shift matrix# cv2.imshow('dst',dst)# cv2.waitKey(0)
The following will show the original image and the translated image in the JupyterLab control:
xxxxxxxxxx#bgr8 to jpeg formatimport enumimport cv2def bgr8_to_jpeg(value, quality=75):return bytes(cv2.imencode('.jpg', value)[1])import ipywidgets.widgets as widgetsimage_widget1 = widgets.Image(format='jpg', )image_widget2 = widgets.Image(format='jpg', )# create a horizontal box container to place the image widget next to each otherimage_container = widgets.HBox([image_widget1, image_widget2])# display the container in this cell's outputdisplay(image_container)#display(image_widget2)img1 = cv2.imread('yahboom.jpg',1)image_widget1.value = bgr8_to_jpeg(img1)image_widget2.value = bgr8_to_jpeg(dst)
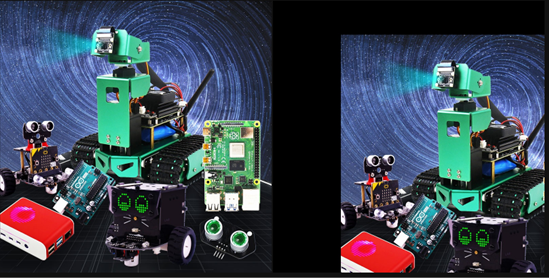
As can be seen from the image, the picture has moved to the lower right corner by (200, 100).