Welcome to ROSMASTER M3 PRO repository
6.Face special effects
1. Content Description
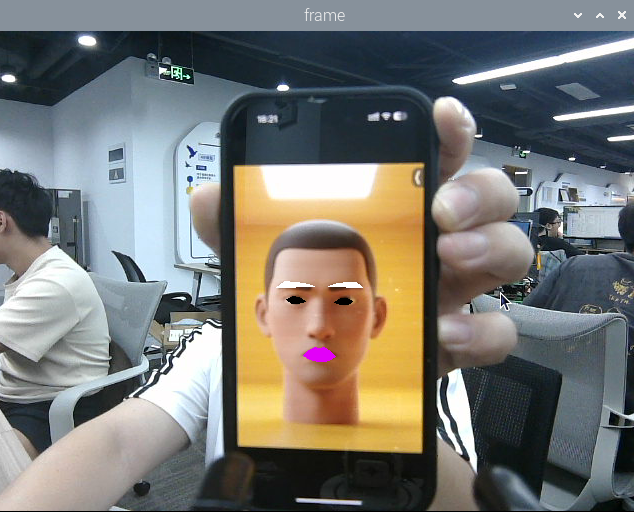
This program implements the functions of acquiring color images and using the dlib library to implement face detection and face effects.
This section requires entering commands in the terminal. The terminal you open depends on your motherboard type. This lesson uses the Raspberry Pi 5 as an example. For Raspberry Pi and Jetson-Nano boards, you need to open a terminal on the host computer and enter the command to enter the Docker container. Once inside the Docker container, enter the commands mentioned in this section in the terminal. For instructions on entering the Docker container from the host computer, refer to this product tutorial [Configuration and Operation Guide]--[Enter the Docker (Jetson Nano and Raspberry Pi 5 users, see here)].
Open the terminal directly on the Orin motherboard and enter the commands mentioned in this section.
2. Program startup
First, in the terminal, enter the following command to start the camera,
xxxxxxxxxxros2 launch orbbec_camera dabai_dcw2.launch.py
After successfully starting the camera, open another terminal and enter the following command in the terminal to start the face effects program:
xxxxxxxxxxros2 run yahboomcar_mediapipe 06_FaceLandmarks
After the program is run, as shown in the figure below, it will first detect the face, and then perform special effects processing on the eyebrows, eyes and mouth areas.
3. Core code analysis
Program code path:
Raspberry Pi 5 and Jetson-Nano board
The program code is in the running docker. The path in docker is
/root/yahboomcar_ws/src/yahboomcar_mediapipe/yahboomcar_mediapipe/06_FaceLandmarks.pyOrin Motherboard
The program code path is /home/jetson/yahboomcar_ws/src/yahboomcar_mediapipe/yahboomcar_mediapipe/06_FaceLandmarks.py
Import the library files used,
x
import time#Import dlib libraryimport dlibimport cv2 as cvimport numpy as npimport rclpyfrom rclpy.node import Nodefrom cv_bridge import CvBridgefrom sensor_msgs.msg import Imagefrom arm_msgs.msg import ArmJointsimport cv2Introduction to the dlib library:
DLIB is a modern C++ toolkit that includes machine learning algorithms and tools for creating complex software in C++ to solve real-world problems. It is widely used in industry and academia for robotics, embedded devices, mobile phones, and large-scale high-performance computing environments. The dlib library uses 68 points to mark important facial features, such as points 18-22 for the right eyebrow and points 51-68 for the mouth. Faces are detected using the get_frontal_face_detector module in the dlib library, and facial feature values are predicted using the shape_predictor_68_face_landmarks.dat feature data.
The 68 facial key points of dlib are arranged in the following order:
- 0-16: Chin contour
- 17-21: right eyebrow
- 22-26: Left eyebrow
- 27-35: Nose bridge and nose tip
- 36-41: right eye
- 42-47: Left eye
- 48-67: Lip contour
Initialize data and define publishers and subscribers,
x
def __init__(self,name): super().__init__(name) #Import database self.dat_file = "/root/yahboomcar_ws/src/yahboomcar_mediapipe/yahboomcar_mediapipe/file/shape_predictor_68_face_landmarks.dat" #Define face detection object self.hog_face_detector = dlib.get_frontal_face_detector() self.dlib_facelandmark = dlib.shape_predictor(self.dat_file) self.rgb_bridge = CvBridge() #Define the topic for controlling 6 servos and publish the detected posture self.TargetAngle_pub = self.create_publisher(ArmJoints, "arm6_joints", 10) self.init_joints = [90, 150, 10, 20, 90, 90] self.pubSix_Arm(self.init_joints) #Define subscribers for the color image topic self.sub_rgb = self.create_subscription(Image,"/camera/color/image_raw",self.get_RGBImageCallBack,100)The topic of color images returns to the function,
x
def get_RGBImageCallBack(self,msg): rgb_image = self.rgb_bridge.imgmsg_to_cv2(msg, "bgr8") #Put the obtained image into the defined get_face function and return the detected image frame = self.get_face(rgb_image, draw=False) #Call the prettify_face function to perform special effects processing on the image frame = self.prettify_face(frame, eye=True, lips=True, eyebrow=True, draw=True) key = cv2.waitKey(1) cv.imshow('frame', frame)get_face function, detects faces,
x
def get_face(self, frame, draw=True): #Convert the image space and convert bgr into grayscale image to facilitate subsequent image processing gray = cv.cvtColor(frame, cv.COLOR_BGR2GRAY) #Input grayscale image and detect faces self.faces = self.hog_face_detector(gray) for face in self.faces: self.face_landmarks = self.dlib_facelandmark(gray, face) if draw: for n in range(68): x = self.face_landmarks.part(n).x y = self.face_landmarks.part(n).y cv.circle(frame, (x, y), 2, (0, 255, 255), 2) cv.putText(frame, str(n), (x, y), cv.FONT_HERSHEY_SIMPLEX, 0.6, (0, 255, 255), 2) return frameprettify_face function, add special effects to the face,
x
def prettify_face(self, frame, eye=True, lips=True, eyebrow=True, draw=True): #Eye if eye: leftEye = self.get_lmList(frame, 36, 42) rightEye = self.get_lmList(frame, 42, 48) if draw: if len(leftEye) != 0: frame = cv.fillConvexPoly(frame, np.mat(leftEye), (0, 0, 0)) if len(rightEye) != 0: frame = cv.fillConvexPoly(frame, np.mat(rightEye), (0, 0, 0)) #lips if lips: lipIndexlistA = [51, 52, 53, 54, 64, 63, 62] lipIndexlistB = [48, 49, 50, 51, 62, 61, 60] lipsUpA = self.get_lipList(frame, lipIndexlistA, draw=True) lipsUpB = self.get_lipList(frame, lipIndexlistB, draw=True) lipIndexlistA = [57, 58, 59, 48, 67, 66] lipIndexlistB = [54, 55, 56, 57, 66, 65, 64] lipsDownA = self.get_lipList(frame, lipIndexlistA, draw=True) lipsDownB = self.get_lipList(frame, lipIndexlistB, draw=True) if draw: if len(lipsUpA) != 0: frame = cv.fillConvexPoly(frame, np.mat(lipsUpA), (249, 0, 226)) if len(lipsUpB) != 0: frame = cv.fillConvexPoly(frame, np.mat(lipsUpB), (249, 0, 226)) if len(lipsDownA) != 0: frame = cv.fillConvexPoly(frame, np.mat(lipsDownA), (249, 0, 226)) if len(lipsDownB) != 0: frame = cv.fillConvexPoly(frame, np.mat(lipsDownB), (249, 0, 226)) #Eyebrow if eyebrow: lefteyebrow = self.get_lmList(frame, 17, 22) righteyebrow = self.get_lmList(frame, 22, 27) if draw: if len(lefteyebrow) != 0: frame = cv.fillConvexPoly(frame, np.mat(lefteyebrow), (255, 255, 255)) if len(righteyebrow) != 0: frame = cv.fillConvexPoly(frame, np.mat(righteyebrow), (255, 255, 255)) return frameget_lmList gets the facial coordinate function,
x
def get_lmList(self, frame, p1, p2, draw=True): #Define an empty list lmList = [] # Determine whether a face is detected if len(self.faces) != 0: #Traverse the face list and get the xy coordinates of each point in the interval for n in range(p1, p2): x = self.face_landmarks.part(n).x y = self.face_landmarks.part(n).y #Add the coordinates of the points on the face to the list lmList.append([x, y]) if draw: next_point = n + 1 if n == p2 - 1: next_point = p1 x2 = self.face_landmarks.part(next_point).x y2 = self.face_landmarks.part(next_point).y cv.line(frame, (x, y), (x2, y2), (0, 255, 0), 1) return lmList