Welcome to ROSMASTER M3 PRO repository
6.Color block color sorting
Color block color sorting
1. Content Description
This function enables the program to obtain images through the camera, select the color of the color block to be sorted according to the key input, and the program will identify the color block that meets the requirements and clamp it with the lower claw, and finally place it in the set position.
This section requires entering commands in the terminal. The terminal you open depends on your motherboard type. This lesson uses the Raspberry Pi 5 as an example. For Raspberry Pi and Jetson-Nano boards, you need to open a terminal on the host computer and enter the command to enter the Docker container. Once inside the Docker container, enter the commands mentioned in this section in the terminal. For instructions on entering the Docker container from the host computer, refer to this product tutorial [Configuration and Operation Guide]--[Enter the Docker (Jetson Nano and Raspberry Pi 5 users, see here)].
Simply open the terminal on the Orin motherboard and enter the commands mentioned in this section.
Wooden Blocks Used in This Lesson: 30x30x30mm Colored Blocks
2. Program startup
First, open the terminal and enter the following command to start the robot arm solver and camera driver,
ros2 launch M3Pro_demo camera_arm_kin.launch.py
Then, open another terminal and enter the following command to start the robotic arm gripping program:
xxxxxxxxxxros2 run M3Pro_demo grasp_desktop
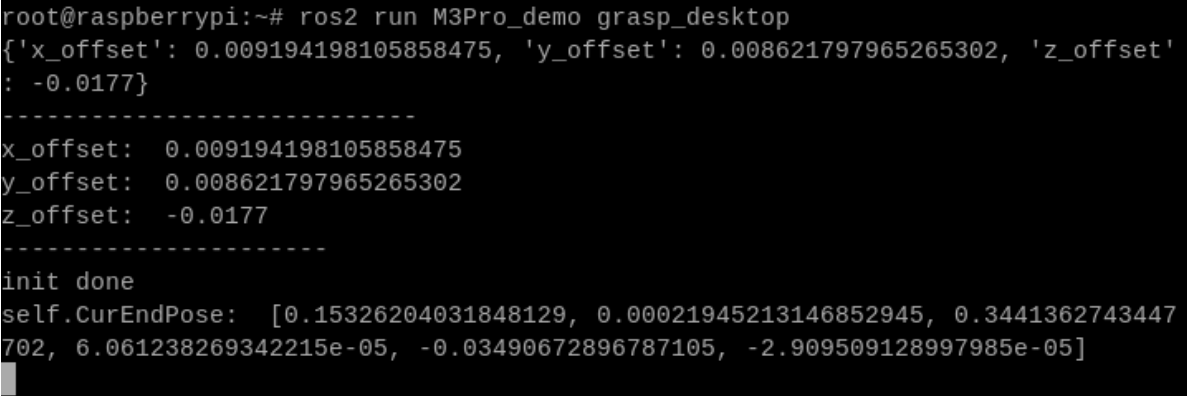
Finally, open the third terminal and enter the following command to start the color sorting program:
xxxxxxxxxxros2 run M3Pro_demo color_recognize
After starting this command, the second terminal should receive the current angle topic information sent in one frame and calculate the current posture once, as shown in the figure below.
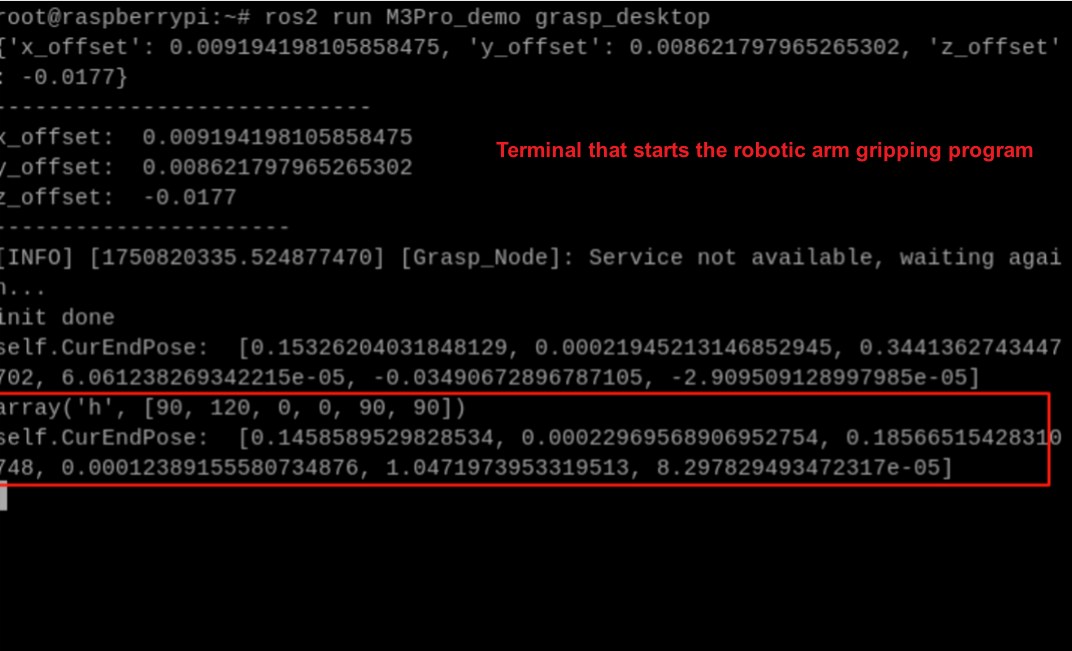
If the current angle information is not received and the current posture is not calculated, the gripping posture will be inaccurate when the coordinate system is converted. Therefore, you need to close the color sorting program by pressing ctrl+c and restart the color sorting program until the robot gripping program obtains the current angle information and calculates the current end position.
Upon launching the color block sorting program, it subscribes to the color and depth image topics. Place the product's accompanying 30x30x30mm color block beneath the camera; once the color block appears in the image, use the following keys to select or calibrate the color block's color:
- Press R or r: sort red blocks
- Press G or g: sort the green blocks
- Press B or b: sort blue blocks
- Press Y or y: sort the yellow blocks
- Press C or c: calibrate the color of the selected color block
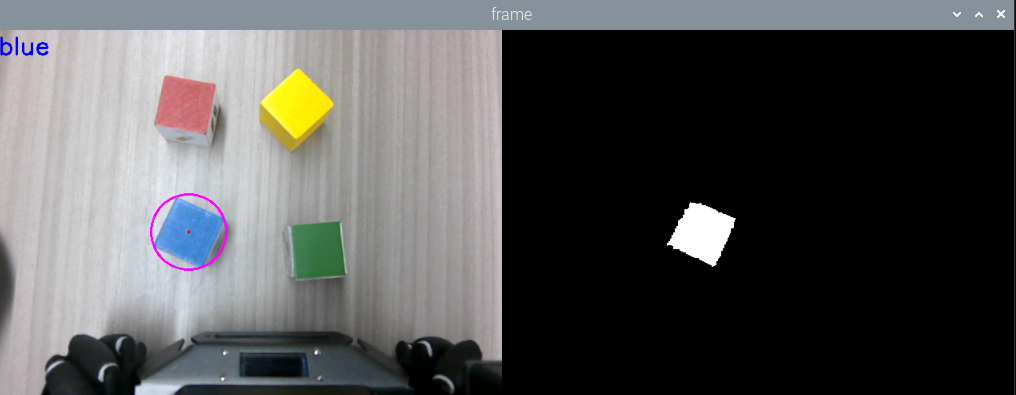
After pressing the button to select the color block, the selected color will be printed in the upper left corner of the image, and a binary image will appear on the right side of the image, showing the blue block that appeared in the left image, as shown in the figure below. Assuming that b is pressed to select the blue block,
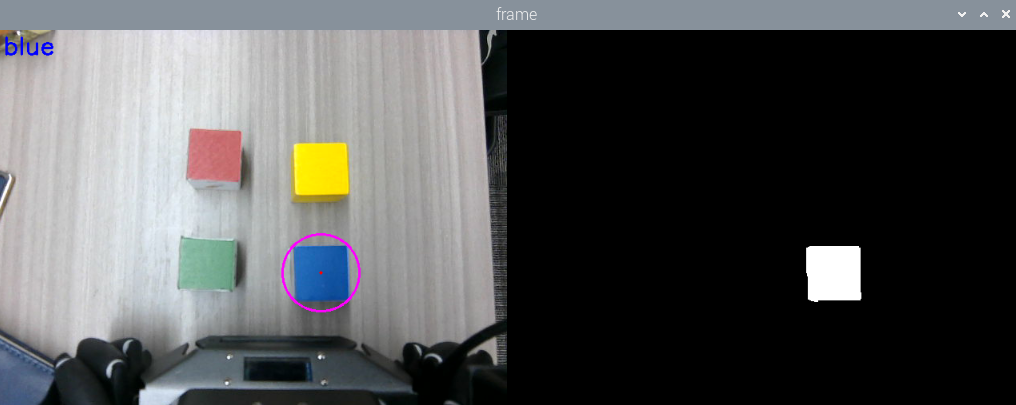
At this point, press the spacebar to begin the gripping process. Similarly, the program determines the distance between the blue block and the robot's base_link. If the distance is within [215, 225], the robot arm directly lowers its gripper to grab the block and place it at the set location. If the distance is outside [215, 225], the robot first moves the robot block to within [215, 225] based on the distance between the robot code block and the robot's base coordinate system (base_link), then lowers its gripper to grab the block and place it at the set location.
2.1. Color block color calibration
Due to lighting reasons, the HSV value preset by the program may not be able to accurately distinguish the color blocks. At this time, you can press the c key or the C key, and then use the mouse to select the color of the color block to recalibrate the HSV value of the color block. As shown in the figure below, suppose you press b or B to select blue first, but the binary image on the right cannot distinguish the blue. Then we need to press the c key or the C key to enter the calibration model and use the mouse to select the area of the blue block. The program will obtain the HSV value in the green box.
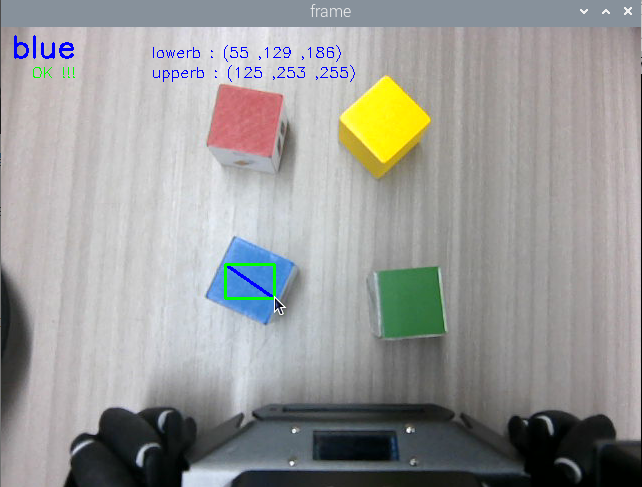
Release the mouse to complete the calibration. Press the b or B key to identify. The binary image on the right can distinguish the blue block very well.
3. Core code analysis
3.1、color_recognize.py
Program code path:
Raspberry Pi and Jetson-Nano board
The program code is in the running docker. The path in docker is /root/yahboomcar_ws/src/M3Pro_demo/M3Pro_demo/ color_recognize.py
Orin Motherboard
The program code path is /home/jetson/yahboomcar_ws/src/M3Pro_demo/M3Pro_demo/color_recognize.py
Import the necessary library files,
xxxxxxxxxximport cv2import osimport numpy as npfrom sensor_msgs.msg import Imagefrom cv_bridge import CvBridgeimport cv2 as cvfrom M3Pro_demo.Robot_Move import *#Import color recognition libraryfrom M3Pro_demo.color_common import *from arm_interface.srv import ArmKinemaricsfrom arm_interface.msg import AprilTagInfo,CurJointsfrom arm_msgs.msg import ArmJointsfrom std_msgs.msg import Bool,Int16import timeimport transforms3d as tfsimport tf_transformations as tfimport yamlimport mathfrom rclpy.node import Nodeimport rclpyfrom message_filters import Subscriber, TimeSynchronizer,ApproximateTimeSynchronizerfrom geometry_msgs.msg import Twistfrom ament_index_python.packages import get_package_share_directoryimport threadingfrom M3Pro_demo.compute_joint5 import *程序初始化以及创建发布者和订阅者,
xxxxxxxxxxdef __init__(self, name): super().__init__(name) self.init_joints = [90, 100, 0, 0, 90, 0] self.rgb_bridge = CvBridge() self.depth_bridge = CvBridge() #Define the flag for publishing color block information. When the value is True, it means publishing. When it is False, it means not publishing. self.pub_pos_flag = True #Define the array that stores the current end pose coordinates self.CurEndPos = [0.1279009179959246, 0.00023254956548456117, 0.1484898062979958, 0.00036263794618046863, 1.3962632350758744, 0.0003332603981328959] #Dabai_DCW2 camera internal parameters self.camera_info_K = [477.57421875, 0.0, 319.3820495605469, 0.0, 477.55718994140625, 238.64108276367188, 0.0, 0.0, 1.0] #Rotation matrix from the end to the camera self.EndToCamMat = np.array([[ 0 ,0 ,1 ,-1.00e-01], [-1 ,0 ,0 ,0], [0 ,-1 ,0 ,4.82000000e-02], [ 0.00000000e+00 , 0.00000000e+00 , 0.00000000e+00 , 1.00000000e+00]]) self.rgb_image_sub = Subscriber(self, Image, '/camera/color/image_raw') self.sub_grasp_status = self.create_subscription(Bool,"grasp_done",self.get_graspStatusCallBack,100) self.depth_image_sub = Subscriber(self, Image, '/camera/depth/image_raw') self.CmdVel_pub = self.create_publisher(Twist,"cmd_vel",1) self.pub_cur_joints = self.create_publisher(CurJoints,"Curjoints",1) self.pos_info_pub = self.create_publisher(AprilTagInfo,"PosInfo",1) self.pub_SixTargetAngle = self.create_publisher(ArmJoints, "arm6_joints", 10) self.client = self.create_client(ArmKinemarics, 'get_kinemarics') self.pub_beep = self.create_publisher(Bool, "beep", 10) self.TargetJoint5_pub = self.create_publisher(Int16, "set_joint5", 10) self.pubCurrentJoints() self.pubSixArm(self.init_joints) #Get the current robot arm end pose coordinates self.get_current_end_pos() self.ts = ApproximateTimeSynchronizer([self.rgb_image_sub, self.depth_image_sub], 1, 0.5) self.ts.registerCallback(self.callback) #Get the compensation values in the xyz directions in the offset table self.x_offset = offset_config.get('x_offset') self.y_offset = offset_config.get('y_offset') self.z_offset = offset_config.get('z_offset') self.adjust_dist = False self.linearx_PID = (0.5, 0.0, 0.2) self.linearx_pid = simplePID(self.linearx_PID[0] / 1000.0, self.linearx_PID[1] / 1000.0, self.linearx_PID[2] / 1000.0) self.target_color = 0 #Read the HSV values of four colors self.red_hsv_text = os.path.join(package_pwd, 'red_colorHSV.text') self.green_hsv_text = os.path.join(package_pwd, 'green_colorHSV.text') self.blue_hsv_text = os.path.join(package_pwd, 'blue_colorHSV.text') self.yellow_hsv_text = os.path.join(package_pwd, 'yellow_colorHSV.text') #Define the variable to store hsv, which will eventually be passed to the color recognition function self.hsv_range = () #Select the color block area flag. When the value is True, it means that the mouse selects the area in the color block. self.select_flags = False self.windows_name = 'frame' #Define state variables, there are three values: init, select, identify self.Track_state = 'init' #Define storage of mouse coordinates self.Mouse_XY = (0, 0) self.cols, self.rows = 0, 0 #Define the region of interest, here refers to the area on the selected color block self.Roi_init = () #Create a color recognition object self.color = color_detect() #Define a variable to record the current color self.cur_color = None #Define the RGB value of the currently selected color self.text_color = (0,0,0) #The center x coordinate of the target color block self.cx = 0 #The center y coordinate of the target color block self.cy = 0 #The radius of the minimum circumscribed circle of the target color block self.circle_r = 0 #Valid distance flag, the value is True means the current distance is valid self.valid_dist = True self.joint5 = Int16() self.corners = np.empty((4, 2), dtype=np.int32) #Define the color value of the current target color block, 1-4 represents red, green, blue, and yellow respectively self.cur_target_color = 0 #Indicates the update HSV value flag. When the value is True, it means that the HSV value of the selected color can be updated. self.updata_flag = Falsecallback image topic callback function,
xxxxxxxxxxdef callback(self,color_frame,depth_frame): #Get color image topic data and use CvBridge to convert message data into image data rgb_image = self.rgb_bridge.imgmsg_to_cv2(color_frame,'rgb8') rgb_image = cv2.cvtColor(rgb_image, cv2.COLOR_RGB2BGR) result_image = np.copy(rgb_image) #Get the deep image topic data and use CvBridge to convert the message data into image data depth_image = self.depth_bridge.imgmsg_to_cv2(depth_frame, encoding[1]) frame = cv.resize(depth_image, (640, 480)) depth_to_color_image = cv2.applyColorMap(cv2.convertScaleAbs(depth_image, alpha=1.0), cv2.COLORMAP_JET) depth_image_info = frame.astype(np.float32) key = cv2.waitKey(10)& 0xFF #Call the defined process function to perform key processing and image processing result_frame, binary = self.process(rgb_image,key) #Call thread function to display image show_frame = threading.Thread(target=self.img_out, args=(result_frame,binary,)) show_frame.start() show_frame.join() if key == 32: self.adjust_dist = True #If self.cx and self.cy are not 0, it means that a color block of the target color has been detected. At the same time, the radius of the minimum circumscribed circle of the current color block must be greater than 30. This is to filter out some small areas that are misidentified. if self.cx!=0 and self.cy!=0 and self.circle_r>30: cx = int(self.cx) cy = int(self.cy) dist = depth_image_info[int(cy),int(cx)]/1000 #Calculate the position of the color block in the world coordinate pose = self.compute_heigh(cx,cy,dist) #Calculate the distance between the center of the color block and the base coordinate base_link dist_detect = math.sqrt(pose[1] ** 2 + pose[0]** 2) dist_detect = dist_detect*1000 #If the distance is less than 130 mm, it is considered invalid if dist_detect<130: print("Invalid dist.") self.valid_dist = False dist = 'dist: ' + str(dist_detect) + ' mm' print("dist: ",dist) #If the distance is valid and outside the range [215, 225], then control the chassis to adjust the distance if abs(dist_detect - 220.0)>5 and self.valid_dist == True: if self.adjust_dist==True: self.move_dist(dist_detect) #If the distance is valid and within the range [215, 225], then extract the coordinates of the center point of the color block, calculate the depth information of the center point of the color block, and then publish it elif abs(dist_detect - 220.0)<5 and self.valid_dist == True: print("------------------------------------") self.pubVel(0,0,0) self.adjust_dist = False cx = int(self.cx) cy = int(self.cy) #Calculate the depth information of the center point of the color block dist = depth_image_info[int(cy),int(cx)]/1000 #print("dist: ",dist) #If the depth distance of the center point of the color block is not 0, it means it is valid if dist!=0: #Calculate the rotation angle of the color block based on the corner coordinates vx = self.corners[0][0][0] - self.corners[1][0][0] vy = self.corners[0][0][1] - self.corners[1][0][1] target_joint5 = compute_joint5(vx,vy) self.joint5.data = int(target_joint5) pos = AprilTagInfo() pos.id = self.target_color pos.x = float(cx) pos.y = float(cy) pos.z = float(dist) if self.pub_pos_flag == True: self.pub_pos_flag = False #Publish color block location information topic self.pos_info_pub.publish(pos) self . pos_info_pub . publish ( pos ) #Publish the topic of No. 5 servo angle self.TargetJoint5_pub.publish(self.joint5) else: self.pubVel(0,0,0)process button image processing function,
xdef process(self,rgb_img,key): rgb_img = cv.resize(rgb_img, (640, 480)) binary = [] #Judge the value of the button and assign values to self.target_color and self.cur_target_color according to the value of the button if key == ord('c') or key == ord('C'): self.target_color = 0 self.Reset() self.updata_flag = True elif key == ord('r') or key == ord('R'): self.target_color = 1 self.cur_target_color = self.target_color elif key == ord('g') or key == ord('G'): self.target_color = 2 self.cur_target_color = self.target_color elif key == ord('b') or key == ord('B'): self.target_color = 3 self.cur_target_color = self.target_color elif key == ord('y') or key == ord('Y'): self.target_color = 4 self.cur_target_color = self.target_color elif key == ord('i') or key == ord('I') or self.target_color!=0: self.Track_state = "identify" #Judge the value of self.Track_state. If it is init, it is in initialization mode. if self.Track_state == 'init': cv.namedWindow(self.windows_name, cv.WINDOW_AUTOSIZE) cv.setMouseCallback(self.windows_name, self.onMouse, 0) if self.select_flags == True: cv.line(rgb_img, self.cols, self.rows, (255, 0, 0), 2) cv.rectangle(rgb_img, self.cols, self.rows, (0, 255, 0), 2) if self.Roi_init[0] != self.Roi_init[2] and self.Roi_init[1] != self.Roi_init[3]: rgb_img, self.hsv_range = self.color.Roi_hsv(rgb_img, self.Roi_init) self.dyn_update = True else: self.Track_state = 'init' #If it is identify, it is identification mode, which reads the hsv file according to the target color value of self.target_color and assigns it to self.hsv_range elif self.Track_state == "identify": if self.target_color == 1: self.hsv_range = read_HSV(self.red_hsv_text) self.cur_color = "red" self.text_color = (0, 0, 255) elif self.target_color == 2: self.hsv_range = read_HSV(self.green_hsv_text) self.cur_color = "green" self.text_color = (0, 255, 0) elif self.target_color == 3: self.hsv_range = read_HSV(self.blue_hsv_text) self.cur_color = "blue" self.text_color = (255, 0, 0) elif self.target_color == 4: self.hsv_range = read_HSV(self.yellow_hsv_text) self.cur_color = "yellow" self.text_color = (255, 255, 0) else: self.Track_state = 'init' #If the current self.Track_state is not init, then enter the color recognition mode if self.Track_state != 'init': #Judge whether self.hsv_range is empty. If it is not empty, it means the current identify recognition model if len(self.hsv_range) != 0: #Call the object_follow function in the color recognition object. The function is to filter out objects that meet the HSV standard in the image based on the HSV value and color image passed in. The returned content includes the processed color image, binary image, minimum circumscribed circle and corner coordinates rgb_img, binary, self.circle,_,self.corners= self.color.object_follow(rgb_img, self.hsv_range) #Get the center x coordinate of the minimum circumscribed circle self.cx = self.circle[0] #Get the center y coordinate of the minimum circumscribed circle self.cy = self.circle[1] #Get the radius of the minimum circumscribed circle self.circle_r = self.circle[2] #If the value of self.updata_flag is true, it means that the hsv parameter file needs to be updated and modified. According to the current target color block color, select the corresponding hsv parameter file for modification if self.cur_target_color == 1 and self.updata_flag == True: write_HSV(self.red_hsv_text, self.hsv_range) elif self.cur_target_color == 2 and self.updata_flag == True: write_HSV(self.green_hsv_text, self.hsv_range) elif self.cur_target_color == 3 and self.updata_flag == True: write_HSV(self.blue_hsv_text, self.hsv_range) elif self.cur_target_color == 4 and self.updata_flag == True: write_HSV(self.yellow_hsv_text, self.hsv_range) self.updata_flag = False #Finally, the color name of the current target color block is displayed in the upper left corner of the image rgb_img = cv2.putText(rgb_img, self.cur_color, (10, 30), cv2.FONT_HERSHEY_SIMPLEX, 1, self.text_color, 2) return rgb_img, binary3.2, color_common
The source code path of the library:
Raspberry Pi 5 and Jetson motherboard
The program code is in the running docker. The path in docker is /root/yahboomcar_ws/src/M3Pro_demo/M3Pro_demo/ color_common.py
Orin Motherboard
The program code path is /home/jetson/yahboomcar_ws/src/M3Pro_demo/M3Pro_demo/color_common.py
object_follow color recognition function
xxxxxxxxxxdef object_follow(self, img, hsv_msg): src = img.copy() # 由颜色范围创建NumPy数组 # Create NumPy array from color range src = cv.cvtColor(src, cv.COLOR_BGR2HSV) lower = np.array(hsv_msg[0], dtype="uint8") upper = np.array(hsv_msg[1], dtype="uint8") # 根据特定颜色范围创建mask # Create a mask based on a specific color range mask = cv.inRange(src, lower, upper) color_mask = cv.bitwise_and(src, src, mask=mask) # 将图像转为灰度图 # Convert the image to grayscale gray_img = cv.cvtColor(color_mask, cv.COLOR_RGB2GRAY) # 获取不同形状的结构元素 # Get structure elements of different shapes kernel = cv.getStructuringElement(cv.MORPH_RECT, (5, 5)) # 形态学闭操作 # Morphological closed operation gray_img = cv.morphologyEx(gray_img, cv.MORPH_CLOSE, kernel) # 图像二值化操作 # Image binarization operation ret, binary = cv.threshold(gray_img, 10, 255, cv.THRESH_BINARY) # 获取轮廓点集(坐标) # Get the set of contour points (coordinates) find_contours = cv.findContours(binary, cv.RETR_EXTERNAL, cv.CHAIN_APPROX_SIMPLE) if len(find_contours) == 3: contours = find_contours[1] else: contours = find_contours[0] if len(contours) != 0: areas = [] for c in range(len(contours)): areas.append(cv.contourArea(contours[c])) max_id = areas.index(max(areas)) max_rect = cv.minAreaRect(contours[max_id]) self.max_box = cv.boxPoints(max_rect) #print("max_box: ",max_box) self.max_box = np.int0(self.max_box) #print("max_box: ",max_box) #计算一组二维点的最小外接圆,返回的是这个圆的圆形坐标xy和这个圆的半径、 #Calculate the minimum circumscribed circle of a set of two-dimensional points, and return the circular coordinates xy and radius of the circle (color_x, color_y), color_radius = cv.minEnclosingCircle(self.max_box) # 将检测到的颜色用原形线圈标记出来 # Mark the detected color with the original shape coil self.Center_x = int(color_x) self.Center_y = int(color_y) self.Center_r = int(color_radius) perimeter = cv.arcLength(contours[max_id], True) self.approx = cv.approxPolyDP(contours[max_id], 0.035 * perimeter, True) cv.circle(img, (self.Center_x, self.Center_y), self.Center_r, (255, 0, 255), 2) cv.circle(img, (self.Center_x, self.Center_y), 2, (0, 0, 255), -1) else: self.Center_x = 0 self.Center_y = 0 self.Center_r = 0 return img, binary, (self.Center_x, self.Center_y, self.Center_r),self.max_box,self.approx