Welcome to ROSMASTER M3 PRO repository
4.Sorting height abnormality machine code
Sorting height abnormality machine code
1. Content Description
This function allows the program to acquire an image through the camera and identify the machine code in the image, calculate the height of each machine code, and then remove the machine code with a height higher than 4 cm.
This section requires entering commands in the terminal. The terminal you open depends on your motherboard type. This lesson uses the Raspberry Pi 5 as an example. For Raspberry Pi and Jetson-Nano boards, you need to open a terminal on the host computer and enter the command to enter the Docker container. Once inside the Docker container, enter the commands mentioned in this section in the terminal. For instructions on entering the Docker container from the host computer, refer to this product tutorial [Configuration and Operation Guide]--[Enter the Docker (Jetson Nano and Raspberry Pi 5 users, see here)].
Simply open the terminal on the Orin motherboard and enter the commands mentioned in this section.
The wooden blocks used in this lesson are: 30x30x30mm and 30x30x60mm Machine Code blocks.
2. Program startup
First, open the terminal and enter the following command to start the robot arm solver and camera driver,
ros2 launch M3Pro_demo camera_arm_kin.launch.py
Then, open another terminal and enter the following command to start the robotic arm gripping program:
xxxxxxxxxxros2 run M3Pro_demo grasp_desktop
After running, it is shown as follows:
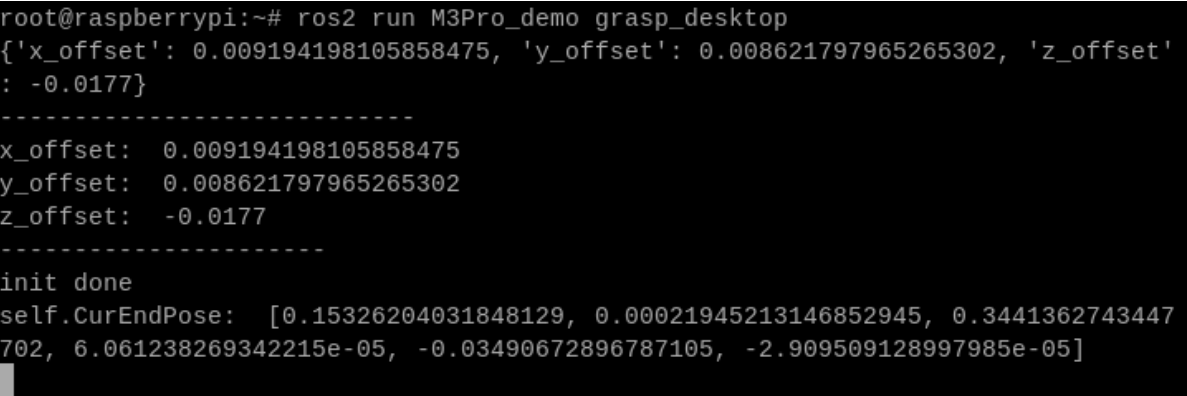
Finally, open the third terminal and enter the following command to start the program to remove highly abnormal machine code:
xxxxxxxxxxros2 run M3Pro_demo apriltag_list
After starting this command, the second terminal should receive the current angle topic information sent in one frame and calculate the current posture once, as shown below
As shown,
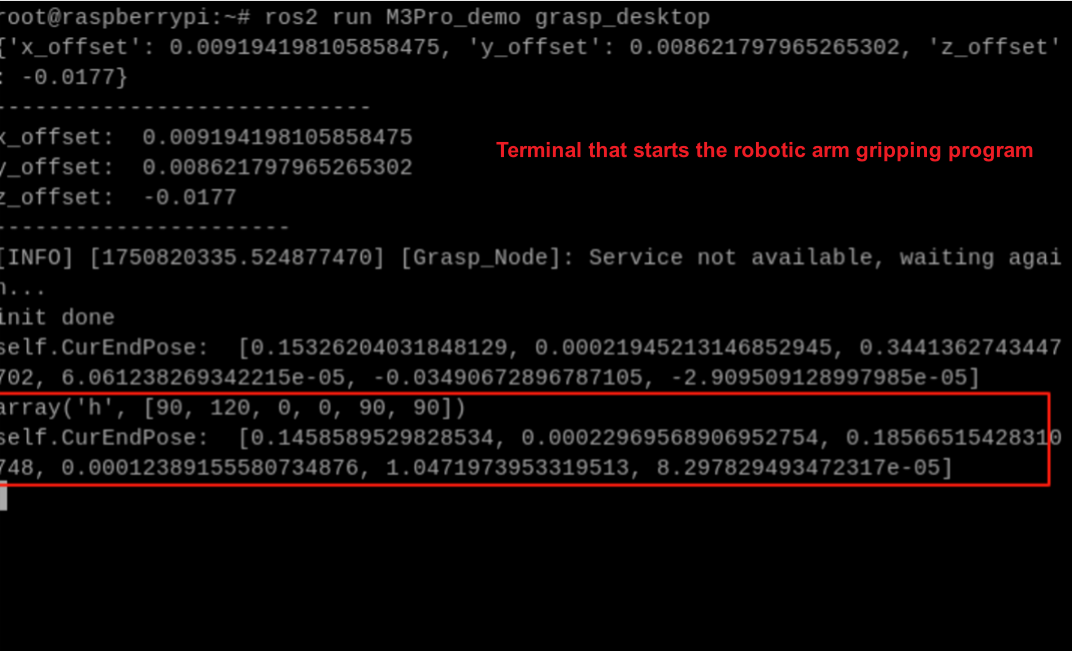
If the current angle information is not received and the current posture is not calculated, the gripping posture will be inaccurate when the coordinate system is converted. Therefore, you need to close the height error sorting machine code program by pressing ctrl c and restart the height error sorting machine code program until the robot arm gripping program obtains the current angle information and calculates the current end position.
After the machine code ID sorting program is started, it will subscribe to the color image and depth image topics, and place the machine code block that comes with the product under the camera.
If a machine code appears in the image, the program will recognize the machine code, as shown below.
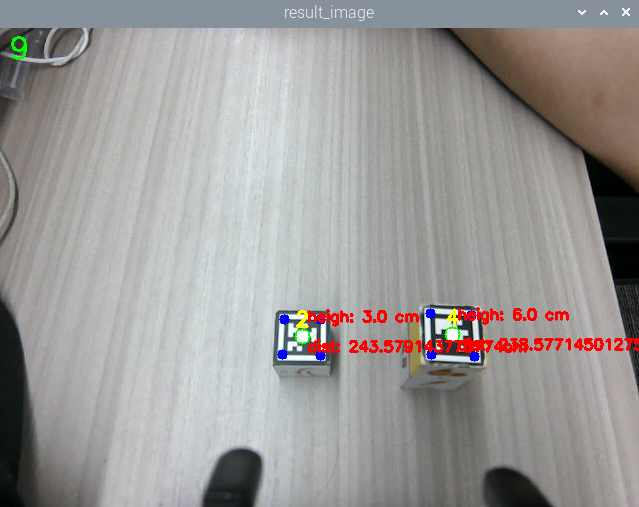
The program will print out the height of the machine code and the distance from the robot base_link. Press the spacebar, and the robot arm will lower its claw to remove the machine code with a height of 6cm. There are two cases:
- If the distance to the target machine code block is within [215, 225], the robot arm directly grabs the machine code block with its lower claw and places it at the set position according to the ID value;
- If the target machine code block is outside [215, 225], the robot will first move and adjust it to within [215, 225] based on the distance between the machine code block and the robot base coordinate system (base_link), then lower the claw to clamp it, and finally place it at the set position according to the ID value.
3. Core code analysis
Program code path:
Raspberry Pi and Jetson-Nano board
The program code is in the running docker. The path in docker is /root/yahboomcar_ws/src/M3Pro_demo/M3Pro_demo/ apriltag_list.py
Orin Motherboard
The program code path is /home/jetson/yahboomcar_ws/src/M3Pro_demo/M3Pro_demo/apriltag_list.py
Import the necessary library files,
xxxxxxxxxximport cv2import osimport numpy as npfrom sensor_msgs.msg import Image#Import the function of drawing machine code informationfrom M3Pro_demo.vutils import draw_tags#Import the function to calculate the angle value of servo No. 5from M3Pro_demo.compute_joint5 import *#Import the library for detecting machine codefrom dt_apriltags import Detectorfrom cv_bridge import CvBridgeimport cv2 as cvfrom arm_interface.srv import ArmKinemaricsfrom arm_interface.msg import AprilTagInfo,CurJointsfrom arm_msgs.msg import ArmJointsfrom std_msgs.msg import Float32,Bool,Int16encoding = ['16UC1', '32FC1']import timeimport transforms3d as tfsimport tf_transformations as tfimport yamlimport math#Import chassis PID operation related librariesfrom M3Pro_demo.Robot_Move import *from rclpy.node import Nodeimport rclpyfrom message_filters import Subscriber, TimeSynchronizer,ApproximateTimeSynchronizerfrom sensor_msgs.msg import Imagefrom geometry_msgs.msg import TwistImport the robot arm offset parameter file to compensate for the deviation caused by the servo virtual position.
xxxxxxxxxxoffset_file = "/root/yahboomcar_ws/src/arm_kin/param/offset_value.yaml"with open(offset_file, 'r') as file: offset_config = yaml.safe_load(file)Program initialization and creation of publishers and subscribers,
xxxxxxxxxxdef __init__(self, name): super().__init__(name) self.init_joints = [90, 120, 0, 0, 90, 90] self.rgb_bridge = CvBridge() self.depth_bridge = CvBridge() #Define the flag for publishing machine code information. When the value is True, it means publishing, and when it is False, it means not publishing self.pubPos_flag = False self.pr_time = time.time() self.at_detector = Detector(searchpath=['apriltags'], families='tag36h11', nthreads=8, quad_decimate=2.0, quad_sigma=0.0, refine_edges=1, decode_sharpening=0.25, debug=0) #Define the array that stores the current end pose coordinates self.CurEndPos = [0.1458589529828534, 0.00022969568906952754, 0.18566515428310748, 0.00012389155580734876, 1.0471973953319513, 8.297829493472317e-05] #Dabai_DCW2 camera internal parameters self.camera_info_K = [477.57421875, 0.0, 319.3820495605469, 0.0, 477.55718994140625, 238.64108276367188, 0.0, 0.0, 1.0] #Rotation matrix from the end to the camera self.EndToCamMat = np.array([[ 0 ,0 ,1 ,-1.00e-01], [-1 ,0 ,0 ,0], [0 ,-1 ,0 ,4.82000000e-02], [ 0.00000000e+00 , 0.00000000e+00 , 0.00000000e+00 , 1.00000000e+00]]) #Create a publisher to publish the machine code location topic. The published message includes the x and y pixel coordinates of the center point, the depth value corresponding to the center point, and the id value of the machine code self.pos_info_pub = self.create_publisher(AprilTagInfo,"PosInfo",1) #Create a subscriber to subscribe to the topic self.sub_grasp_status = self.create_subscription(Bool,"grasp_done",self.get_graspStatusCallBack,100) #Create a publisher for the speed topic self.CmdVel_pub = self.create_publisher(Twist,"cmd_vel",1) #Create a publisher to control the 6 servo angle topics self.TargetAngle_pub = self.create_publisher(ArmJoints, "arm6_joints", 10) #Create a publisher for the topic of servo angle No. 5 self.TargetJoint5_pub = self.create_publisher(Int16, "set_joint5", 10) #Create a subscriber to subscribe to the color image topic self.rgb_image_sub = Subscriber(self, Image, '/camera/color/image_raw') #Create a subscriber to subscribe to the depth image topic self.depth_image_sub = Subscriber(self, Image, '/camera/depth/image_raw') #Create a client that calls the robotic arm solution service self.client = self.create_client(ArmKinemarics, 'get_kinemarics') #Create a topic publisher to publish the current robot arm's 6 servo angles self.pub_cur_joints = self.create_publisher(CurJoints,"Curjoints",1) #Get the current position of the end of the robotic arm self.get_current_end_pos() self.pubSix_Arm(self.init_joints) self.pubCurrentJoints() self.ts = ApproximateTimeSynchronizer([self.rgb_image_sub, self.depth_image_sub], 1, 0.5) self.ts.registerCallback(self.callback) #Get the compensation values in the xyz directions in the offset table self.x_offset = offset_config.get('x_offset') self.y_offset = offset_config.get('y_offset') self.z_offset = offset_config.get('z_offset') self.adjust_dist = True # Initialize PID parameters self.linearx_PID = (0.5, 0.0, 0.2) #Create PID control object self.linearx_pid = simplePID(self.linearx_PID[0] / 1000.0, self.linearx_PID[1] / 1000.0, self.linearx_PID[2] / 1000.0) self.joint5 = Int16()callback image topic callback function,
xdef callback(self,color_frame,depth_frame): #Get color image topic data and use CvBridge to convert message data into image data rgb_image = self.rgb_bridge.imgmsg_to_cv2(color_frame,'rgb8') result_image = np.copy(rgb_image) result_image = cv.resize(result_image, (640, 480)) #Get the deep image topic data and use CvBridge to convert the message data into image data depth_image = self.depth_bridge.imgmsg_to_cv2(depth_frame, encoding[1]) depth_to_color_image = cv2.applyColorMap(cv2.convertScaleAbs(depth_image, alpha=1.0), cv2.COLORMAP_JET) frame = cv.resize(depth_image, (640, 480)) depth_image_info = frame.astype(np.float32) #Call the machine code detection program, pass in the color image for detection, and return a tags list containing information about all the detected machine codes tags = self.at_detector.detect(cv2.cvtColor(rgb_image, cv2.COLOR_RGB2GRAY), False, None, 0.025) #Sort the test results according to the machine code id tags = sorted(tags, key=lambda tag: tag.tag_id) #Draw the center and corner points of the machine code on the color image draw_tags(result_image, tags, corners_color=(0, 0, 255), center_color=(0, 255, 0)) #Detect key input. If the key is a space, change the value of self.pubPos_flag to True key = cv2.waitKey(10) if key == 32: self.pubPos_flag = True #If the length of the test result is not 0, it means that the machine code has been detected if len(tags) > 0 : for i in range(len(tags)): #Get the center point coordinates of the current machine code center_x, center_y = tags[i].center cx = center_x cy = center_y #Calculate the depth information of the center point coordinates cz = depth_image_info[int(cy),int(cx)]/1000 cv2.circle(result_image,(int(cx),int(cy)),1,(255,255,255),10) #Calculate the pose of the machine code in the world coordinate system pose = self.compute_heigh(cx,cy,cz) #Calculate the height of the machine code pose[2] represents the z-axis coordinate, the unit is centimeters compute_heigh = round(pose[2],2)*100 heigh = 'heigh: ' + str(compute_heigh) + ' cm' dist_detect = math.sqrt(pose[1] ** 2 + pose[0]** 2) dist_detect = dist_detect*1000 dist = 'dist: ' + str(dist_detect) + 'cm' cv.putText(result_image, heigh, (int(cx)+5, int(cy)-15), cv.FONT_HERSHEY_SIMPLEX, 0.5, (255, 0, 0), 2) cv.putText(result_image, dist, (int(cx)+5, int(cy)+15), cv.FONT_HERSHEY_SIMPLEX, 0.5, (255, 0, 0), 2) if self.pubPos_flag == True : #If the height of the current machine code is greater than 4 cm if compute_heigh >4.0: #print("found the target.") #Judge whether the distance is within the range of [215, 225]. If not, move the chassis to adjust the distance. If yes, issue a stop command. if abs(dist_detect - 220.0)>5 and self.adjust_dist==True: self.move_dist(dist_detect) else: self.pubVel(0,0,0) #Create a machine code information location message object and assign it tag = AprilTagInfo() center_x, center_y = tags[i].center tag.id = tags[i].tag_id tag.x = center_x tag.y = center_y tag.z = depth_image_info[int(tag.y),int(tag.x)]/1000 #Calculate the offset angle of the machine code block based on the corner coordinates vx = int(tags[i].corners[0][0]) - int(tags[i].corners[1][0]) vy = int(tags[i].corners[0][1]) - int(tags[i].corners[1][1]) target_joint5 = compute_joint5(vx,vy) print("target_joint5: ",target_joint5) self.joint5.data = int(target_joint5) #Judge whether the depth information of the center point is valid. If it is not 0, it means it is valid if tag.z!=0: #Publish the topic message of the angle value of the No. 5 servo self.TargetJoint5_pub.publish(self.joint5) #Publish machine code location information topic message self.pos_info_pub.publish(tag) self.pubPos_flag = False else: print("Invalid distance.") else: self.pubVel(0,0,0) result_image = cv2.cvtColor(result_image, cv2.COLOR_RGB2BGR) cur_time = time.time() fps = str(int(1/(cur_time - self.pr_time))) self.pr_time = cur_time cv2.putText(result_image, fps, (10, 30), cv2.FONT_HERSHEY_SIMPLEX, 1, (0, 255, 0), 2) cv2.imshow("result_image", result_image) key = cv2.waitKey(1)