yahboom
HomeLearn
Solution
Blog
Online Store
About Us
EN/中文
DOGZILLA-Lite📖
1. Get started quickly
  • 0. Notes (Must Read)new
  • 1. Main interface function experience (cm5)new
  • 1. Main interface function experience(cm4)
  • 2. APP control experience
  • 3. Web page image transmission control
  • 4. LLM-Embodied Intelligence Capabilities
  • 5. LLM-Smart Dog Capabilities
2. Basic operations of Raspberry Pi system
  • 1.SSH remote login
  • 2.VNC remote login desktop
  • 3.Remote file transfer
  • 4.JupyterLab environment construction and use
  • 5.Burn the system image
  • 6.Connect to WiFi
  • 7.Close large programs
  • 8.Raspberry Pi system expansion
3. Basic control of the dogzilla
  • 0. Introduction to DOGZILLA-Lite
  • 1. Screen display control
  • 2. Record Audio
  • 3. Play Audio
  • 4. Text to audio
  • 5. Voice to text
  • 6. Record Video
  • 7. Play Video
  • 8. Video recording function
  • 9. Read the posture angle
  • 10. Battery level reading
  • 11. Read the servo angle
  • 12. Screen display of expressions
  • 13. Calibration of the robot dog
  • 14. Burn the firmware
  • 15. Analysis of common problems
4. Motion control of the dogzilla
  • 1. The dog's forward, backward, left, and right movements and gait
  • 2. Dog Spin
  • 3. The dog adjusts its height and posture
  • 4. Dog periodic translation and rotation
  • 5. Self-balancing mode
  • 6. The dog performs preset actions
  • 7. Single Leg Control
  • 8. Robotic arm control
  • 9. Teaching mode
  • 10. Group Control Performance
  • 11. Teaching demonstration onlinenew
5. Open Source CV
A. Getting started with OpenCV
  • 1. Introduction to OpenCV
  • 2. OpenCV image reading and display
  • 3. OpenCV image writing
  • 4. OpenCV Image Quality
  • 5.OpenCV pixel operations
B. OpenCV geometric transformation
  • 1. Image scaling
  • 2. Image cutting
  • 3. Image translation
  • 4. Image mirroring
  • 5. Affine Transformation
  • 6. Image Rotation
  • 7. Perspective Transformation
C. OpenCV image processing and drawing text segments
  • 1. Grayscale processing
  • 2. Image Binarization
  • 3. Edge Detection
  • 4. Line drawing
  • 5. Rectangle and circle drawing
  • 6. Text and picture drawing
D. Image beautification
  • 1. Color Image Histogram
  • 2. Histogram Equalization
  • 3. Image repair
  • 4. Brightness enhancement
  • 5. Skin whitening
  • 6. Gaussian mean filtering
  • 7. Median Filter
6. AI recognition of the dogzilla
  • 1. Camera driver tutorial
  • 2. Color recognition
  • 3. HSV value test
  • 4. Object Recognition
  • 5. QR code recognition
  • 6. License Plate Recognition
  • 7. Human Pose Estimation
  • 8. Yolo detection
  • 9. Face Detection
  • 10. Human face mask
  • 11. Face effects
  • 12. 3D Object Recognition
  • 13. Paintbrush
  • 14. Finger recognition
  • 15. Gesture Recognition
  • 16. Age and gender identification
  • 17. Background Segmentation
  • 18. Facial Recognitionnew
  • 19. Emotion Recognitionnew
  • 20. Motion Detectionnew
7. Dogzilla AI Interaction
  • 1. Color patrol
  • 2. Line patrol and obstacle removal
  • 3. Color tracking
  • 4. Ball tracking
  • 5. The ball follows
  • 6. QR code recognition exercise
  • 7. Face tracking
  • 8. Remote control
  • 9. Gesture tracking
  • 10. Gesture-controlled movement
  • 11. You Drop, I Pick
  • 12. Independent football exercise
  • 13. Human Body Followingnew
8. AI large model interaction
  • 0.AI large model principle foundation
  • 1.Large model premise use configuration
  • 2.Q&A
  • 3.Embodied intelligence
  • 4.Smart dog
  • 5.Picture to text
  • 6.Intelligent interaction
  • 7.Voice intelligent vision
  • 8.Playing football
  • 9.Block gripping
  • 10.Line tracking and obstacle removal
  • 11.Control object tracking
Download
  • System_File
  • Code
  • Firmware
  • Communication interface
  • Instruction Manual
  • Appendix
Download ZIP

Welcome to DOGZILLA-Lite repository

3.Remote file transfer

Remote file transfer

Remote file transfer3.1 Install WinSCP3.2 Get the IP address of the Raspberry Pi3.3 SSH remote file transfer

Sometimes we need to transfer files between two different systems, Windows and Raspberry Pi. Since these are two different file systems, we need to use the so-called ssh service to transfer files across systems.

3.1 Install WinSCP

Go to WinSCP official website to download the program: https://winscp.net/eng/download.php

image.png

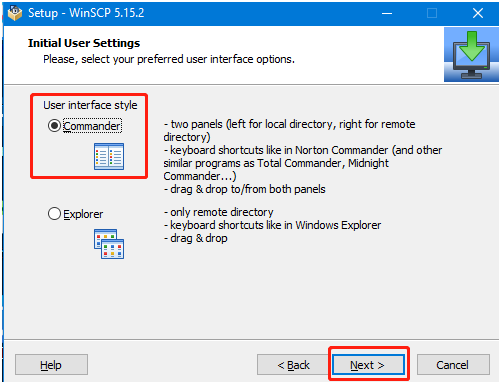
Double-click to open the program and start the installation, click Accept to accept the agreement, and then follow the prompts to install.
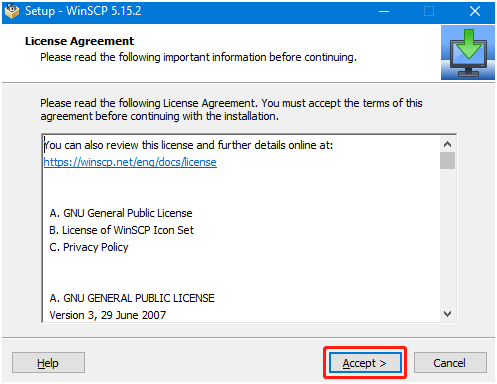
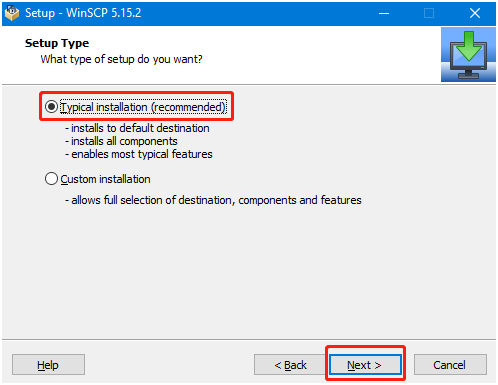
image.png

image.png

image.png

Click Finish to complete the installation.
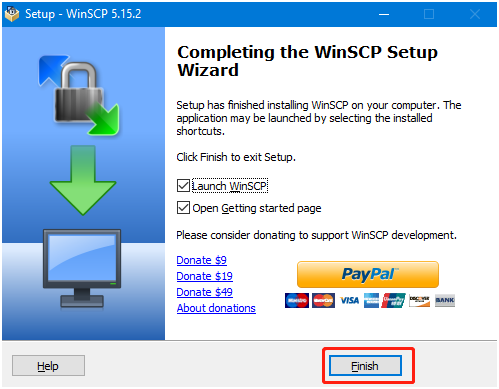
image.png

You can see a WinSCP icon on the desktop image.png.

3.2 Get the IP address of the Raspberry Pi

When you boot up the device for the first time using the factory image, you need to configure the network connection in the boot program, then enter the image transmission mode interface, press the button in the lower right corner of the dog screen, and you can query the corresponding IP address.
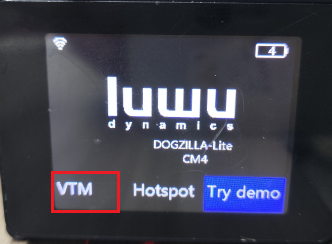
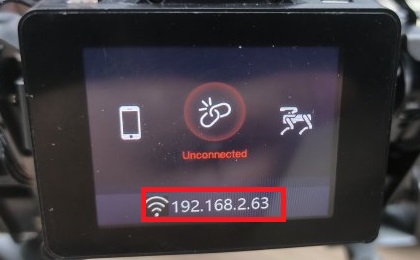
image-2024111200006

image-2024111200007

3.3 SSH remote file transfer

After opening the WinSCP software, the following login interface appears.

File protocol: select SFTP for the file protocol, Host name: the IP address of the Raspberry Pi, Port number: the default 22 is fine, User name: the Raspberry Pi username (pi), Password: the login password (yahboom).

After entering the correct information, you can click Save to save the information you have filled in so you don’t have to re-enter it the next time you log in.
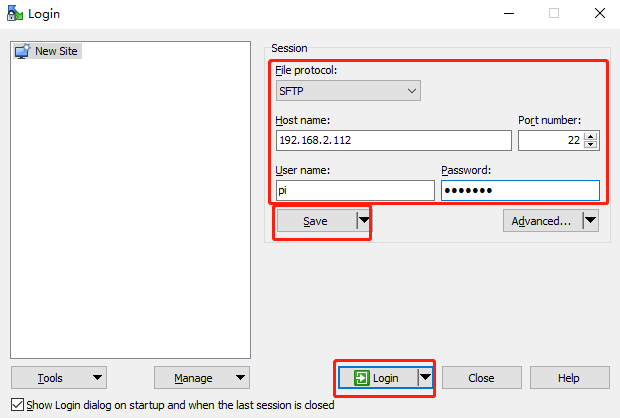
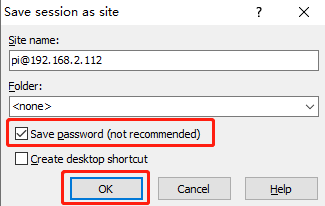
image-20220810104609559

image-20220810104642077

After clicking Login and logging in successfully, the following interface will be displayed. The folder on the left is the folder of the win computer, and the folder on the right is the folder of the Raspberry Pi.
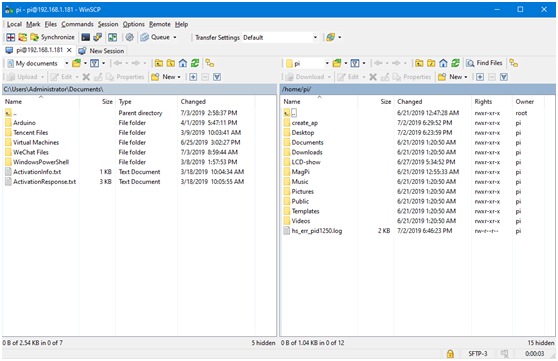
image.png

There are three ways to transfer files. The first is to directly drag the file from the left to the right, or from the right to the left. The system will automatically copy a copy of the file and transfer it.

The second method is to select the file with the mouse and then press the F5 key, and the selected file will be copied to the other side.

The third method is to select the file and right-click it. If it is transferred from a Windows computer to the Raspberry Pi, click upload.
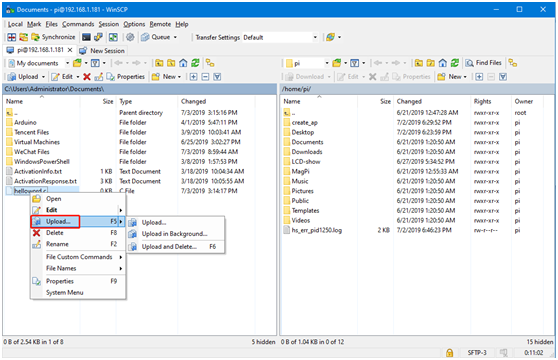
image.png

A prompt will pop up. You can choose not to be prompted again and click OK, and the file will be automatically transferred.
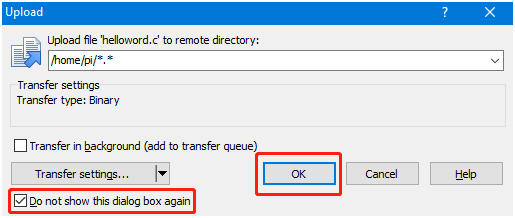
image.png

If you want to transfer files from the Raspberry Pi to a Windows computer, right-click the file and select Download.
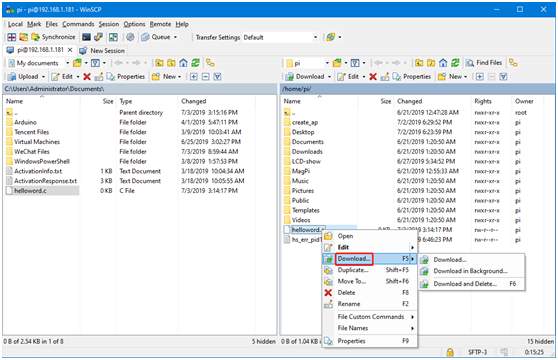
image.png

Note: File transfer requires that the computer and Raspberry Pi are in the same LAN and the SSH service is enabled on the Raspberry Pi. If file transfer fails, it is usually because the Raspberry Pi does not have sufficient permissions. Please operate within the permissions of the user pi directory.

VNC remote login desktop
JupyterLab environment construction and use

COMPANY

  • About us
  • Team Style
  • Blog

LEARNING & EXPLORATION

  • Tutorials
  • Edge AI hardware
  • Educational robots
  • Embedded intelligent hardware

WHERE TO BUY

  • Yahboom Online Store
  • Amazon
  • Alibaba
  • AliExpress
  • Mercado

TECHNOLOGY SUPPORT

  • Email: support@yahboom.com

BE A DISTRIBUTOR

  • Email: sales@yahboom.com
QR Code

Copyright © 2017-2026 Yahboom. All Rights Reserved.

EN/中文