yahboom
HomeLearn
Solution
Blog
Online Store
About Us
EN/中文
DOGZILLA-Lite📖
1. Get started quickly
  • 0. Notes (Must Read)new
  • 1. Main interface function experience (cm5)new
  • 1. Main interface function experience(cm4)
  • 2. APP control experience
  • 3. Web page image transmission control
  • 4. LLM-Embodied Intelligence Capabilities
  • 5. LLM-Smart Dog Capabilities
2. Basic operations of Raspberry Pi system
  • 1.SSH remote login
  • 2.VNC remote login desktop
  • 3.Remote file transfer
  • 4.JupyterLab environment construction and use
  • 5.Burn the system image
  • 6.Connect to WiFi
  • 7.Close large programs
  • 8.Raspberry Pi system expansion
3. Basic control of the dogzilla
  • 0. Introduction to DOGZILLA-Lite
  • 1. Screen display control
  • 2. Record Audio
  • 3. Play Audio
  • 4. Text to audio
  • 5. Voice to text
  • 6. Record Video
  • 7. Play Video
  • 8. Video recording function
  • 9. Read the posture angle
  • 10. Battery level reading
  • 11. Read the servo angle
  • 12. Screen display of expressions
  • 13. Calibration of the robot dog
  • 14. Burn the firmware
  • 15. Analysis of common problems
4. Motion control of the dogzilla
  • 1. The dog's forward, backward, left, and right movements and gait
  • 2. Dog Spin
  • 3. The dog adjusts its height and posture
  • 4. Dog periodic translation and rotation
  • 5. Self-balancing mode
  • 6. The dog performs preset actions
  • 7. Single Leg Control
  • 8. Robotic arm control
  • 9. Teaching mode
  • 10. Group Control Performance
  • 11. Teaching demonstration onlinenew
5. Open Source CV
A. Getting started with OpenCV
  • 1. Introduction to OpenCV
  • 2. OpenCV image reading and display
  • 3. OpenCV image writing
  • 4. OpenCV Image Quality
  • 5.OpenCV pixel operations
B. OpenCV geometric transformation
  • 1. Image scaling
  • 2. Image cutting
  • 3. Image translation
  • 4. Image mirroring
  • 5. Affine Transformation
  • 6. Image Rotation
  • 7. Perspective Transformation
C. OpenCV image processing and drawing text segments
  • 1. Grayscale processing
  • 2. Image Binarization
  • 3. Edge Detection
  • 4. Line drawing
  • 5. Rectangle and circle drawing
  • 6. Text and picture drawing
D. Image beautification
  • 1. Color Image Histogram
  • 2. Histogram Equalization
  • 3. Image repair
  • 4. Brightness enhancement
  • 5. Skin whitening
  • 6. Gaussian mean filtering
  • 7. Median Filter
6. AI recognition of the dogzilla
  • 1. Camera driver tutorial
  • 2. Color recognition
  • 3. HSV value test
  • 4. Object Recognition
  • 5. QR code recognition
  • 6. License Plate Recognition
  • 7. Human Pose Estimation
  • 8. Yolo detection
  • 9. Face Detection
  • 10. Human face mask
  • 11. Face effects
  • 12. 3D Object Recognition
  • 13. Paintbrush
  • 14. Finger recognition
  • 15. Gesture Recognition
  • 16. Age and gender identification
  • 17. Background Segmentation
  • 18. Facial Recognitionnew
  • 19. Emotion Recognitionnew
  • 20. Motion Detectionnew
7. Dogzilla AI Interaction
  • 1. Color patrol
  • 2. Line patrol and obstacle removal
  • 3. Color tracking
  • 4. Ball tracking
  • 5. The ball follows
  • 6. QR code recognition exercise
  • 7. Face tracking
  • 8. Remote control
  • 9. Gesture tracking
  • 10. Gesture-controlled movement
  • 11. You Drop, I Pick
  • 12. Independent football exercise
  • 13. Human Body Followingnew
8. AI large model interaction
  • 0.AI large model principle foundation
  • 1.Large model premise use configuration
  • 2.Q&A
  • 3.Embodied intelligence
  • 4.Smart dog
  • 5.Picture to text
  • 6.Intelligent interaction
  • 7.Voice intelligent vision
  • 8.Playing football
  • 9.Block gripping
  • 10.Line tracking and obstacle removal
  • 11.Control object tracking
Download
  • System_File
  • Code
  • Firmware
  • Communication interface
  • Instruction Manual
  • Appendix
Download ZIP

Welcome to DOGZILLA-Lite repository

14. Finger recognition

Finger recognition

1. Purpose of the experiment

Finger recognition to drive the robot dog

2. Experimental path source code

Enter the robot dog system, end the robot dog program, enter "ip (ip is the robot dog's ip): 8888" in the browser, enter the password "yahboom" and log in. Enter the path of DOGZILLA_Lite_class/5.AI Visual Recognition Course/14. Finger recognition and run FingerCtrl_USB.ipynb .

Or enter the command in the terminal to directly start the Python script

xxxxxxxxxx
cd /home/pi/DOGZILLA_Lite_class/5.AI Visual Recognition Course/14. Finger recognition
python3 FingerCtrl_USB.py

3. Experimental Phenomenon

After running the source code, you can see that the robot dog can detect your fingers and display them.
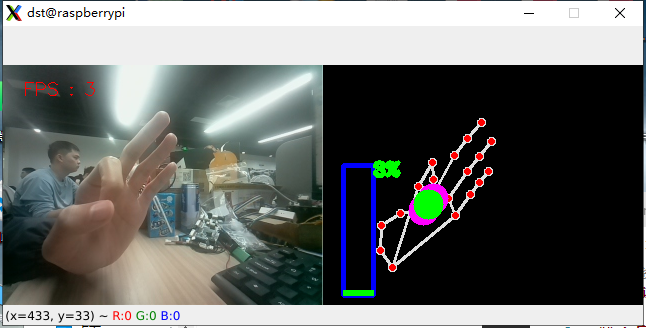
image-2024112100002

Note: The computer screen displays the original picture and the recognition result, while the robot dog can only display the recognition result because the screen is too small.

4. Main source code analysis

xxxxxxxxxx
if __name__ == '__main__':
    capture = cv.VideoCapture(0)
    capture.set(6, cv.VideoWriter.fourcc('M', 'J', 'P', 'G'))
    capture.set(cv.CAP_PROP_FRAME_WIDTH, 320)
    capture.set(cv.CAP_PROP_FRAME_HEIGHT, 240)
    print("capture get FPS : ", capture.get(cv.CAP_PROP_FPS))
    hand_detector = handDetector()
    while capture.isOpened():
        ret, frame = capture.read()
        action = cv.waitKey(1) & 0xFF
        # frame = cv.flip(frame, 1)
        img = hand_detector.findHands(frame)
        lmList = hand_detector.findPosition(frame, draw=False)
        if len(lmList) != 0:
            angle = hand_detector.calc_angle(4, 0, 8)
            x1, y1 = lmList[4][1], lmList[4][2]
            x2, y2 = lmList[8][1], lmList[8][2]
            cx, cy = (x1 + x2) // 2, (y1 + y2) // 2
            cv.circle(img, (x1, y1), 15, (255, 0, 255), cv.FILLED)
            cv.circle(img, (x2, y2), 15, (255, 0, 255), cv.FILLED)
            cv.line(img, (x1, y1), (x2, y2), (255, 0, 255), 3)
            cv.circle(img, (cx, cy), 15, (255, 0, 255), cv.FILLED)
            if angle <= 10: cv.circle(img, (cx, cy), 15, (0, 255, 0), cv.FILLED)
            volBar = np.interp(angle, [0, 70], [230, 100])
            volPer = np.interp(angle, [0, 70], [0, 100])
            value = np.interp(angle, [0, 70], [0, 255])
            # print("angle: {},value: {}".format(angle, value))
        # 进行阈值二值化操作,大于阈值value的,使用255表示,小于阈值value的,使用0表示 Perform a threshold binarization operation. Values ••greater than the threshold value are represented by 255, and values less than the threshold value are represented by 0.
        if effect[index]=="thresh":
            gray = cv.cvtColor(frame, cv.COLOR_BGR2GRAY)
            frame = cv.threshold(gray, value, 255, cv.THRESH_BINARY)[1]
        # 进行高斯滤波,(21, 21)表示高斯矩阵的长与宽都是21,标准差取value Perform Gaussian filtering, (21, 21) means the length and width of the Gaussian matrix are both 21, and the standard deviation is value
        elif effect[index]=="blur":
            frame = cv.GaussianBlur(frame, (21, 21), np.interp(value, [0, 255], [0, 11]))
        # 色彩空间的转化,HSV转换为BGR Color space conversion, HSV to BGR
        elif effect[index]=="hue":
            frame = cv.cvtColor(frame, cv.COLOR_BGR2HSV)
            frame[:, :, 0] += int(value)
            frame = cv.cvtColor(frame, cv.COLOR_HSV2BGR)
        # 调节对比度 Adjust contrast
        elif effect[index]=="enhance":
            enh_val = value / 40
            clahe = cv.createCLAHE(clipLimit=enh_val, tileGridSize=(8, 8))
            lab = cv.cvtColor(frame, cv.COLOR_BGR2LAB)
            lab[:, :, 0] = clahe.apply(lab[:, :, 0])
            frame = cv.cvtColor(lab, cv.COLOR_LAB2BGR)
        if action == ord('q'): break
        if action == ord('f'):
            index += 1
            if index >= len(effect): index = 0
        cTime = time.time()
        fps = 1 / (cTime - pTime)
        pTime = cTime
        text = "FPS : " + str(int(fps))
        cv.rectangle(img, (20, 100), (50, 230), (255, 0, 0), 3)
        cv.rectangle(img, (20, int(volBar)), (50, 230), (0, 255, 0), cv.FILLED)
        cv.putText(img, f'{int(volPer)}%', (50, 110), cv.FONT_HERSHEY_COMPLEX, 0.6, (0, 255, 0), 3)
        cv.putText(frame, text, (20, 30), cv.FONT_HERSHEY_SIMPLEX, 0.6, (0, 0, 255), 1)
        dst = hand_detector.frame_combine(frame, img)
        cv.imshow('dst', dst)
​
        #把画面显示在lcd屏上  Display the image on the LCD screen
        #b, g, r = cv.split(img) #屏幕显示原生图片 Screen displays the original image
        b, g, r = cv.split(img) #屏幕显示识别结果 Screen displays the recognition results
        image = cv.merge((r, g, b))
        imgok = Image.fromarray(image)
        display.ShowImage(imgok)
​
    capture.release()
    cv.destroyAllWindows()

The robot dog calls the detected finger model and displays the recognized finger gestures on the robot dog's screen and the computer's screen.

Paintbrush
Gesture Recognition

COMPANY

  • About us
  • Team Style
  • Blog

LEARNING & EXPLORATION

  • Tutorials
  • Edge AI hardware
  • Educational robots
  • Embedded intelligent hardware

WHERE TO BUY

  • Yahboom Online Store
  • Amazon
  • Alibaba
  • AliExpress
  • Mercado

TECHNOLOGY SUPPORT

  • Email: support@yahboom.com

BE A DISTRIBUTOR

  • Email: sales@yahboom.com
QR Code

Copyright © 2017-2026 Yahboom. All Rights Reserved.

EN/中文