Welcome to Muto RS Robot repository
0)Color HSV Calibration
0、Color HSV value calibration
1 brief introduction
In this course, we will focus on capturing camera images, selecting the corresponding color, and then adjusting its HSV value to achieve the best recognition effect.
This course mainly optimizes the recognition effect by modifying the HSV value of the image, and then provides more accurate HSV values to the routines related to color recognition.
Note: Since the HSV values calibrated by this tutorial are only stored in this routine directory, they need to be manually copied into the source code of the routine that needs to update the HSV values for this to work.
2 Core content analysis
g_ENABLE_CHINESE indicates the control Chinese character switch, the default is False for English characters, if you need to display Chinese, please set to True.
g_ENABLE_CHINESE = FalseName_widgets = {'Red': ("Red", "红色"),'Green': ("Green", "绿色"),'Blue': ("Blue", "蓝色"),'Yellow': ("Yellow", "黄色"),'Custom': ("Custom", "自定义"),'Close_Camera': ("Close_Camera", "关闭摄像头")}
The range of color HSV values is shown in the following figure:

When the color button is clicked for the first time, the initial HSV value is used, and then the value of the slider needs to be adjusted based on the HSV value of the color to make the color more accurate, and the final effect is to accurately identify the color, but not confusing with other colors.
Initialize the hexapod robot, set the camera pan-tilt Angle, the default is S1=90, S2=0, the initial Angle can be modified according to the actual demand.
xxxxxxxxxxfrom MutoLib import Mutog_bot = Muto()g_bot.Gimbal_1_2(90, 0)
The default camera image resolution is 640*480, and the display resolution can be modified to 320*240 to reduce the image frame.
xxxxxxxxxximg_width = 320img_height = 240
3 Steps
Open the jupyterLab client and find the code path:
xxxxxxxxxxmuto/Samples/AI_Samples/00_color_hsv/color_hsv.ipynb
Click to run all cells, and then scroll to the bottom to see the generated controls.

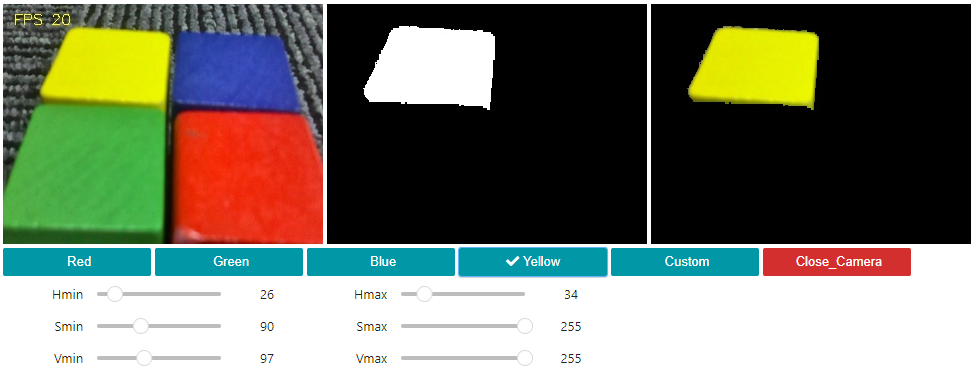
The control displays three image boxes. The image control on the left displays the original image. The function of the image control in the middle is: the recognized color is displayed as white and other colors are displayed as black. The function of the image control on the right is: the recognized color is displayed normally and other colors are displayed. into black.
A single color can be put into the camera picture, but in order to get the HSV value more accurately, four colors, red, green, blue and yellow, can be put into the camera picture. Select a color among red, green, blue and yellow. At this time, a √ will appear to the left of the selected color. Please slightly adjust the six sliders to modify the value of the color HSV so that the selected color is displayed completely and does not differ from other colors. Mix the color blocks, then click on the corresponding color again to save the color HSV value to a local file. Each time you select a color, the local file will be read first. If the local file cannot be read, the default HSV value will be used. If you need to restore the default HSV value, please delete the HSV_VALUE.TXT file of the corresponding color.
For example, red is selected here. If the color recognition is incomplete or wrong, please slightly adjust the six sliders to modify the value of the color HSV. When the color effect reaches the appropriate effect, click the red button again to save the current color HSV. value to a local file.
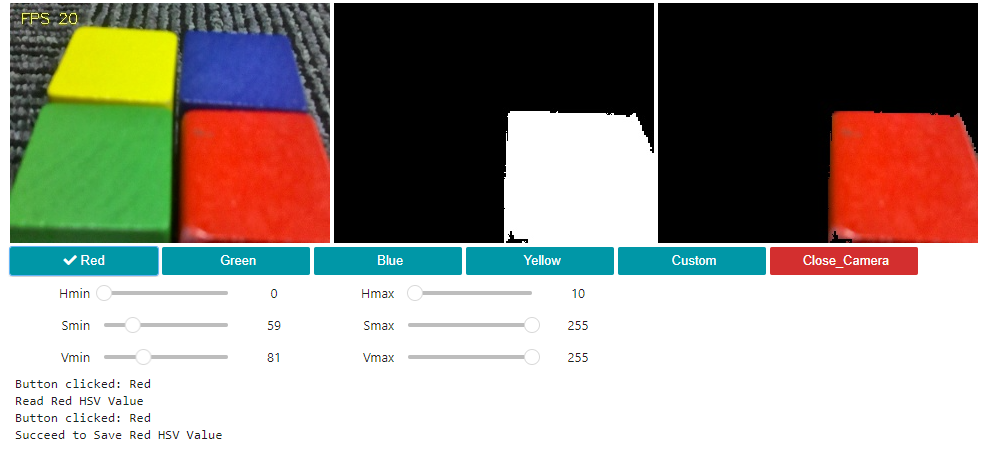
For example, the red color in the picture above is saved in the RED_HSV_VALUE.TXT file, where the HSV values are 0,59,81,10,255,255. Numerical representation: Hmin, Smin, Vmin, Hmax, Smax, Vmax. This value can be copied and updated to the HSV value of other routines.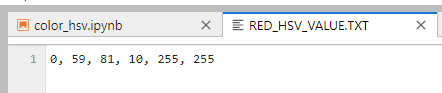
The green HSV calibration effect is as follows. After calibration, please click the green button again to save the values to the GREEN_HSV_VALUE.TXT file.
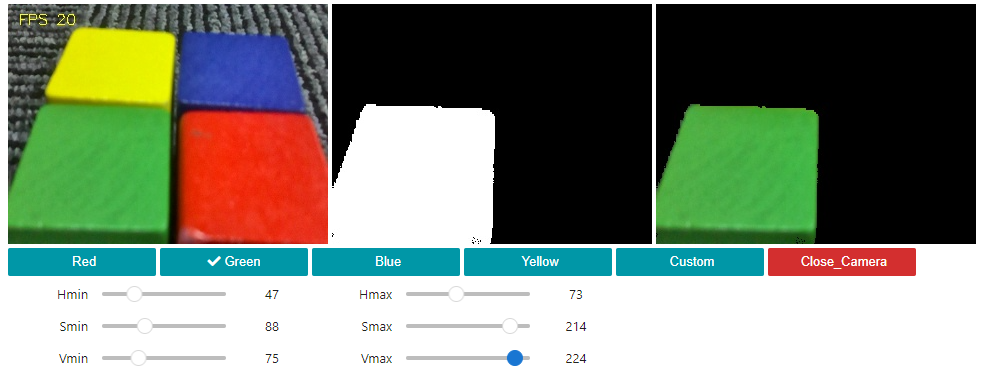
The blue HSV calibration effect is as follows. After calibration, please click the blue button again to save the value to the BLUE_HSV_VALUE.TXT file.
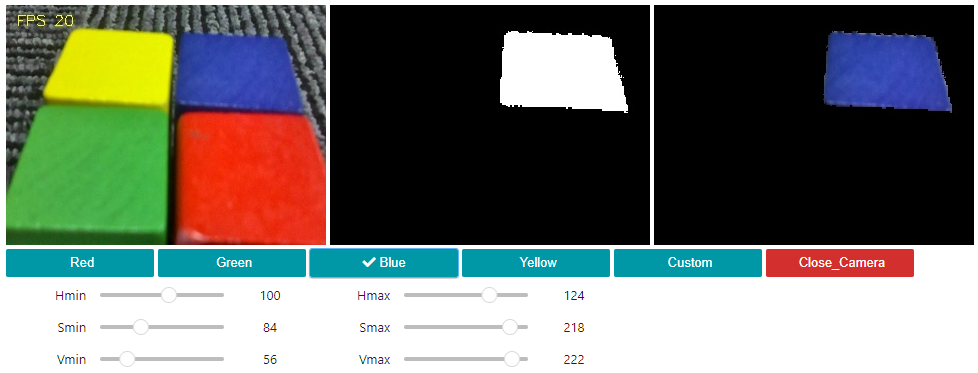
The yellow HSV calibration effect is as follows. After calibration, please click the yellow button again to save the value to the YELLOW_HSV_VALUE.TXT file.
Customize the color button. After calibration, please click the custom button again to save the value to the CUSTOM_HSV_VALUE.TXT file.
Finally click the Close_Camera button to close the camera.
Note: The TXT file of HSV values generated after calibration in this tutorial will not be automatically updated to all routines. You need to update and replace the HSV value variables in the program based on the values in the TXT file.