Welcome to Muto RS Robot repository
5)Enter docker container
5. Enter the Muto‘s Docker container
5. Enter the Muto‘s Docker container5.1. Related concepts5.2. How to query the docker image version used by the robot5.3 Binding external devices5.4. Check the peripheral connection status5.5. Edit script5.6. Execute script5.7. Switch lidar model5.8. Multiple terminals enter the same docker container
5.1. Related concepts
- What is a docker host?
The host is the server where we call the command to create the container using the image. This refers to the main control on our Muto (jetson or Raspberry Pi, etc.). The hosts mentioned below all refer to this.
- What is GUI?
xxxxxxxxxxGUI is the graphical user interface, which mainly refers to: the image window displayed by opencv, rviz interface, rqt interface, etc.
- What is the docker container of the robot?
xxxxxxxxxxThe robot here is the Muto hexapod robot, which is the Muto hexapod container that has been configured with various development dependency environments.
- Before proceeding with this tutorial, please ensure you have mastered the knowledge from the previous chapters; otherwise, you may find it difficult to learn. If this happens, please review the content of the previous chapters repeatedly. Once you have a good grasp of the material, it will become much easier.
5.2. How to query the docker image version used by the robot
- The docker image version used by the robot is also the image version used on Muto. After the user burns the Muto system image and starts it, execute:
xpi@raspberrypi:~ $ docker imagesi Info → U In UseIMAGE ID DISK USAGE CONTENT SIZE EXTRA192.168.2.51:5000/muto-humble:3.3.0 23a4c47d106f 7.92GB 0B192.168.2.51:5000/muto-humble:latest 8c66d7363c22 8.19GB 0B U192.168.2.51:5000/muto-kilted:1.1 2753e1b11ddd 7.4GB 0B192.168.2.51:5000/ros2-kilted-release:1.0 e6252585561e 5.7GB 0Bbusybox:latest eade5be814e8 4.17MB 0Bkilted:1.0 80471fea8516 7.22GB 0Bkilted:1.1 2753e1b11ddd 7.4GB 0Blanggenius/dify-api:1.11.1 c5c633a63f56 2.39GB 0Blanggenius/dify-plugin-daemon:0.5.1-local 3cd80a202e1b 1.43GB 0Blanggenius/dify-sandbox:0.2.12 5c2ad4db0b19 636MB 0Blanggenius/dify-web:1.11.1 baad4c046f12 392MB 0Bmuto-humble:3.2.0 7a8ded22e9e9 7.92GB 0Bmuto-humble:3.2.1 a3a3848cca76 7.92GB 0Bmuto-humble:3.2.2 d831d8628e73 7.92GB 0Bmuto-humble:3.3 23a4c47d106f 7.92GB 0Bmuto-humble:3.4 ea43881950b3 7.94GB 0Bmuto-humble:3.5 f30568583daf 7.95GB 0Bmuto-humble:latest ea43881950b3 7.94GB 0Bnginx:latest de437b5614ad 172MB 0Bpostgres:15-alpine c29ae9deda4b 270MB 0Bredis:6-alpine b85c67e39523 30.4MB 0Bros2-humble-final:3.2.0 88b0e21fdafe 7.9GB 0B............
You will see multiple Docker image versions. Please select the version with the name "[192.168.2.51:5000/muto-humble:latest]" and the highest tag; this is the latest image version for the robot. Ignore the other images.
- Why can’t we just put one docker image in the Muto system?
If you have read the tutorial in this chapter [12.Docker course ------ 3.Deeply understand and publish images], you should know that docker images are a layered mechanism. That is, the image of the next tag depends on the image of the previous tag. Therefore, there may be multiple versions of docker images in the host machine, and the tags of these images will be updated incrementally.
In the future, we will update new courses and update functions by releasing new docker images.
5.3 Binding external devices
First make sure that Muto has connected various peripherals and has done port binding on the peripherals. Port binding is processed on the docker host (Muto)
Common peripherals include: serial port equipment, laser radar, RGBD camera, voice control module, joystick remote control, etc.
Muto has been bound to Astra cameras, lidar and serial devices by default. If you need to bind other devices, please refer to the port binding tutorial.
For the steps of port binding, please refer to the [Linux operating system ------ Bind device ID] tutorial chapter
Port binding has been configured in the host. If you need to modify it, you can check the content and modify it:
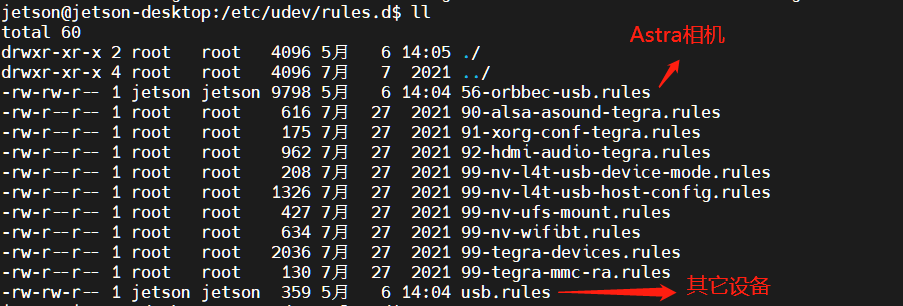
5.4. Check the peripheral connection status
This step is performed on the host machine:
- Here is a view of peripherals other than cameras and voice modules:
xxxxxxxxxxll /dev | grep ttyUSB*

- Check the ports of the AstraPro Plus camera as follows:
xxxxxxxxxxjetson@ubuntu:~$ ll /dev/astra*lrwxrwxrwx 1 root root 15 May 5 17:42 /dev/astradepth -> bus/usb/001/007lrwxrwxrwx 1 root root 15 May 5 17:42 /dev/astrauvc -> bus/usb/001/009
5.5. Edit script
Since the port number often changes after plugging and unplugging the Astra Pro Plus camera, it's necessary to re-edit the script to configure the Astra Pro Plus camera's port.
Edit the script to run Docker. This step is performed on the host machine:
- The script to run Docker,
start_muto_docker, is usually located in the Muto's/usr/bindirectory (/usr/bin/start_muto_docker).
The complete script content is as follows:
xxxxxxxxxx#!/usr/bin/env bash# ==========================================# Script Name / 脚本名称: start_muto_docker# Description / 描述:# Configures and launches the Muto LLM Docker container.# It handles hardware detection (cameras, audio, LiDAR), sets up environment variables,# configures X11 forwarding, and manages the Docker lifecycle.# 配置并启动 Muto LLM Docker 容器。# 该脚本处理硬件检测(摄像头、音频、激光雷达),设置环境变量,# 配置 X11 转发,并管理 Docker 生命周期。# ==========================================# ==========================================# User Configuration Area / 用户配置区域# ==========================================# 1. Voice Module Configuration / 1. 语音模块配置# ============================# 1.1 Provider & Keys / 1.1 服务提供商与密钥# -------------------# Alibaba Cloud API Key / 阿里云 API 密钥export ALIBABA_API_KEY="xxxxxxxxxxxxxxxxxxx"# Force specific voice provider (e.g., "xunfei" or "alibaba")# 指定语音服务提供商(例如:"xunfei" 或 "alibaba")export FORCE_VOICE_PROVIDER="xunfei" # 1.2 General Voice Settings / 1.2 通用语音设置# Language setting ("en" or "zh_cn") / 语言设置 ("en" 或 "zh_cn")export VOICE_LANGUAGE="en"# 2. Dify Configuration / 2. Dify 配置# -------------------# Auto-detect IP from wlan0 interface to connect to local Dify instance# 自动从 wlan0 接口检测 IP 以连接本地 Dify 实例export DIFY_HOST=$(ip addr show wlan0 2>/dev/null | grep "inet " | awk '{print $2}' | cut -d/ -f1 | head -n 1)# Fallback if wlan0 has no IP (use localhost)# 如果 wlan0 没有 IP,则回退使用 localhostif [ -z "$DIFY_HOST" ]; then export DIFY_HOST="127.0.0.1"fi# Set Dify API Key based on selected language# 根据选择的语言设置 Dify API 密钥if [ "$VOICE_LANGUAGE" = "zh_cn" ]; then export DIFY_API_KEY="app-nlbHG1j5hn8ya68M9VjGcnIh"elif [ "$VOICE_LANGUAGE" = "en" ]; then export DIFY_API_KEY="app-Kw3QqjIXE6xtwjsGVxuvIZU8"fi# 3. Docker Image Configuration / 3. Docker 镜像配置# Default Docker image to use / 默认使用的 Docker 镜像export DOCKER_IMAGE="192.168.2.51:5000/muto-humble:latest"# ==========================================# Helper Functions & Colors / 辅助函数与颜色# ==========================================RESET=$'\033[0m'BOLD=$'\033[1m'DIM=$'\033[2m'RED=$'\033[31m'GREEN=$'\033[32m'YELLOW=$'\033[33m'BLUE=$'\033[34m'MAGENTA=$'\033[35m'CYAN=$'\033[36m'# Function to print step information# 打印步骤信息的函数next_step() { local msg=$1 echo -e "${BLUE}>>> ${msg}...${RESET}"}# ==========================================# Audio Configuration Function / 音频配置函数# ==========================================# Configures ALSA settings inside the container based on detected USB devices# 根据检测到的 USB 设备在容器内配置 ALSA 设置configure_audio_in_container() { local container_id="$1" # Execute audio configuration script inside the container # 在容器内执行音频配置脚本 docker exec -u root "$container_id" bash -c 'RESET=$'"'"'\033[0m'"'"'GREEN=$'"'"'\033[32m'"'"'YELLOW=$'"'"'\033[33m'"'"'CYAN=$'"'"'\033[36m'"'"'# Step 1: Detect USB audio devices / 步骤 1: 检测 USB 音频设备USB_CARD=""USB_DEVICE_NAME=""if [ -f /proc/asound/cards ]; then # Method 1: Look for C-Media device (Common USB Audio Chipset) # 方法 1: 查找 C-Media 设备(常见的 USB 音频芯片组) if grep -i "C-Media" /proc/asound/cards > /dev/null 2>&1; then USB_CARD=$(grep -B1 "C-Media" /proc/asound/cards | head -1 | awk '"'"'{print $1}'"'"') USB_DEVICE_NAME=$(grep -B1 "C-Media" /proc/asound/cards | head -1 | grep -o '"'"'$$.*$$'"'"' | tr -d '"'"'[]'"'"') echo "$GREEN ✓ Found Audio Device:$RESET $USB_DEVICE_NAME (Card $USB_CARD)" # Method 2: Look for other USB Audio devices (excluding specific cameras like ASTRA/ORBBEC) # 方法 2: 查找其他 USB 音频设备(排除 ASTRA/ORBBEC 等特定摄像头) elif grep -i "USB Audio Device" /proc/asound/cards | grep -v "ASTRA\|ORBBEC" > /dev/null 2>&1; then USB_CARD=$(grep -B1 "USB Audio Device" /proc/asound/cards | grep -v "ASTRA\|ORBBEC" | head -1 | awk '"'"'{print $1}'"'"') USB_DEVICE_NAME=$(grep -B1 "USB Audio Device" /proc/asound/cards | grep -v "ASTRA\|ORBBEC" | head -1 | grep -o '"'"'$$.*$$'"'"' | tr -d '"'"'[]'"'"') echo "$GREEN ✓ Found Audio Device:$RESET $USB_DEVICE_NAME (Card $USB_CARD)" fifi# Fallback: Use aplay to find devices if /proc method failed# 备选方案: 如果 /proc 方法失败,使用 aplay 查找设备if [ -z "$USB_CARD" ] && command -v aplay >/dev/null 2>&1; then APLAY_LINE=$(aplay -l 2>/dev/null | grep -i "C-Media\|USB Audio" | grep -v "ASTRA\|ORBBEC" | head -1) if [ -n "$APLAY_LINE" ]; then USB_CARD=$(echo "$APLAY_LINE" | grep -o "card [0-9]*" | awk '"'"'{print $2}'"'"') USB_DEVICE_NAME=$(echo "$APLAY_LINE" | grep -o '"'"'$$.*$$'"'"' | head -1 | tr -d '"'"'[]'"'"') echo "$GREEN ✓ Found Audio Device (aplay):$RESET $USB_DEVICE_NAME (Card $USB_CARD)" fifi# Default to card 2 if no USB audio detected# 如果未检测到 USB 音频,默认使用声卡 2if [ -z "$USB_CARD" ]; then echo "$YELLOW ⚠ No USB audio detected, using default card 2$RESET" USB_CARD="2"fi# Step 2: Generate .asoundrc configuration file# 步骤 2: 生成 .asoundrc 配置文件cat > /root/.asoundrc << ASOUNDRC_EOF# ==========================================# ALSA Audio Configuration# Auto-generated by docker_start.sh# ==========================================# USB Audio Card: $USB_CARD# Default PCM device / 默认 PCM 设备pcm.!default { type plug slave.pcm "usbmain"}# USB Audio Device (main output) / USB 音频设备(主输出)pcm.usbmain { type hw card $USB_CARD device 0}# Control device / 控制设备ctl.!default { type hw card $USB_CARD}ASOUNDRC_EOF# Step 4: Set environment variables in .bashrc for persistence# 步骤 4: 在 .bashrc 中设置环境变量以持久化if ! grep -q "# Audio Configuration" /root/.bashrc 2>/dev/null; then { echo "" echo "# Audio Configuration" echo "export ALSA_CARD=$USB_CARD" echo "export AUDIO_DEVICE=\"hw:$USB_CARD,0\"" echo "export AUDIO_CARD_NUM=$USB_CARD" } >> /root/.bashrcfi'}# ==========================================# Pre-flight Checks / 启动前检查# ==========================================# Check Docker service status and start if needed# 检查 Docker 服务状态,如果未运行则启动if command -v systemctl >/dev/null 2>&1; then if ! systemctl is-active --quiet docker; then echo "Docker service not running; starting..." sudo systemctl start docker sleep 3 fielse if ! service docker status >/dev/null 2>&1; then echo "Docker service not running; starting (service)..." sudo service docker start sleep 3 fifi# Verify Docker is actually working# 验证 Docker 是否实际工作正常if ! docker info > /dev/null 2>&1; then echo "Docker unavailable; please check the Docker service" exit 1fi# ==========================================# Device Detection / 设备检测# ==========================================# Detect Astra Depth and UVC cameras# 检测 Astra 深度相机和 UVC 相机DEPTH_PATH=$(readlink -f /dev/astradepth 2>/dev/null || echo "")UVC_PATH=$(readlink -f /dev/astrauvc 2>/dev/null || echo "")echo ""echo -e "${BOLD}${MAGENTA}Device Status / 设备状态${RESET}"if [ -n "$DEPTH_PATH" ] && [ -e "$DEPTH_PATH" ]; thenecho -e "${GREEN} ✅ Depth camera detected / 检测到深度相机:${RESET} $DEPTH_PATH"elseecho -e "${YELLOW} ❌ Depth camera not detected / 未检测到深度相机${RESET}"fiif [ -n "$UVC_PATH" ] && [ -e "$UVC_PATH" ]; thenecho -e "${GREEN} ✅ UVC camera detected / 检测到 UVC 相机:${RESET} $UVC_PATH"elseecho -e "${YELLOW} ❌ UVC camera not detected / 未检测到 UVC 相机${RESET}"fiif [ -n "$DEPTH_PATH" ] && [ -e "$DEPTH_PATH" ]; thenecho -e "${GREEN} ✅ Depth camera ready to map into container / 深度相机准备映射到容器${RESET}"fiif [ -n "$UVC_PATH" ] && [ -e "$UVC_PATH" ]; thenecho -e "${GREEN} ✅ UVC camera ready to map into container / UVC 相机准备映射到容器${RESET}"fi# Check for Yahboom ROS2 workspace# 检查 Yahboom ROS2 工作空间YAHBOOM_HOST_DIR="$HOME/yahboomcar_ros2_ws"MOUNT_YAHBOOM=falseif [ -d "$YAHBOOM_HOST_DIR" ] && [ "$(ls -A "$YAHBOOM_HOST_DIR" 2>/dev/null)" ]; thenecho -e "${GREEN} ✅ yahboomcar_ros2_ws found, will mount / 发现 yahboomcar_ros2_ws,将挂载${RESET}" MOUNT_YAHBOOM=trueelseecho -e "${YELLOW} ❌ yahboomcar_ros2_ws missing or empty; using container default / yahboomcar_ros2_ws 缺失或为空;使用容器默认值${RESET}" MOUNT_YAHBOOM=falsefiif [ "$MOUNT_YAHBOOM" = true ]; then mkdir -p "$HOME/yahboomcar_ros2_ws/"fi# ==========================================# Port Utilities / 端口工具# ==========================================# Function to check if a port is free# 检查端口是否空闲的函数is_port_free() { local port="$1" if command -v ss >/dev/null 2>&1; then ! ss -lnt | awk '{print $4}' | grep -q ":$port$" return $? elif command -v netstat >/dev/null 2>&1; then ! netstat -ltn | awk '{print $4}' | grep -q ":$port" return $? elif command -v lsof >/dev/null 2>&1; then ! lsof -iTCP -sTCP:LISTEN -P | grep -q ":$port" return $? else return 0 fi}# Function to find a free port in a range# 在指定范围内查找空闲端口的函数find_free_port() { local start="$1"; local end="$2"; end=${end:-$((start+50))} local p=$start while [ "$p" -le "$end" ]; do if is_port_free "$p"; then echo "$p"; return 0; fi p=$((p+1)) done echo "$start"}# ==========================================# Docker Launch Arguments / Docker 启动参数# ==========================================DOCKER_ARGS=( "docker" "run" "-d" "--privileged" # Enable privileged mode for hardware access / 启用特权模式以访问硬件 "--group-add=audio" # Add to audio group / 添加到 audio 组 "--net=host" # Use host network / 使用主机网络)# List of environment variables to pass to container# 要传递给容器的环境变量列表VOICE_ENV_VARS=( "VOICE_LANGUAGE" "VOICE_WAKE_SERIAL_PORT" "VOICE_WAKE_BAUDRATE" "VOICE_WAKE_TIMEOUT" "VOICE_WAKE_AUTO_START" "VOICE_RECORD_SAMPLE_RATE" "VOICE_RECORD_FRAME_DURATION_MS" "VOICE_RECORD_VAD_MODE" "VOICE_RECORD_MAX_SILENCE_FRAMES" "VOICE_RECORD_MIN_SPEECH_FRAMES" "VOICE_RECORD_ENERGY_FACTOR" "VOICE_RECORD_ENERGY_ADD" "VOICE_RECORD_CALIBRATION_MS" "VOICE_RECORD_DISABLE_WAKE_DURING_RECORDING" "VOICE_RECORD_SPEECH_SERIAL_PORT" "VOICE_RECORD_SPEECH_BAUDRATE" "VOICE_RECORD_MIC_INDEX" "VOICE_RECORD_OUTPUT_DIR" "VOICE_PLAYER_SYSTEM_SOUNDS_DIR" "VOICE_PLAYER_DEFAULT_VOLUME" "VOICE_PLAYER_OUTPUT_DEVICE_INDEX" "VOICE_PLAYER_AUTO_HEAL_SYSTEM_SOUNDS" "VOICE_PLAYER_BACKEND" "VOICE_PLAYER_APLAY_PATH" "VOICE_PLAYER_ALSA_DEVICE" "VOICE_QUEUE_MAX_SIZE" "VOICE_QUEUE_ENABLE_PRIORITY" "XUNFEI_STT_DOMAIN" "XUNFEI_STT_LANGUAGE" "XUNFEI_STT_ACCENT" "XUNFEI_STT_VAD_EOS" "XUNFEI_STT_FRAME_SIZE" "XUNFEI_STT_SEND_INTERVAL" "ALIBABA_STT_MODEL" "ALIBABA_STT_FORMAT" "ALIBABA_STT_SAMPLE_RATE" "ALIBABA_STT_ENABLE_INTERMEDIATE_RESULT" "ALIBABA_STT_ENABLE_PUNCTUATION_PREDICTION" "ALIBABA_STT_ENABLE_INVERSE_TEXT_NORMALIZATION" "XUNFEI_TTS_VOICE_NAME" "XUNFEI_TTS_SPEED" "XUNFEI_TTS_VOLUME" "XUNFEI_TTS_PITCH" "XUNFEI_TTS_AUDIO_ENCODING" "XUNFEI_TTS_SAMPLE_RATE" "ALIBABA_TTS_MODEL" "ALIBABA_TTS_VOICE" "ALIBABA_TTS_FORMAT" "ALIBABA_TTS_SAMPLE_RATE" "VOICE_TTS_OUTPUT_DIR" "VOICE_LOG_LEVEL" "ALIBABA_API_KEY" "XUNFEI_APP_ID" "XUNFEI_API_KEY" "XUNFEI_API_SECRET" "FORCE_VOICE_PROVIDER" "DIFY_HOST" "DIFY_API_KEY")# Set ROS 2 console output format to message only# 设置 ROS 2 控制台输出格式仅为消息DOCKER_ARGS+=("-e" "RCUTILS_CONSOLE_OUTPUT_FORMAT={message}")# Pass voice environment variables# 传递语音环境变量for var in "${VOICE_ENV_VARS[@]}"; do DOCKER_ARGS+=("-e" "$var=${!var}")donenext_step "Configure X11 / 配置 X11"# Configure X11 forwarding for GUI applications# 为 GUI 应用程序配置 X11 转发if [ -n "$DISPLAY" ]; then if command -v xhost >/dev/null 2>&1; then xhost +local:root >/dev/null 2>&1 || true fi SAFE_DISPLAY=${DISPLAY/localhost/127.0.0.1} DOCKER_ARGS+=("--env=DISPLAY=$SAFE_DISPLAY") DOCKER_ARGS+=("--env=QT_X11_NO_MITSHM=1") DOCKER_ARGS+=("--env=XDG_RUNTIME_DIR=/tmp") DOCKER_ARGS+=("--env=XDG_SESSION_TYPE=x11") if [ -d "/tmp/.X11-unix" ] || [ -S "/tmp/.X11-unix/X0" ]; then DOCKER_ARGS+=("-v" "/tmp/.X11-unix:/tmp/.X11-unix:rw") fi if [ -f "$HOME/.Xauthority" ]; then DOCKER_ARGS+=("-v" "$HOME/.Xauthority:/root/.Xauthority:rw") DOCKER_ARGS+=("-e" "XAUTHORITY=/root/.Xauthority") fifinext_step "Mount data & params / 挂载数据和参数"# Mount Yahboom workspace if available# 如果可用,挂载 Yahboom 工作空间if [ "$MOUNT_YAHBOOM" = true ]; then DOCKER_ARGS+=("-v" "$HOME/yahboomcar_ros2_ws/:/root/yahboomcar_ros2_ws/")fi# Mount project directories# 挂载项目目录DOCKER_ARGS+=( "-v" "$HOME/muto-llm-2.0/:/root/muto-llm-2.0/" "-v" "$HOME/speech_music/:/root/speech_music/")# Configure thread usage based on CPU cores# 根据 CPU 核心配置线程使用THREADS=$( (command -v nproc >/dev/null 2>&1 && nproc) || grep -c '^processor' /proc/cpuinfo 2>/dev/null || echo 1 )DOCKER_ARGS+=( "-e" "OMP_NUM_THREADS=$THREADS" "-e" "TORCH_NUM_THREADS=$THREADS" "-e" "RMW_IMPLEMENTATION=rmw_cyclonedds_cpp" "-v" "/proc:/host/proc:ro")next_step "Add hardware devices / 添加硬件设备"echo ""echo -e "${BOLD}${MAGENTA}Hardware Devices / 硬件设备${RESET}"# Serial Device (for robot control)# 串口设备(用于MutoRS底层控制)if [ -e "/dev/myserial" ]; then MYSERIAL_REAL=$(readlink -f /dev/myserial) if [ -e "$MYSERIAL_REAL" ]; then DOCKER_ARGS+=("--device=$MYSERIAL_REAL:/dev/myserial") else DOCKER_ARGS+=("--device=/dev/myserial") fiecho -e "${GREEN} ✅ Serial device detected / 检测到串口设备:${RESET} /dev/myserial"elseecho -e "${YELLOW} ❌ Serial device not detected / 未检测到串口设备:${RESET} /dev/myserial"fi# Speech Device (Mic array or similar)# 语音设备(麦克风阵列)if [ -e "/dev/myspeech" ]; then MYSPEECH_REAL=$(readlink -f /dev/myspeech) if [ -e "$MYSPEECH_REAL" ]; then DOCKER_ARGS+=("--device=$MYSPEECH_REAL:/dev/myspeech") else DOCKER_ARGS+=("--device=/dev/myspeech") fiecho -e "${GREEN} ✅ Speech device detected / 检测到语音设备:${RESET} /dev/myspeech"elseecho -e "${YELLOW} ❌ Speech device not detected / 未检测到语音设备:${RESET} /dev/myspeech"fi# Audio Devices (Sound card)# 音频设备(声卡)if [ -e "/dev/snd" ]; then DOCKER_ARGS+=("--device=/dev/snd")echo -e "${GREEN} ✅ Audio device detected / 检测到音频设备:${RESET} /dev/snd"elseecho -e "${YELLOW} ❌ Audio device not detected / 未检测到音频设备:${RESET} /dev/snd"fi# LiDAR Device# 激光雷达设备if [ -e "/dev/rplidar" ]; then RPLIDAR_REAL=$(readlink -f /dev/rplidar) if [ -e "$RPLIDAR_REAL" ]; then DOCKER_ARGS+=("--device=$RPLIDAR_REAL:/dev/rplidar") DOCKER_ARGS+=("--device=$RPLIDAR_REAL:$RPLIDAR_REAL") else DOCKER_ARGS+=("--device=/dev/rplidar") fiecho -e "${GREEN} ✅ LiDAR device detected / 检测到激光雷达:${RESET} /dev/rplidar"elseecho -e "${YELLOW} ❌ LiDAR device not detected / 未检测到激光雷达:${RESET} /dev/rplidar"fi# Input Devices (Keyboard, Mouse, Joystick)# 输入设备(键盘、鼠标、手柄)if [ -e "/dev/input" ]; then DOCKER_ARGS+=("--device=/dev/input")echo -e "${GREEN} ✅ Input device detected / 检测到输入设备:${RESET} /dev/input"elseecho -e "${YELLOW} ❌ Input device not detected / 未检测到输入设备:${RESET} /dev/input"fi# Video Devices (Webcams)# 视频设备(摄像头)if [ -e "/dev/video0" ]; then DOCKER_ARGS+=("--device=/dev/video0")echo -e "${GREEN} ✅ Video device detected / 检测到视频设备:${RESET} /dev/video0"elseecho -e "${YELLOW} ❌ Video device not detected / 未检测到视频设备:${RESET} /dev/video0"fiif [ -e "/dev/video1" ]; then DOCKER_ARGS+=("--device=/dev/video1")echo -e "${GREEN} ✅ Video device detected / 检测到视频设备:${RESET} /dev/video1"elseecho -e "${YELLOW} ❌ Video device not detected / 未检测到视频设备:${RESET} /dev/video1"fi# Map detected depth/UVC devices# 映射检测到的深度/UVC 设备if [ -n "$DEPTH_PATH" ] && [ -e "$DEPTH_PATH" ]; then DOCKER_ARGS+=("--device=$DEPTH_PATH")fiif [ -n "$UVC_PATH" ] && [ -e "$UVC_PATH" ]; then DOCKER_ARGS+=("--device=$UVC_PATH")finext_step "Select image / 选择镜像"# Use environment variable or default image# 使用环境变量或默认镜像IMAGE=${DOCKER_IMAGE:-"ros2-humble-final:3.2.0"}DOCKER_ARGS+=("$IMAGE")# Keep container running indefinitely# 保持容器无限期运行DOCKER_ARGS+=("bash" "-lc" "while true; do sleep 10; done")echo ""next_step "Launch container / 启动容器"echo ""echo -e "${BOLD}${MAGENTA}Launch Info / 启动信息${RESET}"printf "%b%-16s%b %s\n" "$CYAN" "Image:" "$RESET" "$IMAGE"printf "%b%-16s%b %s\n" "$CYAN" "Network Mode:" "$RESET" "host"printf "%b%-16s%b %s\n" "$CYAN" "Service Ports:" "$RESET" "80, 9090, 8888, 8080"if [ -n "$DISPLAY" ]; then printf "%b%-16s%b %s\n" "$CYAN" "X11 Env:" "$RESET" "DISPLAY=$DISPLAY"fiecho ""# Run the Docker command# 运行 Docker 命令CONTAINER_ID=$("${DOCKER_ARGS[@]}" 2>/dev/null)if [ $? -eq 0 ]; then # Check if container is actually running # 检查容器是否实际正在运行 RUNNING=$(docker inspect -f '{{.State.Running}}' "$CONTAINER_ID" 2>/dev/null) if [ "$RUNNING" != "true" ]; then echo "Container is not running; showing startup logs / 容器未运行;显示启动日志:" docker logs "$CONTAINER_ID" | tail -n 50 echo "Container launch failed! / 容器启动失败!" exit 1 fi CID_SHORT=${CONTAINER_ID:0:12} echo -e "${GREEN}Container started successfully! / 容器启动成功!${RESET} Container ID: $CID_SHORT" echo "" next_step "Configure camera devices / 配置摄像头设备" # Create symlinks for camera devices inside container # 在容器内为摄像头设备创建软链接 if [ -n "$DEPTH_PATH" ] && [ -e "$DEPTH_PATH" ]; then docker exec -u root "$CONTAINER_ID" ln -sf "$DEPTH_PATH" /dev/astradepth > /dev/null 2>&1 fi if [ -n "$UVC_PATH" ] && [ -e "$UVC_PATH" ]; then docker exec -u root "$CONTAINER_ID" ln -sf "$UVC_PATH" /dev/astrauvc > /dev/null 2>&1 fi next_step "Configure audio / 配置音频" configure_audio_in_container "$CONTAINER_ID" next_step "Ready for use / 准备就绪" echo "" echo -e "${BOLD}${MAGENTA}Access Methods / 访问方法${RESET}" echo -e " ${GREEN}Enter container / 进入容器:${RESET} docker exec -it $CONTAINER_ID /bin/bash" echo "" echo -e "${BOLD}${GREEN}Container ready! / 容器已就绪!${RESET}" echo "" # Enter the container automatically # 自动进入容器 docker exec -it "$CONTAINER_ID" bash -lc "cd ~; exec bash" EC=$? echo -e "${YELLOW}Container session exited / 容器会话已退出${RESET} (code: $EC), stopping container..." # Stop container when user exits shell # 当用户退出 shell 时停止容器 docker stop "$CONTAINER_ID" >/dev/null 2>&1 || true echo -e "${GREEN}Container stopped / 容器已停止${RESET}"else echo "Container launch failed! / 容器启动失败!" exit 1fi
5.6. Execute script
After completing step 5.5, open a terminal on the Docker host machine [i.e., Muto, which can be accessed via VNC or on the Muto screen].
Execute the following command in the Muto VNC interface or on the Muto screen:
xxxxxxxxxxstart_muto_docker
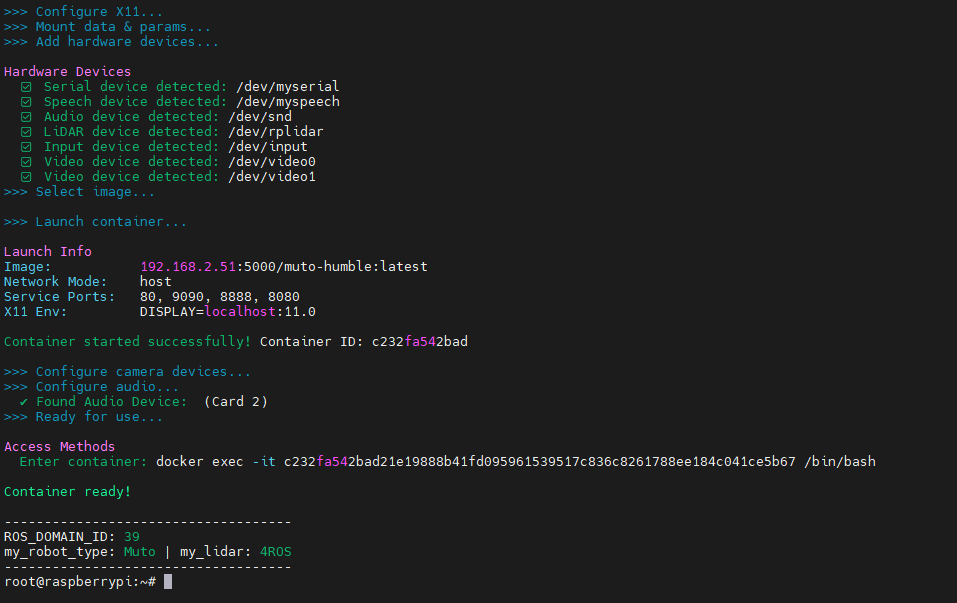
5.7. Switch lidar model
Note: Since the Muto series robots are equipped with multiple radar devices, the factory system has been configured with routines for multiple devices. However, since the product cannot be automatically recognized, the lidar model needs to be manually set.
After entering the container: Make the following modifications according to the radar type:
xxxxxxxxxxroot@ubuntu:/# cdroot@ubuntu:~# vim .bashrc
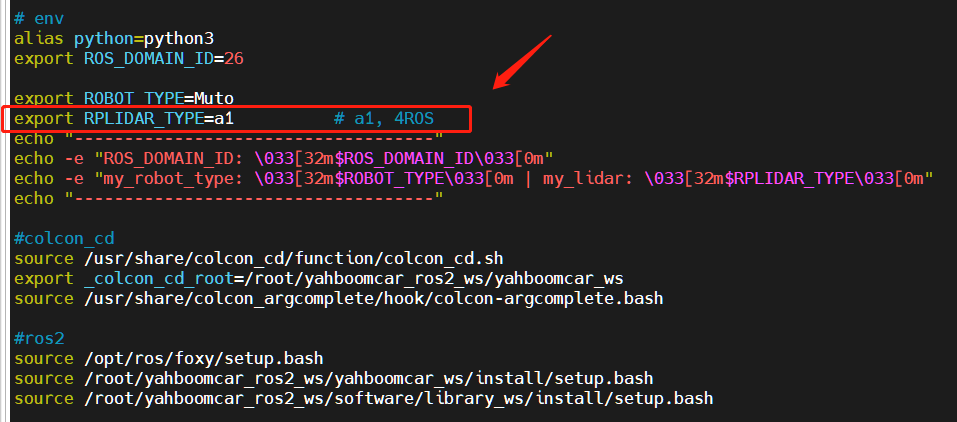
After the modification is completed, save and exit vim, and then execute:
xxxxxxxxxxroot@jetson-desktop:~# source .bashrc------------------------------------ROS_DOMAIN_ID: 26my_robot_type: Muto | my_lidar: a1------------------------------------root@jetson-desktop:~#
You can see the current modified radar type.
Robot project files are stored in the following directory:
xxxxxxxxxx/root/yahboomcar_ros2_ws
5.8. Multiple terminals enter the same docker container
- In the above steps, a docker container has been opened. You can open another terminal on the host (Muto) to view:
xxxxxxxxxxdocker ps -a

2、Now enter the docker container in the newly opened terminal:
xxxxxxxxxxdocker exec -it 925c8e27a6d7 /bin/bash

After successfully entering the container, you can open countless terminals to enter the container.
Robot project files are stored in the following directory:
xxxxxxxxxx/root/yahboomcar_ros2_ws
- Note:
(1) When executing the command in step 2, ensure that the container is in the "UP" state.
