Welcome to ROSMASTER X3 Plus repository
16.2 MoveIt control the real machine
2. MoveIt precautions and control of real machine
2. MoveIt precautions and control of real machine2.1. Preparation2.2. Simulation startup2.3. Control the real machine2.4. Notes2.4.1. Start the robotic arm2.4.2. MoveIT startup
MoveIt official website: http://docs.ros.org/en/melodic/api/moveit_tutorials/html/index.html
2.1. Preparation
According to different models, you only need to set the purchased model in [.bashrc], X1 (normal four-wheel drive) X3 (Mailun) Take X3 as an example
xxxxxxxxxx#Raspberry Pi 5 master needs to enter docker first, please perform this step#If running the script into docker fails, please refer to ROS/07, Docker tutorial~/run_docker.shOpen the [.bashrc] file
xxxxxxxxxxsudo vim .bashrc
Find the [ROBOT_TYPE] parameters and modify the corresponding car model
xxxxxxxxxxexport ROBOT_TYPE=X3plus # ROBOT_TYPE: X1 X3 X3plus R2 X7This lesson is applicable to all MoveIT cases of robots; MoveIT is mainly aimed at robots with robotic arms.
2.2. Simulation startup
Just control the robot in the simulation under MoveIT simulation.
xxxxxxxxxxroslaunch arm_moveit_demo x3plus_moveit_demo.launch sim:=true # Recommended virtual machineParameter use_rviz: whether to enable rviz, if true, enable it.
Parameter use_gui: Whether to enable the GUI control interface, if true, enable it. This parameter is only valid when sim is true.
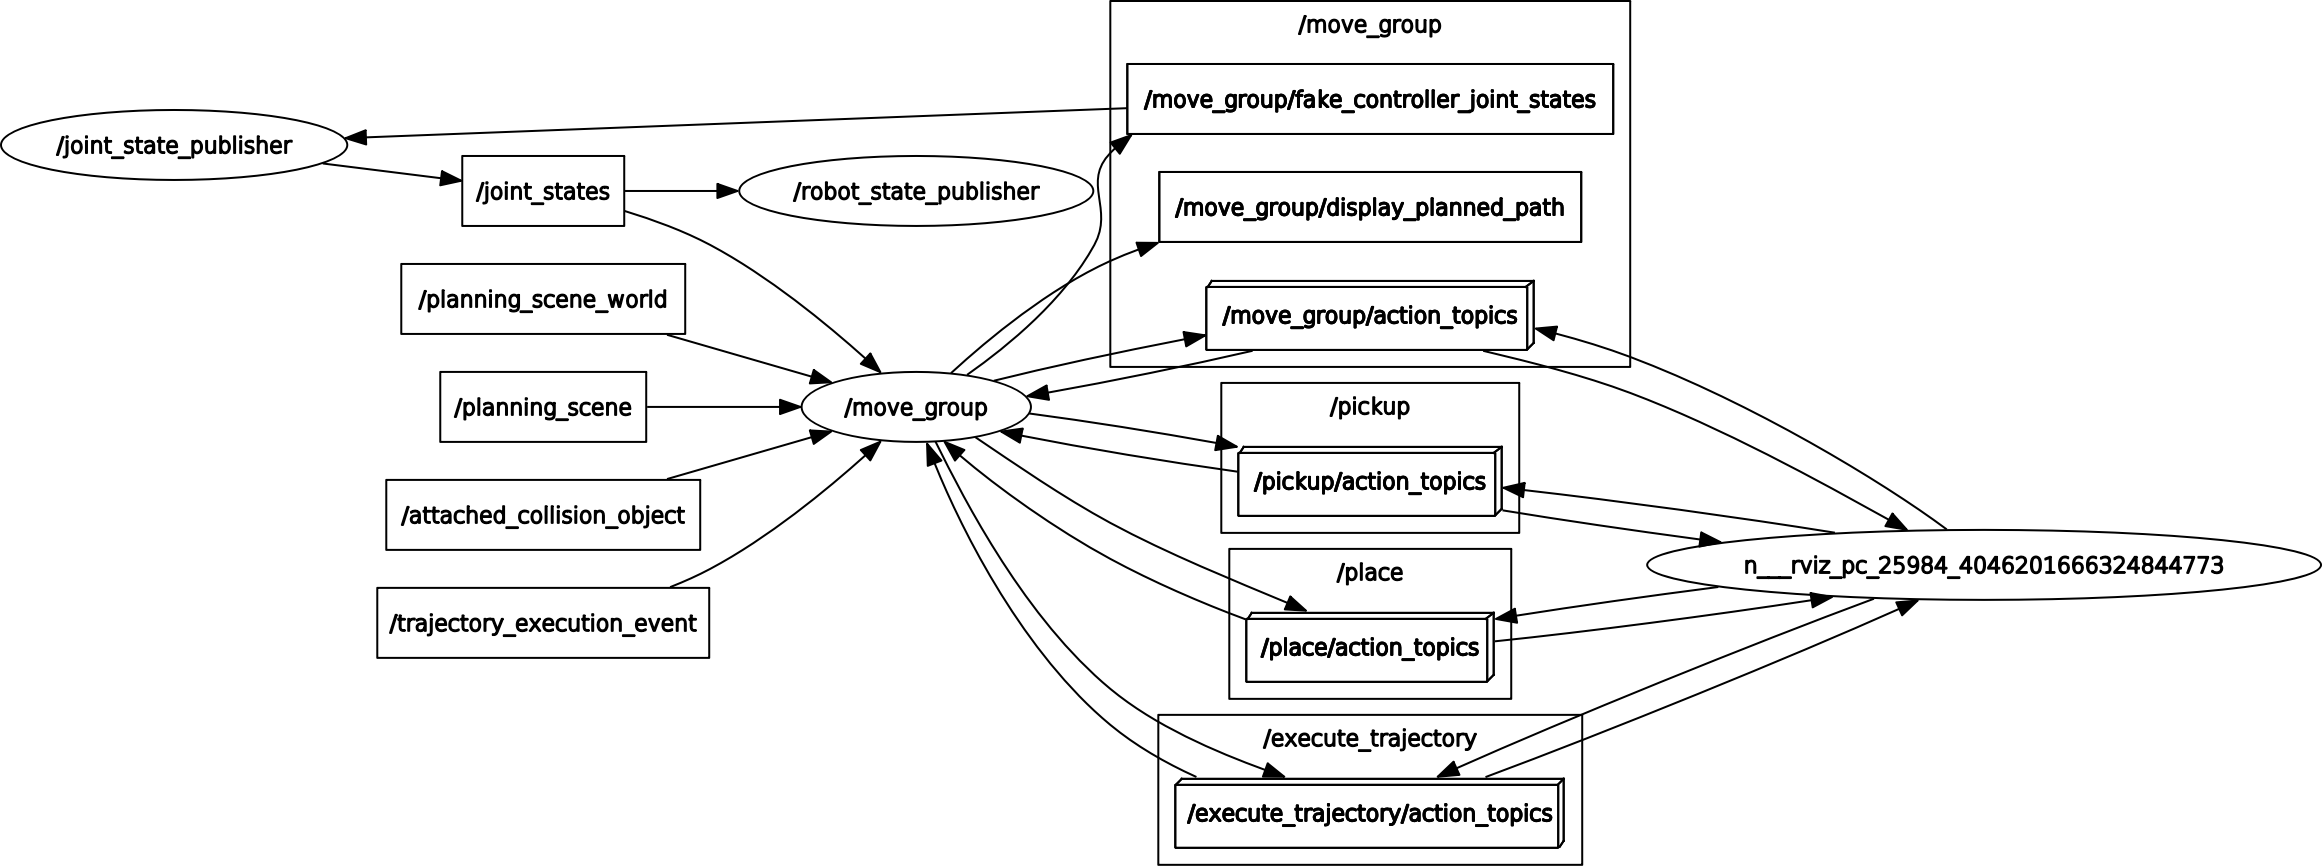
xxxxxxxxxxrqt_graph
The node diagram is as follows:
2.3. Control the real machine
Controlling real machines is combined with MoveIT to control real robots.
Hosted by a robot
xxxxxxxxxxroslaunch yahboomcar_bringup bringup.launch # Robot terminalroslaunch arm_moveit_demo x3plus_moveit_demo.launch sim:=false # Recommended virtual machineHost a virtual machine
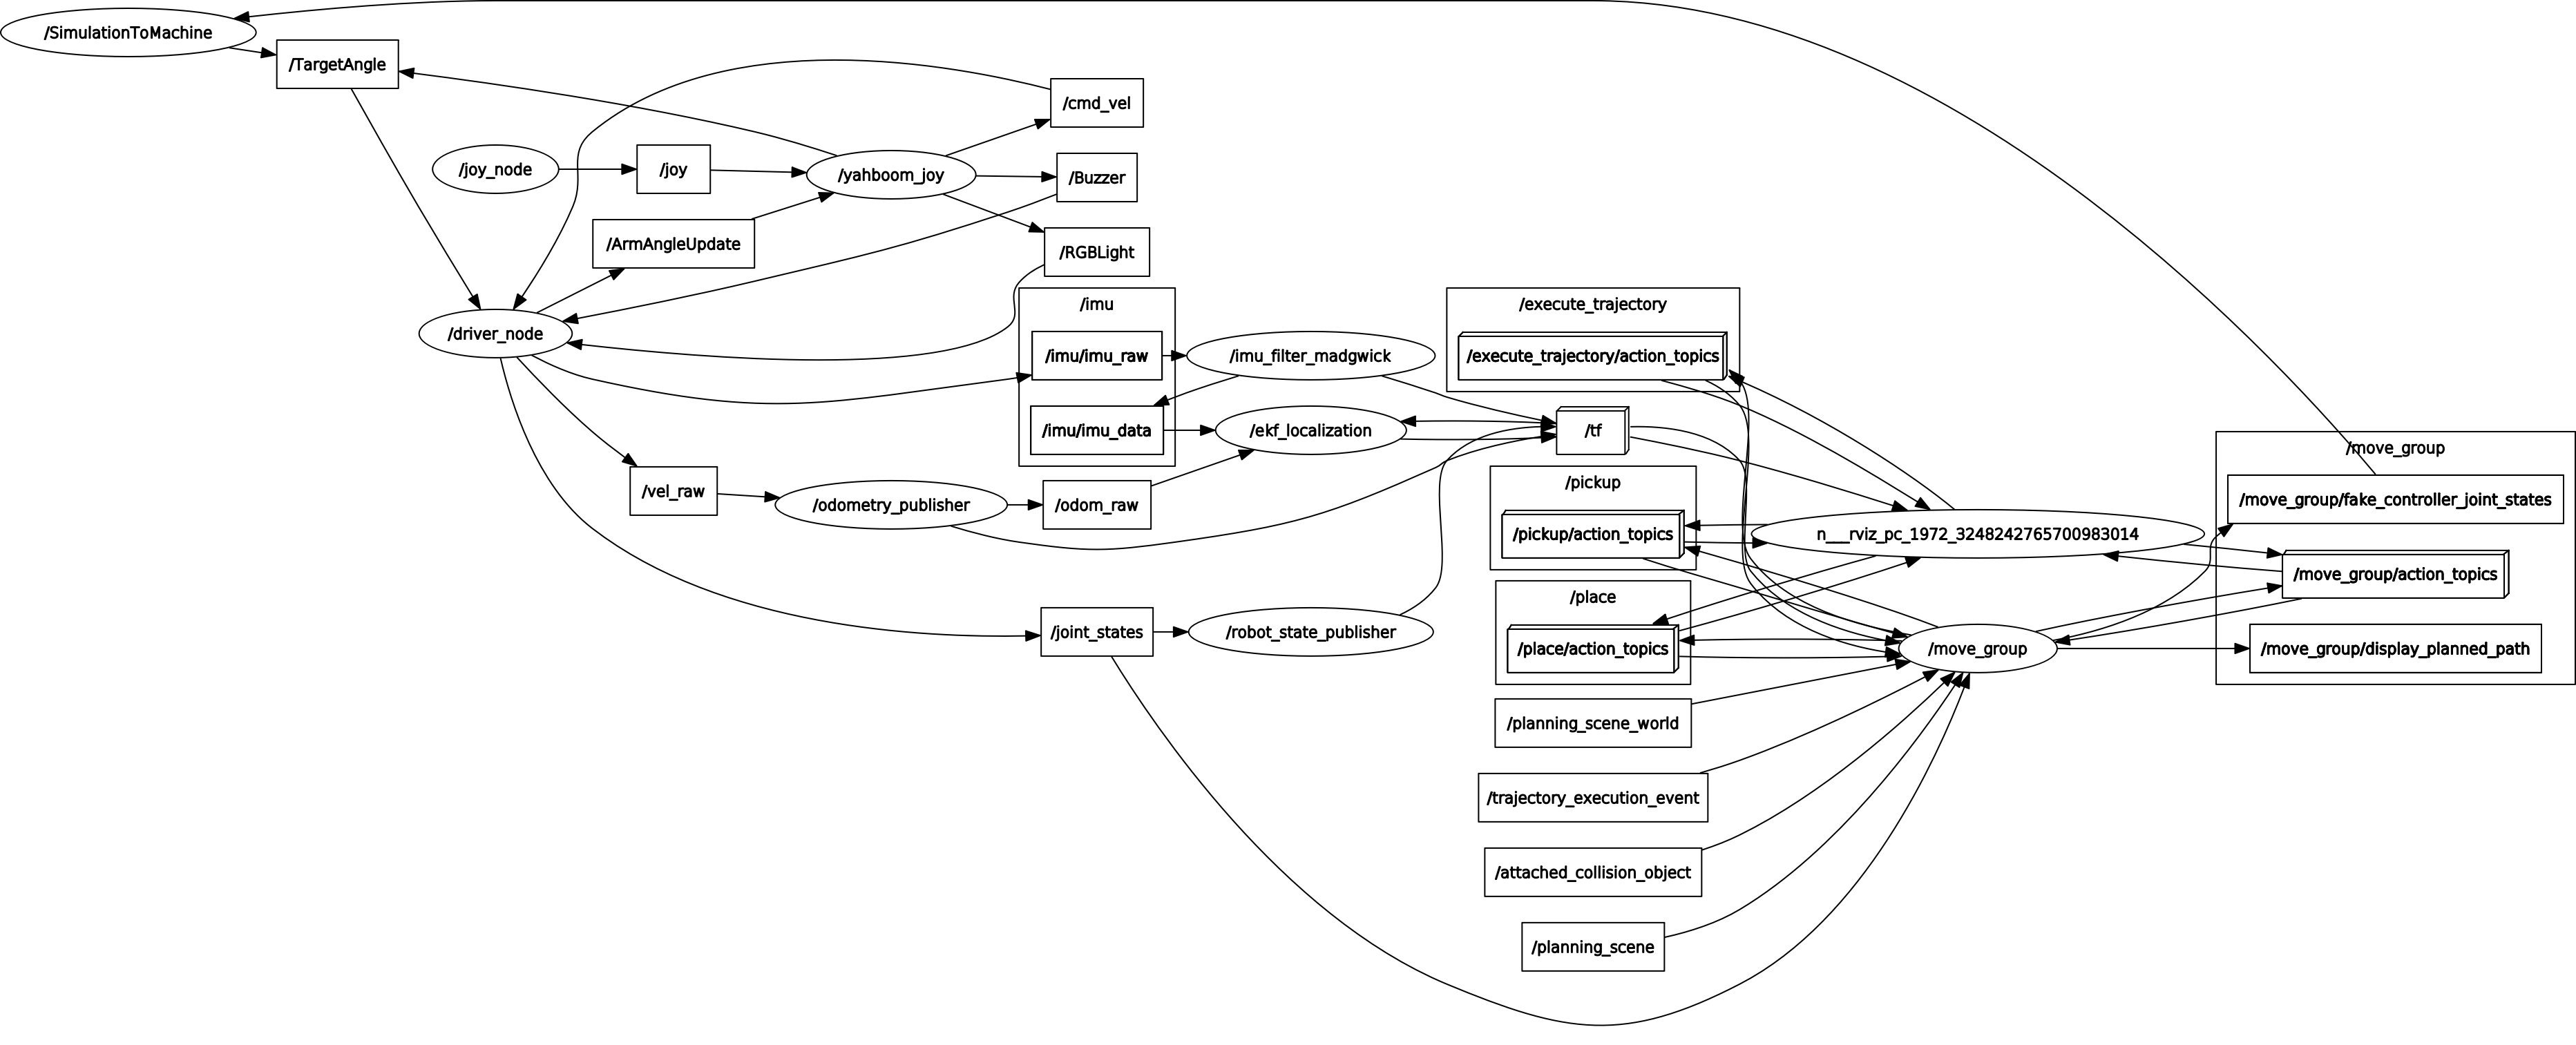
xxxxxxxxxxroscore # virtual machineroslaunch yahboomcar_bringup bringup.launch # Robot terminalroslaunch arm_moveit_demo x3plus_moveit_demo.launch sim:=false # Recommended virtual machineThe node diagram is as follows:
The corresponding relationship between the robotic arm servo and the joints: from the lowest end of the robotic arm to the end of the gripper.
| Robotic arm servo | joint | joint |
|---|---|---|
| The first servo | joint1 | joint1 |
| Second servo | joint2 | joint2 |
| The third servo | joint3 | joint3 |
| The fourth servo | joint4 | joint4 |
| The fifth servo | joint5 | joint5 |
| Servo that controls the gripper | grip_joint | Gripper |
Handle control robotic arm
| Button | Robotic arm | Button | Robotic arm |
|---|---|---|---|
| X | Joint 1 turns left (data decreases) | B | Joint 1 turns right (data increases) |
| A | Joint 2 goes down (data decreases) | Y | Joint 2 goes up (data increases) |
| Left click on the left row | Joint 3 down (data decreases) | Right click on the left row | Joint 3 up (data increased) |
| Left row down key | Joint 4 down (data decreases) | Left row up key | Joint 4 up (data increase) |
| L1 (default) | Joint 5 turns left (data increases) | L2 (default) | Joint 5 turns right (data increases) |
| L1 | Clamping jaws tightened (data increased) | L2 | Clamping jaws released (data reduced) |
Handle [R2] key: Get the current joint angle of the robotic arm.
Use the [SELECT] key on the handle to switch between controlling [Joint 5] or controlling [Clamp].
At this time, use the handle to control the robotic arm, and you will find that the real machine and the MoveIT simulation run synchronously.
2.4. Notes
Note: Problems that may arise are not inevitable.
2.4.1. Start the robotic arm
Regardless of whether you are using MoveIT or not, when you start the controller to control the real robot, the status of the controller is connected, but the robot cannot be controlled.
In this case, the handle control node may be obtaining the current position of the robotic arm, and the current position data of the robotic arm is [-1] (out of range or failed to read).
Solution: Click the [START] button on the handle multiple times, and at the same time, grab the gripper and gently rock the robot arm up and down until you hear the buzzer sound.
2.4.2. MoveIT startup
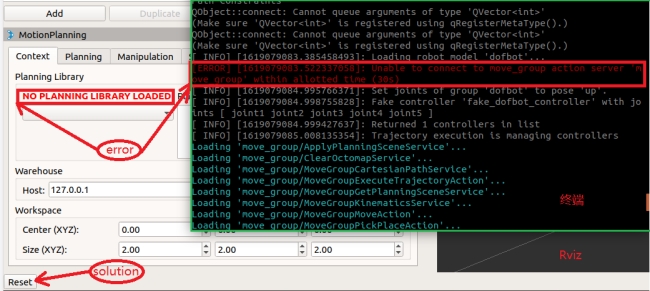
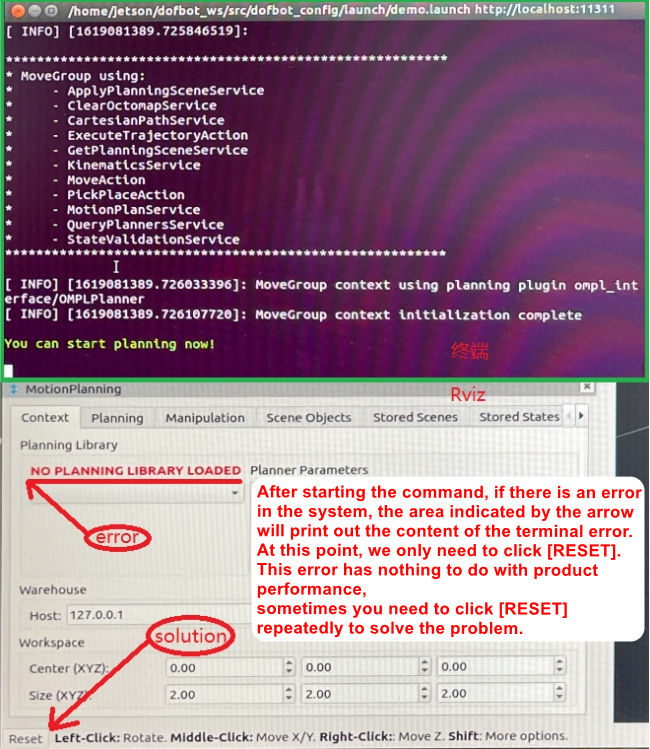
The MoveIt simulation environment starts slowly, so wait patiently and observe the terminal. An error occurs as shown in the figure below. The solution is as shown in the figure. If the terminal reports an error and the motion planning library is not loaded, click [Reset] in the lower left corner and reload. At first, it is during the loading process. Don't rush to click [Reset]. If you click it before loading is complete, the system will reload and it will not start.
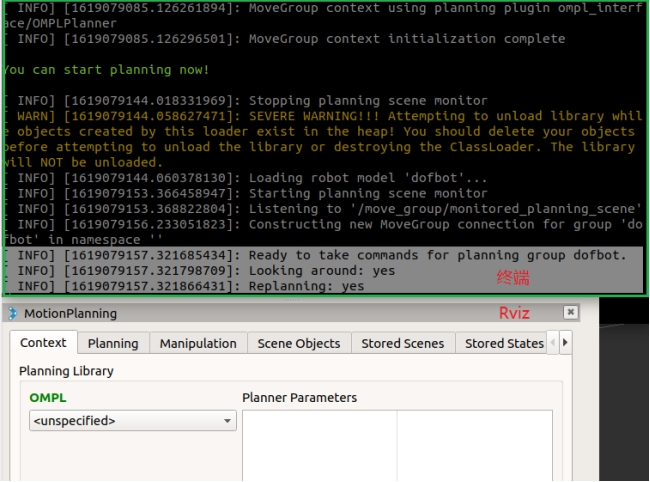
As shown in the figure below, if [Replanning: yes] appears on the terminal and a green [OMPL] appears below the Planning Library, the startup is successful.