yahboom
HomeLearn
Solution
Blog
Online Store
About Us
EN/中文
ROSMASTER X3 Plus📖
1.Preparation and First Trial
  • 1.1 Wiring Introduction
  • 1.2 Precautions for battery
  • 1.3 First Trial
  • 1.4 Precautions for DIY Robotic Arm
2. Assembly steps
  • Installation Video
3.Remote control course
  • 3.1 APP remote control
  • 3.2 Model aircraft remote control
  • 3.3 Handle remote control
4.Hardware course
  • 4.1 About expansion board_V3.0
  • 4.1 About expansion board_V1.0
  • 4.2 STM32 Development
  • 4.3 Button to control the buzzer
  • 4.4 FreeRTOS application
  • 4.5 Serial communication
  • 4.6 SBUS model aircraft remote control
  • 4.7 CAN bus communication
  • 4.8 RGB colorful light bar
  • 4.9 Timer interrupt to control
  • 4.10 Control serial port servos
  • 4.11 Nine-axis attitude sensor
  • 4.12 Control motor
  • 4.13 Timer captures the encoder data
  • 4.14 Kinematic Analysis
  • 4.15 PID control robot movement
5.Basic course
  • 5.1 Update the firmware
  • 5.2 Turn off the self-starting process
  • 5.3 Install the Rosmaster driver
  • 5.4 Buzzer whistle
  • 5.5 Control PWM servo
  • 5.6 RGB colorful light bar
  • 5.7 Control motor
  • 5.8 Control robot movement
  • 5.9 Control Serial Servo
6.Linux operating system
  • 6.1 Virtual machine installation
  • 6.2 Linux basics
  • 6.3 Remote control
  • 6.4 Multi-machine communication
  • 6.5 Static IP and hotspot mode
  • 6.6 Bind the device ID
  • 6.7 Web page real-time monitor
  • 6.8 Expansion tutorial
  • 6.9.1 Jetson Nano write sytem
  • 6.9.2 Jetson Xavier NX write system
  • 6.9.3 Jetson TX2 NX write system
  • 6.9.4 Raspberry Pi write system
7.Docker-Just for pi5
  • 7.1 Docker overview and docker installation
  • 7.2 Common commands for docker image containers
  • 7.3 Docker images deeply understand and publish images
  • 7.4 Docker hardware interaction and data processing
  • 7.5 Enter the bot's docker container
  • 7.6 Robot development environment construction in Docker
  • 7.7 How customers can update docker images in the future
8.ROS basic course
  • 8.1 ROS introduction
  • 8.2 ROS installation
  • 8.3 ROS common command tools
  • 8.4 ROS workspace
  • 8.5 ROS function package
  • 8.6 ROS node
  • 8.7 ROS topic publisher
  • 8.8 ROS topic subscribers
  • 8.9 ROS service client
  • 8.10 ROS service server
  • 8.11 ROS action client
  • 8.12 ROS action server
  • 8.13 ROS custom message reception
  • 8.14 ROS-launch file
  • 8.15 ROS-TF transformation
  • 8.16 ROS parameter service
  • 8.17 ROS-rviz use
  • 8.18 ROS-rqt tool usage
  • 8.19 Topic message recording and playback
  • 8.20 urdf model introduction
  • 8.21 gazebo introduction
  • 8.22 ROS distributed communication
9.OpenCV courses
  • 9.1 Getting started with Open Source CV
  • 9.2 Geometric transformation
  • 9.3 Image processing and draw
  • 9.4 Image beautification
  • 9.5 Opencv application
  • 9.6 AR vision
  • 9.7 AR QR code
  • 9.8 ROS+Opencv foundation
  • 9.9 ROS+Opencv application
  • 9.10 Data transformation
  • 9.11 MediaPipe development
10.Robot control course
  • 10.1 PID algorithm theory
  • 10.2 Robot PID debugging
  • 10.3 Robot information release
  • 10.4 Robot keyboard control
  • 10.5 Robot handle control
  • 10.6 Robot state estimation
  • 10.7 Robot calibration
  • 10.8 Robot URDF model
11.Depth camera course
  • 11.1 How to use the Astra camera
  • 11.2 Astra camera calibration
  • 11.3 Astra Color Tracking
  • 11.4 Astra Object Tracking
  • 11.5 Visual tracking autopilot
  • 11.6 Pure visual 2D mapping
  • 11.7 RTAB-Map 3D mapping
  • 11.8 ORB_SLAM2 basics
  • 11.9 ORB_SLAM2_Octomap
12.Lidar course
  • 12.1 Lidar basic-SLAM
  • 12.1 Lidar basic-EAI
  • 12.2 Lidar avoiding
  • 12.3 Lidar guard
  • 12.4 Lidar follow
  • 12.5 Patrol game
  • 12.6 gmapping mapping algoritm
  • 12.7 hector mapping algorithm
  • 12.8 karto mapping algorithm
  • 12.9 cartographer mapping
  • 12.10 rrt_exploration mapping
  • 12.11 AMCL
  • 12.12 Navigation and avoiding
  • 12.13 APP mapping and navigation
13.Multi-robot control course
  • 13.1 Multi-machine handle control
  • 13.2 Multi-machine navigation
  • 13.3 Multi-machine formation
  • 13.4 Multi-machine surround
14.Deep learning courses
  • 14.1 KNN recognizes handwritten
  • 14.2 Basic use of TensorFlow
  • 14.3 Basic use of PyTorch(jetson)
  • 14.4 yolov5 model training(jetson)
  • 14.5 yolov5+tensorrt acceleration
  • 14.6 yolov4-tiny
15.Voice control courses
  • 0. How to use old voice module in new image
  • 15.1 Introduction of voice control-new
  • 15.2 Voice control module port-new
  • 15.3.Introduction of voice module-old
  • 15.4.Voice control module port binding-old
  • 15.5 Voice control car movement
  • 15.6 Voice control Autopilot
  • 15.7 Voice control color recogzition
  • 15.8 Voice control color tracking
  • 15.9 Voice control multi-point nagavation
16.Robotic arm control course
  • 16.1 MoveIt configuration
  • 16.2 MoveIt control the real machine
  • 16.3 MoveIt moves randomly
  • 16.4 MoveIt kinematics design
  • 16.5 MoveIt cartesian path
  • 16.6 MoveIt avoiding
  • 16.7 MoveIt scene design
  • 16.8 MoveIt trajectory planning
  • 16.9 Mediapipe palm control car
  • 16.10 Mediapipe gesture control robotic arm
  • 16.11 Mediapipe gesture control car
  • 16.12 Mediapipe arm attitude control robotic arm
  • 16.13 Mediapipe recognizes and tracks palm control robotic arm
  • 16.14 Recognizes color block and handling
  • 16.15 Autopilot to clear obstacles
17.Voice control robotic arm course
  • 17.1 Voice control robotic arm movement
  • 17.2 Voice control robotic arm learning
  • 17.3 Voice control color block transport
  • 17.4 Voice control robotic arm grip objects
  • 17.5 Voice control robotic arm garbage sorting
18.Model training Autopilot
  • 18.0 ReadMe
  • 18.1 yolov5 to train traffic signs
  • 18.2 TensorRt acceleration identification mark
  • 18.3 Road sign indication function description
  • 18.4 Collect data
  • 18.5 Training model
  • 18.6 Model transformation and application
  • 18.7 AI Autopilot
19.For Orin-Remote control course
1. APP control
  • 1. APP control
  • 2. Model aircraft control
  • 3. Handle control
2. Model aircraft control
3. Handle control
20.Orin-Hardware course
  • 1. About expansion board_V1.0
  • 1. About expansion board_V2.0
  • 2. STM32 Development environment
  • 3. Button control
  • 4. FreeRTOS application
  • 5. Serial communication
  • 6. SBUS model aircraft remote control
  • 7. CAN bus communication
  • 8. RGB colorful light bar
  • 9. Timer interrupt to control PWM servo
  • 10. Control serial port servos
  • 11. Nine-axis attitude sensor to obtain data
  • 12. Control motor
  • 13. Timer captures the encoder data
  • 14. Robot kinematics analysis theory
  • 15. PID control robot movement
21.Orin-Basic course
  • 1. Update the firmware
  • 2. Turn off the self-starting process at startup
  • 3. Install the Rosmaster driver library
  • 4. Buzzer whistle
  • 5. Control PWM servo
  • 6. RGB colorful light bar special effects display
  • 7. Control motor
  • 8. Control robot movement
  • 9. Control Serial Servo
22.Orin-Linux operating systemnew
  • 1. Virtual machine installation and use
  • 2. Linux basics
  • 3. Remote control
  • 4. Multi-machine communication configuration
  • 5. Static IP and hotspot mode
  • 6. Bind the device ID
  • 7. Web page real-time monitoring
  • 8. Expansion tutorial
  • 9.1 Jetson Nano write sytem
  • 9.2 Jetson Xavier NX write system
  • 9.3 Jetson TX2 NX-Orin series write system
  • 9.4 Raspberry Pi write system
  • 10.Jetpack old system upgraded to SUPER system
23.Orin-Dockernew
SUPER image uses ros environment in docker
  • 1、Docker overview and docker installationnew
  • 2、Common commands for docker image containersnew
  • 3、Docker images deeply understand and publish imagesnew
  • 4、Docker hardware interaction and data processingnew
  • 5、Enter the bot's docker containernew
  • 6、Robot development environment construction in Dockernew
23.Orin-ROS basic course
  • 1.ROS introduction
  • 2.Project file structure
  • 3.Common commands and tools
  • 4.Publisher
  • 5.Subscribers
  • 6.Customize topic messages and use
  • 7.Client
  • 8.Server
  • 9.Custom service messages and usage
  • 10.TF release and monitoring
24.Orin-OpenCV courses
  • 1. Getting started with Open Source CV
  • 2. Open Source CV geometric transformation
  • 3. Open Source CV image processing and drawing text line segments
  • 4. Open Source CV image beautification
  • 5. Opencv application
  • 6. AR vision
  • 7. AR QR code
  • 8. ROS+Opencv foundation
  • 9. ROS+Opencv application
  • 10. Data transformation and point cloud
  • 11. MediaPipe development
25.Orin-Robot control course
  • 1.PID algorithm theory
  • 2.Robot PID debugging
  • 3.Robot information release
  • 4.Robot keyboard control
  • 5.Robot handle control
  • 6.Robot state estimation
  • 7.Robot calibration
  • 8.Robot URDF model
26.Orin-Depth camera course
  • 01.How to use the Astra camera
  • 02.Astra camera calibration
  • 03.Astra Color Tracking
  • 04.Astra Object Tracking
  • 05.Visual tracking autopilot
  • 06.Pure visual 2D mapping and navigation
  • 07.RTAB-Map 3D mapping navigation
  • 08.ORB_SLAM2 basics
  • 09.ORB_SLAM2_Octomap
27.Orin-Lidar course
  • 1.Lidar basic-4ROS-EAI
  • 1.Lidar basic-SLAM
  • 2.Lidar avoiding
  • 3.Lidar guard
  • 4.Lidar follow
  • 5.Patrol game
  • 6.gmapping mapping algorithm
  • 7.hector mapping algorithm
  • 8.karto mapping algorithm
  • 9.cartographer mapping algorithm
  • 10.rrt_exploration mapping algorithm
  • 11.AMCL
  • 12.Navigation and avoiding
  • 13.APP mapping and navigation
28.Orin-Multi-robot control course
  • 1.Multi-machine handle control
  • 2.Multi-machine navigation
  • 3.Multi-machine formation
  • 4.Multi-machine surround
29.Orin-Deep learning courses
  • 1.KNN recognizes handwritten digits
  • 2.Basic use of TensorFlow
  • 3.Basic use of PyTorch(jetson)
  • 4.YOLOv11Model conversion(SUPER)new
  • 5.YOLOv11Dataset annotation(SUPER)new
  • 6.YOLOv11Model conversion + tensorrt acceleration(SUPER)new
  • 7.YOLOv11Object recognition(SUPER)new
30.Orin-Voice control courses
  • 0. How to use old voice module in new image
  • 1.1 Introduction of voice module-new
  • 1.2 Introduction of voice module-old
  • 2.1 Voice control module port binding-new
  • 2.2 Voice control module port binding-old
  • 3. Voice control car movement
  • 4. Voice control Autopilot
  • 5. Voice control color recognition
  • 6. Voice control color tracking
  • 7. Voice control multi-point navigation
31.Orin-Robotic arm control course
  • 1.MoveIt configuration(VM)
  • 2.MoveIt control the real machine(VM)
  • 3.MoveIt moves randomly(VM)
  • 4.MoveIt kinematics design(VM)
  • 5.MoveIt cartesian path(VM)
  • 6.MoveIt avoiding(VM)
  • 7.MoveIt scene design(VM)
  • 8.MoveIt trajectory planning(VM)
  • 9.Mediapipe palm control car
  • 10.Mediapipe gesture control robotic arm
  • 11.Mediapipe gesture control car
  • 12.Mediapipe arm attitude control robotic arm
  • 13.Mediapipe recognizes and tracks palm control robotic arm
  • 14.Recognizes color block and handling
  • 15.Autopilot to clear obstacles
32.Orin-Voice control robotic arm course
  • 1.Voice control robotic arm movement
  • 2.Voice control robotic arm learning
  • 3.Voice control color block transport
  • 4.Voice control robotic arm grip objects
  • 5.Voice control robotic arm garbage sorting
LLM tutorial
1.Development environment
  • 0. Model usage instructions
  • 1.Environments deployment
  • 2.Dialogue platform installation
2.Jetson Nano B01
  • 1.Qwen2 model
  • 2.TinyLlama model
  • 3.Phi-3 model
  • 4.Gemma model
  • 5.Orca Mini model
  • 6.StarCoder2 model
  • 7.DeepSeek-R1 model
  • 8.Expand LLaVA-Phi3
3.Jetson Orin NXNANO
  • 1.Llama3 model
  • 2.Qwen2 model
  • 3.Phi-3 model
  • 4.Gemma model
  • 5.WizardLM2 model
  • 6.Codellama model
  • 7.DeepSeek-R1 model
  • 8.Orca Mini model
  • 9.StarCoder2 model
  • 10.TinyLlama model
  • 11.Expand LLaVA
  • 12.Expand LLaVA-Phi3
4.Raspberry Pi 5B
  • 1.Meta AI Llama3 model
  • 2.Qwen2 model
  • 3.Phi-3 model
  • 4.Gemma model
  • 5.WizardLM2 model
  • 6.Meta AI Codellama model
  • 7.DeepSeek-R1 model
  • 8.Expand LLaVA
FAQ
  • Using your own Jetson board, car cannot start normally
Download
  • RemoteCtrl_APP(iOS/Android)
  • Mapping_APP(iOS_Android)
  • SystemFile_OrinNANOSUPER
  • SystemFile_OrinNXSUPER
  • SystemFile_RPi_NANO
  • Instruction Manual
  • Code
  • Autopilot Annex
  • VM software
  • Jetson_Boot_USB.tar.gz
  • Other_Annex_File
Download ZIP
FAQ
  • 1、How to connect OLED?
  • 2、Precautions for DIY Robotic Arm

Welcome to ROSMASTER X3 Plus repository

3.Basic use of PyTorch(jetson)

3. Basic use of PyTorch
image-20220224160612500

The Raspberry Pi motherboard series does not support PyTorch function yet.

3.1. About PyTorch

3.1.1. Introduction

PyTorch is an Open Source Python machine learning library, based on Torch, using for applications such as natural language processing.

3.1.2. Features

1)Powerful GPU-accelerated tensor calculations

2)Deep neural network for automatic derivation system

3)Dynamic graph mechanism

3.2. Tensors in PyTorch

3.2.1. Tensor

Tensor in English is Tensor, which is the basic unit of operation in PyTorch. Like Numpy's ndarray, it represents a multi-dimensional matrix. The biggest difference with ndarray is that PyTorch's Tensor can run on the GPU, while numpy's ndarray can only run on the CPU. Running on the GPU greatly speeds up the operation.

3.2.2. Create a tensor

1)There are many ways to create tensors. Different types of tensors can be created by calling APIs of different interfaces.

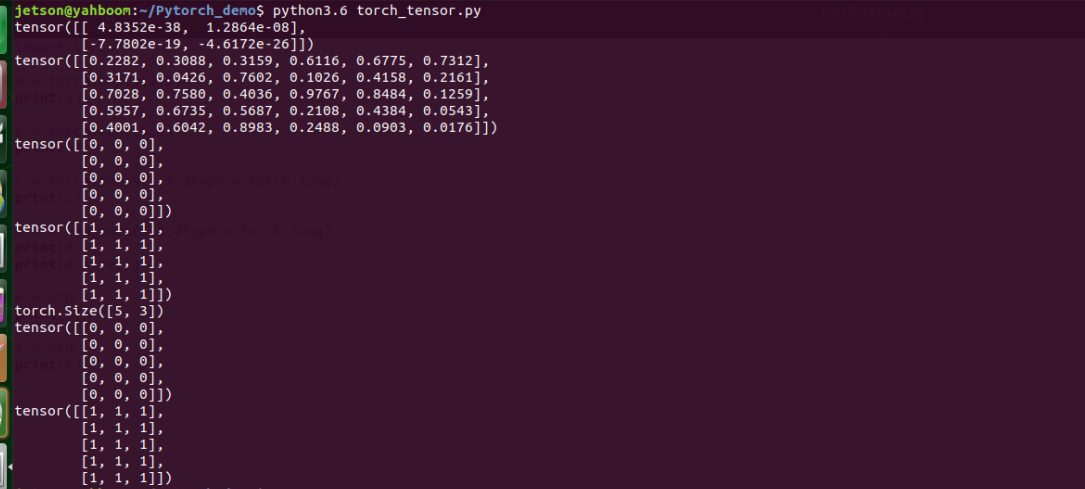
a = torch.empty(2,2):Create an uninitialized 2*2 tensor

b = torch.rand(5, 6):Creates a uniformly distributed tensor with each element initialized from 0-1

c = torch.zeros(5, 5, dtype=torch.long):Create an initialized all-zero tensor and specify the type of each element as long

d = c.new_ones(5, 3, dtype=torch.double) :Create a new tensor d based on the known tensor c

d.size():Get the shape of tensor d

2)Operations between tensors

Operations between tensors are actually operations between matrices. Due to the dynamic graph mechanism, mathematical calculations can be performed directly on tensors, for example,

  • Add two tensors:

    c = torch.zeros(5,3,dtype=torch.long)
    d = torch.ones(5,3,dtype=torch.long)
    e = c + d
    print(e)
  • Multiply two tensors

    xxxxxxxxxx
    c = torch.zeros(5,3,dtype=torch.long)
    d = torch.ones(5,3,dtype=torch.long)
    e = c * d
    print(e)

This part of the code can be referred to:~/Pytorch_demo/torch_tensor.py

Run the code,

xxxxxxxxxx
python3 torch_tensor.py

image-20220301093522387

3.3. torchvision package introduction

3.3.1. torchvision is a library specifically used to process images in Pytorch, including four major categories:

1)torchvision.datasets: Load data sets. Pytorch has many data sets such as CIFAR, MNIST, etc. You can use this class to load data sets. The usage is as follows:

xxxxxxxxxx
cifar_train_data = torchvision.datasets.CIFAR10(root='./data', train=True,
                                          download=False, transform=transform)

2)torchvision.models:Load the trained model. The model includes the following VCG, ResNet, etc. The usage is as follows:

xxxxxxxxxx
import torchvision.models as models
resnet18 = models.resnet18()

3)torchvision.transforms:Class for image conversion operations, usage is as follows:

xxxxxxxxxx
transform = transforms.Compose(
    [transforms.ToTensor(),
     transforms.Normalize((0.5, 0.5, 0.5), (0.5, 0.5, 0.5))])

4)torchvision.untils:Arrange the pictures into a grid shape as follows:

xxxxxxxxxx
torchvision.utils.make_grid(tensor, nrow=8, padding=2, normalize=False, range=None, scale_each=False, pad_value=0)

For more information on the use of the torchvision package, please refer to the official website documentation:https://pytorch.org/vision/0.8/datasets.html

3.4. Convolutional neural network

3.4.1. Neural Network

1)The difference between neural networks and machine learning

Neural networks and machine learning are both used for classification tasks. The difference is that neural networks are more efficient than machine learning, the data are simpler, and fewer parameters are required to perform tasks. The following points are explained:

  • Efficiency: The efficiency of neural networks is reflected in the extraction of features. It is different from the features of machine learning. It can train and "correct" itself. We only need to input data, and it will continuously update the features on its own.
  • Data simplicity: In the machine learning process, we need to perform some processing on the data before inputting the data, such as normalization, format conversion, etc., but in neural networks, there is no need for too much processing.
  • Fewer parameters to perform tasks: In machine learning, we need to adjust penalty factors, slack variables, etc. to achieve the most suitable effect, but for neural networks, we only need to give a weight w and a bias term b , during the training process, these two values will be continuously revised and adjusted to the optimum to minimize the error of the model.

3.4.2. Convolutional neural network

1) Convolution kernel

The convolution kernel can be understood as a feature extractor, filter (digital signal processing), etc. The neural network has three layers (input layer, hidden layer, output layer). The neurons in each layer can share the convolution kernel, so it will be very convenient to process high-level data. We only need to design the size, number and sliding step of the convolution kernel and let it train by itself.

2)Three basic layers of convolutional neural network:

  • Convolutional layer

    Perform convolution operation, inner product operation of two matrices with the size of convolution kernel, multiply numbers at the same position and then add and sum. The convolution layer close to the input layer sets a small number of convolution kernels, and the later the convolution layer sets, the more convolution kernels it sets.

  • Pooling layer

    Through downsampling, the image and parameters are compressed without destroying the quality of the image. There are two pooling methods, MaxPooling (that is, taking the maximum value in the sliding window) and AveragePooling (taking the average of all values in the sliding window).

  • Flatten layer & Fully Connected layer

    This layer is mainly about stacking layers. After passing through the pooling layer, the image is compressed and then enters the Flatten layer; the output of the Flatten layer is placed in the Fully Connected layer, and softmax is used to classify it.

3.5. Build LetNet neural network and train data set

3.5.1. Preparation before implementation

1)Environment

development board series are all installed with the project development environment, including:

  • python 3.8.10
  • torch 2.0.0
  • torchvision 0.15.1

2)Dataset

CIFAR-10,50,000 training images of 32*32 size and 10,000 test images

3.5. Build LetNet neural network and train data set

3.5.1. Preparation before implementation

1). Environment

The ROSMASTER-jetson development board series are all installed with the project development environment, including:

-python 3.8.10 -torch 2.0.0

  • torchvision 0.15.1

2), data set

CIFAR-10, 50,000 training images of 32*32 size and 10,000 test images

Note: The data set is stored in the ~/Pytorch_demo/data/cifar-10-batches-py directory,

3.5.2. Implementation process

1)Import relevant modules

xxxxxxxxxx
import torch
import torch.nn as nn
import torch.nn.functional as F
import torchvision
import torchvision.transforms as transforms
import torch.optim as optim

2)Load data set

xxxxxxxxxx
cifar_train_data = torchvision.datasets.CIFAR10(root='./data', train=True,
                                          download=False, transform=transform)
cifar_test_data = torchvision.datasets.CIFAR10(root='./data', train=False,
                                          transform=transform)

3)Encapsulated data set

xxxxxxxxxx
train_data_loader = torch.utils.data.DataLoader(cifar_train_data, batch_size=32, shuffle=True)
test_data_loader = torch.utils.data.DataLoader(cifar_test_data, batch_size=32, shuffle=True

4)Build a convolutional neural network

xxxxxxxxxx
class LeNet(nn.Module):
    #Define the operation operators required by the network, such as convolution, fully connected operators, etc.
    def __init__(self):
        super(LeNet, self).__init__()
        #Conv2d parameter meaning: number of input channels, number of output channels, kernel size
        self.conv1 = nn.Conv2d(3, 6, 5)
        self.conv2 = nn.Conv2d(6, 16, 5)
        self.fc1 = nn.Linear(16*5*5, 120)
        self.fc2 = nn.Linear(120, 84)
        self.fc3 = nn.Linear(84, 10)
        self.pool = nn.MaxPool2d(2, 2)
    def forward(self, x):
        x = F.relu(self.conv1(x))
        x = self.pool(x)
        x = F.relu(self.conv2(x))
        x = self.pool(x)
        x = x.view(-1, 16*5*5)
        x = F.relu(self.fc1(x))
        x = F.relu(self.fc2(x))
        x = self.fc3(x)
        return x

5)Configure the training loss function and optimizer

xxxxxxxxxx
criterion = nn.CrossEntropyLoss()
optimizer = optim.SGD(net.parameters(), lr=0.005, momentum=0.9)

6)Start training and testing

3.5.3. Running the program

1)Reference code path

xxxxxxxxxx
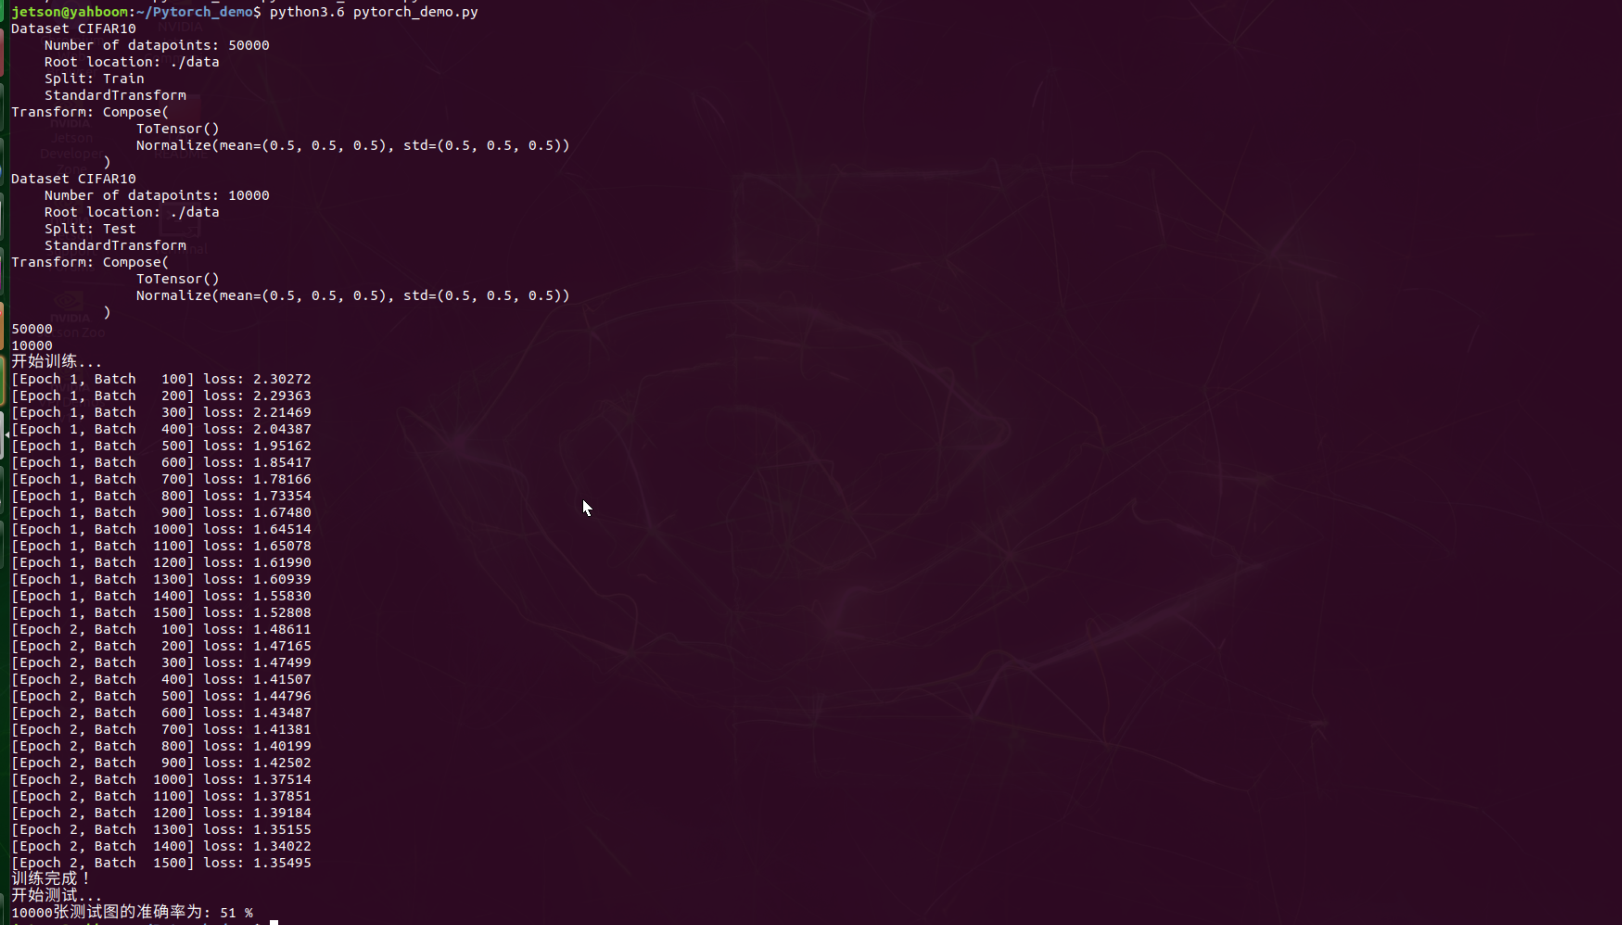
~/Pytorch_demo/pytorch_demo.py

2)Run the program

xxxxxxxxxx
cd  ~/Pytorch_demo
python3 pytorch_demo.py

image-20220301094204119

We have only trained 2 times here. You can modify the epoch value to modify the number of training times. The more times you train, the higher the accuracy.


Basic use of TensorFlow
YOLOv11Model conversion(SUPER)

COMPANY

  • About us
  • Team Style
  • Blog

LEARNING & EXPLORATION

  • Tutorials
  • Edge AI hardware
  • Educational robots
  • Embedded intelligent hardware

WHERE TO BUY

  • Yahboom Online Store
  • Amazon
  • Alibaba
  • AliExpress
  • Mercado

TECHNOLOGY SUPPORT

  • Email: support@yahboom.com

BE A DISTRIBUTOR

  • Email: sales@yahboom.com
QR Code

Copyright © 2017-2026 Yahboom. All Rights Reserved.

EN/中文