Welcome to ROSMASTER X3 Plus repository
9.3 Image processing and draw
3. Open Source CV image processing and drawing text line segments
3. Open Source CV image processing and drawing text line segments 3.1. OpenCV image grayscale processing 3.2. OpenCV image binarization processing 3.3. OpenCV image edge detection 3.4. OpenCV line segment drawing 3.5. OpenCV draw rectangle 3.6. OpenCV draws a circle 3.7. OpenCV draw ellipse 3.8. OpenCV draws polygons 3.9. OpenCV to draw text
3.1. OpenCV image grayscale processing
- Image grayscale
The process of converting a color image to a grayscale image is the grayscale processing of the image. The color of each pixel in the color image is determined by the three components of R, G, and B, and each component can take a value of 0-255, so that a pixel can have more than 16 million (256 256 256 = 1677256) colors range of changes. The grayscale image is a special color image with the same three components of R, G, and B. The variation range of one pixel is 256. Therefore, in digital image processing, images of various formats are generally converted into grayscale. image to make subsequent images less computationally expensive. The description of grayscale images, like color images, still reflects the distribution and characteristics of the overall and local chromaticity and highlight levels of the entire image.
- Image grayscale processing
Grayscale processing is the process of converting a color image into a grayscale image. A color image is divided into three components, R, G, and B, which respectively display various colors such as red, green, and blue. Grayscale is the process of making the R, G, and B components of the color equal. Pixels with large grayscale values are brighter (the maximum pixel value is 255, which is white), and vice versa (the lowest pixel is 0, which is black).
The core idea of image grayscale is R = G = B, this value is also called gray value.
Maximum value method: Make the value of R, G, B after transformation equal to the largest one of the three values before transformation, namely: R=G=B=max(R, G, B). The grayscale image converted by this method is very bright.
Average value method: the value of R, G, B after transformation is the average value of R, G, B before transformation. That is: R=G=B=(R+G+B)/3. This method produces a softer grayscale image.
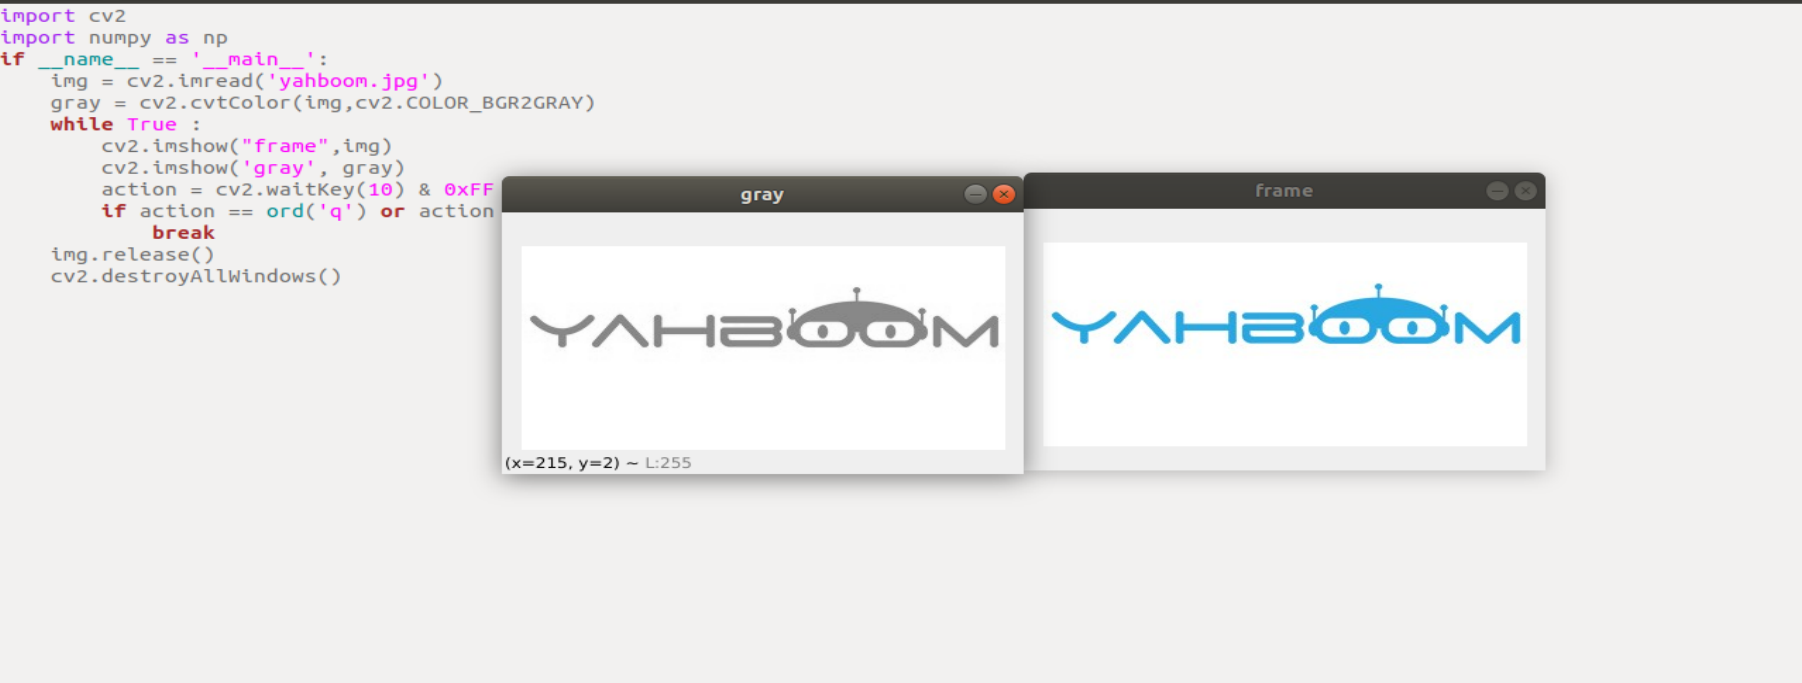
In OpenCV, use cv2.cvtColor(img1, cv2.COLOR_BGR2GRAY) to achieve grayscale processing of images
- Code and actual effect display
run the program
xxxxxxxxxxpython ~/yahboomcar_ws/src/yahboomcar_astra/scripts/opencv/3_1.py
xxxxxxxxxximport cv2import numpy as npif __name__ == '__main__':img = cv2.imread('yahboom.jpg')gray = cv2.cvtColor(img,cv2.COLOR_BGR2GRAY)while True :cv2.imshow("frame",img)cv2.imshow('gray', gray)action = cv2.waitKey(10) & 0xFFif action == ord('q') or action == 113:breakimg.release()cv2.destroyAllWindows()
3.2. OpenCV image binarization processing
- The core idea of binarization
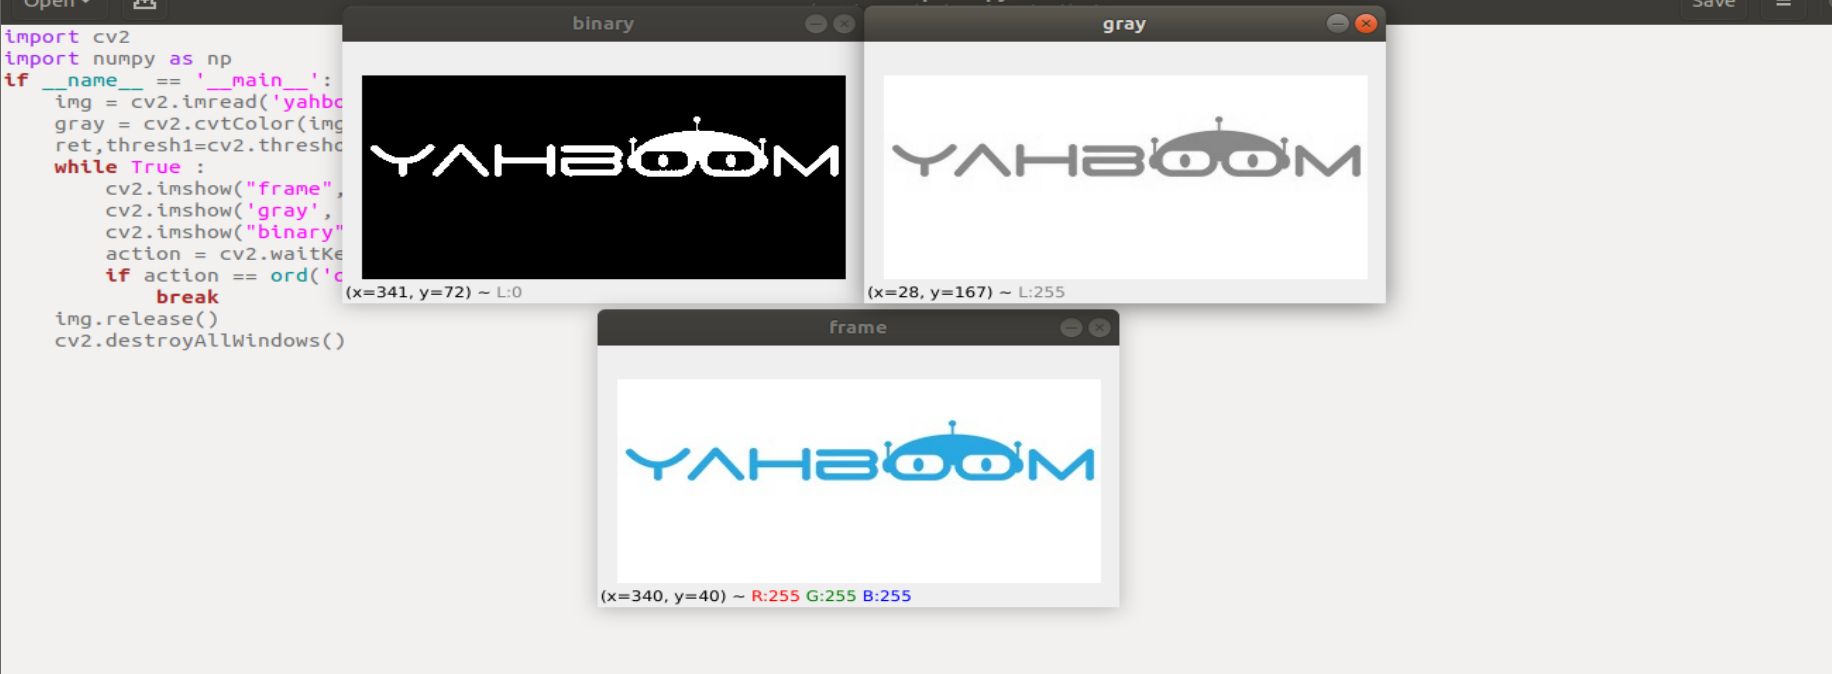
Set the threshold, which is 0 (black) or 255 (white) above the threshold, so that the image is called a black and white image. The threshold can be fixed or adaptive. The adaptive threshold is generally the comparison of a point pixel with the average value of the region pixels or the weighted sum of Gaussian distribution where this point is in the middle order, and a difference value can be set or not set.
- The threshold (threshold) function is provided in Python-OpenCV: cv2.threshold (src, threshold, maxValue, thresholdType)
Parameter meaning:
src: original image
threshold: current threshold
maxVal: the maximum threshold, usually 255
thresholdType: Threshold type, generally has the following values
enum ThresholdTypes { THRESH_BINARY = 0, #The gray value of the pixel point greater than the threshold is set to maxValue (for example, the maximum gray value of 8-bit gray value is 255), and the gray value of the pixel point whose gray value is less than the threshold value is set to 0. THRESH_BINARY_INV = 1, #The gray value of the pixel greater than the threshold is set to 0, and the gray value of the pixel less than the threshold is set to maxValue. THRESH_TRUNC = 2, #The gray value of the pixel point greater than the threshold is set to 0, and the gray value of the pixel less than the threshold is set to maxValue. THRESH_TOZERO = 3, # If the gray value of the pixel is less than the threshold, no change will be made, and the gray value of the part greater than the threshold will all become 0. THRESH_TOZERO_INV = 4 # If the gray value of the pixel is greater than the threshold, no change will be made, and if the gray value of the pixel is less than the threshold, all the gray values will become 0. }
return value:
retval: consistent with the parameter thresh
dst: result image
Note: Before binarization, we need to grayscale the color image to get a grayscale image.
- Code and actual effect display
run the program
xxxxxxxxxxpython ~/yahboomcar_ws/src/yahboomcar_astra/scripts/opencv/3_2.py
xxxxxxxxxximport cv2import numpy as npif __name__ == '__main__':img = cv2.imread('yahboom.jpg')gray = cv2.cvtColor(img,cv2.COLOR_BGR2GRAY)ret,thresh1=cv2.threshold(gray,180,255,cv2.THRESH_BINARY_INV)while True :cv2.imshow("frame",img)cv2.imshow('gray', gray)cv2.imshow("binary",thresh1)action = cv2.waitKey(10) & 0xFFif action == ord('q') or action == 113:breakimg.release()cv2.destroyAllWindows()
3.3. OpenCV image edge detection
- The purpose of image edge detection
In the case of preserving the original image properties, the data size of the image is significantly reduced. There are a variety of algorithms for edge detection. Although the Canny algorithm is old, it can be said that it is a standard algorithm for edge detection, and it is still widely used in research.
- Canny edge detection algorithm
Among the currently commonly used edge detection methods, the Canny edge detection algorithm is one of the methods with strict definition that can provide good and reliable detection. It has become one of the most popular algorithms for edge detection due to its advantages of satisfying the three criteria of edge detection and simple implementation process.
The Canny edge detection algorithm can be divided into the following 5 steps:
(1). Use a Gaussian filter to smooth the image and filter out noise
(2). Calculate the gradient strength and direction of each pixel in the image
(3). Apply Non-Maximum Suppression to eliminate spurious responses from edge detection
(4). Apply double-threshold (Double-Threshold) detection to determine real and potential edges
(5). Edge detection is finally completed by suppressing isolated weak edges
- How do we implement it in OpenCV? It's very simple, in three steps
(1). Image grayscale: gray=cv2.cvtColor(img,cv2.COLOR_BGR2GRAY)
(2). Gaussian filtering (noise reduction processing) image: GaussianBlur(src, ksize, sigmaX[, dst[, sigmaY[, borderType]]]) -> dst
Parameter meaning:
src: the input image, usually a grayscale image
ksize: Gaussian kernel size
sigmaX : Gaussian kernel standard deviation in X direction
sigmaY : Gaussian kernel standard deviation in Y direction
dst: the processed image
(3). The image processed by the Canny method: edges=cv2.Canny( image, threshold1, threshold2[, apertureSize[, L2gradient]])
Parameter meaning:
edges: the calculated edge image
image : The calculated edge image, generally the image obtained after Gaussian processing
threshold1 : the first threshold during processing
threshold2 : the second threshold during processing
apertureSize : the aperture size of the Sobel operator
L2gradient : The flag for calculating the gradient magnitude of the image. The default value is False. If True, the more precise L2 norm is used for the calculation (ie, the sum of the squares of the derivatives in the two directions is re-squared), otherwise the L1 norm is used (the absolute value of the derivatives in the two directions is directly added).
- Code and actual effect display
run the program
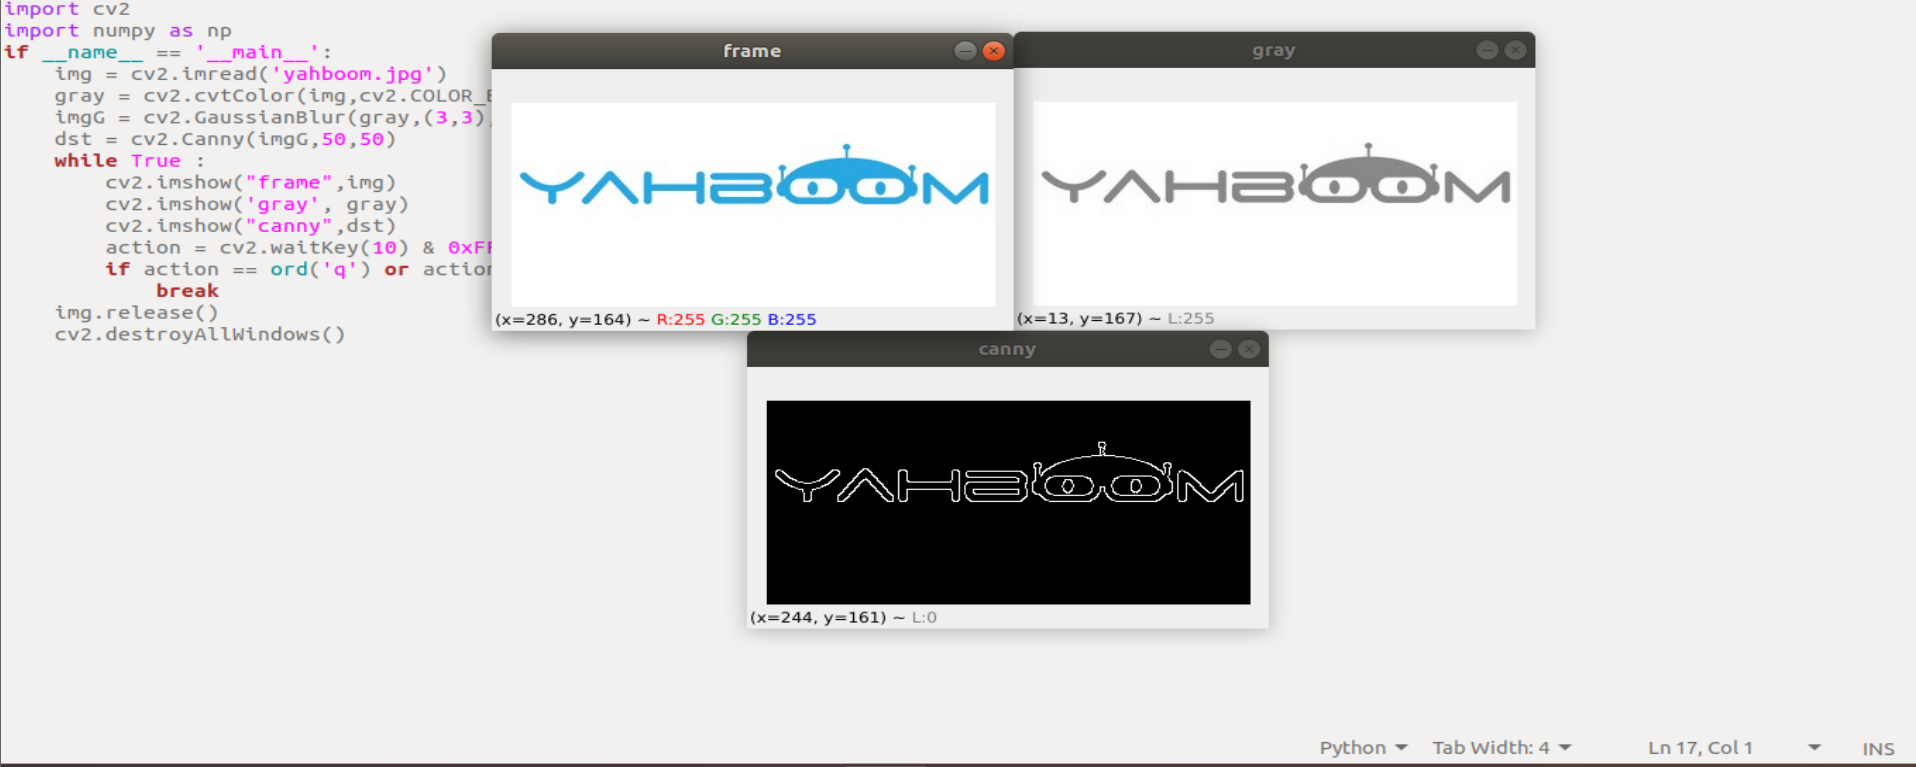
xxxxxxxxxxpython ~/yahboomcar_ws/src/yahboomcar_astra/scripts/opencv/3_3.py
ximport cv2import numpy as npif __name__ == '__main__':img = cv2.imread('yahboom.jpg')gray = cv2.cvtColor(img,cv2.COLOR_BGR2GRAY)imgG = cv2.GaussianBlur(gray,(3,3),0)dst = cv2.Canny(imgG,50,50)while True :cv2.imshow("frame",img)cv2.imshow('gray', gray)cv2.imshow("canny",dst)action = cv2.waitKey(10) & 0xFFif action == ord('q') or action == 113:breakimg.release()cv2.destroyAllWindows()
3.4. OpenCV line segment drawing
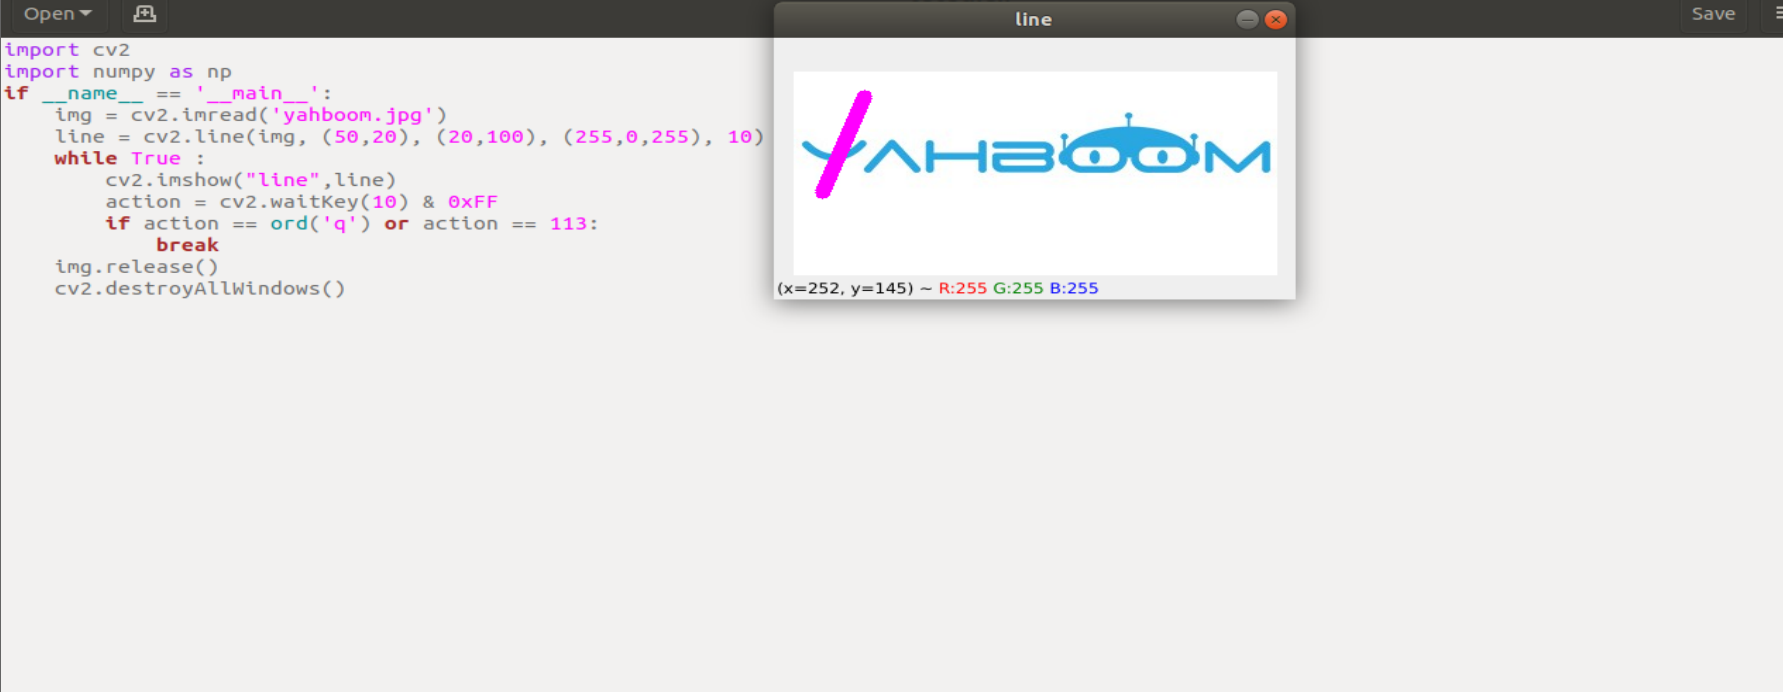
- When using OpenCV to process images, we sometimes need to draw line segments, rectangles, etc. on the image. used in OpenCV
The cv2.line(dst, pt1, pt2, color, thickness=None, lineType=None, shift=None) function draws line segments.
Parameter meaning:
dst: output image.
pt1, pt2: Required parameters. The coordinate points of the line segment, representing the starting point and the ending point, respectively
color: required parameter. Used to set the color of the line segment
thickness: optional parameter. Used to set the width of the line segment
lineType: optional parameter. Used to set the type of line segment, optional 8 (8 adjacent connecting lines - default), 4 (4 adjacent connecting lines) and cv2.LINE_AA for antialiasing
- Code and actual effect display
run the program
xxxxxxxxxxpython ~/yahboomcar_ws/src/yahboomcar_astra/scripts/opencv/3_4.py
ximport cv2import numpy as npif __name__ == '__main__':img = cv2.imread('yahboom.jpg')line = cv2.line(img, (50,20), (20,100), (255,0,255), 10)while True :cv2.imshow("line",line)action = cv2.waitKey(10) & 0xFFif action == ord('q') or action == 113:breakimg.release()cv2.destroyAllWindows()
3.5. OpenCV draw rectangle
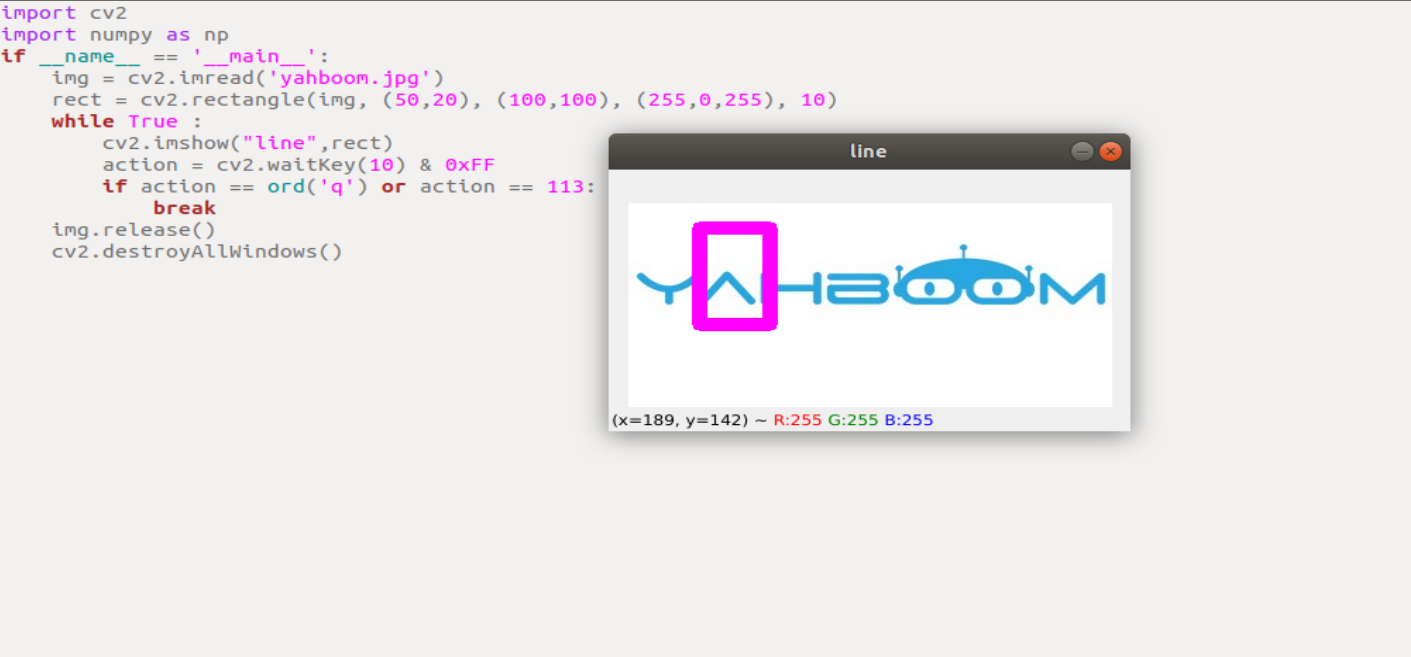
- In OpenCV, what is used to draw rectangles is
cv2.rectangle(img,pt1,pt2,color,thickness=None,lineType=None,shift=None)
Parameter meaning:
img: canvas or carrier image
pt1, pt2: Required parameters. The vertices of the rectangle represent the vertex and the diagonal vertex respectively, that is, the upper left corner and the lower right corner of the rectangle (these two vertices can determine a unique rectangle), which can be understood as a diagonal line.
color: required parameter. Used to set the color of the rectangle
thickness: optional parameter. Used to set the width of the side of the rectangle. When the value is negative, it means to fill the rectangle
lineType: optional parameter. Used to set the type of line segment, optional 8 (8 adjacent connecting lines - default), 4 (4 adjacent connecting lines) and cv2.LINE_AA for antialiasing
- Code and effect display
run the program
xxxxxxxxxxpython ~/yahboomcar_ws/src/yahboomcar_astra/scripts/opencv/3_5.py
ximport cv2import numpy as npif __name__ == '__main__':img = cv2.imread('yahboom.jpg')rect = cv2.rectangle(img, (50,20), (100,100), (255,0,255), 10)while True :cv2.imshow("line",rect)action = cv2.waitKey(10) & 0xFFif action == ord('q') or action == 113:breakimg.release()cv2.destroyAllWindows()
3.6. OpenCV draws a circle
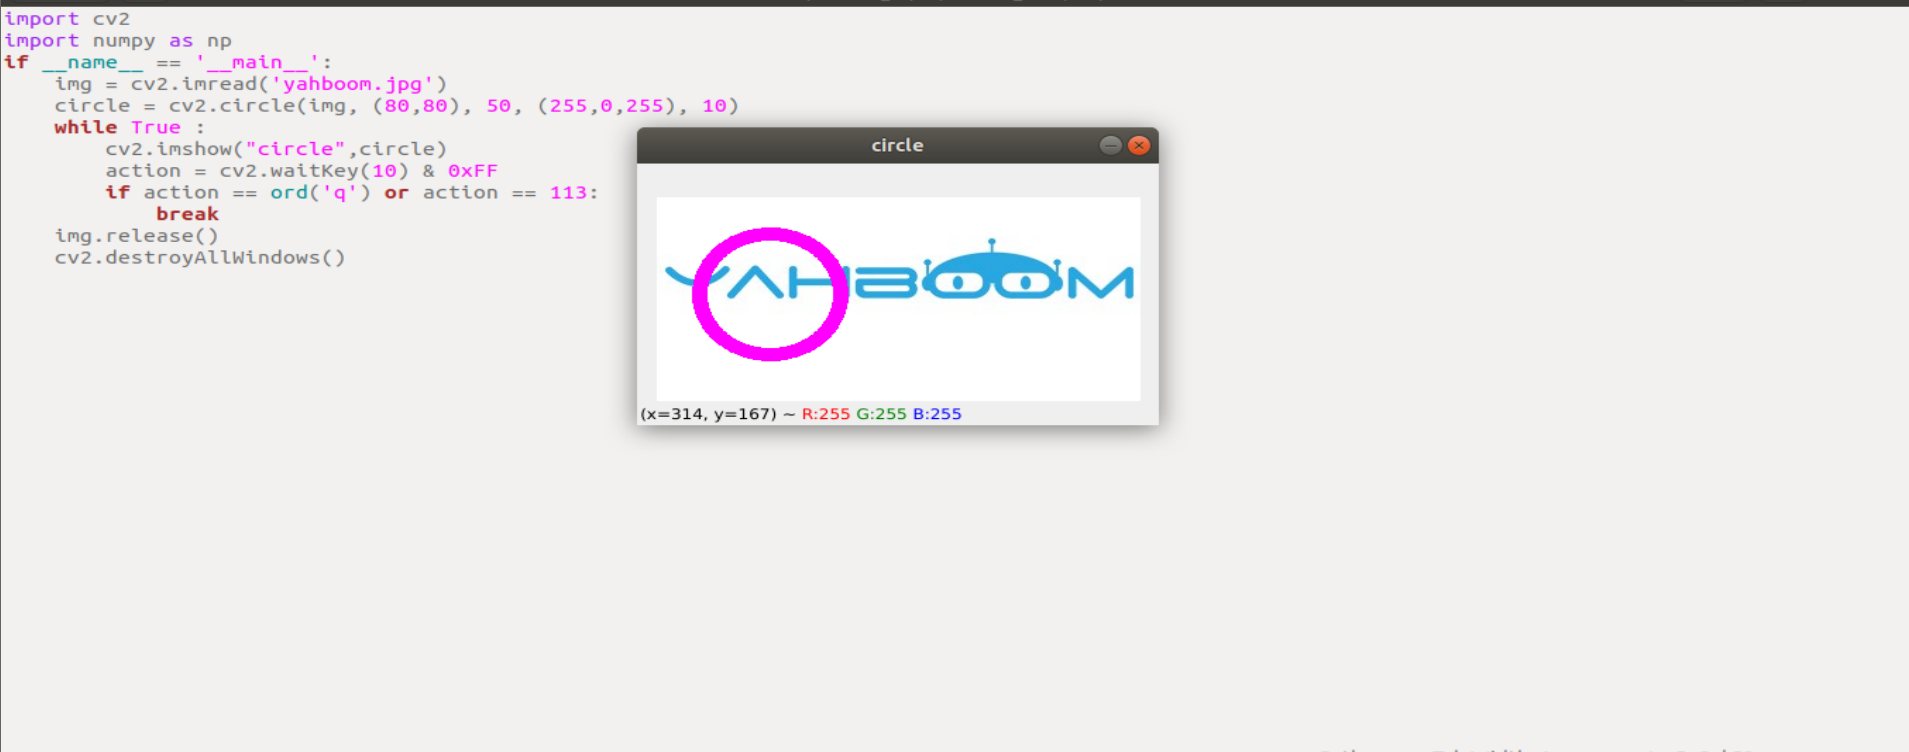
- In OpenCV, what is used to draw a circle is
cv2.circle(img, center, radius, color[,thickness[,lineType]])
Parameter meaning:
img: painting or vector image cloth
center: coordinates of the center of the circle, format: (50,50)
radius: radius
thickness: Line thickness. Default is 1. If -1 then fill solid
lineType: Line type. The default is 8, the connection type. Described in the table below
| parameter | illustrate |
|---|---|
| cv2.FILLED | filling |
| cv2.LINE_4 | 4 Connection Types |
| cv2.LINE_8 | 8 connection types |
| cv2.LINE_AA | Antialiasing, this parameter will make the lines smoother |
- Code and actual effect display
run the program
xxxxxxxxxxpython ~/yahboomcar_ws/src/yahboomcar_astra/scripts/opencv/3_6.py
ximport cv2import numpy as npif __name__ == '__main__':img = cv2.imread('yahboom.jpg')circle = cv2.circle(img, (80,80), 50, (255,0,255), 10)while True :cv2.imshow("circle",circle)action = cv2.waitKey(10) & 0xFFif action == ord('q') or action == 113:breakimg.release()cv2.destroyAllWindows()
3.7. OpenCV draw ellipse
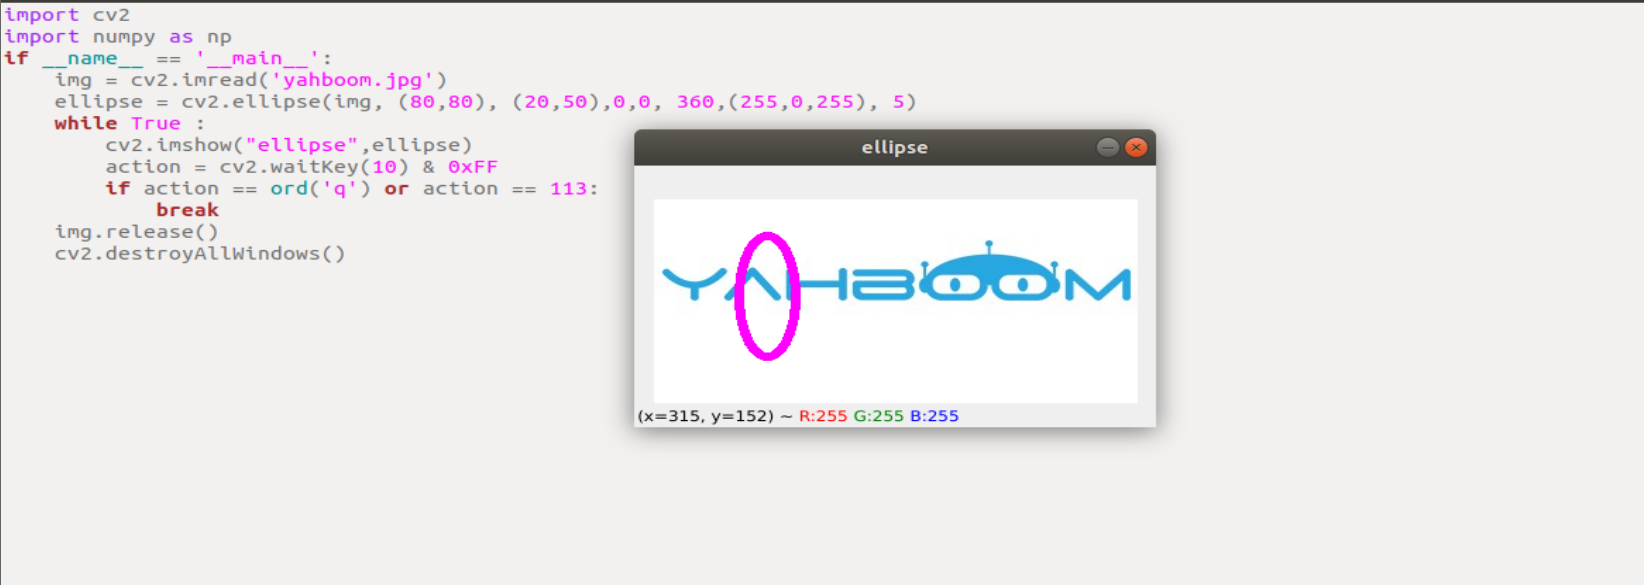
- In OpenCV, the ellipse is drawn using
cv2.ellipse(img, center, axes, angle, StartAngle, endAngle, color[,thickness[,lineType]
Parameter meaning:
center: the center point of the ellipse, (x, y)
axes: refers to the short radius and long radius, (x, y)
StartAngle: The angle of the starting angle of the arc
endAngle: the angle of the end angle of the arc
img, color, thickness, lineType can refer to the description of the circle
- Code and actual effect display
run the program
xxxxxxxxxxpython ~/yahboomcar_ws/src/yahboomcar_astra/scripts/opencv/3_7.py
ximport cv2import numpy as npif __name__ == '__main__':img = cv2.imread('yahboom.jpg')ellipse = cv2.ellipse(img, (80,80), (20,50),0,0, 360,(255,0,255), 5)while True :cv2.imshow("ellipse",ellipse)action = cv2.waitKey(10) & 0xFFif action == ord('q') or action == 113:breakimg.release()cv2.destroyAllWindows()
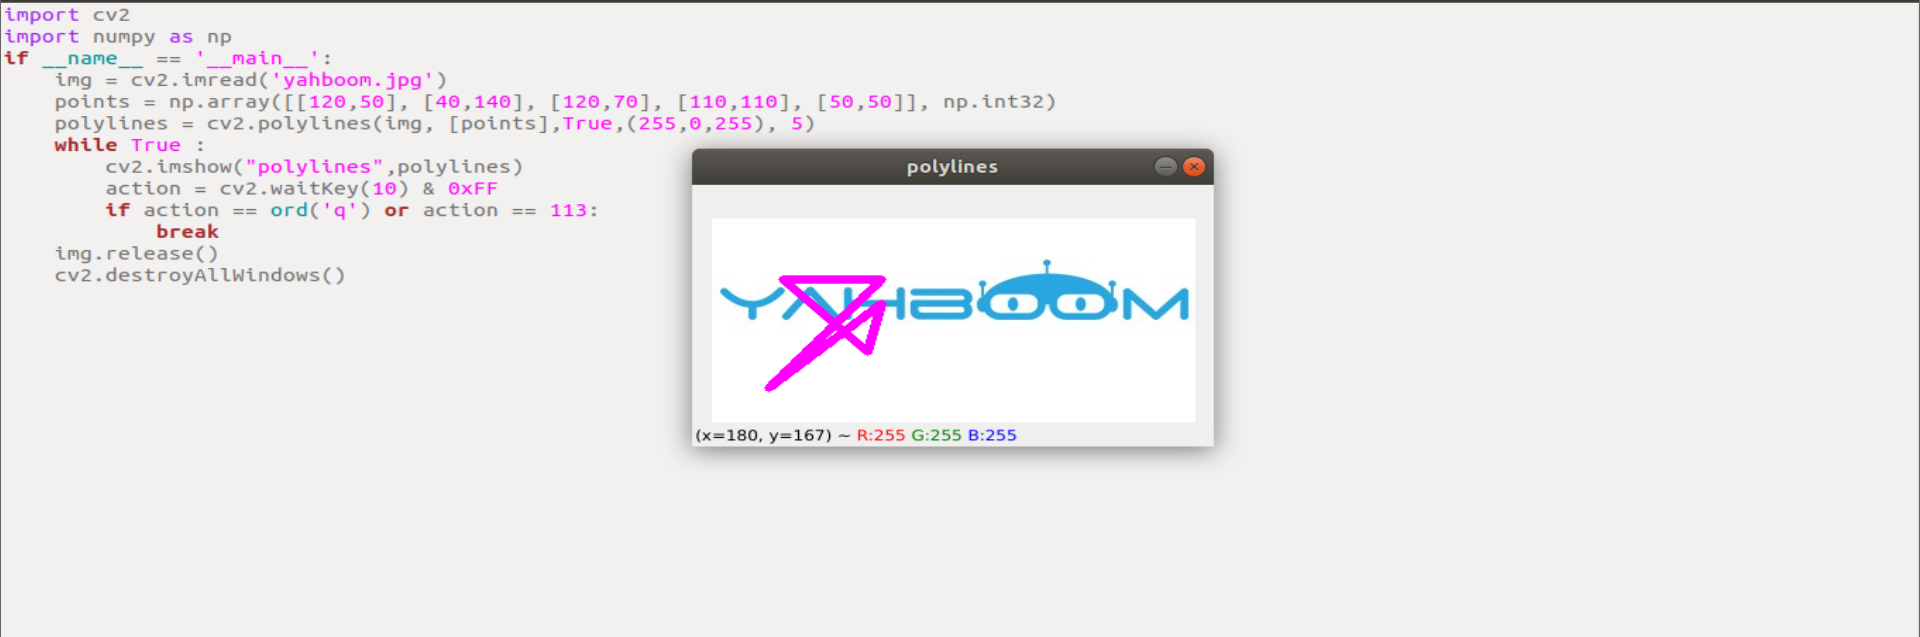
3.8. OpenCV draws polygons
- In OpenCV, what is used to draw polygons is
cv2.polylines(img,[pts],isClosed, color[,thickness[,lineType]])
Parameter meaning:
pts: vertices of the polygon
isClosed: Whether it is closed. (True/False)
Other parameters refer to the drawing parameters of the circle
- Code and actual effect display
run the program
xxxxxxxxxxpython ~/yahboomcar_ws/src/yahboomcar_astra/scripts/opencv/3_8.py
ximport cv2import numpy as npif __name__ == '__main__':img = cv2.imread('yahboom.jpg')points = np.array([[120,50], [40,140], [120,70], [110,110], [50,50]], np.int32)polylines = cv2.polylines(img, [points],True,(255,0,255), 5)while True :cv2.imshow("polylines",polylines)action = cv2.waitKey(10) & 0xFFif action == ord('q') or action == 113:breakimg.release()cv2.destroyAllWindows()
3.9. OpenCV to draw text
- In OpenCV, what is used to draw text is
cv2.putText(img, str, origin, font, size,color,thickness)
Parameter meaning:
img: input image
str: the drawn text
origin: the upper left corner coordinate (integer), which can be understood as where the text starts
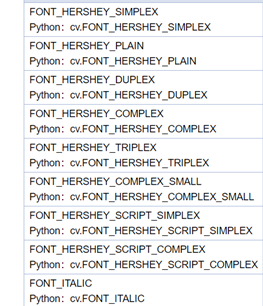
font: font
size: font size
color: font color
thickness: font thickness
Among them, the font is optional
- Code and actual effect display
run the program
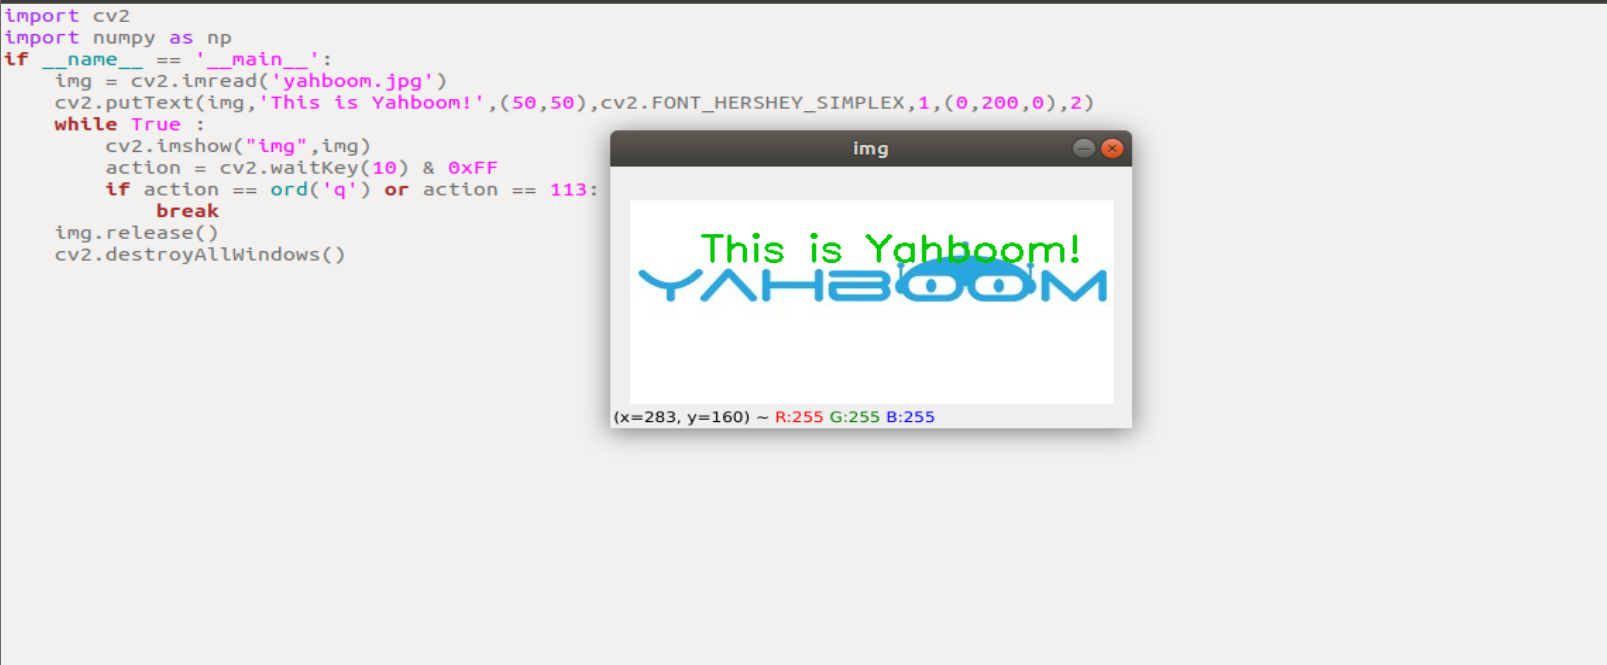
xxxxxxxxxxpython ~/yahboomcar_ws/src/yahboomcar_astra/scripts/opencv/3_9.py
ximport cv2import numpy as npif __name__ == '__main__':img = cv2.imread('yahboom.jpg')cv2.putText(img,'This is Yahboom!',(50,50),cv2.FONT_HERSHEY_SIMPLEX,1,(0,200,0),2)while True :cv2.imshow("img",img)action = cv2.waitKey(10) & 0xFFif action == ord('q') or action == 113:breakimg.release()cv2.destroyAllWindows()