Welcome to ROSMASTER X3 Plus repository
16.15 Autopilot to clear obstacles
15. Autonomous driving obstacle clearance
15. Autonomous driving obstacle clearance15.1. Use15.1.1. The first step15.1.2, second step15.2, launch file15.3. Node graph15.4, flow chart
15.1. Use
This function has a line patrol function, which can autonomously clear obstacles on the ground line and continue to patrol the line after cleaning. It also has a radar obstacle avoidance function.
Note: [R2] on the remote control handle has the [pause/start] function for this gameplay. When using it for the first time, perform color calibration first.
HSV (Hue, Saturation, Value) is a color space created by A. R. Smith in 1978 based on the intuitive characteristics of color, also known as the Hexcone Model.
The parameters of color in this model are: hue (H), saturation (S), and lightness (V).
H: 0 — 180
S: 0 — 255
V: 0 — 255
Here some reds are classified into the purple range:

xxxxxxxxxx#Raspberry Pi 5 master needs to enter docker first, please perform this step#If running the script into docker fails, please refer to ROS/07, Docker tutorial~/run_docker.shStart command (robot side)
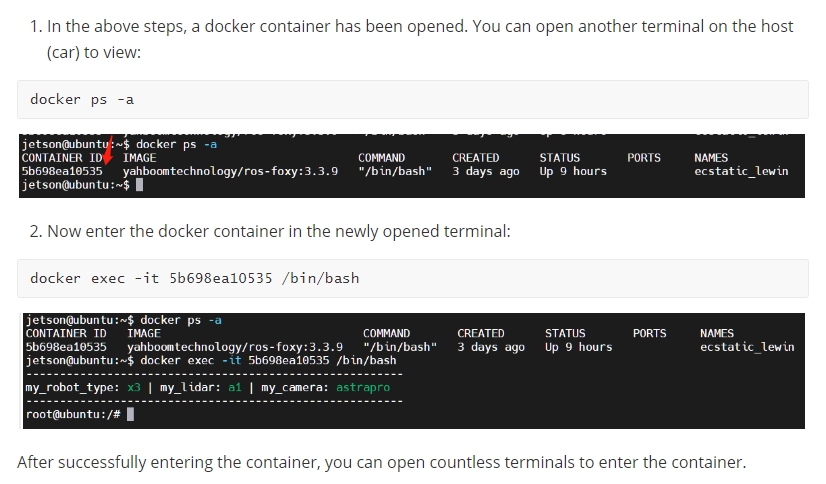
xxxxxxxxxxroslaunch arm_autopilot arm_autopilot.launch<PI5 needs to open another terminal to enter the same docker container
Start dynamically adjusting parameters
xxxxxxxxxxrosrun rqt_reconfigure rqt_reconfigure
Dynamic adjustment parameter window
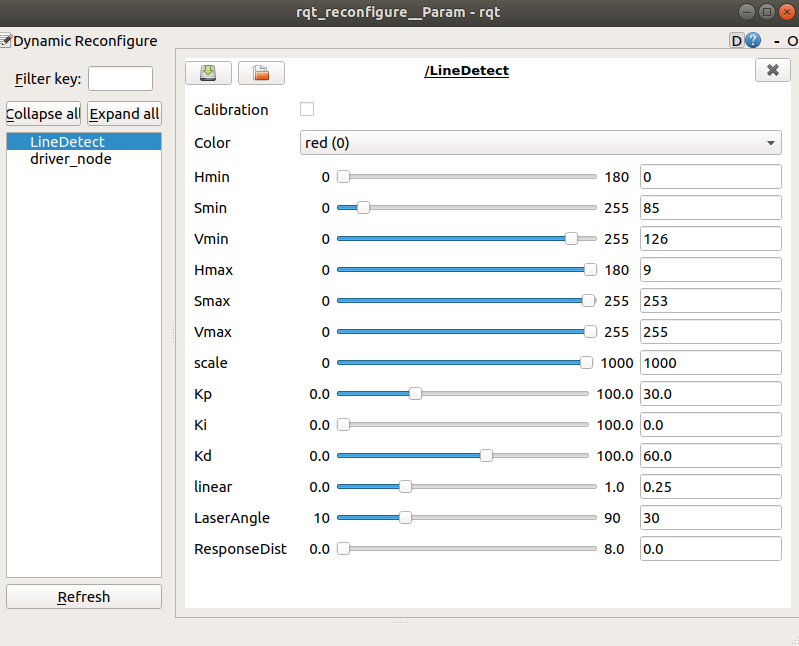
Select the [LineDetect] node. Generally, you only need to adjust [Hmin], [Smin], [Vmin], and [Hmax]. These four parameters can be well identified. The slide bar is always in a dragging state and data will not be transferred to the system until it is released; you can also select a row and then slide the mouse wheel.
Parameter analysis:
| Parameters | Range | Parse |
|---|---|---|
| [laserAngle] | [10, 90] | Lidar detection angle (left and right angles) |
| [ResponseDist] | [0.0, 8.0] | Obstacle detection distance |
| [Calibration] | [False, True] | Color calibration switch |
| [linear] | [0.0, 1.0] | The linear speed of the robot. |
[Kp], [Ki], [Kd]: Car speed PID debugging.
[scale]: PID control scaling coefficient.
Note: If the linear speed [linear] is too fast, the robot will not be able to see obstacles while moving. The flatter the ground, the better.
Parameter modification
When the parameters are adjusted to the optimal state, the corresponding parameters are modified into the file, and no adjustment is required when using again.
According to the optimal parameters of the [rqt_reconfigure] debugging tool, enter the [scripts] folder of the [arm_autopilot] function package and modify the parameters corresponding to the [autopilot_main.py] file, as shown below
xxxxxxxxxxclass LineDetect: def __init__(self): ... ... self.scale = 1000.0 self.FollowLinePID = (30.0, 0.0, 60.0) self.linear = 0.25 # If the speed is too fast, the robot will not be able to see obstacles while moving.[rqt_reconfigure] Modification of the initial value of the debugging tool
xxxxxxxxxxgen.add("Calibration", bool_t, 0, "color calibration", False)command_enum = gen.enum([gen.const("red", int_t, 0, "first data"), gen.const("green", int_t, 1, "two data"), gen.const("blue", int_t, 2, "three datat"), gen.const("yellow", int_t, 3, "four data")], "An enum to set size")gen.add("Color", int_t, 0, "A size parameter which is edited via an enum", 0, 0, 3, edit_method=command_enum)gen.add("Hmin", int_t, 0, "Hmin in HSV", 0, 0, 180)gen.add("Smin", int_t, 0, "Smin in HSV", 85, 0, 255)gen.add("Vmin", int_t, 0, "Vmin in HSV", 126, 0, 255)gen.add("Hmax", int_t, 0, "Hmax in HSV", 9, 0, 180)gen.add("Smax", int_t, 0, "Smax in HSV", 253, 0, 255)gen.add("Vmax", int_t, 0, "Vmax in HSV", 255, 0, 255)gen.add("scale", int_t, 0, "scale", 1000, 0, 1000)gen.add("Kp", double_t, 0, "Kp in PID", 30.0, 0, 100)gen.add("Ki", double_t, 0, "Ki in PID", 0.0, 0, 100)gen.add("Kd", double_t, 0, "Kd in PID", 60.0, 0, 100)gen.add("linear", double_t, 0, "linear", 0.25, 0, 1.0)gen.add("LaserAngle", int_t, 0, "LaserAngle", 30, 10, 90)gen.add("ResponseDist", double_t, 0, "ResponseDist", 0.55, 0, 8)Enter the [cfg] folder of the [arm_autopilot] function package and modify the initial values of the parameters corresponding to the [autopilot.cfg] file.
xxxxxxxxxxgen.add("Kp", double_t, 0, "Kp in PID", 30.0, 0, 100)Take the above article as an example to analyze
| Parameters | Analysis | Corresponding parameters |
|---|---|---|
| name | The name of the parameter | "Kp" |
| type | parameter data type | double_t |
| level | a bitmask passed to the callback | 0 |
| description | A description parameter | "Kp in PID" |
| default | Initial value for node startup | 30.0 |
| min | parameter minimum value | 0 |
| max | parameter maximum value | 100 |
Note: After modification, you must recompile and update the environment to be effective.
xxxxxxxxxxcd ~/yahboomcar_wscatkin_makesource devel/setup.bash15.1.1. The first step
color calibration
Click the box on the right side of [Calibration] to enter the calibration mode; you can also select the image window and click the [C] key on the keyboard.
Select the color [red, green, blue, yellow] in [Color], and put the corresponding color (the color of the color block, the color of the patrol line) into the lower half of the camera's field of view.
Adjust the [Hmin, Smin, Vmin, Hmax, Smax, Vmax] parameters in the dynamic control parameter window.
After the parameter adjustment is completed, the system automatically writes it into the [HSV.yaml] file and saves it, and the system will read it next time it is started.
in addition:
In calibration mode, you can also use the mouse for color calibration. First press the [F] key to switch colors, then select the color block, and then fine-tune [Hmin, Smin, Vmin, Hmax, Smax, Vmax] in the dynamic control parameter window. parameter.
15.1.2, second step
Notice:
1) Here it is best to adjust the runway in the middle of the camera screen and the direction of the blocks to be parallel to the runway, so that it is easier to clamp the blocks
2). At corners, the clamping claws may not be very effective at clamping blocks (maybe because the angle of rotation is a bit large, or the vehicle is traveling too fast and cannot see the obstacles), so at this time you need to reduce the speed a bit ,try again.
Method 1: Continuously click the [R1] button on the handle within 0.5 seconds to start line tracking.
Method 2: Autopilot (select the image window)
Make sure the box to the right of [Calibration] is not selected, as shown in the picture above.
Click [Spacebar] to perform line patrol operation.
Click the [f] key to switch the color of the patrol line.
Click the [i] key to enter recognition mode.
Click the [c] key to switch to calibration mode.
Click the [q] key to exit the program.
15.2, launch file
xxxxxxxxxx<launch> <arg name="img_flip" default="false"/> <include file="$(find ydlidar_ros_driver)/launch/TG.launch"/> <include file="$(find yahboomcar_ctrl)/launch/yahboom_joy.launch"/> <include file="$(find yahboomcar_bringup)/launch/yahboomcar.launch"/> <!-- web_video_server --> <node pkg="web_video_server" type="web_video_server" name="web_video_server" output="screen"/> <node name="LineDetect" pkg="arm_autopilot" type="autopilot_main.py" output="screen" required="true"> <param name="img_flip" type="bool" value="$(arg img_flip)"/> </node></launch>Generally, do not set the [img_flip] parameter. For image flip parameters, use the default [false].
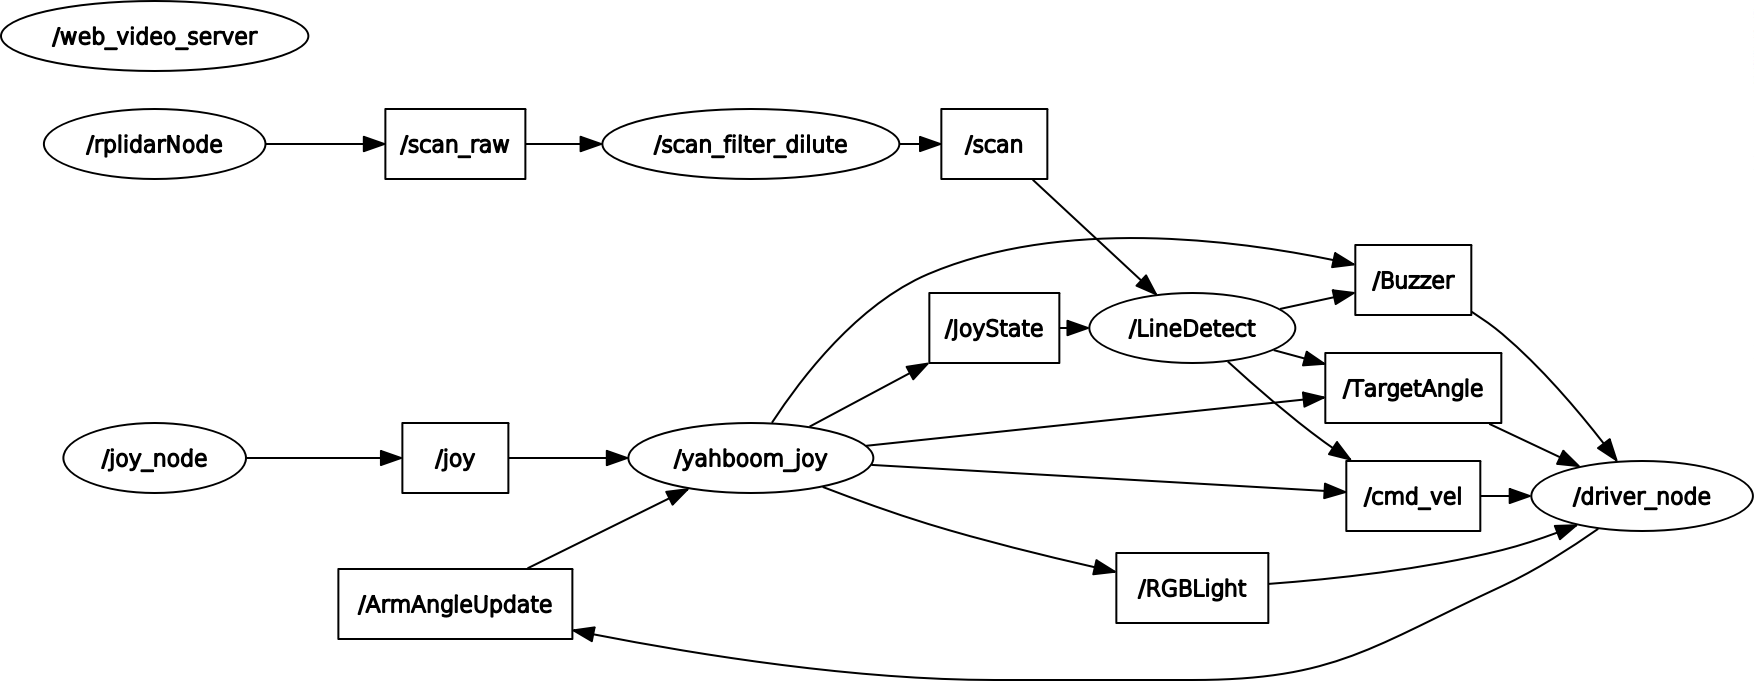
15.3. Node graph
xxxxxxxxxxrqt_graph
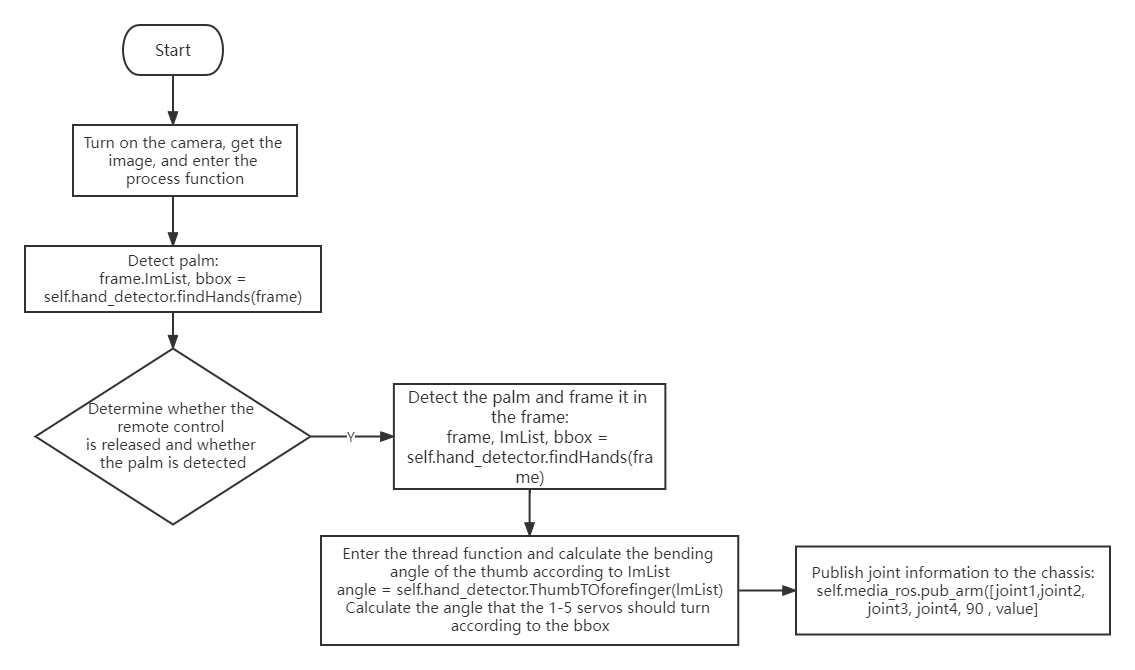
15.4, flow chart