Welcome to ROSMASTER X3 Plus repository
11.7 RTAB-Map 3D mapping
7. RTAB-Map 3D mapping navigation
7. RTAB-Map 3D mapping navigation7.1. Introduction7.2. Map construction and use7.2.1. Start7.2.2. Map construction7.3. Navigation and obstacle avoidance7.3.1. Single-point navigation7.3.2. Multi-point navigation7.3.3. Parameter configuration7.4, node rtabmap7.4.1. Subscribe to topics7.4.2. Publishing topics7.4.3, Service7.4.4. Parameters7.4.5, tf conversion7.5, node rtabmapviz7.5.1. Subscribe to topics7.5.2. Parameter configuration7.5.3. Required tf conversion
wiki: http://wiki.ros.org/rtabmap_ros
7.1. Introduction
This package is a ROS function package for RTAB Map, an RGB-D SLAM method based on a global loop closure detector with real-time constraints. This package can be used to generate 3D point clouds of environments and create 2D occupancy raster maps for navigation.
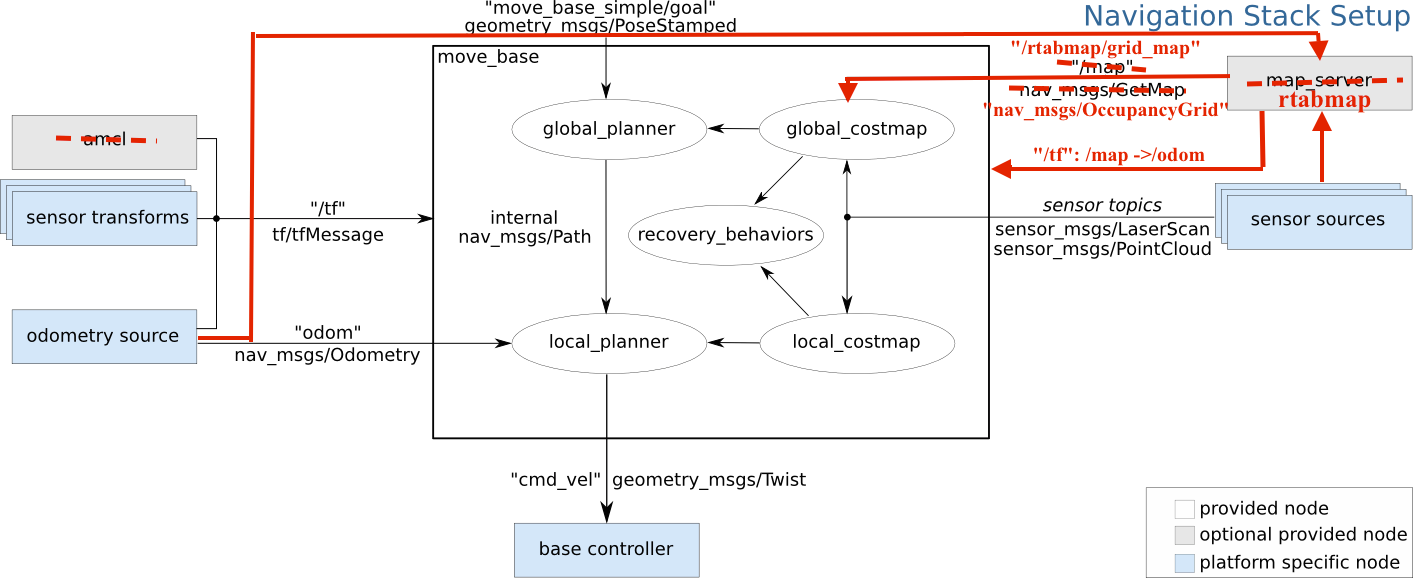
As can be seen from the above figure, Monte Carlo positioning amcl is not required. RTAB Map has its own positioning function; if used, it will cause repeated positioning and positioning failure. When using RTAB Map to navigate the core framework, the initialized map is provided by RTAB Map, not map_server.
7.2. Map construction and use
Note: When building a map, the slower the speed, the better the effect (note that the rotation speed should be slower). If the speed is too fast, the effect will be poor.
According to different models, you only need to set the purchased model in [.bashrc], X1 (normal four-wheel drive) X3 (Mailun) Take X3 as an example
xxxxxxxxxx#Raspberry Pi 5 master needs to enter docker first, please perform this step#If running the script into docker fails, please refer to ROS/07, Docker tutorial~/run_docker.shOpen the [.bashrc] file
xxxxxxxxxxsudo vim .bashrc
Find the [ROBOT_TYPE] parameters and modify the corresponding car model
xxxxxxxxxxexport ROBOT_TYPE=X3 # ROBOT_TYPE: X1 X3 X3plus R2 X77.2.1. Start
Start the underlying driver command (robot side)
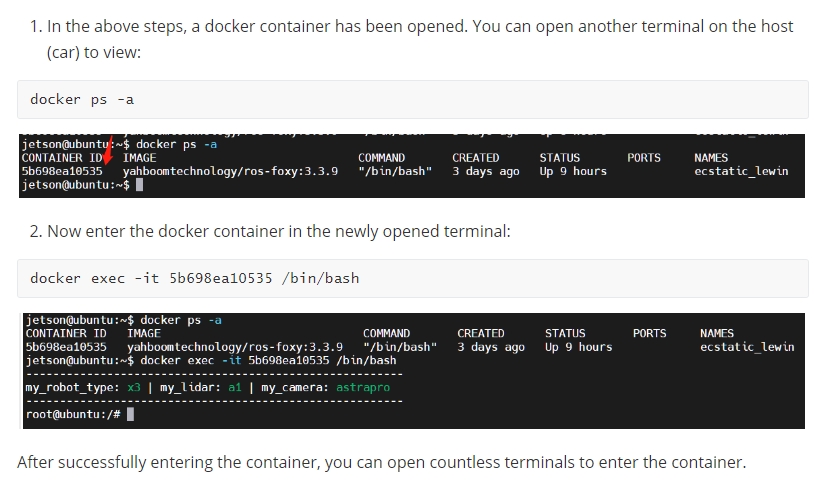
xxxxxxxxxxroslaunch yahboomcar_nav laser_astrapro_bringup.launch<PI5 needs to open another terminal to enter the same docker container
Command to start mapping or navigation (robot side)
xxxxxxxxxxroslaunch yahboomcar_nav yahboomcar_rtabmap.launch use_rviz:=Falseuse_rviz parameter: whether to open rviz.
Start visualization (virtual machine)
xxxxxxxxxxroslaunch yahboomcar_nav view_rtabmap.launchKeyboard control node (virtual machine)
xxxxxxxxxxrosrun teleop_twist_keyboard teleop_twist_keyboard.py # System integrationroslaunch yahboomcar_ctrl yahboom_keyboard.launch # yahboomcar customization7.2.2. Map construction
After starting according to the above method, choose any method to control the mapping (handle control is recommended); the slower the speed when constructing the map, the better the effect (especially the angular speed); the robot will cover the area to be mapped and the map will be as closed as possible.
Joystick control
Keyboard control
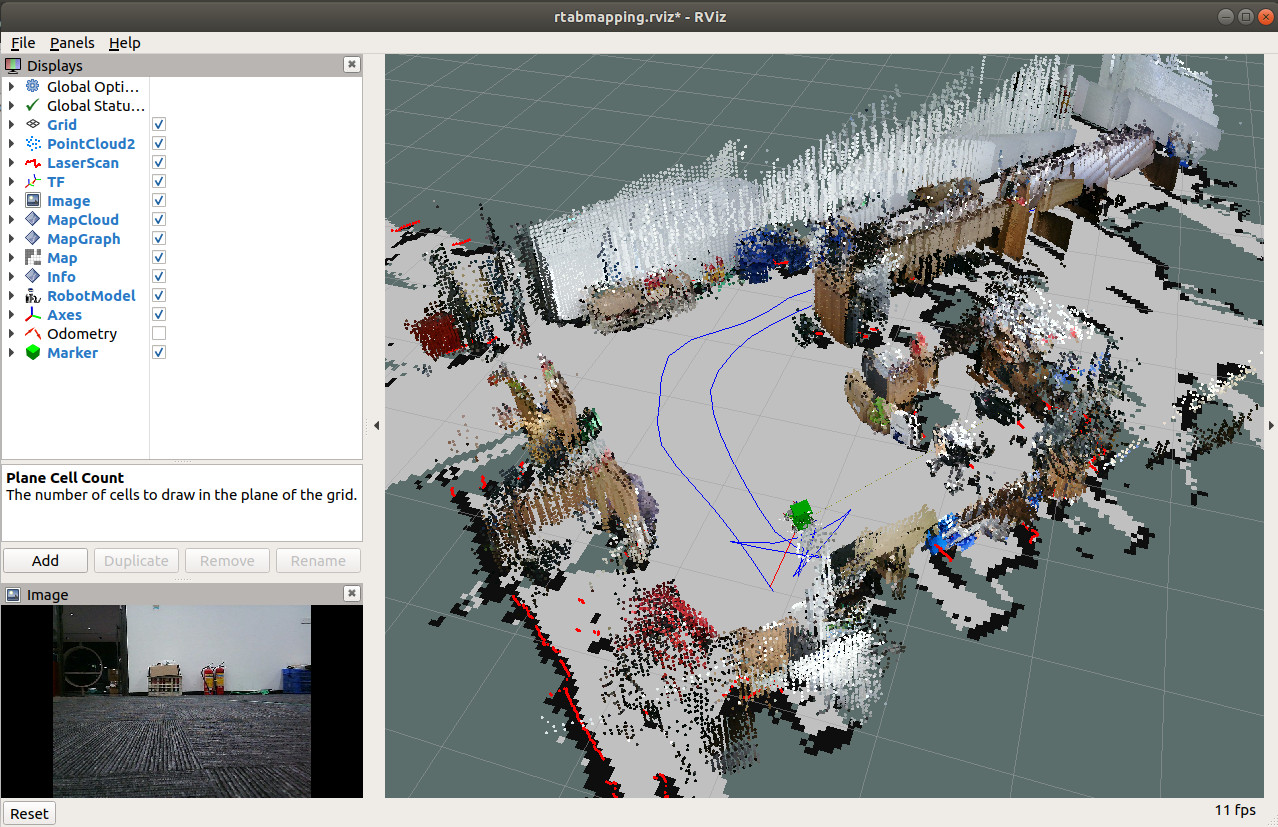
When the map construction is completed, directly [ctrl+c] exit the map construction node, and the system will automatically save the map. The default saving path of the map is [~/.ros/rtabmap.db].
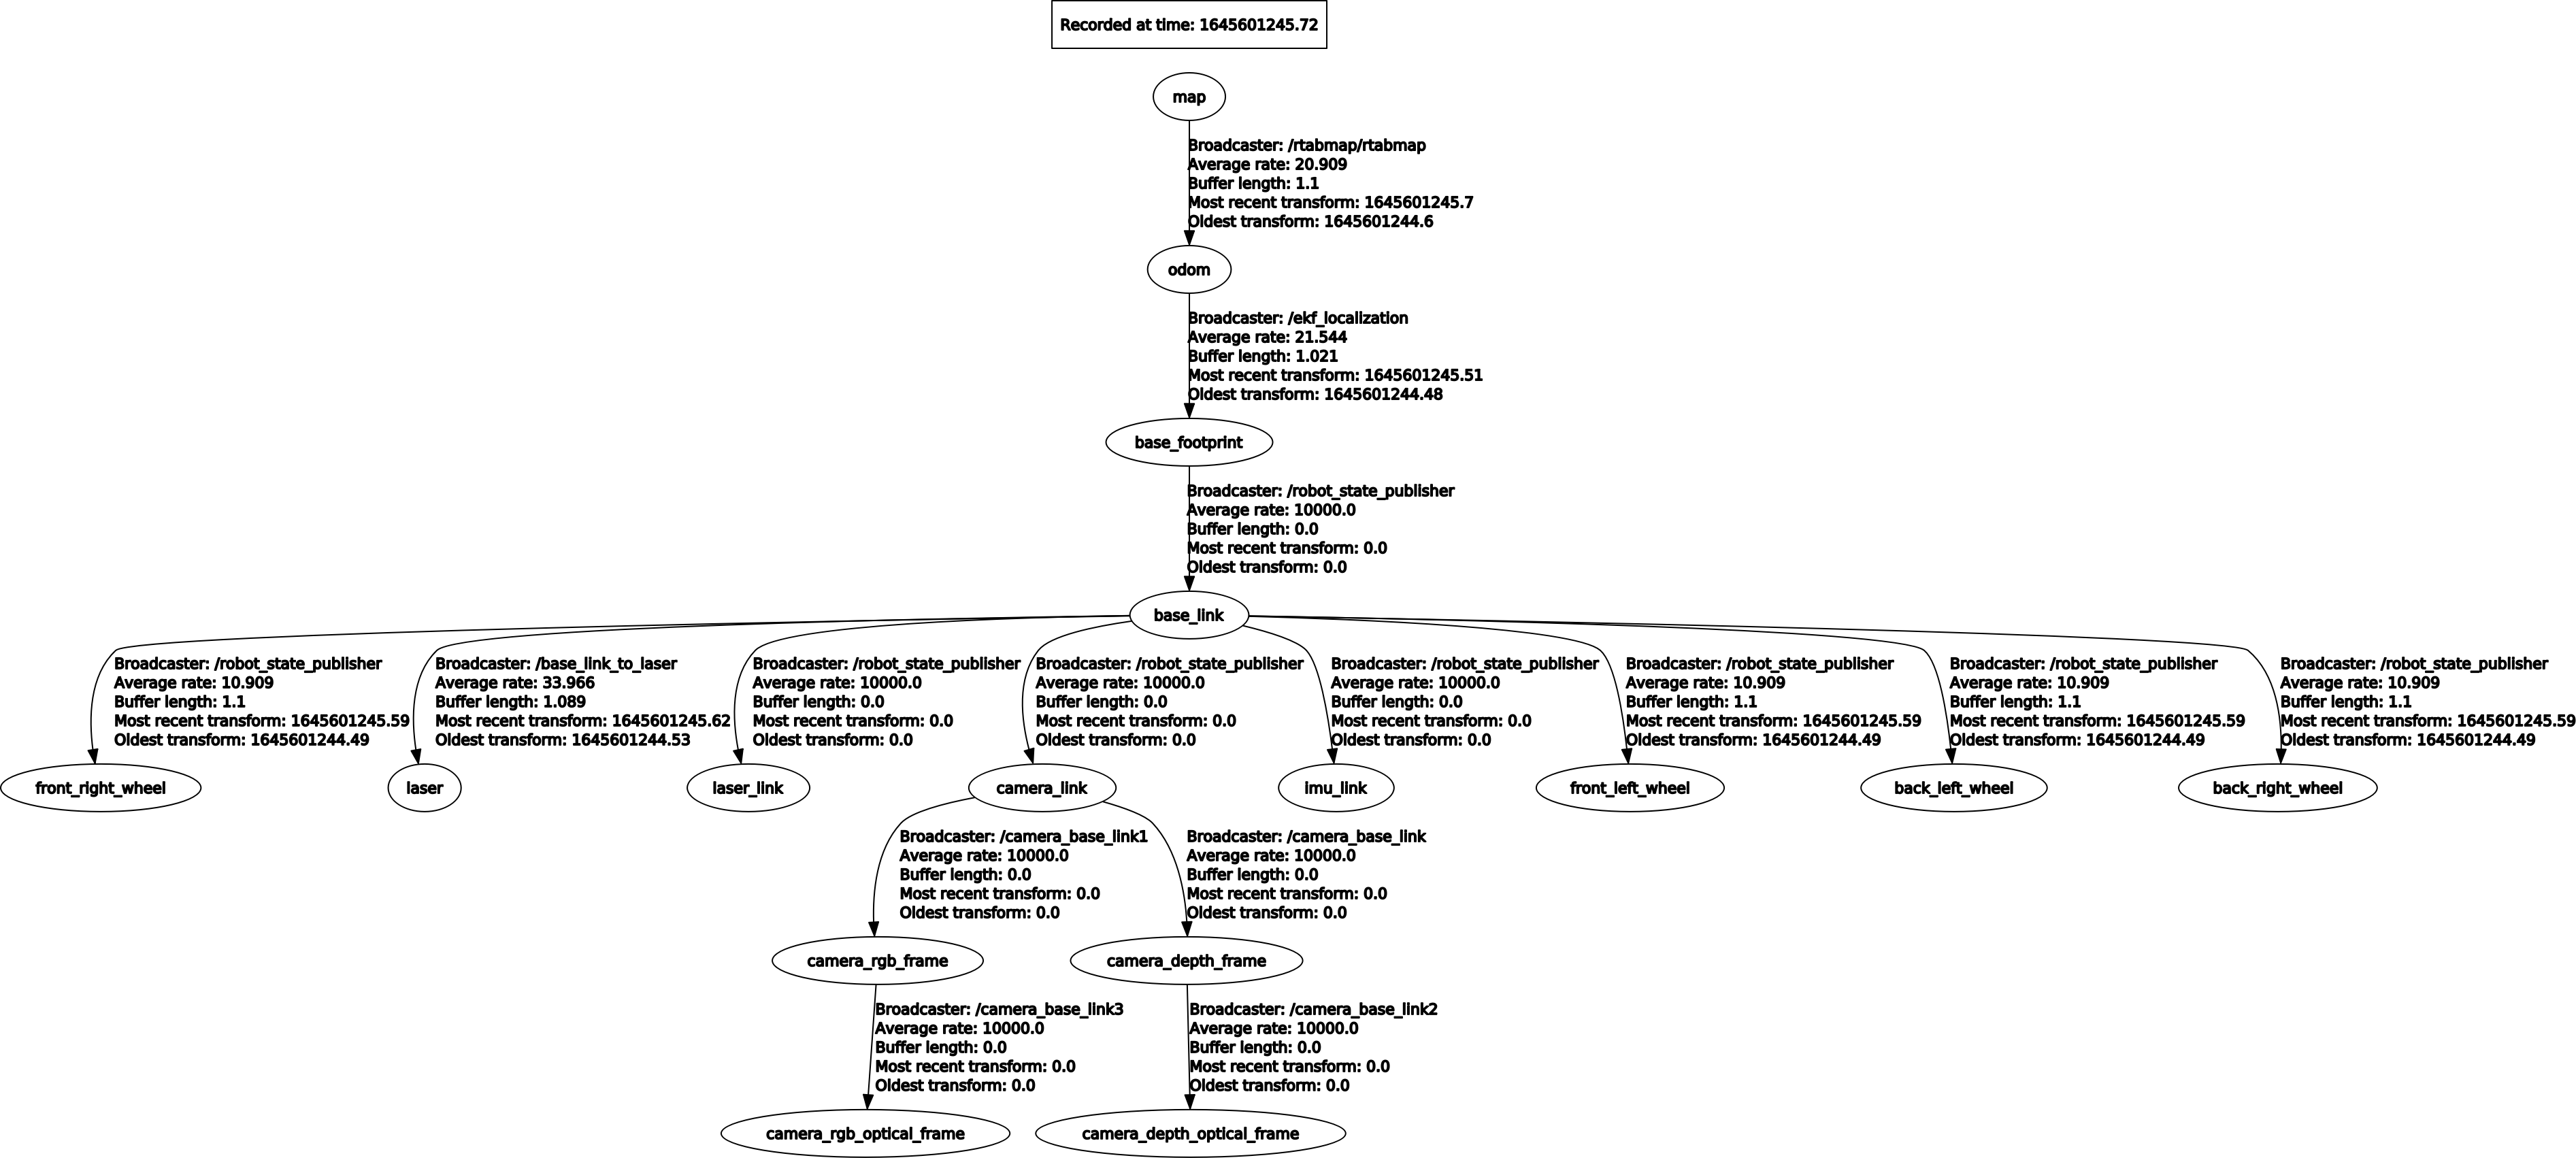
View tf tree
xxxxxxxxxxrosrun rqt_tf_tree rqt_tf_tree
Node view
xxxxxxxxxxrqt_graph
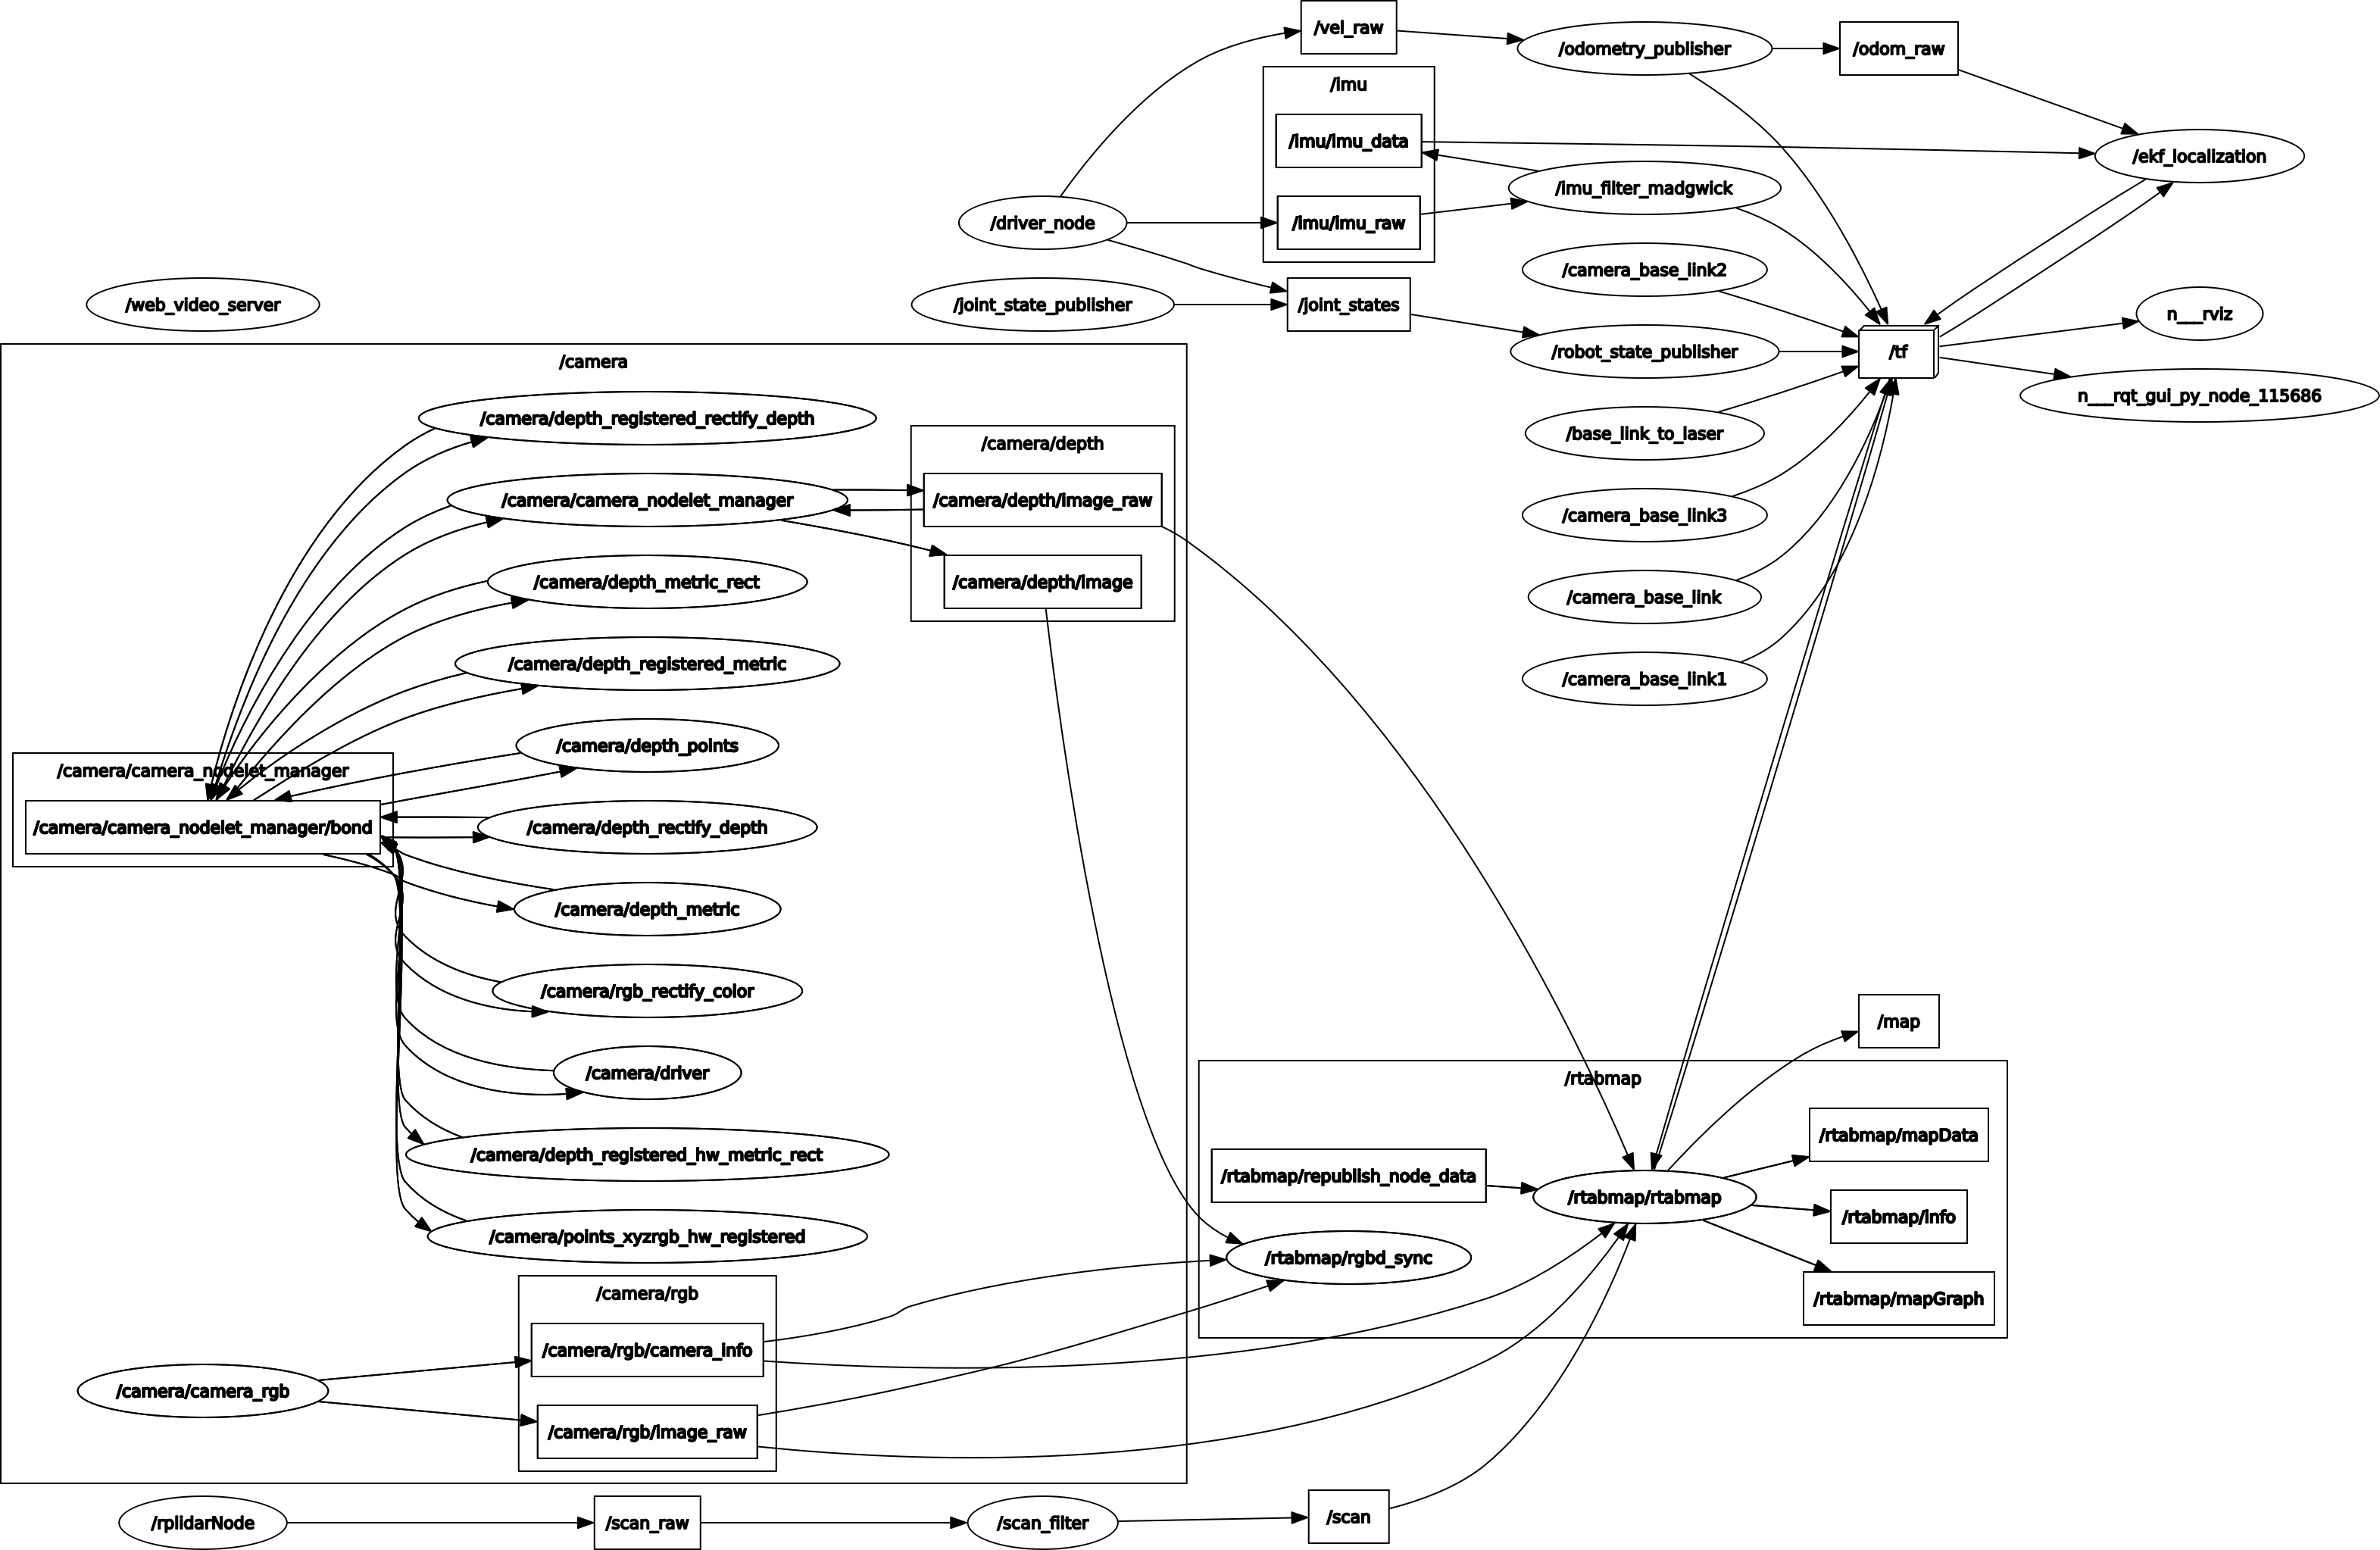
As can be seen from the above figure, the information that the [rtabmap] node needs to subscribe to: radar data, camera data, and tf data.
7.3. Navigation and obstacle avoidance
Note: [R2] on the remote control handle has the function of canceling the target point.
Start the underlying driver command (robot side)
xxxxxxxxxxroslaunch yahboomcar_nav laser_astrapro_bringup.launchCommand to start mapping or navigation (robot side)
xxxxxxxxxxroslaunch yahboomcar_nav yahboomcar_rtabmap_nav.launch use_rviz:=Falseuse_rviz parameter: whether to open rviz.
Start visualization (virtual machine)
xxxxxxxxxxroslaunch yahboomcar_nav view_rtabmap_nav.launchKeyboard control node (virtual machine)
xxxxxxxxxxrosrun teleop_twist_keyboard teleop_twist_keyboard.py # System integrationroslaunch yahboomcar_ctrl yahboom_keyboard.launch # yahboomcar customizationWhen the navigation mode is turned on, the system automatically loads the 2D raster map. It cannot directly load the 3D map and needs to be loaded manually.
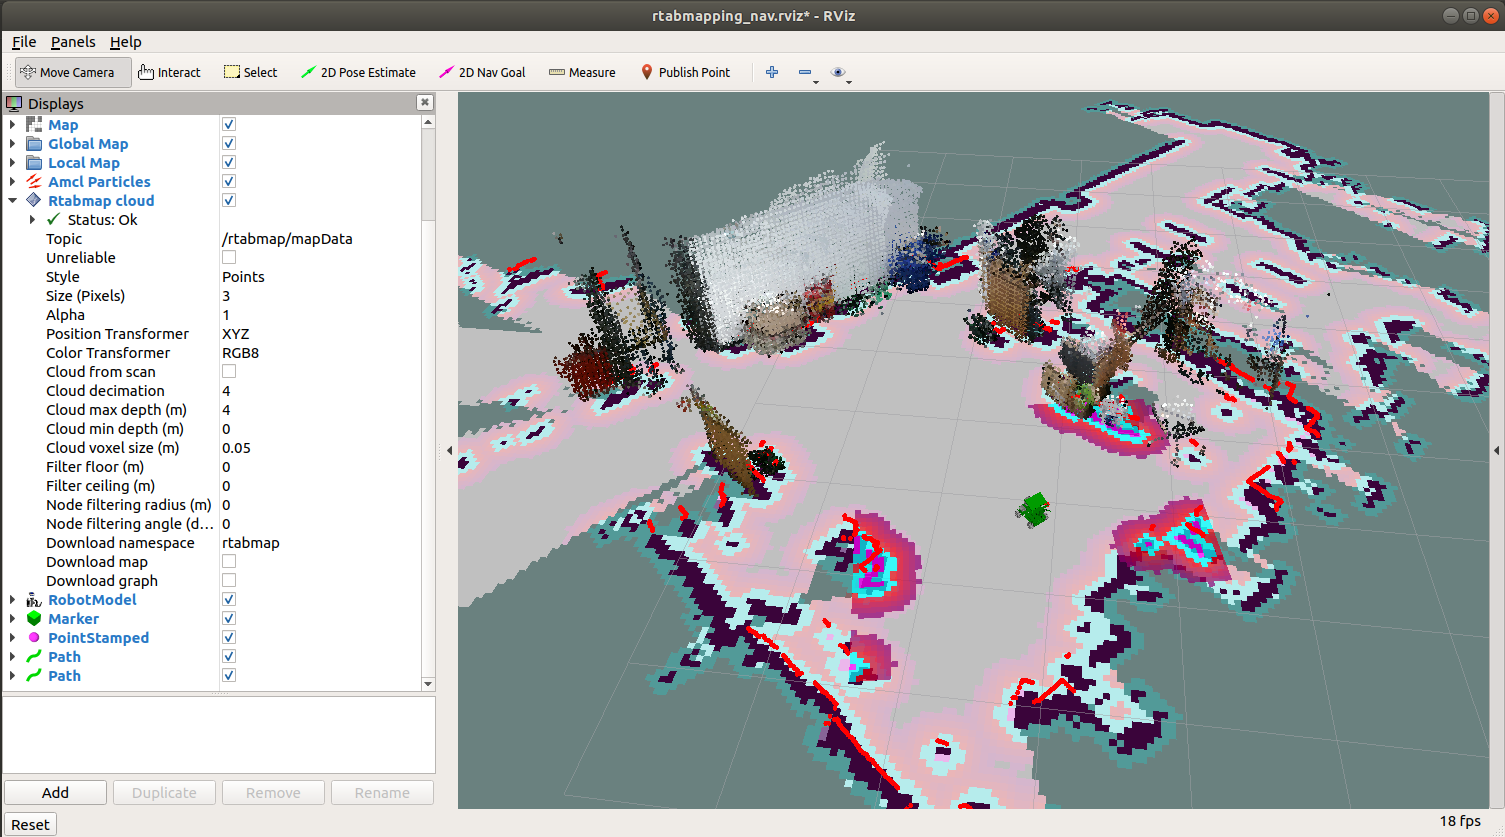
Load the three-dimensional map (1, 2, 3), 4 is to add the rviz debugging tool.
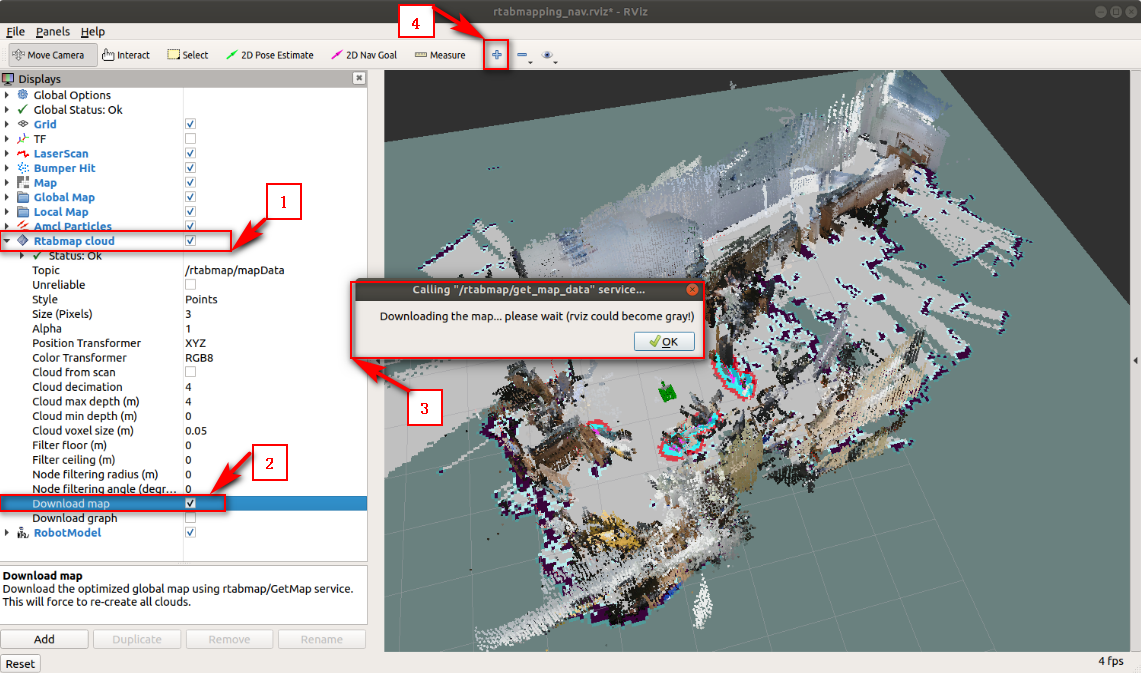
At this time, you can manually add [MarkerArray] to facilitate multi-point navigation and observation, and adjust [rviz] display parameters according to needs, such as the size of lidar points.
7.3.1. Single-point navigation
Use the [2D Pose Estimate] of the [rviz] tool to set the initial pose until the position of the car in the simulation is consistent with the position of the actual car.
Click [2D Nav Goal] of the [rviz] tool, and then select a target point on the map where there are no obstacles. Release the mouse to start navigation. Only one target point can be selected, and it will stop when it is reached.
7.3.2. Multi-point navigation
Same as the first step of single-point navigation, first set the initial pose of the car.
Click [Publish Point] of the [rviz] tool, and then select the target point on the map where there are no obstacles. Release the mouse to start navigation. You can click [Publish Point] again, and then select the point, and the robot will click on it. Cruising between points.
When using the [2D Pose Estimate] tool of the [rviz] tool to set the initial pose of the car, the multi-point navigation function is automatically canceled.
7.3.3. Parameter configuration
After starting the navigation function, open the dynamic parameter adjustment tool, adjust according to your own needs, and observe the robot's motion status until the effect is optimal. Record the current parameters and modify them to the corresponding dwa_local_planner_params.yaml file under the yahboomcar_nav function package.
xxxxxxxxxxrosrun rqt_reconfigure rqt_reconfigure
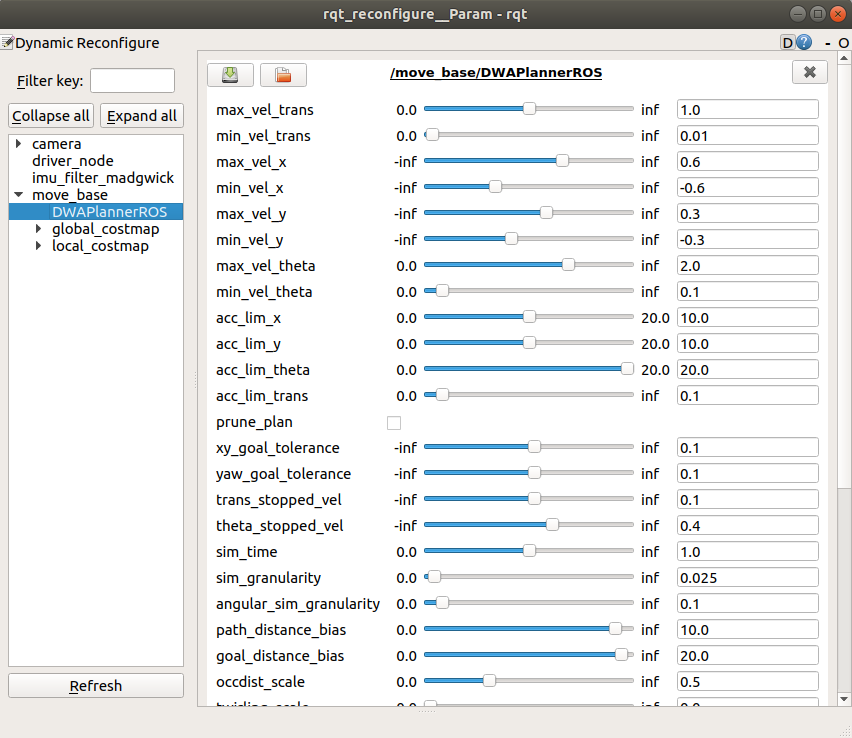
Looking at the yahboomcar_navigation.launch file, we can see that the navigation parameters are modified in the move_base.launch file under the yahboomcar_rtabmap_nav function package.
xxxxxxxxxx<launch> <!-- Whether to open rviz || Whether to open rviz --> <arg name="use_rviz" default="false"/> <!-- MarkerArray node--> <node name='send_mark' pkg="yahboomcar_nav" type="send_mark.py"/> <!-- Mobile APP node --> <include file="$(find yahboomcar_nav)/launch/library/app.launch"/> <!-- Navigation core component move_base --> <include file="$(find yahboomcar_nav)/launch/library/move_base.launch"/> <!-- rtabmap navigation --> <include file="$(find yahboomcar_nav)/launch/library/rtabmap_nav.launch"/> <!-- RVIZ --> <include file="$(find yahboomcar_nav)/launch/view/view_rtabmap_nav.launch" if="$(arg use_rviz)"/></launch>Find the move_base.launch file and open the example file as follows. It can be modified and replaced according to your needs. At this time, [DWA Planner] is selected and the [DWA] file is loaded.
xxxxxxxxxx<launch> <arg name="robot_type" value="$(env ROBOT_TYPE)" doc="robot_type [X1,X3,X3plus,R2,X7]"/> <!-- Arguments --> <arg name="move_forward_only" default="false"/> <!-- move_base --> <node pkg="move_base" type="move_base" respawn="false" name="move_base" output="screen"> <rosparam file="$(find yahboomcar_nav)/param/common/global_costmap_params.yaml" command="load"/> <rosparam file="$(find yahboomcar_nav)/param/common/local_costmap_params.yaml" command="load"/> <rosparam file="$(find yahboomcar_nav)/param/common/move_base_params.yaml" command="load"/> <rosparam file="$(find yahboomcar_nav)/param/common/costmap_common_params_$(arg robot_type).yaml" command="load" ns="global_costmap"/> <rosparam file="$(find yahboomcar_nav)/param/common/costmap_common_params_$(arg robot_type).yaml" command="load" ns="local_costmap"/> <rosparam file="$(find yahboomcar_nav)/param/common/dwa_local_planner_params_$(arg robot_type).yaml" command="load"/> <param name="base_local_planner" type="string" value="dwa_local_planner/DWAPlannerROS" if="$(eval arg('robot_type') == 'X3')"/> <!-- <param name="base_local_planner" type="string" value="teb_local_planner/TebLocalPlannerROS"/>--><param name="DWAPlannerROS/min_vel_x" value="0.0" if="$(arg move_forward_only)"/> <remap from="cmd_vel" to="cmd_vel"/> <remap from="odom" to="odom"/> </node></launch>Note: When using the DWA planner, the difference between an omnidirectional car and a differential car lies in whether the speed in the Y direction is 0. There are clear comments in it, which can be modified according to the actual situation.
Enter the dwa_local_planner_params.yaml file under the yahboomcar_nav function package. Some parameters are as follows:
xxxxxxxxxxDWAPlannerROS: # Robot Configuration Parameters # Absolute value of maximum linear velocity in x direction, unit: meters/second # The maximum y velocity for the robot in m/s max_vel_x: 0.6 # The absolute value of the minimum linear velocity in the x direction, a negative number means it can be retreated, unit: meters/second # The minimum x velocity for the robot in m/s, negative for backwards motion. min_vel_x: -0.6 # Absolute value of the maximum linear velocity in the y direction, unit: meters/second. The differential robot is 0 # The maximum y velocity for the robot in m/s max_vel_y: 0.3 # The absolute value of the minimum linear velocity in the y direction, unit: meters/second. The differential robot is 0 # The minimum y velocity for the robot in m/s min_vel_y: -0.3... ... #The ultimate acceleration of the robot in the x direction, the unit is meters/sec^2 # The x acceleration limit of the robot in meters/sec^2 acc_lim_x: 10.0 # The ultimate acceleration of the robot in the y direction, which is 0 for differential robots # The y acceleration limit of the robot in meters/sec^2 acc_lim_y: 10.0... ..Other parameter files can be opened, combined with comments and courseware, and modified according to your own needs.
7.4, node rtabmap
This is the master node for this package. It is a wrapper around the RTAB mapping core library. Here, when loop closure is detected, the map is incrementally built and optimized. The node's online output is this map, which contains the latest data added to the map. The default location of the RTAB map database is [.ros/rtabmap.db], and the workspace is also set to [.ros].
7.4.1. Subscribe to topics
| Name | Type | Parse |
|---|---|---|
| odom | nav_msgs/Odometry | Odometry. If the parameter subscribe_depth or subscribe_stereo is true; and odom_frame_id is not set, this is a required parameter. |
| rgb/image | sensor_msgs/Image | RGB/monocular image. |
| rgb/camera_info | sensor_msgs/CameraInfo | RGB camera parameters. |
| depth/image | sensor_msgs/Image | Depth image. |
| scan | sensor_msgs/LaserScan | Single line laser. |
| scan_cloud | sensor_msgs/PointCloud2 | Laser scanning point cloud stream. |
| left/image_rect | sensor_msgs/Image | Left eye correction image. |
| left/camera_info | sensor_msgs/CameraInfo | Left eye camera parameters. |
| right/image_rect | sensor_msgs/Image | Right eye correction image. |
| right/camera_info | sensor_msgs/CameraInfo | Right eye camera parameters. |
| goal | geometry_msgs/PoseStamped | Plan a path to achieve this goal using the current online map. |
| rgbd_image | rtabmap_ros/RGBDImage | RGB-D sync image, only if subscribe_rgbd is true. |
7.4.2. Publishing topics
| Name | Type | Parse |
|---|---|---|
| info | rtabmap_ros/Info | rtabmap information. |
| mapData | rtabmap_ros/MapData | rtabmap's graph and latest node data. |
| mapGraph | rtabmap_ros/MapGraph | rtabmap’s graph |
| grid_map | nav_msgs/OccupancyGrid | Map occupancy grid generated by laser scanning. |
| proj_map | nav_msgs/OccupancyGrid | Deprecated, use /grid_map instead of Grid/FromDepth=true |
| cloud_map | sensor_msgs/PointCloud2 | A 3D point cloud generated from a local raster. |
| cloud_obstacles | sensor_msgs/PointCloud2 | Generate a 3D point cloud of obstacles from a local mesh. |
| cloud_ground | sensor_msgs/PointCloud2 | A 3D ground point cloud generated from a local raster. |
| scan_map | sensor_msgs/PointCloud2 | 3D point cloud generated by 2D scan or 3D scan. |
| labels | visualization_msgs/MarkerArray | Convenient way to display graph labels in RVIZ. |
| global_path | nav_msgs/Path | The planning pose of the global path. Published only once per planned path. |
| local_path | nav_msgs/Path | Plan the future local pose corresponding to the global path. Published every time the map is updated. |
| goal_reached | std_msgs/Bool | Plan status message whether the goal was successfully achieved. |
| goal_out | geometry_msgs/PoseStamped | Plan the current metric goal sent from rtabmap's topology planner. For example, you can connect to move_base via move_base_simple/goal. |
| octomap_full | octomap_msgs/Octomap | Get octomap. Only available if rtabmap_ros is built with octomap. |
| octomap_binary | octomap_msgs/Octomap | Get octomap. Only available if rtabmap_ros is built with octomap. |
| octomap_occupied_space | sensor_msgs/PointCloud2 | Point cloud of octomap occupied space (obstacles and ground). Only available if rtabmap_ros is built with octomap. |
| octomap_obstacles | sensor_msgs/PointCloud2 | Point cloud of obstacles on octomap. Only available if rtabmap_ros is built with octomap. |
| octomap_ground | sensor_msgs/PointCloud2 | Point cloud of octomap. Only available if rtabmap_ros is built with octomap. |
| octomap_empty_space | sensor_msgs/PointCloud2 | The empty point cloud of octomap. Only available if rtabmap_ros is built with octomap. |
| octomap_grid | nav_msgs/OccupancyGrid | Project an octomap into a 2D occupancy grid map. Only available if rtabmap_ros is built with octomap. |
7.4.3, Service
| Name | Type | Parse |
|---|---|---|
| get_map | rtabmap_ros/GetMap | Call this service to get a standard 2D occupancy grid. |
| get_map_data | rtabmap_ros/GetMap | Call this service to get map data. |
| publish_map | rtabmap_ros/PublishMap | Call this service to publish map data. |
| list_labels | rtabmap_ros/ListLabels | Get the current labels of the graph. |
| update_parameters | std_srvs/Empty | The node will be updated with the current parameters of the rosparam server. |
| reset | std_srvs/Empty | Delete the map. |
| pause | std_srvs/Empty | Pause mapping. |
| resume | std_srvs/Empty | Resume mapping. |
| trigger_new_map | std_srvs/Empty | Will start a new map. |
| backup | std_srvs/Empty | Back up the database to "database_path.back" (default ~/.ros/rtabmap.db.back). |
| set_mode_localization | std_srvs/Empty | Set pure localization mode. |
| set_mode_mapping | std_srvs/Empty | Set mapping mode. |
| set_label | rtabmap_ros/SetLabel | Set the label to the latest node or the specified node. |
| set_goal | rtabmap_ros/SetGoal | Plan and set topology goals. |
| octomap_full | octomap_msgs/GetOctomap | Get octomap. Only available when rtabmap_ros is built with octomap |
| octomap_binary | octomap_msgs/GetOctomap | Get octomap. Only available when rtabmap_ros is built with octomap |
7.4.4. Parameters
| name | type | default value | parse |
|---|---|---|---|
| subscribe_depth | bool | true | Subscribe to depth image |
| subscribe_scan | bool | false | Subscribe to lidar data |
| subscribe_scan_cloud | bool | false | Subscribe to laser 3D point cloud |
| subscribe_stereo | bool | false | Subscribe to stereo images |
| subscribe_rgbd | bool | false | Subscribe to rgbd_image topic |
| frame_id | string | base_link | The frame to connect to the mobile base. |
| map_frame_id | string | map | The coordinate system attached to the map. |
| odom_frame_id | string | ‘ ’ | The coordinate system attached to the odometer. |
| odom_tf_linear_variance | double | 0.001 | When using odom_frame_id, the first 3 values of the diagonal of the 6x6 covariance matrix are set to this value. |
| odom_tf_angular_variance | double | 0.001 | When using odom_frame_id, the last 3 values of the 6x6 covariance matrix diagonal are set to this value |
| queue_size | int | 10 | Message queue size per synchronization topic. |
| publish_tf | bool | true | Publish TF from /map to /odom. |
| tf_delay | double | 0.05 | |
| tf_prefix | string | ‘ ‘ | The prefix to be added to the generated tf. |
| wait_for_transform | bool | true | The wait for the transform while the tf transform is still unavailable (the maximum wait time for the transform is seconds). |
| wait_for_transform_duration | double | 0.1 | The waiting time of wait_for_transform. |
| config_path | string | ‘ ’ | Path to the configuration file containing RTAB mapping parameters. Parameters set in the startup file will override parameters in the configuration file. |
| database_path | string | .ros/rtabmap.db | The path of the rtabmap database. |
| gen_scan | bool | false | Generate a laser scan from a depth image (using the middle horizontal line of the depth image). Not generated if subscribe_scan or subscribe_scan_cloud is true. |
| gen_scan_max_depth | double | 4.0 | The maximum depth of the generated laser scan. |
| approx_sync | bool | false | Synchronize using the approximate time of the input message. If false, note that the odometry input must have exactly the same timestamp as the input image |
| rgbd_cameras | int | 1 | Number of RGB-D cameras to use (when subscribe_rgbd is true). Currently, up to 4 cameras can be synced simultaneously. |
| use_action_for_goal | bool | false | use actionlib sends the metric target to move_base. |
| odom_sensor_sync | bool | false | Adjust the image and scan pose relative to the odometry pose for each node added to the graph. |
| gen_depth | bool | false | Generate a depth image from the scanned cloud projection to the RGB camera, taking into account the displacement of the RGB camera based on odometry and lidar frames. |
| gen_depth_decimation | int | 1 | Reduce the image size of the received camera information (create a smaller depth image) |
| gen_depth_fill_holes_size | int | 0 | Fill empty pixels to this size. Interpolates values from adjacent depth values. 0 means disabled. |
| gen_depth_fill_iterations | double | 0.1 | Maximum depth error to interpolate (m). |
| gen_depth_fill_holes_error | int | 1 | Number of iterations to fill holes. |
| map_filter_radius | double | 0.0 | Load data for only one node in the filter radius (using the latest data) up to the filter angle (map filter angle). |
| map_filter_angle | double | 30.0 | The angle to use when filtering nodes before creating the map. Reference map_filter_radius |
| map_cleanup | bool | true | If there are no map cloud maps, raster maps, or project maps subscribed to, clear the corresponding data. |
| latch | bool | true | If true, the last message posted on the map topic will be saved. |
| map_always_update | bool | true | Always update the occupancy raster map |
| map_empty_ray_tracing | bool | true | Perform ray tracing to fill the unknown space of invalid 2D scan rays (assuming invalid rays are infinite). Only used if map_always_update is also true. |
7.4.5, tf conversion
what is needed:
base_link → sensor
odom → base_link
which provided:
map → odom
7.5, node rtabmapviz
This node starts the visual interface of RTAB-Map. It is a wrapper for the RTAB-MapGUI library. Its purpose is the same as rviz, but with specific options for RTAB-Map.
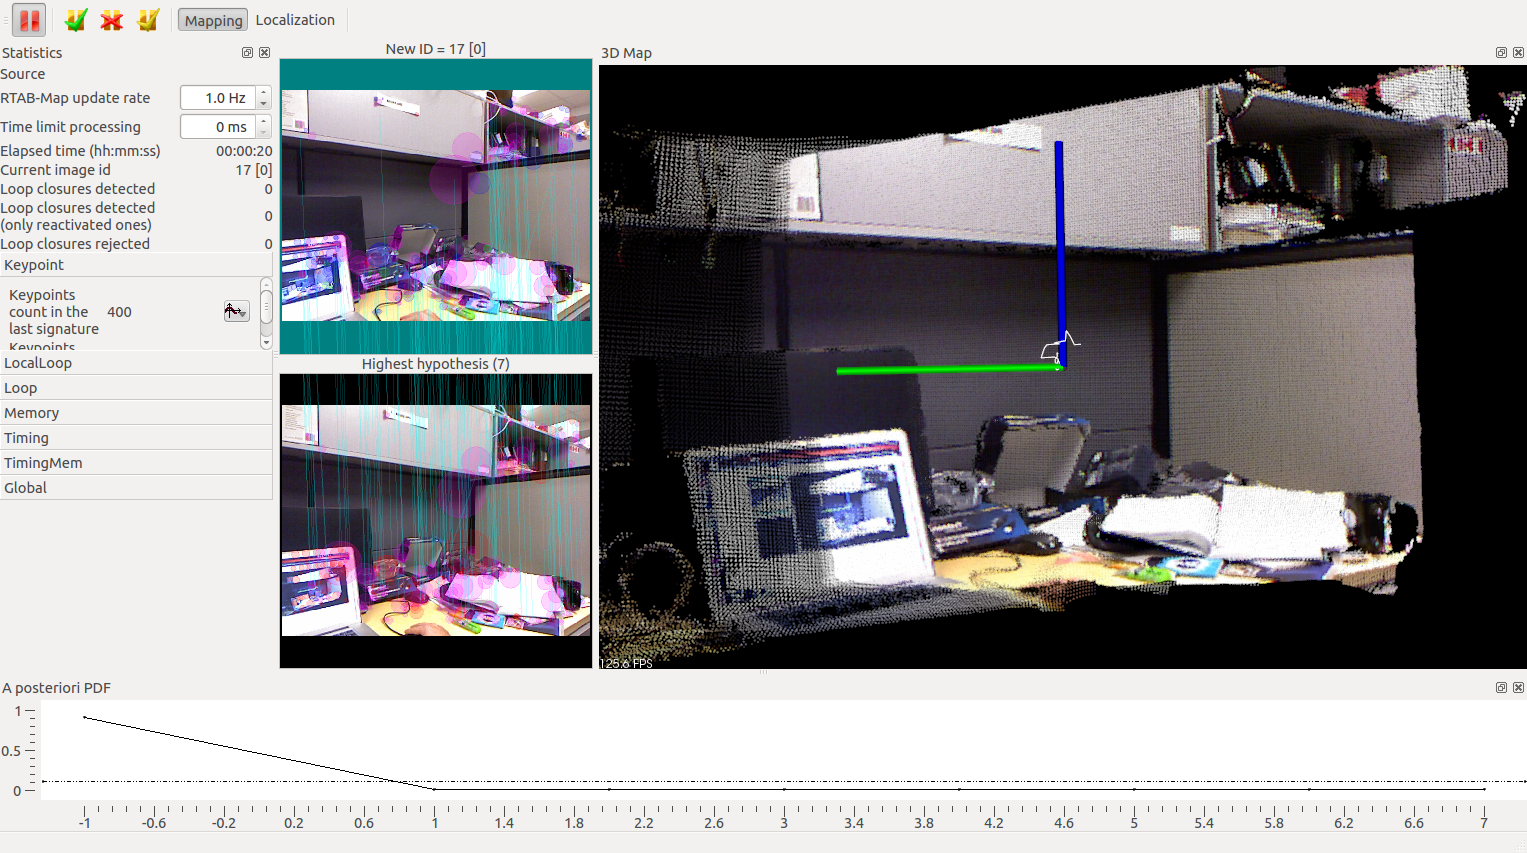
7.5.1. Subscribe to topics
| Name | Type | Parse |
|---|---|---|
| odom | nav_msgs/Odometry | Odometry. Required if the parameters subscribe_depth or subscribe_stereo are true and odom_frame_id is not set. |
| rgb/image | sensor_msgs/Image | RGB/monocular image. If the parameter subscribe_stereo is true, this option is not required (left/image_rect is used instead). |
| rgb/camera_info | sensor_msgs/CameraInfo | RGB camera metadata. If the parameter subscribe_stereo is true, this option is not required (left/camera_info is used instead). |
| depth/image | sensor_msgs/Image | Register depth image. Required if parameter subscribe_depth is true. |
| scan | sensor_msgs/LaserScan | Laser scan stream. Required if parameter subscribe_scan is true. |
| scan_cloud | sensor_msgs/PointCloud2 | Laser scan stream. Required if parameter subscribe_scan_cloud is true. |
| left/image_rect | sensor_msgs/Image | Left eye correction image. Required if parameter subscribe_stereo is true. |
| left/camera_info | sensor_msgs/CameraInfo | Left eye camera parameters. Required if parameter subscribe_stereo is true. |
| right/image_rect | sensor_msgs/Image | Right corrected image. Required if parameter subscribe_stereo is true. |
| right/camera_info | sensor_msgs/CameraInfo | Right eye camera parameters. Required if parameter subscribe_stereo is true. |
| odom_info | rtabmap_ros/OdomInfo | Required if the parameter subscribe_odom_info is true. |
| info | rtabmap_ros/Info | Statistical information of rtabmap. |
| mapData | rtabmap_ros/MapData | rtabmap’s chart and latest node data. |
| rgbd_image | rtabmap_ros/RGBDImage | RGB-D synchronized image, only when subscribe_rgbd is true. |
7.5.2. Parameter configuration
| name | type | default value | parse |
|---|---|---|---|
| subscribe_depth | bool | false | Subscribe to depth image |
| subscribe_scan | bool | false | Subscribe to lidar data |
| subscribe_scan_cloud | bool | false | Subscribe to the laser scanning point cloud. |
| subscribe_stereo | bool | false | Subscribe to stereo images. |
| subscribe_odom_info | bool | false | Subscribe to odom information messages. |
| subscribe_rgbd | bool | false | Subscribe to rgbd_image topic. |
| frame_id | string | base_link | The coordinate system connected to the mobile base. |
| odom_frame_id | string | ‘ ’ | The coordinate system of the odometer. If empty, rtabmapviz will subscribe to the odom topic to get odometry. If set, gets the odometer from tf. |
| tf_prefix | string | ‘ ‘ | The prefix to be added to the generated tf. |
| wait_for_transform | bool | false | Wait for a transform (up to 1 second) when the tf transform is still not available. |
| queue_size | int | 10 | Message queue size per synchronization topic. |
| rgbd_cameras | int | 1 | Number of RGB-D cameras to use (when subscribe_rgbd is true). Currently, up to 4 cameras can be synced simultaneously. |
7.5.3. Required tf conversion
base_link → sensor coordinate system
odom → base_link
map → odom