yahboom
HomeLearn
Solution
Blog
Online Store
About Us
EN/中文
K230 Vision Module📖
1. Quick Start
  • 0.Get start
  • 1. K230 firmware download and burning
  • 2. Install the programming environment
  • 3. Debug and run routines
  • 4. Offline running routine
  • 5. Micropython Quick Start
  • 6. GUI Program Instructions
  • 7.K230 module bracket installation tutorial
  • 8.K230 module 2DOF PTZ installation tutorial
2. Basic Courses
  • 1.FPIOA pin assignment
  • 2.RGB lights
  • 3.Buzzer
  • 4.Buttons
  • 5.Serial communication
  • 6.I2C communication
  • 7.PWM
  • 8.WDT watchdog
  • 9.Timer
  • 10.Fourier Transform
  • 11.SHA256 encryption
  • 12.AES encryption
  • 13.Multithreading
  • 14.File reading and writing
  • 15.Image Display
  • 16.Touch Display
  • 17.Camera display
  • 18.Image Flip
  • 19.Camera
3. Draw the image
  • 1. Draw the lines
  • 2. Draw the circle
  • 3. Draw the rectangle
  • 4. Draw the ellipse
  • 5. Draw the arrow
  • 6. Draw the crosshairs
  • 7. Draw text
  • 8. Draw key points
4. Graphics detection
  • 1. Line segment detection
  • 2. Rectangle Detection
  • 3. Circle detection
  • 4. Object edge detection
  • 5. Line inspection basics:fast linear regression
5. Color recognition
  • 1. Color recognition
  • 2. Object Counting
  • 3. Multi-color recognition
  • 4. K230 Color Line Patrol
6.1 CV_lite Image Processing Special Topic
  • 1.Introduction to cv_litenew
  • 2.cv_lite API Reference Manualnew
  • 3.Color Block Recognition - Grayscale Imagenew
  • 4.Color Block Recognition - Color Imagenew
  • 5.Circle Recognition - Grayscale Imagenew
  • 6.Circle Recognition - Color Imagenew
  • 7.Corner Recognition - Grayscale Imagenew
  • 8.Corner Recognition - Color Imagenew
  • 9.Edge Recognition - Grayscale Imagenew
  • 10. Edge Recognition - Color Imagenew
  • 11. Rectangle Recognition - Grayscale Imagenew
  • 12.Rectangle Recognition - Color Imagenew
  • 13.Rectangle recognition combined with corner recognition - grayscale imagenew
  • 14.Rectangle recognition combined with corner recognition - color imagenew
  • 15.Image Binarization - Grayscalenew
  • 16.Image Binarization - Color Imagenew
  • 17.Exposure Adjustmentnew
  • 18.Image Black Hat Operationsnew
  • 19.Image Color Histogramnew
  • 20.Image Closingnew
  • 21.Image Expansionnew
  • 22.Image Corrosionnew
  • 23.Gaussian Blurnew
  • 24.Gradient Transformationnew
  • 25.Mean Fuzzynew
  • 26.Image Openingnew
  • 27.Image Top Hat Operationnew
  • 28.PnP rangingnew
  • 29.Find rectangles and measure distancesnew
  • 30.Image grayscale world white balancenew
6.2 OpenCV Image Processing Special Topicnew
  • 1. OpenCV Introduction
  • 2. OpenCV API Reference
  • 3. Image Basic Transforms
  • 4. Morphological Operations
  • 5. Color Segmentation and Shape Classification
  • 6. Corner and Centroid Detection
  • 7. Hough Circle Detection
  • 8. Hough Line Detection
  • 9. Contour Analysis
  • 10. Drawing Functions
  • 11. Template Matching
  • 12. Image Blur Filtering
  • 13. Edge Detection
  • 14. Thresholding
  • 15. Color Segmentation
  • 16. Histogram and Pixel Transformation
  • 17. Arithmetic and Bitwise Operations
  • 18. Channel Operation and Statistics
  • 19. Image File Read and Write
  • 20. Pixel Level Transformation
7. Code type recognition
  • 1.Barcode recognition
  • 2.QR code recognition
  • 3.AprilTag tag recognition
  • 4.DM code recognition
8. Face Recognition
  • 1.[Must-read] General code structure and prerequisite knowledge of AI vision routines
  • 2.Face Detection
  • 3.Facial key point recognition
  • 4.Face orientation detection
  • 5.Face 3D Network
  • 6.Gaze direction detection
  • 7.Register for face recognition
9. Human body characteristics
  • 1. Human body detection
  • 2. Human key point detection
  • 3. Human posture recognition
  • 4. Fall detection
  • 5. Palm detection
  • 6. Palm key point detection
  • 7. Palm key point classification
  • 8. Gesture Recognition
  • 9. Dynamic gesture recognition
  • 10. Rock, Paper, Scissors
10. Scenario Application
  • 1.OCR character detection
  • 2.OCR character recognition
  • 3.yolov8n target detection
  • 4.yolov8n segmentation
  • 5. Self-learning object recognition
  • 6. License plate detection
  • 7. License Plate Recognition
  • 8. Target Tracking
  • 9. Fruit classification
  • 10. Garbage classification
  • 11. Road sign recognition
11. Audio and video processing
  • 1. Audio Recording
  • 2. Play Audio
  • 3. Video Recording
  • 4. Play Video
  • 5. Keyword wake-up
12. Network Basics
  • 1. Wireless network connection
  • 2. AP hotspot mode
  • 3. TCP-Server Example
  • 4. TCP-Client Example
  • 5. UDP-Server Example
  • 6. UDP-Client Example
  • 7. HTTP-Server Example
  • 8. HTTP-Client Example
  • 9. MQTT Quick Start
  • 10. MQTT-Publisher
  • 11. MQTT-Subscriber
  • 12. RTSP real-time image transmission
  • 13. RTSP real-time image transmission combined with AIDemo
  • 14. Call OpenRouter large model aggregation service
  • 15. Open the Resource Monitoring Panel
13. LVGL Graphical Interface
  • 1. Introduction to LVGL
  • 2. Create a button
  • 3. Create a slider
  • 4. Create an Image
  • 5. Create a text box and keyboard
14. GUI Code Tutorial & Secondary Development
  • 01.GUI System Architecture
  • 02.Core Engine Initialization
  • 03.Application Discovery Mechanism in GUI
  • 04.Desktop Layout Algorithm
  • 05.Advanced UI Styling
  • 06.BaseApp Base Class Analysis
  • 07.Hello_World Practical
  • 08.GUI Application Lifecycle and Resource Management
15. Train your own model
  • 1. Local deployment of yolo training environment
  • 2. Use online platforms for training
16.Touch Course
  • 1.Touch point detectionnew
  • 2.Touch Paintingnew
  • 3.Touch to take a photonew
17. Multi-master communication (purchased separately)
ESP32-K230
  • 1.k230 color recognition
  • 2.k230 barcode recognition
  • 3.k230 QR code recognition
  • 4.k230Apriltag code recognition
  • 5.k230DM code recognition
  • 6.k230 face detection
  • 7.k230 gaze direction
  • 8.k230 face recognition
  • 9.k230 human body detection
  • 10.k230 fall detection
  • 11.k230 palm detection
  • 12.k230 gesture recognition
  • 13.k230OCR character recognition
  • 14.k230 object detection
  • 15.k230 target tracking
  • 16.k230 self-learning object recognition
  • 17.k230 license plate recognition
Jetson-K230
  • 1.k230 color recognition
  • 2.k230 barcode recognition
  • 3.k230 QR code recognition
  • 4.k230Apriltag code recognition
  • 5.k230DM code recognition
  • 6.k230 face detection
  • 7.k230 gaze direction
  • 8.k230 face recognition
  • 9.k230 human body detection
  • 10.k230 fall detection
  • 11.k230 palm detection
  • 12.k230 gesture recognition
  • 13.k230OCR character recognition
  • 14.k230 object detection
  • 15.k230 target tracking
  • 16.k230 self-learning object recognition
  • 17.k230 license plate recognition
MSPM0G3507-K230
  • 1.k230 color recognition
  • 2.k230 barcode recognition
  • 3.k230 QR code recognition
  • 4.k230Apriltag code recognition
  • 5.k230DM code recognition
  • 6.k230 face detection
  • 7.k230 gaze direction
  • 8.k230 face recognition
  • 9.k230 human body detection
  • 10.k230 fall detection
  • 11.k230 palm detection
  • 12.k230 gesture recognition
  • 13.k230OCR character recognition
  • 14.k230 object detection
  • 15.k230 target tracking
  • 16.k230 self-learning object recognition
  • 17.k230 license plate recognition
Pico-K230
  • 1.k230 color recognition
  • 2.k230 barcode recognition
  • 3.k230 QR code recognition
  • 4.k230Apriltag code recognition
  • 5.k230DM code recognition
  • 6.k230 face detection
  • 7.k230 gaze direction
  • 8.k230 face recognition
  • 9.k230 human body detection
  • 10.k230 fall detection
  • 11.k230 palm detection
  • 12.k230 gesture recognition
  • 13.k230OCR character recognition
  • 14.k230 object detection
  • 15.k230 target tracking
  • 16.k230 self-learning object recognition
  • 17.k230 license plate recognition
raspberrypi-K230
  • 1.k230 color recognition
  • 2.k230 barcode recognition
  • 3.k230 QR code recognition
  • 4.k230Apriltag code recognition
  • 5.k230DM code recognition
  • 6.k230 face detection
  • 7.k230 gaze direction
  • 8.k230 face recognition
  • 9.k230 human body detection
  • 10.k230 fall detection
  • 11.k230 palm detection
  • 12.k230 gesture recognition
  • 13.k230OCR character recognition
  • 14.k230 object detection
  • 15.k230 target tracking
  • 16.k230 self-learning object recognition
  • 17.k230 license plate recognition
RDK-K230
  • 1.k230 color recognition
  • 2.k230 barcode recognition
  • 3.k230 QR code recognition
  • 4.k230Apriltag code recognition
  • 5.k230DM code recognition
  • 6.k230 face detection
  • 7.k230 gaze direction
  • 8.k230 face recognition
  • 9.k230 human body detection
  • 10.k230 fall detection
  • 11.k230 palm detection
  • 12.k230 gesture recognition
  • 13.k230OCR character recognition
  • 14.k230 object detection
  • 15.k230 target tracking
  • 16.k230 self-learning object recognition
  • 17.k230 license plate recognition
STM32-K230
  • 1. stm32_k230 color recognition
  • 2. stm32_k230 barcode recognition
  • 3. stm32_k230 QR code recognition
  • 4. stm32_k230Apriltag code recognition
  • 5. stm32_k230DM code recognition
  • 6. stm32_k230 face detection
  • 7.stm32_k230 looking direction
  • 8. stm32_k230 face recognition
  • 9. stm32_k230 human body detection
  • 10. stm32_k230 fall detection
  • 11. stm32_k230 palm detection
  • 12. stm32_k230 gesture recognition
  • 13. stm32_k230OCR character recognition
  • 14. stm32_k230 object detection
  • 15. stm32_k230 target tracking
  • 16. stm32_k230 self-learning object recognition
  • 17.stm32_k230 license plate recognition
Arduino-K230
  • 1.arduino_k230 color recognition
  • 2.arduino_k230 barcode recognition
  • 3.arduino_k230 QR code recognition
  • 4.arduino_k230 Apriltag code recognition
  • 5.arduino_k230 DM code recognition
  • 6.arduino_k230 face detection
  • 7.arduino_k230 looking direction
  • 8.arduino_k230 face recognition
  • 9.arduino_k230 human body detection
  • 10.arduino_k230 fall detection
  • 11.arduino_k230 palm detection
  • 12.arduino_k230 gesture recognition
  • 13.arduino_k230 OCR character recognition
  • 14.arduino_k230 object detection
  • 15.arduino_k230 target tracking
  • 16.arduino_k230 self-learning object recognition
  • 17.arduino_k230 license plate recognition
Microbit-K230
  • 1.microbit_k230 color recognition
  • 2.microbit_k230 barcode recognition
  • 3.microbit_k230 QR code recognition
  • 4.microbit_k230 Apriltag code recognition
  • 5.microbit_k230 DM code recognition
  • 6.microbit_k230 face detection
  • 7.microbit_k230 looking direction
  • 8.microbit_k230 face recognition
  • 9.microbit_k230 human body detection
  • 10.microbit_k230 fall detection
  • 11.microbit_k230 palm detection
  • 12.microbit_k230 gesture recognition
  • 13.microbit_k230 OCR character recognition
  • 14.microbit_k230 object detection
  • 15.microbit_k230 target tracking
  • 16.microbit_k230 self-learning object recognition
  • 17.microbit_k230 license plate recognition
MSPM0G3519-K230
  • 1. K230 Color Recognitionnew
  • 2. K230 Barcode Recognitionnew
  • 3. K230 QR Code Recognitionnew
  • 4. K230 Apriltag Code Recognitionnew
  • 5. K230 DM Code Recognitionnew
  • 6. K230 Face Detectionnew
  • 7. K230 Gaze Directionnew
  • 8. K230 Face Recognitionnew
  • 9. K230 Human Body Detectionnew
  • 10. K230 Fall Detectionnew
  • 11. K230 Palm Detectionnew
  • 12. K230 Gesture Recognitionnew
  • 13. K230 OCR Character Recognitionnew
  • 14. K230 Object Detectionnew
  • 15. K230 Target Trackingnew
  • 16. K230 Self-learning Object Recognitionnew
  • 17. K230 License Plate Recognitionnew
18.Extension case (purchase separately)
For 2DOF Electric Platform
  • 1.Moving target control and automatic tracking system
  • 2.Human body recognition alarm
  • 3.Gesture Recognition
  • 4.Rock Paper Scissors
  • 5.Fruit sorting
  • 6.Color Tracking
  • 7.Face Tracking
MSPM0G3507 wheeled chassis V1/V2 combined with K230 application case
  • 1.Visual tracking
  • 2.Color tracking
  • 3.Color response
  • 4.Road sign recognition
  • 5.Machine code tracking
  • 6.QR code recognition action
  • 7.Autonomous avoid
  • 8.License plate tracking
  • 9.Face tracking
  • 10.Gaze direction tracking
  • 11.Palm tracking
  • 12.Target tracking
  • 13.Human body tracking
  • 14.OCR character recognition action
STM32 wheeled chassis V1/V2 combined with K230 application case
  • 1.Visual tracking
  • 2.Color tracking
  • 3.Color response
  • 4.Road sign recognition
  • 5.Machine code tracking
  • 6.QR code recognition action
  • 7.Autonomous avoid
  • 8.License plate tracking
  • 9.Face tracking
  • 10.Gaze direction tracking
  • 11.Palm tracking
  • 12.Target tracking
  • 13.Human body tracking
  • 14.OCR character recognition action
MSPM0G3519 wheeled chassis V1/V2 combined with K230 application case
  • 1.Visual trackingnew
  • 2.Color trackingnew
  • 3.Color responsenew
  • 4.Road sign recognitionnew
  • 5.Machine code trackingnew
  • 6.QR code recognition actionnew
  • 7.Autonomous avoidnew
  • 8.License plate trackingnew
  • 9.Face trackingnew
  • 10.Gaze direction trackingnew
  • 11.Palm trackingnew
  • 12.Target trackingnew
  • 13.Human body trackingnew
  • 14.OCR character recognition actionnew
19. Expansion case(purchase separately)new
  • 1.Motion target control and Auto track system
  • 2.Vehicle-mounted balance ball motion control system
Download
  • Manual
  • CanMV IDE
  • Software Tools
  • Firmware
  • Source Code
  • Appendix
Download ZIP

Welcome to K230 Vision Module repository

3. Circle detection

Circle detection

Circle detectionIntroduction to the experimental results of the routineCode explanationComplete codeCode structureCircle Detection Functionfind_rects

Introduction to the experimental results of the routine

The routine code of this section is located at: [TODO]

We use CanMV IDE to open the routine code and connect K230 to the computer via USB

Click the run button in the lower left corner of CanMV IDE,

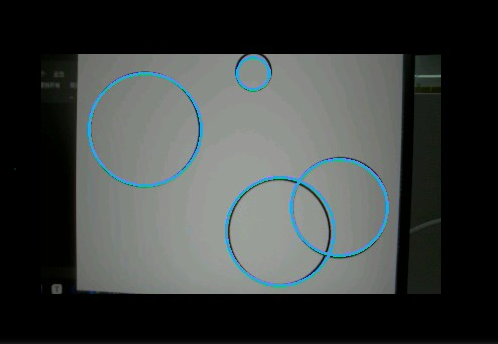
Aim the camera of K230 at the line segment

You can see that the circle in the picture will be marked on the screen (if there is no screen, look at the frame buffer)
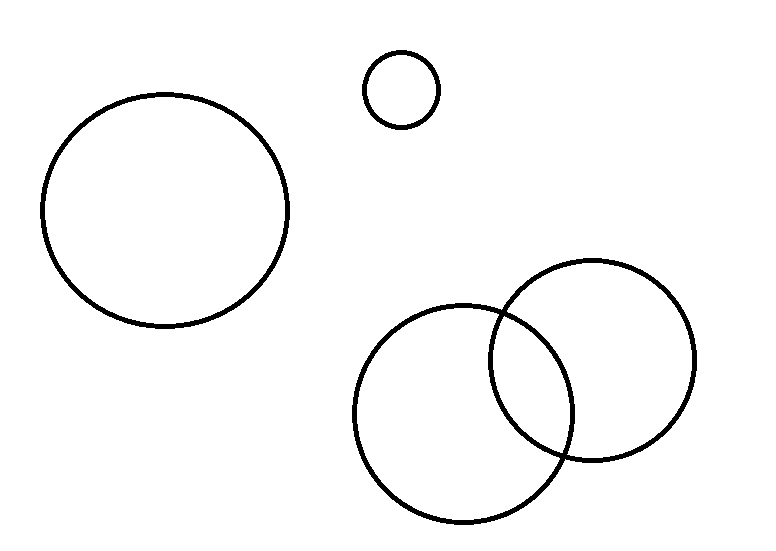
image-20250114093432656

【K230 recognition results】

image-20250211102053335


Code explanation

The peripherals we will use in this section are mainly camera modules

Line segment detection is implemented by the find_circles() method in K230, which belongs to the image module

Complete code

​x
import time, os, sys
from media.sensor import *
from media.display import *
from media.media import *
​
# 设置图像捕获分辨率 / Set picture capture resolution
PICTURE_WIDTH = 400
PICTURE_HEIGHT = 240
​
# 显示模式:"VIRT"用于无屏幕情况,"LCD"用于有屏幕情况
# Display mode: "VIRT" for virtual display, "LCD" for physical screen
DISPLAY_MODE = "LCD"
​
# 根据显示模式设置显示分辨率 / Set display resolution based on mode
if DISPLAY_MODE == "VIRT":
    # 虚拟显示器模式(1920x1080) / Virtual display mode
    DISPLAY_WIDTH = ALIGN_UP(1920, 16)  # 确保宽度16字节对齐 / Ensure width is 16-byte aligned
    DISPLAY_HEIGHT = 1080
elif DISPLAY_MODE == "LCD":
    DISPLAY_WIDTH = 640
    DISPLAY_HEIGHT = 480
else:
    raise ValueError("未知的显示模式,请选择 'VIRT' 或 'LCD' / Unknown display mode, please choose 'VIRT' or 'LCD'")
​
def init_sensor():
    """初始化传感器 / Initialize sensor"""
    sensor = Sensor(id=2)
    sensor.reset()
    sensor.set_framesize(width=PICTURE_WIDTH, height=PICTURE_HEIGHT, chn=CAM_CHN_ID_0)
    sensor.set_pixformat(Sensor.RGB565, chn=CAM_CHN_ID_0)
    return sensor
​
def init_display():
    """初始化显示器 / Initialize display"""
    if DISPLAY_MODE == "VIRT":
        Display.init(Display.VIRT, width=DISPLAY_WIDTH, height=DISPLAY_HEIGHT, fps=60)
    elif DISPLAY_MODE == "LCD":
        Display.init(Display.ST7701, width=DISPLAY_WIDTH, height=DISPLAY_HEIGHT, to_ide=True)
​
def process_circles(img, circles):
    """处理检测到的圆形 / Process detected circles"""
    print("【圆形信息 / Circle Statistics Start】")
    for i, circle in enumerate(circles):
        # 使用蓝色绘制圆形 / Draw circles in blue
        img.draw_circle(circle.circle(), color=(40,167,225), thickness=3)
        print(f"Circle {i}: {circle}")
    print("【==============================】")
​
def main():
    try:
        # 初始化设备 / Initialize devices
        sensor = init_sensor()
        init_display()
        MediaManager.init()
        sensor.run()
​
        # 计算显示偏移量以居中显示 / Calculate display offsets for center alignment
        x_offset = (DISPLAY_WIDTH - PICTURE_WIDTH) // 2
        y_offset = (DISPLAY_HEIGHT - PICTURE_HEIGHT) // 2
​
        while True:
            os.exitpoint()
​
            # 捕获图像 / Capture image
            img = sensor.snapshot(chn=CAM_CHN_ID_0)
​
            # 寻找并处理圆形 / Find and process circles
            # threshold: 控制圆形检测的阈值,更高的值会减少检测到的圆形数量
            # threshold: Controls circle detection sensitivity, higher values reduce the number of detected circles
            circles = img.find_circles(threshold=3500)
            process_circles(img, circles)
​
            # 居中显示图像 / Display image in center
            Display.show_image(img, x=x_offset, y=y_offset)
​
    except KeyboardInterrupt as e:
        print("用户中断 / User interrupted: ", e)
    except Exception as e:
        print(f"发生错误 / Error occurred: {e}")
    finally:
        # 清理资源 / Cleanup resources
        if 'sensor' in locals() and isinstance(sensor, Sensor):
            sensor.stop()
        Display.deinit()
        os.exitpoint(os.EXITPOINT_ENABLE_SLEEP)
        time.sleep_ms(100)
        MediaManager.deinit()
​
if __name__ == "__main__":
    main()
​

Code structure

Initialization configuration

  • Support two display modes: virtual display (VIRT, 1920x1080) and LCD screen (640x480)
  • Set the corresponding display resolution according to the selected display mode

Core function

  • init_sensor(): Initialize the camera sensor, set the image resolution and format
  • init_display(): Initialize the display device according to the display mode
  • process_circles(): Process the detected circles, draw on the image and output information

Main loop processing

  • Continuously capture images
  • Detect circles in the image
  • Draw blue circles at the detected circle position
  • Center the processed image on the screen

Exception handling and resource cleanup

  • Handle abnormal situations such as keyboard interrupts
  • Ensure that all resources (sensors, displays, media managers) are properly released when the program ends


Circle Detection Function

find_rects

xxxxxxxxxx
image.find_rects([roi=Auto, threshold=10000])

This function uses the same quadrilateral detection algorithm as AprilTag to find rectangles in an image. The algorithm works best for rectangles that contrast sharply with the background. AprilTag's quadrilateral detection can handle rectangles of arbitrary scale, rotation, and shear, and returns a list of image.rect objects.

  • roi is a rectangle tuple (x, y, w, h) that specifies the region of interest. If not specified, the ROI defaults to the entire image. The operation is limited to pixels within the region.

In the returned list of rectangles, rectangles with a bounding size (by sliding the Sobel operator over all pixels on the edge of the rectangle and summing its values) less than threshold are filtered out. The appropriate threshold value depends on the specific application scenario.

Note: Compressed images and Bayer images are not supported.

Rectangle Detection
Object edge detection

COMPANY

  • About us
  • Team Style
  • Blog

LEARNING & EXPLORATION

  • Tutorials
  • Edge AI hardware
  • Educational robots
  • Embedded intelligent hardware

WHERE TO BUY

  • Yahboom Online Store
  • Amazon
  • Alibaba
  • AliExpress
  • Mercado

TECHNOLOGY SUPPORT

  • Email: support@yahboom.com

BE A DISTRIBUTOR

  • Email: sales@yahboom.com
QR Code
QR Code

Copyright © 2017-2026 Yahboom. All Rights Reserved.

EN/中文