Welcome to K230 Vision Module repository
1. Color recognition
Color recognition
Color recognitionIntroduction to the results of routine experimentsCode ExplanationComplete codeCode structureAdd custom colors
Introduction to the results of routine experiments
The example code for this section is located in: [Source code/05.Color/01.color_recognition.py]
We use CanMV IDE to open the sample code and connect K230 to the computer via USB.
Open the sample code, find the THRESHOLDS array, and find the index of the color you want to track/identify in the array.
To add a custom color, see [the Add custom color]
Click the Run button in the lower left corner of CanMV IDE.
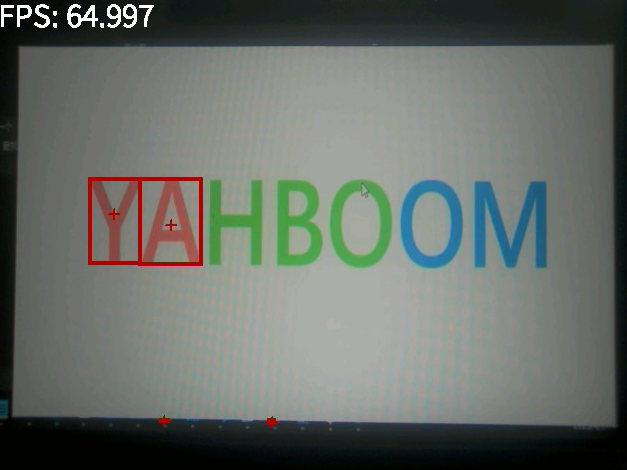
The K230 screen will frame the recognizable colors in the image captured by the camera (the routine detects red by default)
CanMV integrates the find_blobs function for RGB565 color block recognition based on the LAB color model

The running effect is as shown in the figure
Code Explanation
The peripherals we will use in this section are mainly camera modules
Line segment detection is implemented by the find_blobs() method in K230, which belongs to the image module
Complete code
xxxxxxxxxximport time, os, sysfrom media.sensor import *from media.display import *from media.media import *# 显示参数 / Display parametersDISPLAY_WIDTH = 640 # LCD显示宽度 / LCD display widthDISPLAY_HEIGHT = 480 # LCD显示高度 / LCD display height# LAB颜色空间阈值 / LAB color space thresholds# (L Min, L Max, A Min, A Max, B Min, B Max)THRESHOLDS = [ (0, 66, 7, 127, 3, 127), # 红色阈值 / Red threshold (42, 100, -128, -17, 6, 66), # 绿色阈值 / Green threshold (43, 99, -43, -4, -56, -7), # 蓝色阈值 / Blue threshold (37, 100, -128, 127, -128, -27) # 亚博智能Logo的颜色 color of YAHBOOM]def get_closest_rgb(lab_threshold): """根据LAB阈值计算最接近的RGB颜色 / Calculate closest RGB color based on LAB threshold""" # Get the center point value of the LAB space # 获取LAB空间的中心点值 l_center = (lab_threshold[0] + lab_threshold[1]) // 2 a_center = (lab_threshold[2] + lab_threshold[3]) // 2 b_center = (lab_threshold[4] + lab_threshold[5]) // 2 return image.lab_to_rgb((l_center,a_center,b_center))def init_sensor(): """初始化摄像头 / Initialize camera sensor""" sensor = Sensor() sensor.reset() sensor.set_framesize(width=DISPLAY_WIDTH, height=DISPLAY_HEIGHT) sensor.set_pixformat(Sensor.RGB565) return sensordef init_display(): """初始化显示 / Initialize display""" Display.init(Display.ST7701, to_ide=True) MediaManager.init()def process_blobs(img, blobs, color): """处理检测到的色块 / Process detected color blobs""" for blob in blobs: img.draw_rectangle(blob[0:4], color=color, thickness=4) img.draw_cross(blob[5], blob[6], color=color, thickness=2)def draw_fps(img, fps): """绘制FPS信息 / Draw FPS information""" img.draw_string_advanced(0, 0, 30, f'FPS: {fps:.3f}', color=(255, 255, 255))def main(): try: # 初始化设备 / Initialize devices sensor = init_sensor() init_display() sensor.run() clock = time.clock() # 选择要检测的颜色索引 (0:红, 1:绿, 2:蓝) / Select color index to detect color_index = 0 # 可以修改这个值来选择检测不同的颜色 You can modify this value to select different colors to detect threshold = THRESHOLDS[color_index] detect_color = get_closest_rgb(threshold) while True: clock.tick() img = sensor.snapshot() # 检测指定颜色 / Detect specified color blobs = img.find_blobs([threshold]) if blobs: process_blobs(img, blobs, detect_color) fps = clock.fps() draw_fps(img, fps) print(fps) Display.show_image(img) except KeyboardInterrupt as e: print("用户中断 / User interrupted: ", e) except Exception as e: print(f"发生错误 / Error occurred: {e}") finally: if 'sensor' in locals() and isinstance(sensor, Sensor): sensor.stop() Display.deinit() MediaManager.deinit()if __name__ == "__main__": main()
Code structure
Program settings:
- Set the screen resolution to 800×480
- Defines LAB color space thresholds for 4 colors (red, green, blue and a custom color)
Key features:
- Initialize the camera and display
- Real-time video capture
- Detect objects of specific colors in the picture
- Draw a box around the detected object and mark the center point
- Display current frame rate (FPS)
Workflow:
- After the program starts, select the color to be detected (set by color_index)
- Continuously capture camera images
- Color recognition using LAB color space
- Draw a rectangle and a cross mark around the detected object
- Real-time display of processed images and frame rate
Exception handling:
- Contains user interrupt and other exception handling mechanisms
- The camera and display device resources will be released correctly when the program ends
Add custom colors
CanMV IDE provides us with a more convenient LAB color gamut selection tool
We click [Tools] -> [Machine Vision] -> [Threshold Editor] in the upper left corner of CanMV IDE
Open a picture with the color we want to identify (as many interference colors as possible)
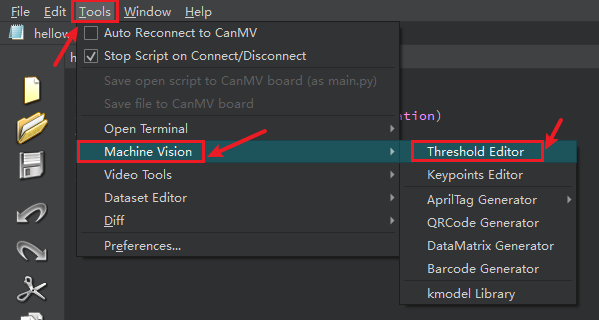
Take the color of Yabo Smart’s Logo as an example
Original image:

Open with the Threshold Editor:
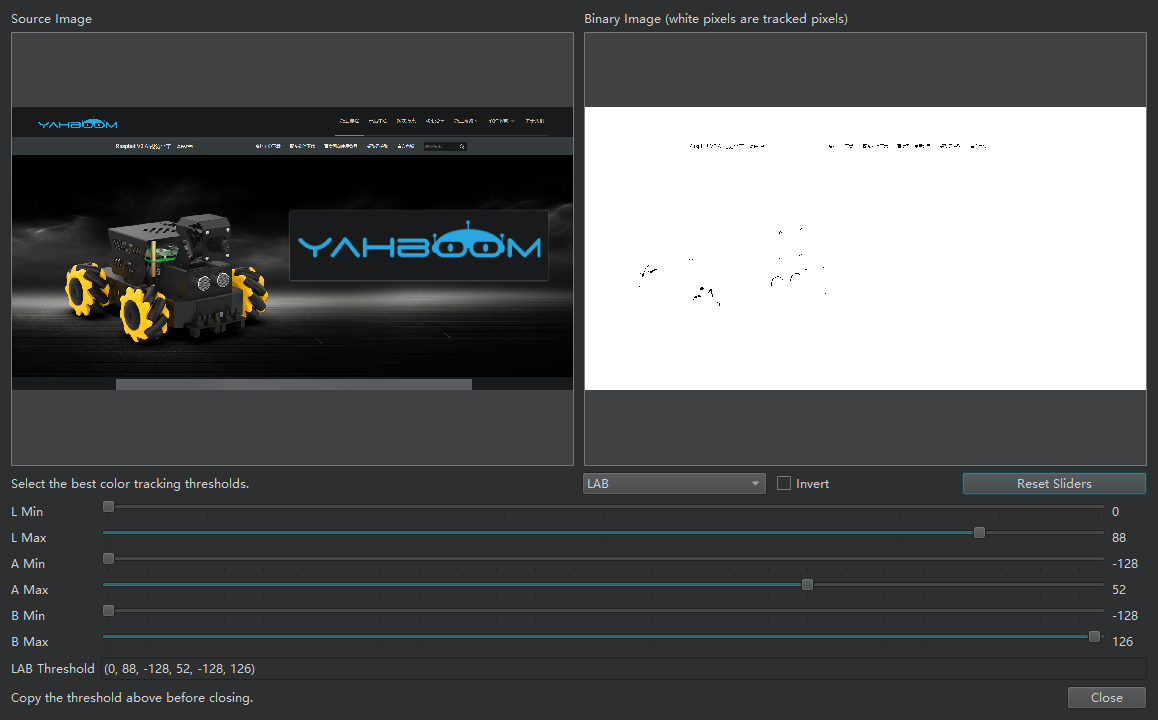
Drag the slider below to adjust the binary image on the right so that only the part we need is white and the rest is black.
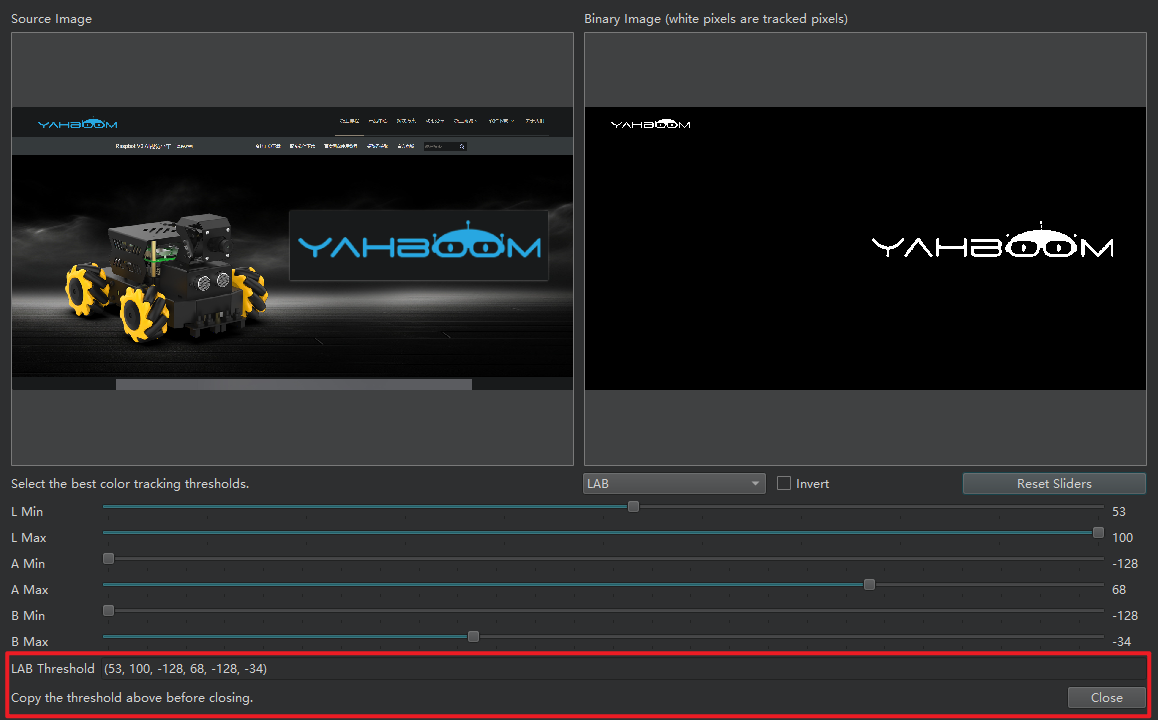
At this time, the LAB threshold in the red circle is what we need
We copy this threshold and add it to the THRESHOLDS array in the code
THRESHOLDS = [ ( 30 , 100 , 15 , 127 , 15 , 127 ), # Red threshold ( 30 , 100 , - 64 , - 8 , 50 , 70 ), # Green threshold ( 0 , 40 , 0 , 90 , - 128 , - 20 ), # Blue threshold ( 53 , 100 , - 128 , 68 , - 128 , - 34 ) # color of YAHBOOM logo]Modify color_index to the subscript of the color we just added in the array
# Select color index to detect (0: red, 1: green, 2: blue)color_index = 3 # You can modify this value to select different colors to detectthreshold = THRESHOLDS [ color_index ]detect_color = get_closest_rgb ( threshold )Now our program can start detecting and tracking the new color we added.
Poor color detection?
Try to use the frame buffer when opening the threshold editor, or use the image file taken by the K230. This can greatly improve the recognition accuracy.
The recognition threshold can be relaxed a bit.