Welcome to K230 Vision Module repository
26.Image Opening
Image Opening
Image OpeningExample effectPrinciple explanationWhat is image opening?Code OverviewImporting ModulesSetting the Image SizeInitialize the camera (RGB888 format)Initialize the display moduleInitialize the media manager and start the cameraSet opening parametersImage processing and opening operationResource releaseParameter adjustment instructions
Example effect
Run the example code in this section [Source code/06.cv_lite/24.rgb888_open.py]
In this section, we will combine the cv_lite extension module to implement the image opening processing in RGB888 format on embedded devices.
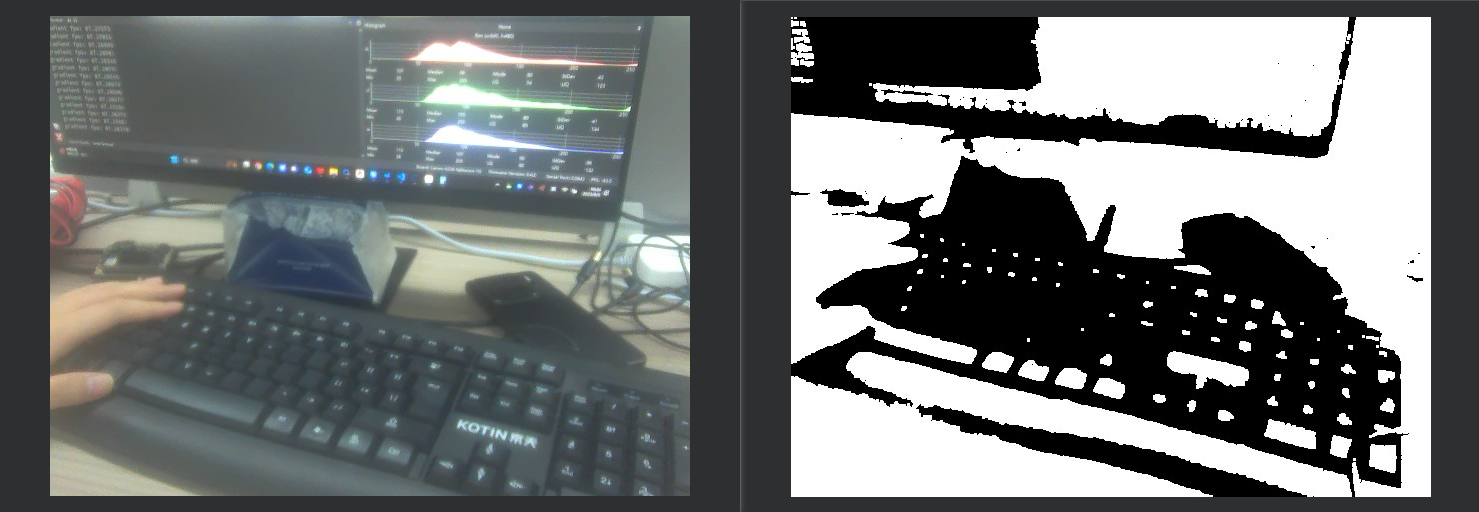
Principle explanation
What is image opening?
Image opening is a morphological image processing operation used to remove small white noise in an image and smooth the object boundaries while preserving the main foreground structure. The opening operation is achieved by first eroding the image and then dilating it. It is commonly used for binary images or grayscale images.
- Operation principle: The steps of the opening operation are erosion first and then dilation, that is,
Opening = Dilate(Erode(Image)). The erosion operation shrinks the white areas (foreground) and removes small, isolated white noise points. The subsequent dilation operation expands the remaining white areas, restoring the general shape of the primary object without recovering the eroded small noise points. This combined operation effectively removes noise while preserving the original object's structure. - Effect: The opening operation removes small white noise points (such as white dots) from an image, smooths object boundaries, and separates finely connected regions, while preserving larger foreground areas. In practical applications, the opening operation is often used for denoising and preprocessing, especially when separating objects or removing small noise points.
- Application Scenarios: The opening operation is very common in image preprocessing, for example, for removing small noise points in object detection, removing background noise in medical image processing, and separating contiguous characters in character recognition.
In the opening operation, the size of the convolution kernel and the number of iterations significantly affect the results: larger kernels and more iterations result in stronger denoising, but may lose some detail. Furthermore, the binarization threshold (if any) determines which pixels are considered foreground (white) or background (black).
Code Overview
Importing Modules
import time, os, gcfrom machine import Pinfrom media.sensor import * # Camera interfacefrom media.display import * # Display interfacefrom media.media import * # Media managerimport cv_lite # AI CV extension (open function)import ulab.numpy as np # NumPy-like ndarray for MicroPythonSetting the Image Size
xxxxxxxxxximage_shape = [480, 640] # Height x WidthDefine the image resolution to 480x640 (height x width). The camera and display modules will be initialized based on this size.
Initialize the camera (RGB888 format)
xxxxxxxxxxsensor = Sensor(width=1280, height=960)sensor.reset()sensor.set_framesize(width=image_shape[1], height=image_shape[0])sensor.set_pixformat(Sensor.RGB888) # Set pixel format to RGB888- Initialize the camera and set the resolution to 1280x960 (the frame rate is not specified, so the default value is used).
- Resize the output frame to 640x480 and set it to RGB888 format (a three-channel color image, suitable for morphological operations on color images).
Initialize the display module
xxxxxxxxxxDisplay.init(Display.ST7701, width=image_shape[1], height=image_shape[0], to_ide=True)Initialize the display module, using the ST7701 driver chip, with a resolution consistent with the image size. to_ide=True indicates that the image will be simultaneously transferred to the IDE for virtual display.
Initialize the media manager and start the camera
xxxxxxxxxxMediaManager.init()sensor.run()Initialize the media resource manager and start the camera to capture the image stream.
Set opening parameters
xxxxxxxxxxkernel_size = 3 # Kernel size (should be odd)iterations = 1 # Number of morphological passesthreshold_value = 100 # Binarization threshold (0 = Otsu)clock = time.clock() # Start FPS timerkernel_size: Kernel size, used for the opening operation (erosion followed by dilation). An odd value is recommended; larger values increase the denoising range.iterations: Number of opening iterations. A larger value increases the denoising and smoothing effects, but increases the computational effort.threshold_value: Binarization threshold, used before or after the opening operation. A value of 0 uses the Otsu thresholding algorithm.clock: used to calculate frame rate.
Image processing and opening operation
xwhile True: clock.tick() # Start timing / Start frame timing # Capture a frame / Capture a frame img = sensor.snapshot() img_np = img.to_numpy_ref() # Get RGB888 ndarray reference / Get RGB888 ndarray reference (HWC) # Apply opening (erode then dilate) / result_np = cv_lite.rgb888_open( result_np = cv_lite.rgb888_open( image_shape, img_np, kernel_size, iterations, threshold_value ) # Wrap processed grayscale image for display img_out = image.Image(image_shape[1], image_shape[0], image.GRAYSCALE, alloc=image.ALLOC_REF, data=result_np) # Display image Display.show_image(img_out) # Clean up memory and print FPS gc.collect() print("open fps:", clock.fps())- Image capture: Acquire an image frame using
sensor.snapshot()and convert it to a NumPy array reference usingto_numpy_ref(). - Opening operation: Call
cv_lite.rgb888_open()to perform the opening operation (internal erosion followed by dilation), returning the processed image NumPy array. - Image packaging and display: Package the processed result into a grayscale image object and display it on the screen or in an IDE virtual window.
- Memory management and frame rate output: Call
gc.collect()to clean up memory and print the current frame rate usingclock.fps().
Resource release
xxxxxxxxxxsensor.stop()Display.deinit()os.exitpoint(os.EXITPOINT_ENABLE_SLEEP)time.sleep_ms(100)MediaManager.deinit()Parameter adjustment instructions
kernel_size: Convolution kernel size. A larger value results in a larger denoising area, suitable for removing larger white noise or smoothing larger boundaries. It is recommended to use an odd number (such as 3, 5, 7) and start testing with 3 to balance denoising effect and detail preservation.iterations: Number of iterations. A larger value results in a stronger operation effect, but may cause over-smoothing and loss of details. It is recommended to start with 1 and gradually increase it according to the image characteristics.threshold_value: Binarization threshold. Higher values require brighter pixels to be considered foreground. A value of 0 uses Otsu's automatic thresholding. It is recommended to test from 50 to 150 based on the image brightness, or set to 0 for automatic adaptation.