yahboom
HomeLearn
Solution
Blog
Online Store
About Us
EN/中文
K230 Vision Module📖
1. Quick Start
  • 0.Get start
  • 1. K230 firmware download and burning
  • 2. Install the programming environment
  • 3. Debug and run routines
  • 4. Offline running routine
  • 5. Micropython Quick Start
  • 6. GUI Program Instructions
  • 7.K230 module bracket installation tutorial
  • 8.K230 module 2DOF PTZ installation tutorial
2. Basic Courses
  • 1.FPIOA pin assignment
  • 2.RGB lights
  • 3.Buzzer
  • 4.Buttons
  • 5.Serial communication
  • 6.I2C communication
  • 7.PWM
  • 8.WDT watchdog
  • 9.Timer
  • 10.Fourier Transform
  • 11.SHA256 encryption
  • 12.AES encryption
  • 13.Multithreading
  • 14.File reading and writing
  • 15.Image Display
  • 16.Touch Display
  • 17.Camera display
  • 18.Image Flip
  • 19.Camera
3. Draw the image
  • 1. Draw the lines
  • 2. Draw the circle
  • 3. Draw the rectangle
  • 4. Draw the ellipse
  • 5. Draw the arrow
  • 6. Draw the crosshairs
  • 7. Draw text
  • 8. Draw key points
4. Graphics detection
  • 1. Line segment detection
  • 2. Rectangle Detection
  • 3. Circle detection
  • 4. Object edge detection
  • 5. Line inspection basics:fast linear regression
5. Color recognition
  • 1. Color recognition
  • 2. Object Counting
  • 3. Multi-color recognition
  • 4. K230 Color Line Patrol
6.1 CV_lite Image Processing Special Topic
  • 1.Introduction to cv_litenew
  • 2.cv_lite API Reference Manualnew
  • 3.Color Block Recognition - Grayscale Imagenew
  • 4.Color Block Recognition - Color Imagenew
  • 5.Circle Recognition - Grayscale Imagenew
  • 6.Circle Recognition - Color Imagenew
  • 7.Corner Recognition - Grayscale Imagenew
  • 8.Corner Recognition - Color Imagenew
  • 9.Edge Recognition - Grayscale Imagenew
  • 10. Edge Recognition - Color Imagenew
  • 11. Rectangle Recognition - Grayscale Imagenew
  • 12.Rectangle Recognition - Color Imagenew
  • 13.Rectangle recognition combined with corner recognition - grayscale imagenew
  • 14.Rectangle recognition combined with corner recognition - color imagenew
  • 15.Image Binarization - Grayscalenew
  • 16.Image Binarization - Color Imagenew
  • 17.Exposure Adjustmentnew
  • 18.Image Black Hat Operationsnew
  • 19.Image Color Histogramnew
  • 20.Image Closingnew
  • 21.Image Expansionnew
  • 22.Image Corrosionnew
  • 23.Gaussian Blurnew
  • 24.Gradient Transformationnew
  • 25.Mean Fuzzynew
  • 26.Image Openingnew
  • 27.Image Top Hat Operationnew
  • 28.PnP rangingnew
  • 29.Find rectangles and measure distancesnew
  • 30.Image grayscale world white balancenew
6.2 OpenCV Image Processing Special Topicnew
  • 1. OpenCV Introduction
  • 2. OpenCV API Reference
  • 3. Image Basic Transforms
  • 4. Morphological Operations
  • 5. Color Segmentation and Shape Classification
  • 6. Corner and Centroid Detection
  • 7. Hough Circle Detection
  • 8. Hough Line Detection
  • 9. Contour Analysis
  • 10. Drawing Functions
  • 11. Template Matching
  • 12. Image Blur Filtering
  • 13. Edge Detection
  • 14. Thresholding
  • 15. Color Segmentation
  • 16. Histogram and Pixel Transformation
  • 17. Arithmetic and Bitwise Operations
  • 18. Channel Operation and Statistics
  • 19. Image File Read and Write
  • 20. Pixel Level Transformation
7. Code type recognition
  • 1.Barcode recognition
  • 2.QR code recognition
  • 3.AprilTag tag recognition
  • 4.DM code recognition
8. Face Recognition
  • 1.[Must-read] General code structure and prerequisite knowledge of AI vision routines
  • 2.Face Detection
  • 3.Facial key point recognition
  • 4.Face orientation detection
  • 5.Face 3D Network
  • 6.Gaze direction detection
  • 7.Register for face recognition
9. Human body characteristics
  • 1. Human body detection
  • 2. Human key point detection
  • 3. Human posture recognition
  • 4. Fall detection
  • 5. Palm detection
  • 6. Palm key point detection
  • 7. Palm key point classification
  • 8. Gesture Recognition
  • 9. Dynamic gesture recognition
  • 10. Rock, Paper, Scissors
10. Scenario Application
  • 1.OCR character detection
  • 2.OCR character recognition
  • 3.yolov8n target detection
  • 4.yolov8n segmentation
  • 5. Self-learning object recognition
  • 6. License plate detection
  • 7. License Plate Recognition
  • 8. Target Tracking
  • 9. Fruit classification
  • 10. Garbage classification
  • 11. Road sign recognition
11. Audio and video processing
  • 1. Audio Recording
  • 2. Play Audio
  • 3. Video Recording
  • 4. Play Video
  • 5. Keyword wake-up
12. Network Basics
  • 1. Wireless network connection
  • 2. AP hotspot mode
  • 3. TCP-Server Example
  • 4. TCP-Client Example
  • 5. UDP-Server Example
  • 6. UDP-Client Example
  • 7. HTTP-Server Example
  • 8. HTTP-Client Example
  • 9. MQTT Quick Start
  • 10. MQTT-Publisher
  • 11. MQTT-Subscriber
  • 12. RTSP real-time image transmission
  • 13. RTSP real-time image transmission combined with AIDemo
  • 14. Call OpenRouter large model aggregation service
  • 15. Open the Resource Monitoring Panel
13. LVGL Graphical Interface
  • 1. Introduction to LVGL
  • 2. Create a button
  • 3. Create a slider
  • 4. Create an Image
  • 5. Create a text box and keyboard
14. GUI Code Tutorial & Secondary Development
  • 01.GUI System Architecture
  • 02.Core Engine Initialization
  • 03.Application Discovery Mechanism in GUI
  • 04.Desktop Layout Algorithm
  • 05.Advanced UI Styling
  • 06.BaseApp Base Class Analysis
  • 07.Hello_World Practical
  • 08.GUI Application Lifecycle and Resource Management
15. Train your own model
  • 1. Local deployment of yolo training environment
  • 2. Use online platforms for training
16.Touch Course
  • 1.Touch point detectionnew
  • 2.Touch Paintingnew
  • 3.Touch to take a photonew
17. Multi-master communication (purchased separately)
ESP32-K230
  • 1.k230 color recognition
  • 2.k230 barcode recognition
  • 3.k230 QR code recognition
  • 4.k230Apriltag code recognition
  • 5.k230DM code recognition
  • 6.k230 face detection
  • 7.k230 gaze direction
  • 8.k230 face recognition
  • 9.k230 human body detection
  • 10.k230 fall detection
  • 11.k230 palm detection
  • 12.k230 gesture recognition
  • 13.k230OCR character recognition
  • 14.k230 object detection
  • 15.k230 target tracking
  • 16.k230 self-learning object recognition
  • 17.k230 license plate recognition
Jetson-K230
  • 1.k230 color recognition
  • 2.k230 barcode recognition
  • 3.k230 QR code recognition
  • 4.k230Apriltag code recognition
  • 5.k230DM code recognition
  • 6.k230 face detection
  • 7.k230 gaze direction
  • 8.k230 face recognition
  • 9.k230 human body detection
  • 10.k230 fall detection
  • 11.k230 palm detection
  • 12.k230 gesture recognition
  • 13.k230OCR character recognition
  • 14.k230 object detection
  • 15.k230 target tracking
  • 16.k230 self-learning object recognition
  • 17.k230 license plate recognition
MSPM0G3507-K230
  • 1.k230 color recognition
  • 2.k230 barcode recognition
  • 3.k230 QR code recognition
  • 4.k230Apriltag code recognition
  • 5.k230DM code recognition
  • 6.k230 face detection
  • 7.k230 gaze direction
  • 8.k230 face recognition
  • 9.k230 human body detection
  • 10.k230 fall detection
  • 11.k230 palm detection
  • 12.k230 gesture recognition
  • 13.k230OCR character recognition
  • 14.k230 object detection
  • 15.k230 target tracking
  • 16.k230 self-learning object recognition
  • 17.k230 license plate recognition
Pico-K230
  • 1.k230 color recognition
  • 2.k230 barcode recognition
  • 3.k230 QR code recognition
  • 4.k230Apriltag code recognition
  • 5.k230DM code recognition
  • 6.k230 face detection
  • 7.k230 gaze direction
  • 8.k230 face recognition
  • 9.k230 human body detection
  • 10.k230 fall detection
  • 11.k230 palm detection
  • 12.k230 gesture recognition
  • 13.k230OCR character recognition
  • 14.k230 object detection
  • 15.k230 target tracking
  • 16.k230 self-learning object recognition
  • 17.k230 license plate recognition
raspberrypi-K230
  • 1.k230 color recognition
  • 2.k230 barcode recognition
  • 3.k230 QR code recognition
  • 4.k230Apriltag code recognition
  • 5.k230DM code recognition
  • 6.k230 face detection
  • 7.k230 gaze direction
  • 8.k230 face recognition
  • 9.k230 human body detection
  • 10.k230 fall detection
  • 11.k230 palm detection
  • 12.k230 gesture recognition
  • 13.k230OCR character recognition
  • 14.k230 object detection
  • 15.k230 target tracking
  • 16.k230 self-learning object recognition
  • 17.k230 license plate recognition
RDK-K230
  • 1.k230 color recognition
  • 2.k230 barcode recognition
  • 3.k230 QR code recognition
  • 4.k230Apriltag code recognition
  • 5.k230DM code recognition
  • 6.k230 face detection
  • 7.k230 gaze direction
  • 8.k230 face recognition
  • 9.k230 human body detection
  • 10.k230 fall detection
  • 11.k230 palm detection
  • 12.k230 gesture recognition
  • 13.k230OCR character recognition
  • 14.k230 object detection
  • 15.k230 target tracking
  • 16.k230 self-learning object recognition
  • 17.k230 license plate recognition
STM32-K230
  • 1. stm32_k230 color recognition
  • 2. stm32_k230 barcode recognition
  • 3. stm32_k230 QR code recognition
  • 4. stm32_k230Apriltag code recognition
  • 5. stm32_k230DM code recognition
  • 6. stm32_k230 face detection
  • 7.stm32_k230 looking direction
  • 8. stm32_k230 face recognition
  • 9. stm32_k230 human body detection
  • 10. stm32_k230 fall detection
  • 11. stm32_k230 palm detection
  • 12. stm32_k230 gesture recognition
  • 13. stm32_k230OCR character recognition
  • 14. stm32_k230 object detection
  • 15. stm32_k230 target tracking
  • 16. stm32_k230 self-learning object recognition
  • 17.stm32_k230 license plate recognition
Arduino-K230
  • 1.arduino_k230 color recognition
  • 2.arduino_k230 barcode recognition
  • 3.arduino_k230 QR code recognition
  • 4.arduino_k230 Apriltag code recognition
  • 5.arduino_k230 DM code recognition
  • 6.arduino_k230 face detection
  • 7.arduino_k230 looking direction
  • 8.arduino_k230 face recognition
  • 9.arduino_k230 human body detection
  • 10.arduino_k230 fall detection
  • 11.arduino_k230 palm detection
  • 12.arduino_k230 gesture recognition
  • 13.arduino_k230 OCR character recognition
  • 14.arduino_k230 object detection
  • 15.arduino_k230 target tracking
  • 16.arduino_k230 self-learning object recognition
  • 17.arduino_k230 license plate recognition
Microbit-K230
  • 1.microbit_k230 color recognition
  • 2.microbit_k230 barcode recognition
  • 3.microbit_k230 QR code recognition
  • 4.microbit_k230 Apriltag code recognition
  • 5.microbit_k230 DM code recognition
  • 6.microbit_k230 face detection
  • 7.microbit_k230 looking direction
  • 8.microbit_k230 face recognition
  • 9.microbit_k230 human body detection
  • 10.microbit_k230 fall detection
  • 11.microbit_k230 palm detection
  • 12.microbit_k230 gesture recognition
  • 13.microbit_k230 OCR character recognition
  • 14.microbit_k230 object detection
  • 15.microbit_k230 target tracking
  • 16.microbit_k230 self-learning object recognition
  • 17.microbit_k230 license plate recognition
MSPM0G3519-K230
  • 1. K230 Color Recognitionnew
  • 2. K230 Barcode Recognitionnew
  • 3. K230 QR Code Recognitionnew
  • 4. K230 Apriltag Code Recognitionnew
  • 5. K230 DM Code Recognitionnew
  • 6. K230 Face Detectionnew
  • 7. K230 Gaze Directionnew
  • 8. K230 Face Recognitionnew
  • 9. K230 Human Body Detectionnew
  • 10. K230 Fall Detectionnew
  • 11. K230 Palm Detectionnew
  • 12. K230 Gesture Recognitionnew
  • 13. K230 OCR Character Recognitionnew
  • 14. K230 Object Detectionnew
  • 15. K230 Target Trackingnew
  • 16. K230 Self-learning Object Recognitionnew
  • 17. K230 License Plate Recognitionnew
18.Extension case (purchase separately)
For 2DOF Electric Platform
  • 1.Moving target control and automatic tracking system
  • 2.Human body recognition alarm
  • 3.Gesture Recognition
  • 4.Rock Paper Scissors
  • 5.Fruit sorting
  • 6.Color Tracking
  • 7.Face Tracking
MSPM0G3507 wheeled chassis V1/V2 combined with K230 application case
  • 1.Visual tracking
  • 2.Color tracking
  • 3.Color response
  • 4.Road sign recognition
  • 5.Machine code tracking
  • 6.QR code recognition action
  • 7.Autonomous avoid
  • 8.License plate tracking
  • 9.Face tracking
  • 10.Gaze direction tracking
  • 11.Palm tracking
  • 12.Target tracking
  • 13.Human body tracking
  • 14.OCR character recognition action
STM32 wheeled chassis V1/V2 combined with K230 application case
  • 1.Visual tracking
  • 2.Color tracking
  • 3.Color response
  • 4.Road sign recognition
  • 5.Machine code tracking
  • 6.QR code recognition action
  • 7.Autonomous avoid
  • 8.License plate tracking
  • 9.Face tracking
  • 10.Gaze direction tracking
  • 11.Palm tracking
  • 12.Target tracking
  • 13.Human body tracking
  • 14.OCR character recognition action
MSPM0G3519 wheeled chassis V1/V2 combined with K230 application case
  • 1.Visual trackingnew
  • 2.Color trackingnew
  • 3.Color responsenew
  • 4.Road sign recognitionnew
  • 5.Machine code trackingnew
  • 6.QR code recognition actionnew
  • 7.Autonomous avoidnew
  • 8.License plate trackingnew
  • 9.Face trackingnew
  • 10.Gaze direction trackingnew
  • 11.Palm trackingnew
  • 12.Target trackingnew
  • 13.Human body trackingnew
  • 14.OCR character recognition actionnew
19. Expansion case(purchase separately)new
  • 1.Motion target control and Auto track system
  • 2.Vehicle-mounted balance ball motion control system
Download
  • Manual
  • CanMV IDE
  • Software Tools
  • Firmware
  • Source Code
  • Appendix
Download ZIP

Welcome to K230 Vision Module repository

5. Create a text box and keyboard

Creating a text box and keyboard

Creating a text box and keyboardDetailed TutorialComplete code


Detailed Tutorial

In this section, we will learn how to create text boxes and numeric keyboards in lvgl.

The text box component is Textarea: Text area (lv_textarea) — LVGL documentation

The keyboard component is a Button matrix: Button matrix (lv_btnmatrix) — LVGL documentation

First, we copy the code of the lvgl basic structure and add touch-related code.

We first declare a function to create a text box create_textarea() and a function to create a small keyboard create_btnm()

The code is as follows:

xxxxxxxxxx
# 创建一个文本输入区域 Create a text input area
def create_textarea():
    # 在当前活动屏幕上创建文本输入框对象
    # Create a textarea object on the current active screen
    ta = lv.textarea(lv.scr_act())
    
    # 将文本框对齐到屏幕顶部中间位置,x偏移0,y偏移10像素
    # Align the textarea to the top-middle of screen with x offset 0 and y offset 10 pixels
    ta.align(lv.ALIGN.TOP_MID, 0, 20)
    
    # 设置文本框为单行模式
    # Set textarea to single line mode
    ta.set_one_line(True)
    
    return ta
​
# 创建一个按钮矩阵 Create a button matrix
def create_btnm(ta):
    # 定义按钮矩阵的布局映射,包含数字键和功能键
    # Define button matrix layout map including number keys and function keys
    btnm_map = [
        "Q", "W", "E", "R", "T", "Y", "U", "I", "O", "P", "\n",
        "A", "S", "D", "F", "G", "H", "J", "K", "L", "\n",
        "Shift", "Z", "X", "C", "V", "B", "N", "M", lv.SYMBOL.BACKSPACE, "\n",
        "alt", "Space", lv.SYMBOL.NEW_LINE, ""
    ]
    
    # 在当前活动屏幕上创建按钮矩阵对象
    # Create a button matrix object on the current active screen
    btnm = lv.btnmatrix(lv.scr_act())
    
    # 设置按钮矩阵的大小为200x150像素
    # Set the size of button matrix to 200x150 pixels
    btnm.set_size(640, 300)
    
    # 将按钮矩阵对齐到屏幕底部中间位置,x偏移0,y偏移-10像素
    # Align the button matrix to bottom-middle of screen with x offset 0 and y offset -10 pixels
    btnm.align(lv.ALIGN.BOTTOM_MID, 0, -10)
    
    # 添加按钮点击事件处理函数
    # Add event handler for button clicks
    btnm.add_event(lambda e: btnm_event_handler(e, ta), lv.EVENT.VALUE_CHANGED, None)
    
    # 清除点击焦点标志,以保持文本框始终获得焦点
    # Clear click focusable flag to keep textarea focused when buttons are clicked
    btnm.clear_flag(lv.obj.FLAG.CLICK_FOCUSABLE)
    
    # 设置按钮矩阵的布局映射
    # Set the layout map for button matrix
    btnm.set_map(btnm_map)

Because our keyboard events need to operate on the text box component, when we create the text box, we return the text box object as the return value, and then pass it as a parameter to the keyboard callback function.

Then implement the button callback function btnm_event_handler(), and then handle the button pressing event in the callback function

xxxxxxxxxx
def btnm_event_handler(e, ta):
    # 获取触发事件的按钮矩阵对象
    # Get the button matrix object that triggered the event
    obj = lv.btnmatrix.__cast__(e.get_target())
    
    # 获取被选中按钮的文本
    # Get the text of the selected button
    txt = obj.get_btn_text(obj.get_selected_btn())
​
    # 根据按钮文本执行相应操作
    # Execute corresponding action based on button text
    if txt == lv.SYMBOL.BACKSPACE:
        # 如果是退格键,删除一个字符
        # If backspace, delete one character
        ta.del_char()
    elif txt == lv.SYMBOL.NEW_LINE:
        # 如果是回车键,发送READY事件
        # If new line, send READY event
        lv.event_send(ta, lv.EVENT.READY, None)
    elif txt in ["Shift", "alt"]:
        # 如果是Shift或alt键,不做任何操作
        # If Shift or alt, do nothing
        return
    elif txt == "Space":
        # 如果是空格键,添加空格
        # If Space, add a space character
        ta.add_text(" ")
    else:
        # 其他情况,将按钮文本添加到文本区域
        # Otherwise, add the button text to text area
        ta.add_text(txt)

We click Run and we can see the following effect:
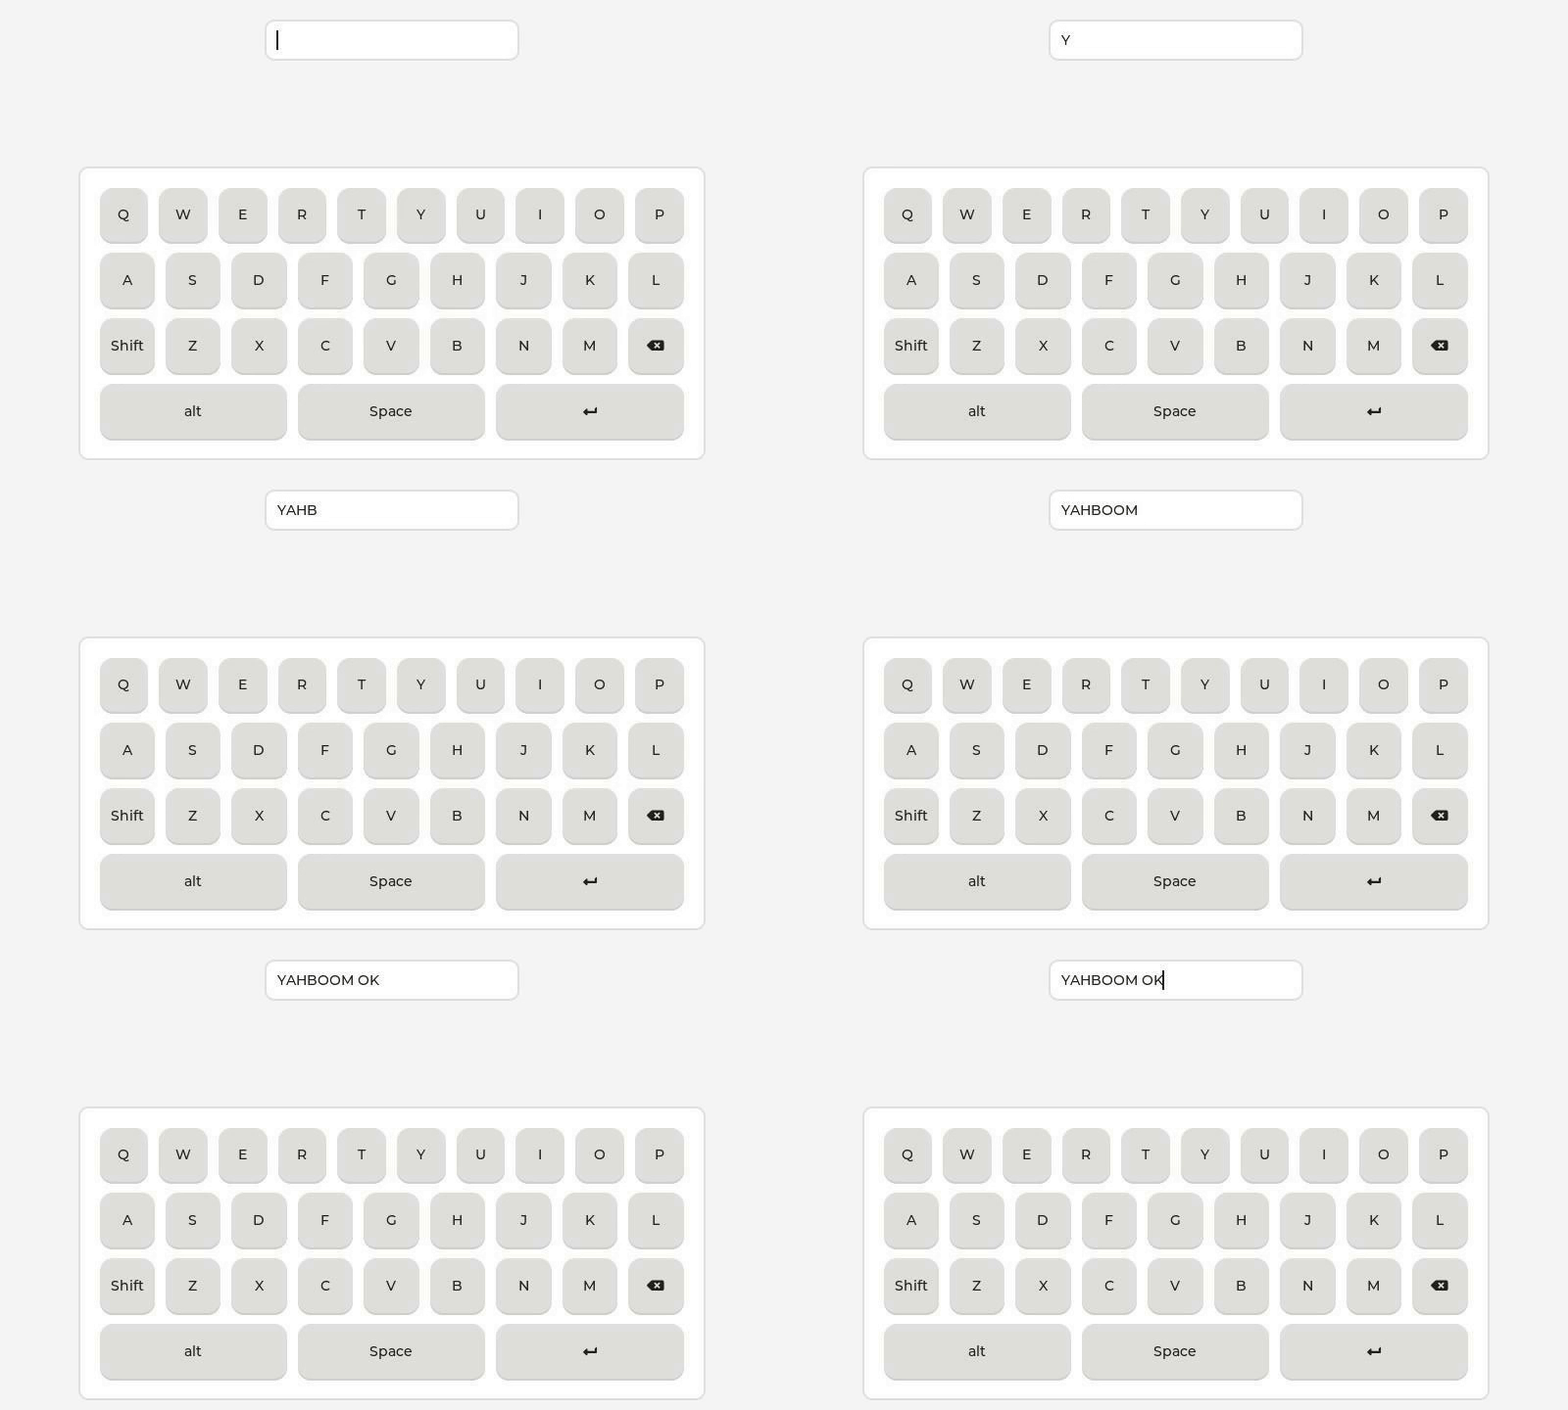
btnm

Complete code

For the complete code, please refer to [Source Code Summary / 12.Lvgl / 05.lvgl_text]

xxxxxxxxxx
import lvgl as lv
from media.display import *
import time  # 显式导入time模块 / Explicitly import time module
​
from machine import TOUCH
class touch_screen():
    def __init__(self):
        self.state = lv.INDEV_STATE.RELEASED
​
        self.indev_drv = lv.indev_create()
        self.indev_drv.set_type(lv.INDEV_TYPE.POINTER)
        self.indev_drv.set_read_cb(self.callback)
        self.touch = TOUCH(0)
​
    def callback(self, driver, data):
        x, y, state = 0, 0, lv.INDEV_STATE.RELEASED
        tp = self.touch.read(1)
        if len(tp):
            x, y, event = tp[0].x, tp[0].y, tp[0].event
            if event == 2 or event == 3:
                state = lv.INDEV_STATE.PRESSED
        data.point = lv.point_t({'x': x, 'y': y})
        data.state = state
​
​
# 显示屏分辨率配置 / Display resolution configuration
DISPLAY_WIDTH = 640   # 显示屏宽度 / Display width
DISPLAY_HEIGHT = 480  # 显示屏高度 / Display height
​
def disp_drv_flush_cb(disp_drv, area, color):
    """
    显示驱动刷新回调函数
    Display driver flush callback function
​
    Args:
        disp_drv: 显示驱动对象 / Display driver object
        area: 刷新区域 / Refresh area
        color: 颜色数据 / Color data
    """
    global disp_img1
    Display.show_image(disp_img1)  # 显示图像缓冲区 / Show image buffer
    time.sleep(0.01)  # 适当延时确保显示稳定 / Small delay to ensure stable display
    disp_drv.flush_ready()  # 通知LVGL刷新完成 / Notify LVGL that flush is complete
​
def display_init():
    """
    显示设备初始化函数
    Display device initialization function
    """
    # 初始化ST7701显示屏 / Initialize ST7701 display
    Display.init(
        Display.ST7701,
        width=DISPLAY_WIDTH,
        height=DISPLAY_HEIGHT,
        to_ide=True  # 启用IDE显示功能 / Enable IDE display function
    )
​
    # 初始化媒体管理器 / Initialize media manager
    MediaManager.init()
​
def lvgl_init():
    """
    LVGL初始化函数
    LVGL initialization function
    """
    global disp_img1
​
    # 初始化LVGL库 / Initialize LVGL library
    lv.init()
​
    # 创建显示缓冲区 / Create display buffer
    disp_img1 = image.Image(
        DISPLAY_WIDTH,
        DISPLAY_HEIGHT,
        image.BGRA8888  # 使用BGRA8888颜色格式 / Use BGRA8888 color format
    )
​
    # 创建显示驱动 / Create display driver
    disp_drv = lv.disp_create(DISPLAY_WIDTH, DISPLAY_HEIGHT)
​
    # 设置显示缓冲区 / Set display buffers
    disp_drv.set_draw_buffers(
        disp_img1.bytearray(),
        None,  # 单缓冲模式 / Single buffer mode
        disp_img1.size(),
        lv.DISP_RENDER_MODE.DIRECT  # 直接渲染模式 / Direct rendering mode
    )
​
​
    # 设置刷新回调函数 / Set flush callback
    disp_drv.set_flush_cb(disp_drv_flush_cb)
    tp = touch_screen()
​
​
def display_deinit():
    os.exitpoint(os.EXITPOINT_ENABLE_SLEEP)
    time.sleep_ms(50)
    # deinit display
    Display.deinit()
    # release media buffer
    MediaManager.deinit()
​
​
def btnm_event_handler(e, ta):
    # 获取触发事件的按钮矩阵对象
    # Get the button matrix object that triggered the event
    obj = lv.btnmatrix.__cast__(e.get_target())
​
    # 获取被选中按钮的文本
    # Get the text of the selected button
    txt = obj.get_btn_text(obj.get_selected_btn())
​
    # 根据按钮文本执行相应操作
    # Execute corresponding action based on button text
    if txt == lv.SYMBOL.BACKSPACE:
        # 如果是退格键,删除一个字符
        # If backspace, delete one character
        ta.del_char()
    elif txt == lv.SYMBOL.NEW_LINE:
        # 如果是回车键,发送READY事件
        # If new line, send READY event
        pass
    elif txt in ["Shift", "alt"]:
        # 如果是Shift或alt键,不做任何操作
        # If Shift or alt, do nothing
        return
    elif txt == "Space":
        # 如果是空格键,添加空格
        # If Space, add a space character
        ta.add_text(" ")
    else:
        # 其他情况,将按钮文本添加到文本区域
        # Otherwise, add the button text to text area
        ta.add_text(txt)
​
def lvgl_deinit():
    global disp_img1
    lv.deinit()
    del disp_img1
​
# 创建一个文本输入区域 Create a text input area
def create_textarea():
    # 在当前活动屏幕上创建文本输入框对象
    # Create a textarea object on the current active screen
    ta = lv.textarea(lv.scr_act())
​
    # 将文本框对齐到屏幕顶部中间位置,x偏移0,y偏移10像素
    # Align the textarea to the top-middle of screen with x offset 0 and y offset 10 pixels
    ta.align(lv.ALIGN.TOP_MID, 0, 20)
​
    # 设置文本框为单行模式
    # Set textarea to single line mode
    ta.set_one_line(True)
​
    return ta
​
# 创建一个按钮矩阵 Create a button matrix
def create_btnm(ta):
    # 定义按钮矩阵的布局映射,包含数字键和功能键
    # Define button matrix layout map including number keys and function keys
    btnm_map = [
        "Q", "W", "E", "R", "T", "Y", "U", "I", "O", "P", "\n",
        "A", "S", "D", "F", "G", "H", "J", "K", "L", "\n",
        "Shift", "Z", "X", "C", "V", "B", "N", "M", lv.SYMBOL.BACKSPACE, "\n",
        "alt", "Space", lv.SYMBOL.NEW_LINE, ""
    ]
​
    # 在当前活动屏幕上创建按钮矩阵对象
    # Create a button matrix object on the current active screen
    btnm = lv.btnmatrix(lv.scr_act())
​
    # 设置按钮矩阵的大小为200x150像素
    # Set the size of button matrix to 200x150 pixels
    btnm.set_size(640, 300)
​
    # 将按钮矩阵对齐到屏幕底部中间位置,x偏移0,y偏移-10像素
    # Align the button matrix to bottom-middle of screen with x offset 0 and y offset -10 pixels
    btnm.align(lv.ALIGN.BOTTOM_MID, 0, -10)
​
    # 添加按钮点击事件处理函数
    # Add event handler for button clicks
    btnm.add_event(lambda e: btnm_event_handler(e, ta), lv.EVENT.VALUE_CHANGED, None)
​
    # 清除点击焦点标志,以保持文本框始终获得焦点
    # Clear click focusable flag to keep textarea focused when buttons are clicked
    btnm.clear_flag(lv.obj.FLAG.CLICK_FOCUSABLE)
​
    # 设置按钮矩阵的布局映射
    # Set the layout map for button matrix
    btnm.set_map(btnm_map)
​
​
def main():
    """
    主函数
    Main function
    """
    try:
        # 初始化显示设备和LVGL / Initialize display device and LVGL
        display_init()
        lvgl_init()
        ta = create_textarea()
        create_btnm(ta)
        print("LVGL initialization completed")
​
        # LVGL主循环 / LVGL main loop
        while True:
            # 运行LVGL定时器处理程序 / Run LVGL timer handler
            period = lv.timer_handler_run_in_period(1)
            ta.add_state(lv.STATE.FOCUSED)
            time.sleep_ms(period)
​
    except Exception as e:
        display_deinit()
        lvgl_deinit()
        print(f"Error occurred: {e}")
​
if __name__ == "__main__":
    main()
Create an Image
GUI System Architecture

COMPANY

  • About us
  • Team Style
  • Blog

LEARNING & EXPLORATION

  • Tutorials
  • Edge AI hardware
  • Educational robots
  • Embedded intelligent hardware

WHERE TO BUY

  • Yahboom Online Store
  • Amazon
  • Alibaba
  • AliExpress
  • Mercado

TECHNOLOGY SUPPORT

  • Email: support@yahboom.com

BE A DISTRIBUTOR

  • Email: sales@yahboom.com
QR Code
QR Code

Copyright © 2017-2026 Yahboom. All Rights Reserved.

EN/中文