yahboom
HomeLearn
Solution
Blog
Online Store
About Us
EN/中文
K230 Vision Module📖
1. Quick Start
  • 0.Get start
  • 1. K230 firmware download and burning
  • 2. Install the programming environment
  • 3. Debug and run routines
  • 4. Offline running routine
  • 5. Micropython Quick Start
  • 6. GUI Program Instructions
  • 7.K230 module bracket installation tutorial
  • 8.K230 module 2DOF PTZ installation tutorial
2. Basic Courses
  • 1.FPIOA pin assignment
  • 2.RGB lights
  • 3.Buzzer
  • 4.Buttons
  • 5.Serial communication
  • 6.I2C communication
  • 7.PWM
  • 8.WDT watchdog
  • 9.Timer
  • 10.Fourier Transform
  • 11.SHA256 encryption
  • 12.AES encryption
  • 13.Multithreading
  • 14.File reading and writing
  • 15.Image Display
  • 16.Touch Display
  • 17.Camera display
  • 18.Image Flip
  • 19.Camera
3. Draw the image
  • 1. Draw the lines
  • 2. Draw the circle
  • 3. Draw the rectangle
  • 4. Draw the ellipse
  • 5. Draw the arrow
  • 6. Draw the crosshairs
  • 7. Draw text
  • 8. Draw key points
4. Graphics detection
  • 1. Line segment detection
  • 2. Rectangle Detection
  • 3. Circle detection
  • 4. Object edge detection
  • 5. Line inspection basics:fast linear regression
5. Color recognition
  • 1. Color recognition
  • 2. Object Counting
  • 3. Multi-color recognition
  • 4. K230 Color Line Patrol
6.1 CV_lite Image Processing Special Topic
  • 1.Introduction to cv_litenew
  • 2.cv_lite API Reference Manualnew
  • 3.Color Block Recognition - Grayscale Imagenew
  • 4.Color Block Recognition - Color Imagenew
  • 5.Circle Recognition - Grayscale Imagenew
  • 6.Circle Recognition - Color Imagenew
  • 7.Corner Recognition - Grayscale Imagenew
  • 8.Corner Recognition - Color Imagenew
  • 9.Edge Recognition - Grayscale Imagenew
  • 10. Edge Recognition - Color Imagenew
  • 11. Rectangle Recognition - Grayscale Imagenew
  • 12.Rectangle Recognition - Color Imagenew
  • 13.Rectangle recognition combined with corner recognition - grayscale imagenew
  • 14.Rectangle recognition combined with corner recognition - color imagenew
  • 15.Image Binarization - Grayscalenew
  • 16.Image Binarization - Color Imagenew
  • 17.Exposure Adjustmentnew
  • 18.Image Black Hat Operationsnew
  • 19.Image Color Histogramnew
  • 20.Image Closingnew
  • 21.Image Expansionnew
  • 22.Image Corrosionnew
  • 23.Gaussian Blurnew
  • 24.Gradient Transformationnew
  • 25.Mean Fuzzynew
  • 26.Image Openingnew
  • 27.Image Top Hat Operationnew
  • 28.PnP rangingnew
  • 29.Find rectangles and measure distancesnew
  • 30.Image grayscale world white balancenew
6.2 OpenCV Image Processing Special Topicnew
  • 1. OpenCV Introduction
  • 2. OpenCV API Reference
  • 3. Image Basic Transforms
  • 4. Morphological Operations
  • 5. Color Segmentation and Shape Classification
  • 6. Corner and Centroid Detection
  • 7. Hough Circle Detection
  • 8. Hough Line Detection
  • 9. Contour Analysis
  • 10. Drawing Functions
  • 11. Template Matching
  • 12. Image Blur Filtering
  • 13. Edge Detection
  • 14. Thresholding
  • 15. Color Segmentation
  • 16. Histogram and Pixel Transformation
  • 17. Arithmetic and Bitwise Operations
  • 18. Channel Operation and Statistics
  • 19. Image File Read and Write
  • 20. Pixel Level Transformation
7. Code type recognition
  • 1.Barcode recognition
  • 2.QR code recognition
  • 3.AprilTag tag recognition
  • 4.DM code recognition
8. Face Recognition
  • 1.[Must-read] General code structure and prerequisite knowledge of AI vision routines
  • 2.Face Detection
  • 3.Facial key point recognition
  • 4.Face orientation detection
  • 5.Face 3D Network
  • 6.Gaze direction detection
  • 7.Register for face recognition
9. Human body characteristics
  • 1. Human body detection
  • 2. Human key point detection
  • 3. Human posture recognition
  • 4. Fall detection
  • 5. Palm detection
  • 6. Palm key point detection
  • 7. Palm key point classification
  • 8. Gesture Recognition
  • 9. Dynamic gesture recognition
  • 10. Rock, Paper, Scissors
10. Scenario Application
  • 1.OCR character detection
  • 2.OCR character recognition
  • 3.yolov8n target detection
  • 4.yolov8n segmentation
  • 5. Self-learning object recognition
  • 6. License plate detection
  • 7. License Plate Recognition
  • 8. Target Tracking
  • 9. Fruit classification
  • 10. Garbage classification
  • 11. Road sign recognition
11. Audio and video processing
  • 1. Audio Recording
  • 2. Play Audio
  • 3. Video Recording
  • 4. Play Video
  • 5. Keyword wake-up
12. Network Basics
  • 1. Wireless network connection
  • 2. AP hotspot mode
  • 3. TCP-Server Example
  • 4. TCP-Client Example
  • 5. UDP-Server Example
  • 6. UDP-Client Example
  • 7. HTTP-Server Example
  • 8. HTTP-Client Example
  • 9. MQTT Quick Start
  • 10. MQTT-Publisher
  • 11. MQTT-Subscriber
  • 12. RTSP real-time image transmission
  • 13. RTSP real-time image transmission combined with AIDemo
  • 14. Call OpenRouter large model aggregation service
  • 15. Open the Resource Monitoring Panel
13. LVGL Graphical Interface
  • 1. Introduction to LVGL
  • 2. Create a button
  • 3. Create a slider
  • 4. Create an Image
  • 5. Create a text box and keyboard
14. GUI Code Tutorial & Secondary Development
  • 01.GUI System Architecture
  • 02.Core Engine Initialization
  • 03.Application Discovery Mechanism in GUI
  • 04.Desktop Layout Algorithm
  • 05.Advanced UI Styling
  • 06.BaseApp Base Class Analysis
  • 07.Hello_World Practical
  • 08.GUI Application Lifecycle and Resource Management
15. Train your own model
  • 1. Local deployment of yolo training environment
  • 2. Use online platforms for training
16.Touch Course
  • 1.Touch point detectionnew
  • 2.Touch Paintingnew
  • 3.Touch to take a photonew
17. Multi-master communication (purchased separately)
ESP32-K230
  • 1.k230 color recognition
  • 2.k230 barcode recognition
  • 3.k230 QR code recognition
  • 4.k230Apriltag code recognition
  • 5.k230DM code recognition
  • 6.k230 face detection
  • 7.k230 gaze direction
  • 8.k230 face recognition
  • 9.k230 human body detection
  • 10.k230 fall detection
  • 11.k230 palm detection
  • 12.k230 gesture recognition
  • 13.k230OCR character recognition
  • 14.k230 object detection
  • 15.k230 target tracking
  • 16.k230 self-learning object recognition
  • 17.k230 license plate recognition
Jetson-K230
  • 1.k230 color recognition
  • 2.k230 barcode recognition
  • 3.k230 QR code recognition
  • 4.k230Apriltag code recognition
  • 5.k230DM code recognition
  • 6.k230 face detection
  • 7.k230 gaze direction
  • 8.k230 face recognition
  • 9.k230 human body detection
  • 10.k230 fall detection
  • 11.k230 palm detection
  • 12.k230 gesture recognition
  • 13.k230OCR character recognition
  • 14.k230 object detection
  • 15.k230 target tracking
  • 16.k230 self-learning object recognition
  • 17.k230 license plate recognition
MSPM0G3507-K230
  • 1.k230 color recognition
  • 2.k230 barcode recognition
  • 3.k230 QR code recognition
  • 4.k230Apriltag code recognition
  • 5.k230DM code recognition
  • 6.k230 face detection
  • 7.k230 gaze direction
  • 8.k230 face recognition
  • 9.k230 human body detection
  • 10.k230 fall detection
  • 11.k230 palm detection
  • 12.k230 gesture recognition
  • 13.k230OCR character recognition
  • 14.k230 object detection
  • 15.k230 target tracking
  • 16.k230 self-learning object recognition
  • 17.k230 license plate recognition
Pico-K230
  • 1.k230 color recognition
  • 2.k230 barcode recognition
  • 3.k230 QR code recognition
  • 4.k230Apriltag code recognition
  • 5.k230DM code recognition
  • 6.k230 face detection
  • 7.k230 gaze direction
  • 8.k230 face recognition
  • 9.k230 human body detection
  • 10.k230 fall detection
  • 11.k230 palm detection
  • 12.k230 gesture recognition
  • 13.k230OCR character recognition
  • 14.k230 object detection
  • 15.k230 target tracking
  • 16.k230 self-learning object recognition
  • 17.k230 license plate recognition
raspberrypi-K230
  • 1.k230 color recognition
  • 2.k230 barcode recognition
  • 3.k230 QR code recognition
  • 4.k230Apriltag code recognition
  • 5.k230DM code recognition
  • 6.k230 face detection
  • 7.k230 gaze direction
  • 8.k230 face recognition
  • 9.k230 human body detection
  • 10.k230 fall detection
  • 11.k230 palm detection
  • 12.k230 gesture recognition
  • 13.k230OCR character recognition
  • 14.k230 object detection
  • 15.k230 target tracking
  • 16.k230 self-learning object recognition
  • 17.k230 license plate recognition
RDK-K230
  • 1.k230 color recognition
  • 2.k230 barcode recognition
  • 3.k230 QR code recognition
  • 4.k230Apriltag code recognition
  • 5.k230DM code recognition
  • 6.k230 face detection
  • 7.k230 gaze direction
  • 8.k230 face recognition
  • 9.k230 human body detection
  • 10.k230 fall detection
  • 11.k230 palm detection
  • 12.k230 gesture recognition
  • 13.k230OCR character recognition
  • 14.k230 object detection
  • 15.k230 target tracking
  • 16.k230 self-learning object recognition
  • 17.k230 license plate recognition
STM32-K230
  • 1. stm32_k230 color recognition
  • 2. stm32_k230 barcode recognition
  • 3. stm32_k230 QR code recognition
  • 4. stm32_k230Apriltag code recognition
  • 5. stm32_k230DM code recognition
  • 6. stm32_k230 face detection
  • 7.stm32_k230 looking direction
  • 8. stm32_k230 face recognition
  • 9. stm32_k230 human body detection
  • 10. stm32_k230 fall detection
  • 11. stm32_k230 palm detection
  • 12. stm32_k230 gesture recognition
  • 13. stm32_k230OCR character recognition
  • 14. stm32_k230 object detection
  • 15. stm32_k230 target tracking
  • 16. stm32_k230 self-learning object recognition
  • 17.stm32_k230 license plate recognition
Arduino-K230
  • 1.arduino_k230 color recognition
  • 2.arduino_k230 barcode recognition
  • 3.arduino_k230 QR code recognition
  • 4.arduino_k230 Apriltag code recognition
  • 5.arduino_k230 DM code recognition
  • 6.arduino_k230 face detection
  • 7.arduino_k230 looking direction
  • 8.arduino_k230 face recognition
  • 9.arduino_k230 human body detection
  • 10.arduino_k230 fall detection
  • 11.arduino_k230 palm detection
  • 12.arduino_k230 gesture recognition
  • 13.arduino_k230 OCR character recognition
  • 14.arduino_k230 object detection
  • 15.arduino_k230 target tracking
  • 16.arduino_k230 self-learning object recognition
  • 17.arduino_k230 license plate recognition
Microbit-K230
  • 1.microbit_k230 color recognition
  • 2.microbit_k230 barcode recognition
  • 3.microbit_k230 QR code recognition
  • 4.microbit_k230 Apriltag code recognition
  • 5.microbit_k230 DM code recognition
  • 6.microbit_k230 face detection
  • 7.microbit_k230 looking direction
  • 8.microbit_k230 face recognition
  • 9.microbit_k230 human body detection
  • 10.microbit_k230 fall detection
  • 11.microbit_k230 palm detection
  • 12.microbit_k230 gesture recognition
  • 13.microbit_k230 OCR character recognition
  • 14.microbit_k230 object detection
  • 15.microbit_k230 target tracking
  • 16.microbit_k230 self-learning object recognition
  • 17.microbit_k230 license plate recognition
MSPM0G3519-K230
  • 1. K230 Color Recognitionnew
  • 2. K230 Barcode Recognitionnew
  • 3. K230 QR Code Recognitionnew
  • 4. K230 Apriltag Code Recognitionnew
  • 5. K230 DM Code Recognitionnew
  • 6. K230 Face Detectionnew
  • 7. K230 Gaze Directionnew
  • 8. K230 Face Recognitionnew
  • 9. K230 Human Body Detectionnew
  • 10. K230 Fall Detectionnew
  • 11. K230 Palm Detectionnew
  • 12. K230 Gesture Recognitionnew
  • 13. K230 OCR Character Recognitionnew
  • 14. K230 Object Detectionnew
  • 15. K230 Target Trackingnew
  • 16. K230 Self-learning Object Recognitionnew
  • 17. K230 License Plate Recognitionnew
18.Extension case (purchase separately)
For 2DOF Electric Platform
  • 1.Moving target control and automatic tracking system
  • 2.Human body recognition alarm
  • 3.Gesture Recognition
  • 4.Rock Paper Scissors
  • 5.Fruit sorting
  • 6.Color Tracking
  • 7.Face Tracking
MSPM0G3507 wheeled chassis V1/V2 combined with K230 application case
  • 1.Visual tracking
  • 2.Color tracking
  • 3.Color response
  • 4.Road sign recognition
  • 5.Machine code tracking
  • 6.QR code recognition action
  • 7.Autonomous avoid
  • 8.License plate tracking
  • 9.Face tracking
  • 10.Gaze direction tracking
  • 11.Palm tracking
  • 12.Target tracking
  • 13.Human body tracking
  • 14.OCR character recognition action
STM32 wheeled chassis V1/V2 combined with K230 application case
  • 1.Visual tracking
  • 2.Color tracking
  • 3.Color response
  • 4.Road sign recognition
  • 5.Machine code tracking
  • 6.QR code recognition action
  • 7.Autonomous avoid
  • 8.License plate tracking
  • 9.Face tracking
  • 10.Gaze direction tracking
  • 11.Palm tracking
  • 12.Target tracking
  • 13.Human body tracking
  • 14.OCR character recognition action
MSPM0G3519 wheeled chassis V1/V2 combined with K230 application case
  • 1.Visual trackingnew
  • 2.Color trackingnew
  • 3.Color responsenew
  • 4.Road sign recognitionnew
  • 5.Machine code trackingnew
  • 6.QR code recognition actionnew
  • 7.Autonomous avoidnew
  • 8.License plate trackingnew
  • 9.Face trackingnew
  • 10.Gaze direction trackingnew
  • 11.Palm trackingnew
  • 12.Target trackingnew
  • 13.Human body trackingnew
  • 14.OCR character recognition actionnew
19. Expansion case(purchase separately)new
  • 1.Motion target control and Auto track system
  • 2.Vehicle-mounted balance ball motion control system
Download
  • Manual
  • CanMV IDE
  • Software Tools
  • Firmware
  • Source Code
  • Appendix
Download ZIP

Welcome to K230 Vision Module repository

2.Face Detection

Face Detection

Face DetectionRoutine Experiment EffectCode ExplanationCode structureImport related dependency classesCustom face detection classPerforming face detectionA brief introduction to face detection algorithmsCommon application scenariosAlgorithm Overview


Routine Experiment Effect

In this section, we will learn how to use K230 to implement face detection.

The code in this section is in [Source code/07.Face/01.face_detection.py]

After connecting to the IDE, run the example code in this section and aim the K230 at the face. You can see that the positions of all faces are framed in the middle of the screen.
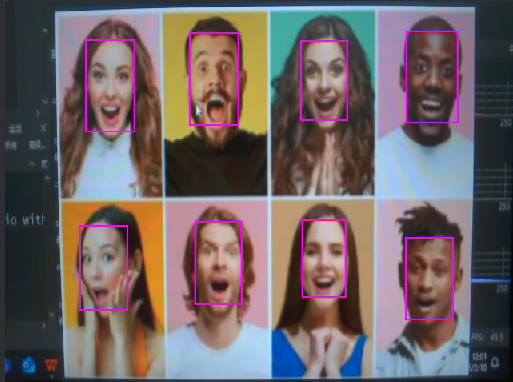
image-20250210120145878

Serial port output function has been added

After detecting a face, the following serial output will be sent

$x,y,w,h#

The '$' represents the beginning of the data, and the '#' represents the end of the data.

x, y, w, h are the positions of the face detection frame (resolution is 640*480)

Code Explanation

Code structure

Import related dependency classes

xxxxxxxxxx
from libs.PipeLine import PipeLine, ScopedTiming
# Pipeline是集成了摄像头、LCD屏幕显示等多媒体功能的模块,大大简化了调用摄像头和显示相关的操作
# Pipeline is a module that integrates multimedia functions like camera and LCD display, greatly simplifying camera and display operations
​
# ScopedTiming是一个代码执行计时器,使用方法可以参考例程代码
# ScopedTiming is a code execution timer, refer to example code for usage
​
from libs.AIBase import AIBase
from libs.AI2D import Ai2d
# AIBase和AI2D用来处理AI底层的逻辑
# AIBase is the base class for all AI functionality implementations
# AI2D用于处理图像
# AI2D is used for image processing
​
import os
import ujson
# os和ujson分别提供系统相关操作和JSON数据相关操作,不是每个例程都能用上
# os and ujson provide system operations and JSON data operations respectively, not required for every example
​
from media.media import *
from time import *
import nncase_runtime as nn
# nncase是K230进行AI推理的核心模块,提供了便捷的方法供用户调用K230的KPU
# nncase is the core module for AI inference on K230, providing convenient methods for users to call K230's KPU
​
import ulab.numpy as np
# ulab.numpy是从python的numpy中移植而来,用于进行一些AI运算中必要的矩阵操作
# ulab.numpy is ported from Python's numpy, used for necessary matrix operations in AI computations
​
import time
import utime
import image
import random
import gc
import sys
import aidemo
# aidemo也是核心模块之一,K230固件中预制了非常多的AI玩法
# aidemo is another core module, K230 firmware includes many pre-configured AI applications
# 通过aidemo模块可以快速简单的调用这些玩法中的复杂方法
# Complex methods in these applications can be easily called through the aidemo module
​
import _thread
# _thread是线程模块,前面章节中我们有做过详细讲解,这里就不再赘述
# _thread is the threading module, as detailed in previous chapters, no need to elaborate further

Custom face detection class

xxxxxxxxxx
# 自定义人脸检测类,继承自AIBase基类
class FaceDetectionApp(AIBase):
    def __init__(self, kmodel_path, model_input_size, anchors, confidence_threshold=0.5, nms_threshold=0.2, rgb888p_size=[224,224], display_size=[1920,1080], debug_mode=0):
        # 调用基类的构造函数 / Call parent class constructor
        super().__init__(kmodel_path, model_input_size, rgb888p_size, debug_mode)
        
        # 模型文件路径 / Path to the model file
        self.kmodel_path = kmodel_path
        
        # 模型输入分辨率 / Model input resolution
        self.model_input_size = model_input_size
        
        # 置信度阈值:检测结果的最小置信度要求 / Confidence threshold: minimum confidence requirement for detection results
        self.confidence_threshold = confidence_threshold
        
        # NMS阈值:非极大值抑制的阈值 / NMS threshold: threshold for Non-Maximum Suppression
        self.nms_threshold = nms_threshold
        
        # 锚点数据:用于目标检测的预定义框 / Anchor data: predefined boxes for object detection
        self.anchors = anchors
        
        # sensor给到AI的图像分辨率,宽度16对齐 / Image resolution from sensor to AI, width aligned to 16
        self.rgb888p_size = [ALIGN_UP(rgb888p_size[0], 16), rgb888p_size[1]]
        
        # 显示分辨率,宽度16对齐 / Display resolution, width aligned to 16
        self.display_size = [ALIGN_UP(display_size[0], 16), display_size[1]]
        
        # 调试模式标志 / Debug mode flag
        self.debug_mode = debug_mode
        
        # 实例化AI2D对象用于图像预处理 / Initialize AI2D object for image preprocessing
        self.ai2d = Ai2d(debug_mode)
        
        # 设置AI2D的输入输出格式 / Set AI2D input/output format
        self.ai2d.set_ai2d_dtype(nn.ai2d_format.NCHW_FMT, nn.ai2d_format.NCHW_FMT, np.uint8, np.uint8)
​
    def config_preprocess(self, input_image_size=None):
        with ScopedTiming("set preprocess config", self.debug_mode > 0):
            # 获取AI2D输入尺寸 / Get AI2D input size
            ai2d_input_size = input_image_size if input_image_size else self.rgb888p_size
            
            # 获取padding参数 / Get padding parameters
            top, bottom, left, right = self.get_padding_param()
            
            # 设置padding: [上,下,左,右], 填充值[104,117,123] / Set padding: [top,bottom,left,right], padding value[104,117,123]
            self.ai2d.pad([0, 0, 0, 0, top, bottom, left, right], 0, [104, 117, 123])
            
            # 设置resize方法:双线性插值 / Set resize method: bilinear interpolation
            self.ai2d.resize(nn.interp_method.tf_bilinear, nn.interp_mode.half_pixel)
            
            # 构建预处理流程 / Build preprocessing pipeline
            self.ai2d.build([1,3,ai2d_input_size[1],ai2d_input_size[0]],
                          [1,3,self.model_input_size[1],self.model_input_size[0]])
​
    def postprocess(self, results):
        with ScopedTiming("postprocess", self.debug_mode > 0):
            # 调用aidemo库进行人脸检测后处理 / Call aidemo library for face detection post-processing
            post_ret = aidemo.face_det_post_process(self.confidence_threshold, 
                                                  self.nms_threshold,
                                                  self.model_input_size[1], 
                                                  self.anchors,
                                                  self.rgb888p_size,
                                                  results)
            return post_ret[0] if post_ret else post_ret
​
    def draw_result(self, pl, dets):
        with ScopedTiming("display_draw", self.debug_mode > 0):
            if dets:
                # 清除上一帧的OSD绘制 / Clear previous frame's OSD drawing
                pl.osd_img.clear()
                
                for det in dets:
                    # 转换检测框坐标到显示分辨率 / Convert detection box coordinates to display resolution
                    x, y, w, h = map(lambda x: int(round(x, 0)), det[:4])
                    x = x * self.display_size[0] // self.rgb888p_size[0]
                    y = y * self.display_size[1] // self.rgb888p_size[1]
                    w = w * self.display_size[0] // self.rgb888p_size[0]
                    h = h * self.display_size[1] // self.rgb888p_size[1]
                    
                    # 绘制黄色检测框 / Draw yellow detection box
                    pl.osd_img.draw_rectangle(x, y, w, h, color=(255, 255, 0, 255), thickness=2)
            else:
                pl.osd_img.clear()
​
    def get_padding_param(self):
        # 计算模型输入和实际图像的缩放比例 / Calculate scaling ratio between model input and actual image
        dst_w = self.model_input_size[0]
        dst_h = self.model_input_size[1]
        ratio_w = dst_w / self.rgb888p_size[0]
        ratio_h = dst_h / self.rgb888p_size[1]
        ratio = min(ratio_w, ratio_h)
        
        # 计算缩放后的新尺寸 / Calculate new dimensions after scaling
        new_w = int(ratio * self.rgb888p_size[0])
        new_h = int(ratio * self.rgb888p_size[1])
        
        # 计算padding值 / Calculate padding values
        dw = (dst_w - new_w) / 2
        dh = (dst_h - new_h) / 2
        
        # 返回padding参数 / Return padding parameters
        return (int(round(0)),
                int(round(dh * 2 + 0.1)),
                int(round(0)),
                int(round(dw * 2 - 0.1)))

Performing face detection

xxxxxxxxxx
def exce_demo(pl):
    # 声明全局变量face_det / Declare global variable face_det
    global face_det
​
    # 获取显示相关参数 / Get display-related parameters
    display_mode = pl.display_mode      # 显示模式(如lcd) / Display mode (e.g., lcd)
    rgb888p_size = pl.rgb888p_size     # 原始图像分辨率 / Original image resolution
    display_size = pl.display_size      # 显示分辨率 / Display resolution
​
    # 设置人脸检测模型路径 / Set face detection model path
    kmodel_path = "/sdcard/kmodel/face_detection_320.kmodel"
​
    # 设置模型参数 / Set model parameters
    confidence_threshold = 0.5    # 置信度阈值 / Confidence threshold
    nms_threshold = 0.2          # 非极大值抑制阈值 / Non-maximum suppression threshold
    anchor_len = 4200            # 锚框数量 / Number of anchor boxes
    det_dim = 4                  # 检测维度(x,y,w,h) / Detection dimensions (x,y,w,h)
    
    # 加载锚框数据 / Load anchor box data
    anchors_path = "/sdcard/utils/prior_data_320.bin"
    anchors = np.fromfile(anchors_path, dtype=np.float)
    anchors = anchors.reshape((anchor_len, det_dim))
​
    try:
        # 初始化人脸检测应用实例 / Initialize face detection application instance
        face_det = FaceDetectionApp(kmodel_path, 
                                  model_input_size=[320, 320], 
                                  anchors=anchors,
                                  confidence_threshold=confidence_threshold,
                                  nms_threshold=nms_threshold,
                                  rgb888p_size=rgb888p_size,
                                  display_size=display_size,
                                  debug_mode=0)
        
        # 配置图像预处理 / Configure image preprocessing
        face_det.config_preprocess()
​
        # 主循环 / Main loop
        while True:
            with ScopedTiming("total",0):    # 计时器 / Timer
                img = pl.get_frame()          # 获取摄像头帧图像 / Get camera frame
                res = face_det.run(img)       # 执行人脸检测 / Run face detection
                face_det.draw_result(pl, res) # 绘制检测结果 / Draw detection results
                pl.show_image()               # 显示处理后的图像 / Display processed image
                gc.collect()                  # 垃圾回收 / Garbage collection
                time.sleep_us(10)             # 短暂延时 / Brief delay
​
    except Exception as e:
        print("人脸检测功能退出")           # 异常退出提示 / Exception exit prompt
    finally:
        face_det.deinit()                   # 释放资源 / Release resources

A brief introduction to face detection algorithms

Common application scenarios

Face detection is also the basis for subsequent face recognition, face key point recognition and other functions.

Camera App

  • Autofocus function
  • Framing assistance
  • People Counting

Image Processing

  • Beauty and skin resurfacing positioning
  • Sticker special effects position determination
  • Background blur range definition
  • Photo cropping suggestions

Statistical analysis

  • Crowd density detection
  • Regional population statistics
  • Crowd distribution heat map
  • Queue length monitoring

Camera Control

  • Automatic zoom following
  • Automatic adjustment of the framing range
  • Automatically frame the video conference screen

Algorithm Overview

Common face detection algorithms can be roughly classified into the following two types:

  1. Viola-Jones algorithm (classic method)

    • Face pattern recognition using Haar features
    • Using integral graph to accelerate feature calculation
    • Building a strong classifier using AdaBoost
    • Using cascade classifiers to improve efficiency
  2. Deep learning based methods

    • CNN convolutional neural network extracts features
    • Multi-scale detection to handle faces of different sizes
    • Anchor box predicts the face position
    • Confidence score determines whether it is a face

In the example, we use a method based on deep learning. We first use a pre-trained deep learning model (.kmodel file), and then set 4200 anchor boxes in the code to predict the face position.

In the post-processing step, we filter the detection results using a confidence threshold (confidence_threshold) and then use non-maximum suppression (NMS) to eliminate overlapping boxes.

The example code is optimized for the Yabo Intelligent K230 hardware platform and uses the nncase runtime library to run the deep learning model.

[Must-read] General code structure and prerequisite knowledge of AI vision routines
Facial key point recognition

COMPANY

  • About us
  • Team Style
  • Blog

LEARNING & EXPLORATION

  • Tutorials
  • Edge AI hardware
  • Educational robots
  • Embedded intelligent hardware

WHERE TO BUY

  • Yahboom Online Store
  • Amazon
  • Alibaba
  • AliExpress
  • Mercado

TECHNOLOGY SUPPORT

  • Email: support@yahboom.com

BE A DISTRIBUTOR

  • Email: sales@yahboom.com
QR Code
QR Code

Copyright © 2017-2026 Yahboom. All Rights Reserved.

EN/中文