yahboom
HomeLearn
Solution
Blog
Online Store
About Us
EN/中文
K230 Vision Module📖
1. Quick Start
  • 0.Get start
  • 1. K230 firmware download and burning
  • 2. Install the programming environment
  • 3. Debug and run routines
  • 4. Offline running routine
  • 5. Micropython Quick Start
  • 6. GUI Program Instructions
  • 7.K230 module bracket installation tutorial
  • 8.K230 module 2DOF PTZ installation tutorial
2. Basic Courses
  • 1.FPIOA pin assignment
  • 2.RGB lights
  • 3.Buzzer
  • 4.Buttons
  • 5.Serial communication
  • 6.I2C communication
  • 7.PWM
  • 8.WDT watchdog
  • 9.Timer
  • 10.Fourier Transform
  • 11.SHA256 encryption
  • 12.AES encryption
  • 13.Multithreading
  • 14.File reading and writing
  • 15.Image Display
  • 16.Touch Display
  • 17.Camera display
  • 18.Image Flip
  • 19.Camera
3. Draw the image
  • 1. Draw the lines
  • 2. Draw the circle
  • 3. Draw the rectangle
  • 4. Draw the ellipse
  • 5. Draw the arrow
  • 6. Draw the crosshairs
  • 7. Draw text
  • 8. Draw key points
4. Graphics detection
  • 1. Line segment detection
  • 2. Rectangle Detection
  • 3. Circle detection
  • 4. Object edge detection
  • 5. Line inspection basics:fast linear regression
5. Color recognition
  • 1. Color recognition
  • 2. Object Counting
  • 3. Multi-color recognition
  • 4. K230 Color Line Patrol
6.1 CV_lite Image Processing Special Topic
  • 1.Introduction to cv_litenew
  • 2.cv_lite API Reference Manualnew
  • 3.Color Block Recognition - Grayscale Imagenew
  • 4.Color Block Recognition - Color Imagenew
  • 5.Circle Recognition - Grayscale Imagenew
  • 6.Circle Recognition - Color Imagenew
  • 7.Corner Recognition - Grayscale Imagenew
  • 8.Corner Recognition - Color Imagenew
  • 9.Edge Recognition - Grayscale Imagenew
  • 10. Edge Recognition - Color Imagenew
  • 11. Rectangle Recognition - Grayscale Imagenew
  • 12.Rectangle Recognition - Color Imagenew
  • 13.Rectangle recognition combined with corner recognition - grayscale imagenew
  • 14.Rectangle recognition combined with corner recognition - color imagenew
  • 15.Image Binarization - Grayscalenew
  • 16.Image Binarization - Color Imagenew
  • 17.Exposure Adjustmentnew
  • 18.Image Black Hat Operationsnew
  • 19.Image Color Histogramnew
  • 20.Image Closingnew
  • 21.Image Expansionnew
  • 22.Image Corrosionnew
  • 23.Gaussian Blurnew
  • 24.Gradient Transformationnew
  • 25.Mean Fuzzynew
  • 26.Image Openingnew
  • 27.Image Top Hat Operationnew
  • 28.PnP rangingnew
  • 29.Find rectangles and measure distancesnew
  • 30.Image grayscale world white balancenew
6.2 OpenCV Image Processing Special Topicnew
  • 1. OpenCV Introduction
  • 2. OpenCV API Reference
  • 3. Image Basic Transforms
  • 4. Morphological Operations
  • 5. Color Segmentation and Shape Classification
  • 6. Corner and Centroid Detection
  • 7. Hough Circle Detection
  • 8. Hough Line Detection
  • 9. Contour Analysis
  • 10. Drawing Functions
  • 11. Template Matching
  • 12. Image Blur Filtering
  • 13. Edge Detection
  • 14. Thresholding
  • 15. Color Segmentation
  • 16. Histogram and Pixel Transformation
  • 17. Arithmetic and Bitwise Operations
  • 18. Channel Operation and Statistics
  • 19. Image File Read and Write
  • 20. Pixel Level Transformation
7. Code type recognition
  • 1.Barcode recognition
  • 2.QR code recognition
  • 3.AprilTag tag recognition
  • 4.DM code recognition
8. Face Recognition
  • 1.[Must-read] General code structure and prerequisite knowledge of AI vision routines
  • 2.Face Detection
  • 3.Facial key point recognition
  • 4.Face orientation detection
  • 5.Face 3D Network
  • 6.Gaze direction detection
  • 7.Register for face recognition
9. Human body characteristics
  • 1. Human body detection
  • 2. Human key point detection
  • 3. Human posture recognition
  • 4. Fall detection
  • 5. Palm detection
  • 6. Palm key point detection
  • 7. Palm key point classification
  • 8. Gesture Recognition
  • 9. Dynamic gesture recognition
  • 10. Rock, Paper, Scissors
10. Scenario Application
  • 1.OCR character detection
  • 2.OCR character recognition
  • 3.yolov8n target detection
  • 4.yolov8n segmentation
  • 5. Self-learning object recognition
  • 6. License plate detection
  • 7. License Plate Recognition
  • 8. Target Tracking
  • 9. Fruit classification
  • 10. Garbage classification
  • 11. Road sign recognition
11. Audio and video processing
  • 1. Audio Recording
  • 2. Play Audio
  • 3. Video Recording
  • 4. Play Video
  • 5. Keyword wake-up
12. Network Basics
  • 1. Wireless network connection
  • 2. AP hotspot mode
  • 3. TCP-Server Example
  • 4. TCP-Client Example
  • 5. UDP-Server Example
  • 6. UDP-Client Example
  • 7. HTTP-Server Example
  • 8. HTTP-Client Example
  • 9. MQTT Quick Start
  • 10. MQTT-Publisher
  • 11. MQTT-Subscriber
  • 12. RTSP real-time image transmission
  • 13. RTSP real-time image transmission combined with AIDemo
  • 14. Call OpenRouter large model aggregation service
  • 15. Open the Resource Monitoring Panel
13. LVGL Graphical Interface
  • 1. Introduction to LVGL
  • 2. Create a button
  • 3. Create a slider
  • 4. Create an Image
  • 5. Create a text box and keyboard
14. GUI Code Tutorial & Secondary Development
  • 01.GUI System Architecture
  • 02.Core Engine Initialization
  • 03.Application Discovery Mechanism in GUI
  • 04.Desktop Layout Algorithm
  • 05.Advanced UI Styling
  • 06.BaseApp Base Class Analysis
  • 07.Hello_World Practical
  • 08.GUI Application Lifecycle and Resource Management
15. Train your own model
  • 1. Local deployment of yolo training environment
  • 2. Use online platforms for training
16.Touch Course
  • 1.Touch point detectionnew
  • 2.Touch Paintingnew
  • 3.Touch to take a photonew
17. Multi-master communication (purchased separately)
ESP32-K230
  • 1.k230 color recognition
  • 2.k230 barcode recognition
  • 3.k230 QR code recognition
  • 4.k230Apriltag code recognition
  • 5.k230DM code recognition
  • 6.k230 face detection
  • 7.k230 gaze direction
  • 8.k230 face recognition
  • 9.k230 human body detection
  • 10.k230 fall detection
  • 11.k230 palm detection
  • 12.k230 gesture recognition
  • 13.k230OCR character recognition
  • 14.k230 object detection
  • 15.k230 target tracking
  • 16.k230 self-learning object recognition
  • 17.k230 license plate recognition
Jetson-K230
  • 1.k230 color recognition
  • 2.k230 barcode recognition
  • 3.k230 QR code recognition
  • 4.k230Apriltag code recognition
  • 5.k230DM code recognition
  • 6.k230 face detection
  • 7.k230 gaze direction
  • 8.k230 face recognition
  • 9.k230 human body detection
  • 10.k230 fall detection
  • 11.k230 palm detection
  • 12.k230 gesture recognition
  • 13.k230OCR character recognition
  • 14.k230 object detection
  • 15.k230 target tracking
  • 16.k230 self-learning object recognition
  • 17.k230 license plate recognition
MSPM0G3507-K230
  • 1.k230 color recognition
  • 2.k230 barcode recognition
  • 3.k230 QR code recognition
  • 4.k230Apriltag code recognition
  • 5.k230DM code recognition
  • 6.k230 face detection
  • 7.k230 gaze direction
  • 8.k230 face recognition
  • 9.k230 human body detection
  • 10.k230 fall detection
  • 11.k230 palm detection
  • 12.k230 gesture recognition
  • 13.k230OCR character recognition
  • 14.k230 object detection
  • 15.k230 target tracking
  • 16.k230 self-learning object recognition
  • 17.k230 license plate recognition
Pico-K230
  • 1.k230 color recognition
  • 2.k230 barcode recognition
  • 3.k230 QR code recognition
  • 4.k230Apriltag code recognition
  • 5.k230DM code recognition
  • 6.k230 face detection
  • 7.k230 gaze direction
  • 8.k230 face recognition
  • 9.k230 human body detection
  • 10.k230 fall detection
  • 11.k230 palm detection
  • 12.k230 gesture recognition
  • 13.k230OCR character recognition
  • 14.k230 object detection
  • 15.k230 target tracking
  • 16.k230 self-learning object recognition
  • 17.k230 license plate recognition
raspberrypi-K230
  • 1.k230 color recognition
  • 2.k230 barcode recognition
  • 3.k230 QR code recognition
  • 4.k230Apriltag code recognition
  • 5.k230DM code recognition
  • 6.k230 face detection
  • 7.k230 gaze direction
  • 8.k230 face recognition
  • 9.k230 human body detection
  • 10.k230 fall detection
  • 11.k230 palm detection
  • 12.k230 gesture recognition
  • 13.k230OCR character recognition
  • 14.k230 object detection
  • 15.k230 target tracking
  • 16.k230 self-learning object recognition
  • 17.k230 license plate recognition
RDK-K230
  • 1.k230 color recognition
  • 2.k230 barcode recognition
  • 3.k230 QR code recognition
  • 4.k230Apriltag code recognition
  • 5.k230DM code recognition
  • 6.k230 face detection
  • 7.k230 gaze direction
  • 8.k230 face recognition
  • 9.k230 human body detection
  • 10.k230 fall detection
  • 11.k230 palm detection
  • 12.k230 gesture recognition
  • 13.k230OCR character recognition
  • 14.k230 object detection
  • 15.k230 target tracking
  • 16.k230 self-learning object recognition
  • 17.k230 license plate recognition
STM32-K230
  • 1. stm32_k230 color recognition
  • 2. stm32_k230 barcode recognition
  • 3. stm32_k230 QR code recognition
  • 4. stm32_k230Apriltag code recognition
  • 5. stm32_k230DM code recognition
  • 6. stm32_k230 face detection
  • 7.stm32_k230 looking direction
  • 8. stm32_k230 face recognition
  • 9. stm32_k230 human body detection
  • 10. stm32_k230 fall detection
  • 11. stm32_k230 palm detection
  • 12. stm32_k230 gesture recognition
  • 13. stm32_k230OCR character recognition
  • 14. stm32_k230 object detection
  • 15. stm32_k230 target tracking
  • 16. stm32_k230 self-learning object recognition
  • 17.stm32_k230 license plate recognition
Arduino-K230
  • 1.arduino_k230 color recognition
  • 2.arduino_k230 barcode recognition
  • 3.arduino_k230 QR code recognition
  • 4.arduino_k230 Apriltag code recognition
  • 5.arduino_k230 DM code recognition
  • 6.arduino_k230 face detection
  • 7.arduino_k230 looking direction
  • 8.arduino_k230 face recognition
  • 9.arduino_k230 human body detection
  • 10.arduino_k230 fall detection
  • 11.arduino_k230 palm detection
  • 12.arduino_k230 gesture recognition
  • 13.arduino_k230 OCR character recognition
  • 14.arduino_k230 object detection
  • 15.arduino_k230 target tracking
  • 16.arduino_k230 self-learning object recognition
  • 17.arduino_k230 license plate recognition
Microbit-K230
  • 1.microbit_k230 color recognition
  • 2.microbit_k230 barcode recognition
  • 3.microbit_k230 QR code recognition
  • 4.microbit_k230 Apriltag code recognition
  • 5.microbit_k230 DM code recognition
  • 6.microbit_k230 face detection
  • 7.microbit_k230 looking direction
  • 8.microbit_k230 face recognition
  • 9.microbit_k230 human body detection
  • 10.microbit_k230 fall detection
  • 11.microbit_k230 palm detection
  • 12.microbit_k230 gesture recognition
  • 13.microbit_k230 OCR character recognition
  • 14.microbit_k230 object detection
  • 15.microbit_k230 target tracking
  • 16.microbit_k230 self-learning object recognition
  • 17.microbit_k230 license plate recognition
MSPM0G3519-K230
  • 1. K230 Color Recognitionnew
  • 2. K230 Barcode Recognitionnew
  • 3. K230 QR Code Recognitionnew
  • 4. K230 Apriltag Code Recognitionnew
  • 5. K230 DM Code Recognitionnew
  • 6. K230 Face Detectionnew
  • 7. K230 Gaze Directionnew
  • 8. K230 Face Recognitionnew
  • 9. K230 Human Body Detectionnew
  • 10. K230 Fall Detectionnew
  • 11. K230 Palm Detectionnew
  • 12. K230 Gesture Recognitionnew
  • 13. K230 OCR Character Recognitionnew
  • 14. K230 Object Detectionnew
  • 15. K230 Target Trackingnew
  • 16. K230 Self-learning Object Recognitionnew
  • 17. K230 License Plate Recognitionnew
18.Extension case (purchase separately)
For 2DOF Electric Platform
  • 1.Moving target control and automatic tracking system
  • 2.Human body recognition alarm
  • 3.Gesture Recognition
  • 4.Rock Paper Scissors
  • 5.Fruit sorting
  • 6.Color Tracking
  • 7.Face Tracking
MSPM0G3507 wheeled chassis V1/V2 combined with K230 application case
  • 1.Visual tracking
  • 2.Color tracking
  • 3.Color response
  • 4.Road sign recognition
  • 5.Machine code tracking
  • 6.QR code recognition action
  • 7.Autonomous avoid
  • 8.License plate tracking
  • 9.Face tracking
  • 10.Gaze direction tracking
  • 11.Palm tracking
  • 12.Target tracking
  • 13.Human body tracking
  • 14.OCR character recognition action
STM32 wheeled chassis V1/V2 combined with K230 application case
  • 1.Visual tracking
  • 2.Color tracking
  • 3.Color response
  • 4.Road sign recognition
  • 5.Machine code tracking
  • 6.QR code recognition action
  • 7.Autonomous avoid
  • 8.License plate tracking
  • 9.Face tracking
  • 10.Gaze direction tracking
  • 11.Palm tracking
  • 12.Target tracking
  • 13.Human body tracking
  • 14.OCR character recognition action
MSPM0G3519 wheeled chassis V1/V2 combined with K230 application case
  • 1.Visual trackingnew
  • 2.Color trackingnew
  • 3.Color responsenew
  • 4.Road sign recognitionnew
  • 5.Machine code trackingnew
  • 6.QR code recognition actionnew
  • 7.Autonomous avoidnew
  • 8.License plate trackingnew
  • 9.Face trackingnew
  • 10.Gaze direction trackingnew
  • 11.Palm trackingnew
  • 12.Target trackingnew
  • 13.Human body trackingnew
  • 14.OCR character recognition actionnew
19. Expansion case(purchase separately)new
  • 1.Motion target control and Auto track system
  • 2.Vehicle-mounted balance ball motion control system
Download
  • Manual
  • CanMV IDE
  • Software Tools
  • Firmware
  • Source Code
  • Appendix
Download ZIP

Welcome to K230 Vision Module repository

3. TCP-Server Example

TCP-Server Example

TCP-Server ExampleRoutine IntroductionCode AnalysisTCPBasic knowledge of TCP1.1 What is TCP?1.2 TCP vs UDPTCP connection management (three stages illustrated)2.1 Three-way handshake to establish a connection2.2 Four waves to terminate the connectionTCP reliable transmission core mechanism3.1 Data numbering and confirmation3.2 Timeout Retransmission3.3 Sliding Window ProtocolAdvanced control mechanisms4.1 Flow Control4.2 Congestion Control4.3 TCP request message header structurePractical application scenariosFAQs


Routine Introduction

In this section, we will introduce how to use K230 as a TCP server

We open the example code in this section and modify the WIFI connection information part in the code to your home WIFI or mobile hotspot

def connect_wifi():
    """
    连接WiFi并返回IP地址
    Connect to WiFi and return IP address
    """
    sta = network.WLAN(0)  # 创建WiFi站点对象 / Create WiFi station object
    sta.connect("WIFI名称", "WIFI密码")  # 连接到指定WiFi / Connect to specified WiFi
    # 等待直到获取到IP地址 / Wait until IP address is obtained
    while sta.ifconfig()[0] == '0.0.0.0':
        os.exitpoint()
    return sta.ifconfig()[0]  # 返回IP地址 / Return IP address

Then click the Run button in the lower left corner to run the routine

We open the serial terminal and wait for the output message that the server has started successfully

After the server is successfully started, the serial terminal will output TCP server running on xxxxxx:8080 (if 8080 is occupied, you can change to another port)

Here is [TCP server running on 192.168.3.47:8080]

Then we open the network debugging assistant NetAssist.exe in the supporting tools

Enter the information in the area in the upper left corner and click Connect
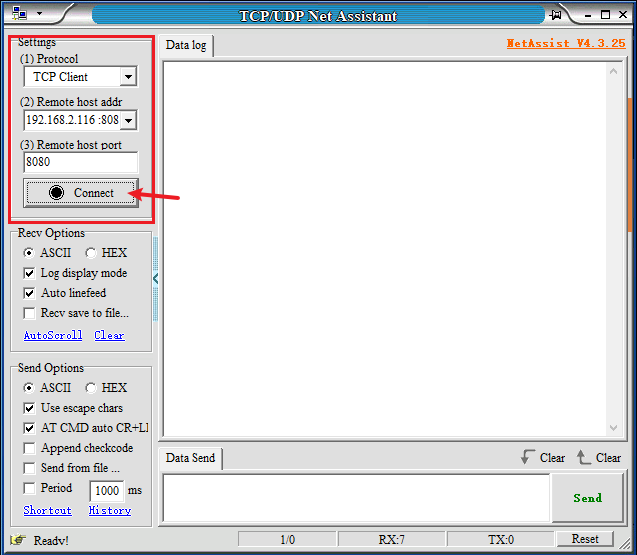
image-20250212122035422

You can see that we received a message from the server running on K230
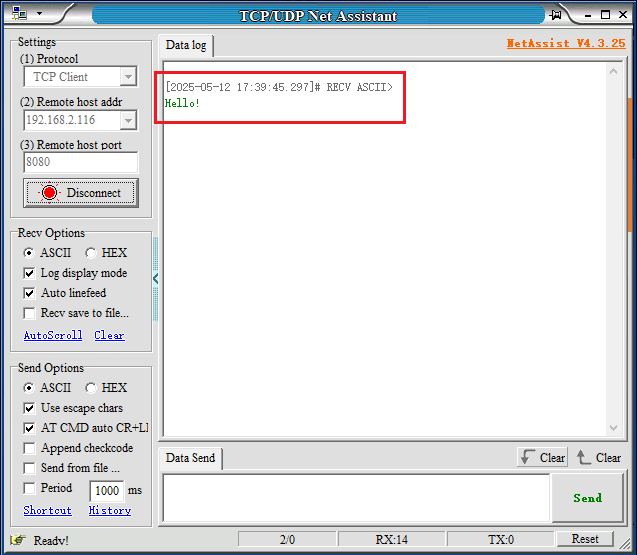
image-20250212122328255

We send a message in the input box, and the server can also receive the information we sent
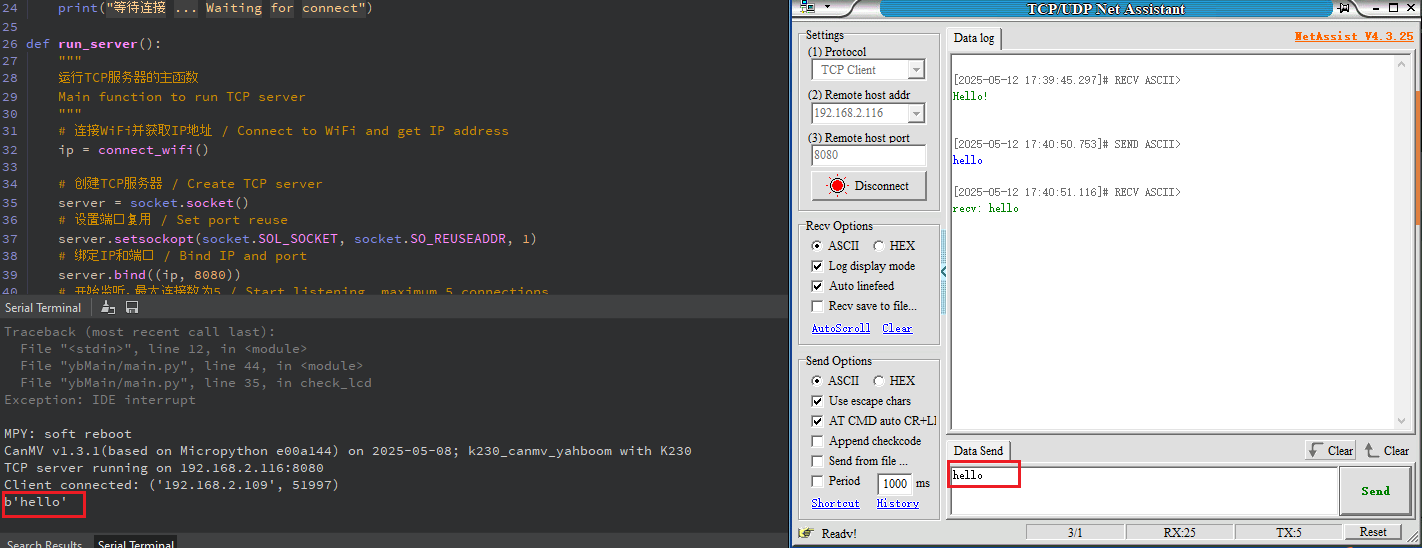
image-20250212122611917

Due to encoding problems, the IDE output looks like garbled code. In fact, we only need to call the decoding function and change print(data) to print(data.decode()) to display the correct content. Here we leave it to you to try it yourself

Code Analysis

For the complete code and bilingual comments, please refer to [Source Code/11.Network/03.tcp/tcp_server.py]

  1. Import module part:
xxxxxxxxxx
import socket      # 导入socket模块,用于网络通信 / Import socket module for network communication
import network    # 导入network模块,用于WiFi连接 / Import network module for WiFi connection
import os         # 导入os模块,用于系统操作 / Import os module for system operations
import time       # 导入time模块,用于时间相关操作 / Import time module for time-related operations

This part imports the basic modules required by the program, including modules related to network communication, WiFi connection, system operation and time operation.

  1. WiFi connection function:
xxxxxxxxxx
def connect_wifi():
    """
    连接WiFi并返回IP地址
    Connect to WiFi and return IP address
    """
    sta = network.WLAN(0)  # 创建WiFi站点对象 / Create WiFi station object
    sta.connect("WIFI名称", "WIFI密码")  # 连接到指定WiFi / Connect to specified WiFi
    # 等待直到获取到IP地址 / Wait until IP address is obtained
    while sta.ifconfig()[0] == '0.0.0.0':
        os.exitpoint()
    return sta.ifconfig()[0]  # 返回IP地址 / Return IP address

This function is responsible for:

  • Create a WiFi site object
  • Connect to a specified WiFi network
  • Wait until a valid IP address is obtained
  • Returns the obtained IP address
  1. Client shutdown function:
xxxxxxxxxx
def close_client(client):
    """
    关闭客户端连接
    Close client connection
    """
    client.close()  # 关闭连接 / Close connection
    print("等待连接 ... Waiting for connect")

This is a simple helper function that closes the client connection and prints a prompt message.

  1. Main server function:
​x
def run_server():
    """
    运行TCP服务器的主函数
    Main function to run TCP server
    """
    # 连接WiFi并获取IP地址 / Connect to WiFi and get IP address
    ip = connect_wifi()
​
    # 创建TCP服务器 / Create TCP server
    server = socket.socket()
    # 设置端口复用 / Set port reuse
    server.setsockopt(socket.SOL_SOCKET, socket.SO_REUSEADDR, 1)
    # 绑定IP和端口 / Bind IP and port
    server.bind((ip, 8080))
    # 开始监听,最大连接数为5 / Start listening, maximum 5 connections
    server.listen(5)
    print(f"TCP server running on {ip}:8080")

This part of the code completes the initialization of the server:

  • Connect to WiFi and obtain an IP address
  • Creating a TCP socket
  • Set up port reuse (allows the server to immediately use the same port when it restarts)
  • Bind IP and port (8080)
  • Start listening for connections, the maximum number of waiting connections is 5
  1. Main loop part:
xxxxxxxxxx
    while True:
        # 等待客户端连接 / Wait for client connection
        client, addr = server.accept()
        print(f"Client connected: {addr}")
        # 设置非阻塞模式 / Set non-blocking mode
        client.setblocking(False)
​
        # 发送欢迎消息 / Send welcome message
        client.write(f"Hello!\n".encode())
​
        while True:
            # 处理接收数据 / Handle received data
            try:
                data = client.read()
                if data:
                    print(data)
                    # 发送确认消息 / Send acknowledgment
                    client.write(b"recv: " + data)
                # 如果收到结束命令,关闭连接 / If end command received, close connection
                if b"end" in data:
                    close_client(client)
                    break
            except:
                pass

This is the core processing logic of the server:

  • The outer loop continues to accept new client connections

  • When there is a new connection, set it to non-blocking mode

  • Send a welcome message

  • The inner loop handles communication with the client:

    • Read data sent by the client
    • If data is received, print and send a confirmation message
    • If an "end" command is received, close the connection and exit the inner loop
    • Use exception handling to handle read operations in non-blocking mode
  1. Server startup:
xxxxxxxxxx
# 启动服务器 / Start server
run_server()

The program flow chart is as follows:

继续等待新连接
Continue waiting new connection
启动服务器
Start server
连接 WiFi connet_wifi 函数
Connect WiFi connet_wifi function
创建 TCP 服务器
Create TCP server
1. 创建 socket / Create socket
2. 设置端口复用 / Set socket reuse
3. 绑定 IP:8080 / Bind IP:8080
4. 开始监听,最大连接数 5 / Start listen, max 5 clients
等待客户端连接
Wait for client connection
客户端连接处理
Handle client connection
1. 设置非阻塞模式 / Set non-blocking mode
2. 发送欢迎消息 / Send welcome message
3. 进入数据循环 / Enter data loop
数据处理循环
Data processing loop
1. 读取客户端数据 / Read client data
2. 发送确认消息 / Send ack message
3. 检查结束命令 / Check exit command
4. 关闭客户端连接 / Close client socket

In this example, the client can normally disconnect the communication with the K230 server by sending "end". However, if the connection is disconnected directly, the server will freeze. To solve this problem, please refer to the other attached source code tcp_server_heartbeat.py in this section.

TCP

We briefly describe the TCP protocol here

Basic knowledge of TCP

1.1 What is TCP?

  • Positioning : Transport layer protocol (OSI layer 4)
  • Features : connection-oriented, reliable transmission, flow control, congestion control
  • Analogy : Like a courier company's "insured package service" (ensuring complete delivery)
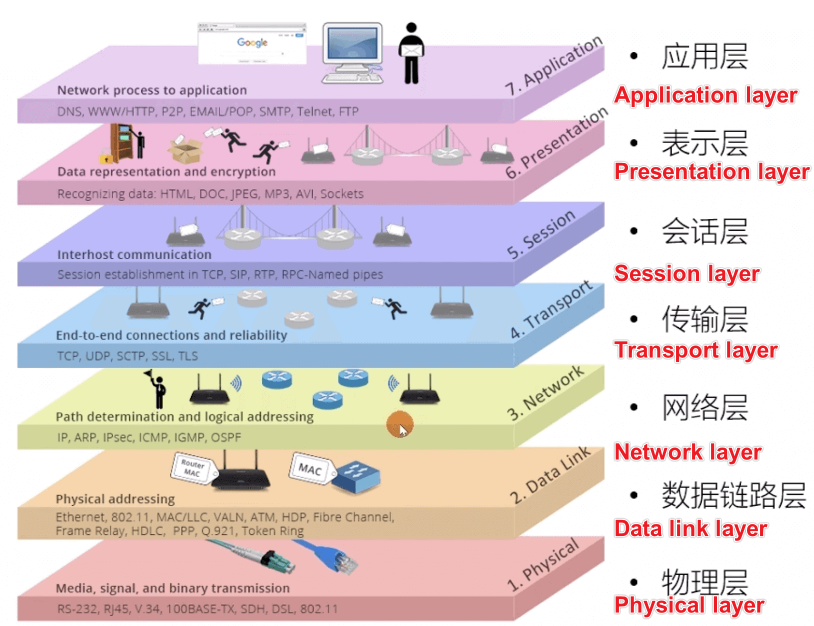
image-20250221092831365

(Diagram description: In the OSI model, TCP is located above the IP layer (network layer) and below the application layer)

1.2 TCP vs UDP

characteristicTCPUDP
ConnectionConnection-OrientedNo connection
reliabilityReliable transmissionDo your best
speedSlowVery fast
Head size20-60 bytes8 bytes
Typical ApplicationsWeb/EmailVideo streaming/gaming

TCP connection management (three stages illustrated)

2.1 Three-way handshake to establish a connection
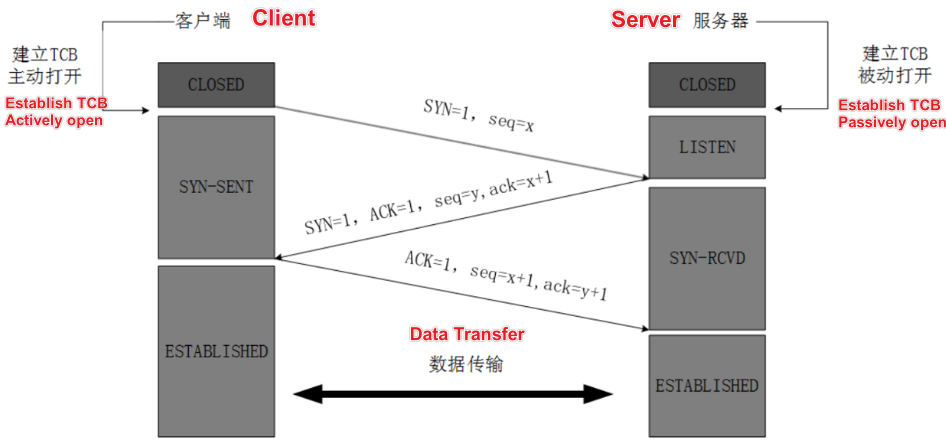
image-20250221093239266

(Diagram description: The client and server interact three times through SYN, SYN-ACK, and ACK)

  1. SYN (client→server) "I want to establish a connection, my initial sequence number is X"
  2. SYN-ACK (Server → Client) "Received! My initial sequence number is Y, looking forward to your next X+1"
  3. ACK (Client → Server) "Confirmed receipt, let's start transmitting data!"

Why not two handshakes? To prevent invalid connection requests from suddenly arriving and causing resource waste (network delay problem)

2.2 Four waves to terminate the connection
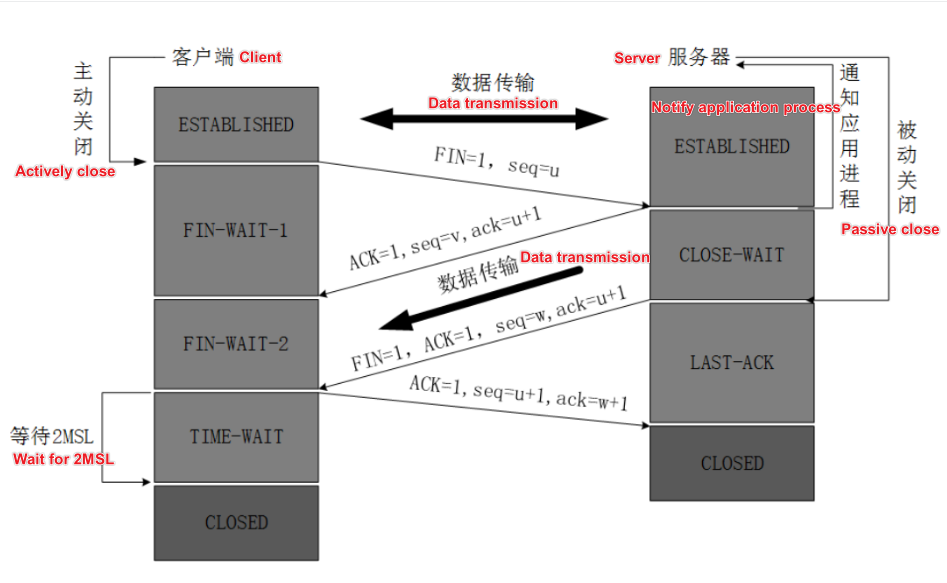
image-20250221093209142

(Diagram describing the four interactive steps of FIN and ACK)

  1. FIN (A→B) "I am closing the connection"
  2. ACK (B→A) "Close request received"
  3. FIN (B→A) "I'm ready to close too"
  4. ACK (A→B) "Confirmation of closure, connection termination"

TIME_WAIT state : The active closing party waits for 2MSL time to ensure that the last ACK is received


TCP reliable transmission core mechanism

3.1 Data numbering and confirmation

  • Sequence Number : Each byte has a unique number

  • Ack Number : "I have received all data before X"

  • Example :

    xxxxxxxxxx
    Sender: Send a data packet with [sequence number = 1, length = 100]
    Receiver: Reply [ACK=101] (expecting the next data packet to start from 101)

3.2 Timeout Retransmission

  • RTO (Retransmission Timeout) : dynamically calculated timeout
  • Fast retransmit : Retransmit immediately after receiving 3 duplicate ACKs

3.3 Sliding Window Protocol

  • Window size : The available buffer size advertised by the receiver
  • Dynamic adjustment : real-time changes based on network conditions

Advanced control mechanisms

4.1 Flow Control

  • Principle : Control the sending rate through the receiving window (rwnd)
  • Zero window detection : Send a detection packet when the receive window is 0

4.2 Congestion Control

  1. Slow start : exponential growth until threshold
  2. Congestion avoidance : linear growth
  3. Fast recovery : halving the window when packet loss occurs

4.3 TCP request message header structure

xxxxxxxxxx
 0                   1                   2                   3   
 0 1 2 3 4 5 6 7 8 9 0 1 2 3 4 5 6 7 8 9 0 1 2 3 4 5 6 7 8 9 0 1 
+-+-+-+-+-+-+-+-+-+-+-+-+-+-+-+-+-+-+-+-+-+-+-+-+-+-+-+-+-+-+-+-+
|          Source Port          |       Destination Port        |
+-+-+-+-+-+-+-+-+-+-+-+-+-+-+-+-+-+-+-+-+-+-+-+-+-+-+-+-+-+-+-+-+
|                        Sequence Number                        |
+-+-+-+-+-+-+-+-+-+-+-+-+-+-+-+-+-+-+-+-+-+-+-+-+-+-+-+-+-+-+-+-+
|                    Acknowledgment Number                      |
+-+-+-+-+-+-+-+-+-+-+-+-+-+-+-+-+-+-+-+-+-+-+-+-+-+-+-+-+-+-+-+-+
|  Data |           |U|A|P|R|S|F|                               |
| Offset| Reserved  |R|C|S|S|Y|I|            Window             |
|       |           |G|K|H|T|N|N|                               |
+-+-+-+-+-+-+-+-+-+-+-+-+-+-+-+-+-+-+-+-+-+-+-+-+-+-+-+-+-+-+-+-+
|           Checksum            |         Urgent Pointer        |
+-+-+-+-+-+-+-+-+-+-+-+-+-+-+-+-+-+-+-+-+-+-+-+-+-+-+-+-+-+-+-+-+
|                    Options (if Data Offset > 5)               |
+-+-+-+-+-+-+-+-+-+-+-+-+-+-+-+-+-+-+-+-+-+-+-+-+-+-+-+-+-+-+-+-+
|                             Data                              |
+-+-+-+-+-+-+-+-+-+-+-+-+-+-+-+-+-+-+-+-+-+-+-+-+-+-+-+-+-+-+-+-+

Practical application scenarios

  1. HTTP communication : Each web page load goes through a TCP connection
  2. File transfer : FTP and other protocols rely on TCP reliability
  3. Database connection : MySQL and other databases use TCP by default

FAQs

Q1: How to deal with TCP packet sticking problem? Through application layer protocol design (such as adding length headers or delimiters)

Q2: Why do some live videos use TCP? When image quality is prioritized, use TCP; when real-time is prioritized, use UDP+QUIC

Q3: How to maintain a long connection? Use the Keep-Alive mechanism to send detection packets regularly

The attached source code tcp_server_heartbeat.py mentioned in this article refers to the Keep-Alive mechanism

AP hotspot mode
TCP-Client Example

COMPANY

  • About us
  • Team Style
  • Blog

LEARNING & EXPLORATION

  • Tutorials
  • Edge AI hardware
  • Educational robots
  • Embedded intelligent hardware

WHERE TO BUY

  • Yahboom Online Store
  • Amazon
  • Alibaba
  • AliExpress
  • Mercado

TECHNOLOGY SUPPORT

  • Email: support@yahboom.com

BE A DISTRIBUTOR

  • Email: sales@yahboom.com
QR Code

Copyright © 2017-2026 Yahboom. All Rights Reserved.

EN/中文