yahboom
HomeLearn
Solution
Blog
Online Store
About Us
EN/中文
K230 Vision Module📖
1. Quick Start
  • 0.Get start
  • 1. K230 firmware download and burning
  • 2. Install the programming environment
  • 3. Debug and run routines
  • 4. Offline running routine
  • 5. Micropython Quick Start
  • 6. GUI Program Instructions
  • 7.K230 module bracket installation tutorial
  • 8.K230 module 2DOF PTZ installation tutorial
2. Basic Courses
  • 1.FPIOA pin assignment
  • 2.RGB lights
  • 3.Buzzer
  • 4.Buttons
  • 5.Serial communication
  • 6.I2C communication
  • 7.PWM
  • 8.WDT watchdog
  • 9.Timer
  • 10.Fourier Transform
  • 11.SHA256 encryption
  • 12.AES encryption
  • 13.Multithreading
  • 14.File reading and writing
  • 15.Image Display
  • 16.Touch Display
  • 17.Camera display
  • 18.Image Flip
  • 19.Camera
3. Draw the image
  • 1. Draw the lines
  • 2. Draw the circle
  • 3. Draw the rectangle
  • 4. Draw the ellipse
  • 5. Draw the arrow
  • 6. Draw the crosshairs
  • 7. Draw text
  • 8. Draw key points
4. Graphics detection
  • 1. Line segment detection
  • 2. Rectangle Detection
  • 3. Circle detection
  • 4. Object edge detection
  • 5. Line inspection basics:fast linear regression
5. Color recognition
  • 1. Color recognition
  • 2. Object Counting
  • 3. Multi-color recognition
  • 4. K230 Color Line Patrol
6.1 CV_lite Image Processing Special Topic
  • 1.Introduction to cv_litenew
  • 2.cv_lite API Reference Manualnew
  • 3.Color Block Recognition - Grayscale Imagenew
  • 4.Color Block Recognition - Color Imagenew
  • 5.Circle Recognition - Grayscale Imagenew
  • 6.Circle Recognition - Color Imagenew
  • 7.Corner Recognition - Grayscale Imagenew
  • 8.Corner Recognition - Color Imagenew
  • 9.Edge Recognition - Grayscale Imagenew
  • 10. Edge Recognition - Color Imagenew
  • 11. Rectangle Recognition - Grayscale Imagenew
  • 12.Rectangle Recognition - Color Imagenew
  • 13.Rectangle recognition combined with corner recognition - grayscale imagenew
  • 14.Rectangle recognition combined with corner recognition - color imagenew
  • 15.Image Binarization - Grayscalenew
  • 16.Image Binarization - Color Imagenew
  • 17.Exposure Adjustmentnew
  • 18.Image Black Hat Operationsnew
  • 19.Image Color Histogramnew
  • 20.Image Closingnew
  • 21.Image Expansionnew
  • 22.Image Corrosionnew
  • 23.Gaussian Blurnew
  • 24.Gradient Transformationnew
  • 25.Mean Fuzzynew
  • 26.Image Openingnew
  • 27.Image Top Hat Operationnew
  • 28.PnP rangingnew
  • 29.Find rectangles and measure distancesnew
  • 30.Image grayscale world white balancenew
6.2 OpenCV Image Processing Special Topicnew
  • 1. OpenCV Introduction
  • 2. OpenCV API Reference
  • 3. Image Basic Transforms
  • 4. Morphological Operations
  • 5. Color Segmentation and Shape Classification
  • 6. Corner and Centroid Detection
  • 7. Hough Circle Detection
  • 8. Hough Line Detection
  • 9. Contour Analysis
  • 10. Drawing Functions
  • 11. Template Matching
  • 12. Image Blur Filtering
  • 13. Edge Detection
  • 14. Thresholding
  • 15. Color Segmentation
  • 16. Histogram and Pixel Transformation
  • 17. Arithmetic and Bitwise Operations
  • 18. Channel Operation and Statistics
  • 19. Image File Read and Write
  • 20. Pixel Level Transformation
7. Code type recognition
  • 1.Barcode recognition
  • 2.QR code recognition
  • 3.AprilTag tag recognition
  • 4.DM code recognition
8. Face Recognition
  • 1.[Must-read] General code structure and prerequisite knowledge of AI vision routines
  • 2.Face Detection
  • 3.Facial key point recognition
  • 4.Face orientation detection
  • 5.Face 3D Network
  • 6.Gaze direction detection
  • 7.Register for face recognition
9. Human body characteristics
  • 1. Human body detection
  • 2. Human key point detection
  • 3. Human posture recognition
  • 4. Fall detection
  • 5. Palm detection
  • 6. Palm key point detection
  • 7. Palm key point classification
  • 8. Gesture Recognition
  • 9. Dynamic gesture recognition
  • 10. Rock, Paper, Scissors
10. Scenario Application
  • 1.OCR character detection
  • 2.OCR character recognition
  • 3.yolov8n target detection
  • 4.yolov8n segmentation
  • 5. Self-learning object recognition
  • 6. License plate detection
  • 7. License Plate Recognition
  • 8. Target Tracking
  • 9. Fruit classification
  • 10. Garbage classification
  • 11. Road sign recognition
11. Audio and video processing
  • 1. Audio Recording
  • 2. Play Audio
  • 3. Video Recording
  • 4. Play Video
  • 5. Keyword wake-up
12. Network Basics
  • 1. Wireless network connection
  • 2. AP hotspot mode
  • 3. TCP-Server Example
  • 4. TCP-Client Example
  • 5. UDP-Server Example
  • 6. UDP-Client Example
  • 7. HTTP-Server Example
  • 8. HTTP-Client Example
  • 9. MQTT Quick Start
  • 10. MQTT-Publisher
  • 11. MQTT-Subscriber
  • 12. RTSP real-time image transmission
  • 13. RTSP real-time image transmission combined with AIDemo
  • 14. Call OpenRouter large model aggregation service
  • 15. Open the Resource Monitoring Panel
13. LVGL Graphical Interface
  • 1. Introduction to LVGL
  • 2. Create a button
  • 3. Create a slider
  • 4. Create an Image
  • 5. Create a text box and keyboard
14. GUI Code Tutorial & Secondary Development
  • 01.GUI System Architecture
  • 02.Core Engine Initialization
  • 03.Application Discovery Mechanism in GUI
  • 04.Desktop Layout Algorithm
  • 05.Advanced UI Styling
  • 06.BaseApp Base Class Analysis
  • 07.Hello_World Practical
  • 08.GUI Application Lifecycle and Resource Management
15. Train your own model
  • 1. Local deployment of yolo training environment
  • 2. Use online platforms for training
16.Touch Course
  • 1.Touch point detectionnew
  • 2.Touch Paintingnew
  • 3.Touch to take a photonew
17. Multi-master communication (purchased separately)
ESP32-K230
  • 1.k230 color recognition
  • 2.k230 barcode recognition
  • 3.k230 QR code recognition
  • 4.k230Apriltag code recognition
  • 5.k230DM code recognition
  • 6.k230 face detection
  • 7.k230 gaze direction
  • 8.k230 face recognition
  • 9.k230 human body detection
  • 10.k230 fall detection
  • 11.k230 palm detection
  • 12.k230 gesture recognition
  • 13.k230OCR character recognition
  • 14.k230 object detection
  • 15.k230 target tracking
  • 16.k230 self-learning object recognition
  • 17.k230 license plate recognition
Jetson-K230
  • 1.k230 color recognition
  • 2.k230 barcode recognition
  • 3.k230 QR code recognition
  • 4.k230Apriltag code recognition
  • 5.k230DM code recognition
  • 6.k230 face detection
  • 7.k230 gaze direction
  • 8.k230 face recognition
  • 9.k230 human body detection
  • 10.k230 fall detection
  • 11.k230 palm detection
  • 12.k230 gesture recognition
  • 13.k230OCR character recognition
  • 14.k230 object detection
  • 15.k230 target tracking
  • 16.k230 self-learning object recognition
  • 17.k230 license plate recognition
MSPM0G3507-K230
  • 1.k230 color recognition
  • 2.k230 barcode recognition
  • 3.k230 QR code recognition
  • 4.k230Apriltag code recognition
  • 5.k230DM code recognition
  • 6.k230 face detection
  • 7.k230 gaze direction
  • 8.k230 face recognition
  • 9.k230 human body detection
  • 10.k230 fall detection
  • 11.k230 palm detection
  • 12.k230 gesture recognition
  • 13.k230OCR character recognition
  • 14.k230 object detection
  • 15.k230 target tracking
  • 16.k230 self-learning object recognition
  • 17.k230 license plate recognition
Pico-K230
  • 1.k230 color recognition
  • 2.k230 barcode recognition
  • 3.k230 QR code recognition
  • 4.k230Apriltag code recognition
  • 5.k230DM code recognition
  • 6.k230 face detection
  • 7.k230 gaze direction
  • 8.k230 face recognition
  • 9.k230 human body detection
  • 10.k230 fall detection
  • 11.k230 palm detection
  • 12.k230 gesture recognition
  • 13.k230OCR character recognition
  • 14.k230 object detection
  • 15.k230 target tracking
  • 16.k230 self-learning object recognition
  • 17.k230 license plate recognition
raspberrypi-K230
  • 1.k230 color recognition
  • 2.k230 barcode recognition
  • 3.k230 QR code recognition
  • 4.k230Apriltag code recognition
  • 5.k230DM code recognition
  • 6.k230 face detection
  • 7.k230 gaze direction
  • 8.k230 face recognition
  • 9.k230 human body detection
  • 10.k230 fall detection
  • 11.k230 palm detection
  • 12.k230 gesture recognition
  • 13.k230OCR character recognition
  • 14.k230 object detection
  • 15.k230 target tracking
  • 16.k230 self-learning object recognition
  • 17.k230 license plate recognition
RDK-K230
  • 1.k230 color recognition
  • 2.k230 barcode recognition
  • 3.k230 QR code recognition
  • 4.k230Apriltag code recognition
  • 5.k230DM code recognition
  • 6.k230 face detection
  • 7.k230 gaze direction
  • 8.k230 face recognition
  • 9.k230 human body detection
  • 10.k230 fall detection
  • 11.k230 palm detection
  • 12.k230 gesture recognition
  • 13.k230OCR character recognition
  • 14.k230 object detection
  • 15.k230 target tracking
  • 16.k230 self-learning object recognition
  • 17.k230 license plate recognition
STM32-K230
  • 1. stm32_k230 color recognition
  • 2. stm32_k230 barcode recognition
  • 3. stm32_k230 QR code recognition
  • 4. stm32_k230Apriltag code recognition
  • 5. stm32_k230DM code recognition
  • 6. stm32_k230 face detection
  • 7.stm32_k230 looking direction
  • 8. stm32_k230 face recognition
  • 9. stm32_k230 human body detection
  • 10. stm32_k230 fall detection
  • 11. stm32_k230 palm detection
  • 12. stm32_k230 gesture recognition
  • 13. stm32_k230OCR character recognition
  • 14. stm32_k230 object detection
  • 15. stm32_k230 target tracking
  • 16. stm32_k230 self-learning object recognition
  • 17.stm32_k230 license plate recognition
Arduino-K230
  • 1.arduino_k230 color recognition
  • 2.arduino_k230 barcode recognition
  • 3.arduino_k230 QR code recognition
  • 4.arduino_k230 Apriltag code recognition
  • 5.arduino_k230 DM code recognition
  • 6.arduino_k230 face detection
  • 7.arduino_k230 looking direction
  • 8.arduino_k230 face recognition
  • 9.arduino_k230 human body detection
  • 10.arduino_k230 fall detection
  • 11.arduino_k230 palm detection
  • 12.arduino_k230 gesture recognition
  • 13.arduino_k230 OCR character recognition
  • 14.arduino_k230 object detection
  • 15.arduino_k230 target tracking
  • 16.arduino_k230 self-learning object recognition
  • 17.arduino_k230 license plate recognition
Microbit-K230
  • 1.microbit_k230 color recognition
  • 2.microbit_k230 barcode recognition
  • 3.microbit_k230 QR code recognition
  • 4.microbit_k230 Apriltag code recognition
  • 5.microbit_k230 DM code recognition
  • 6.microbit_k230 face detection
  • 7.microbit_k230 looking direction
  • 8.microbit_k230 face recognition
  • 9.microbit_k230 human body detection
  • 10.microbit_k230 fall detection
  • 11.microbit_k230 palm detection
  • 12.microbit_k230 gesture recognition
  • 13.microbit_k230 OCR character recognition
  • 14.microbit_k230 object detection
  • 15.microbit_k230 target tracking
  • 16.microbit_k230 self-learning object recognition
  • 17.microbit_k230 license plate recognition
MSPM0G3519-K230
  • 1. K230 Color Recognitionnew
  • 2. K230 Barcode Recognitionnew
  • 3. K230 QR Code Recognitionnew
  • 4. K230 Apriltag Code Recognitionnew
  • 5. K230 DM Code Recognitionnew
  • 6. K230 Face Detectionnew
  • 7. K230 Gaze Directionnew
  • 8. K230 Face Recognitionnew
  • 9. K230 Human Body Detectionnew
  • 10. K230 Fall Detectionnew
  • 11. K230 Palm Detectionnew
  • 12. K230 Gesture Recognitionnew
  • 13. K230 OCR Character Recognitionnew
  • 14. K230 Object Detectionnew
  • 15. K230 Target Trackingnew
  • 16. K230 Self-learning Object Recognitionnew
  • 17. K230 License Plate Recognitionnew
18.Extension case (purchase separately)
For 2DOF Electric Platform
  • 1.Moving target control and automatic tracking system
  • 2.Human body recognition alarm
  • 3.Gesture Recognition
  • 4.Rock Paper Scissors
  • 5.Fruit sorting
  • 6.Color Tracking
  • 7.Face Tracking
MSPM0G3507 wheeled chassis V1/V2 combined with K230 application case
  • 1.Visual tracking
  • 2.Color tracking
  • 3.Color response
  • 4.Road sign recognition
  • 5.Machine code tracking
  • 6.QR code recognition action
  • 7.Autonomous avoid
  • 8.License plate tracking
  • 9.Face tracking
  • 10.Gaze direction tracking
  • 11.Palm tracking
  • 12.Target tracking
  • 13.Human body tracking
  • 14.OCR character recognition action
STM32 wheeled chassis V1/V2 combined with K230 application case
  • 1.Visual tracking
  • 2.Color tracking
  • 3.Color response
  • 4.Road sign recognition
  • 5.Machine code tracking
  • 6.QR code recognition action
  • 7.Autonomous avoid
  • 8.License plate tracking
  • 9.Face tracking
  • 10.Gaze direction tracking
  • 11.Palm tracking
  • 12.Target tracking
  • 13.Human body tracking
  • 14.OCR character recognition action
MSPM0G3519 wheeled chassis V1/V2 combined with K230 application case
  • 1.Visual trackingnew
  • 2.Color trackingnew
  • 3.Color responsenew
  • 4.Road sign recognitionnew
  • 5.Machine code trackingnew
  • 6.QR code recognition actionnew
  • 7.Autonomous avoidnew
  • 8.License plate trackingnew
  • 9.Face trackingnew
  • 10.Gaze direction trackingnew
  • 11.Palm trackingnew
  • 12.Target trackingnew
  • 13.Human body trackingnew
  • 14.OCR character recognition actionnew
19. Expansion case(purchase separately)new
  • 1.Motion target control and Auto track system
  • 2.Vehicle-mounted balance ball motion control system
Download
  • Manual
  • CanMV IDE
  • Software Tools
  • Firmware
  • Source Code
  • Appendix
Download ZIP

Welcome to K230 Vision Module repository

3. Human posture recognition

Human pose recognition

Human pose recognitionRoutine Experiment EffectCode ExplanationCore code


Routine Experiment Effect

In this section, we will learn how to use K230 to realize the function of human key point detection.

The example code is in [Source code/08.Body/03.person_gesture_cls.py]

After connecting to the IDE, run the sample code in this section. Use K230 to aim at a picture with a human body. You can see the key points of the human body marked on the screen.

By comparing the relative positions of these (arm) key points, the state of the arm is judged:

States include straight, bent, left, and right.

The judgment result will be displayed in the upper left corner of the screen
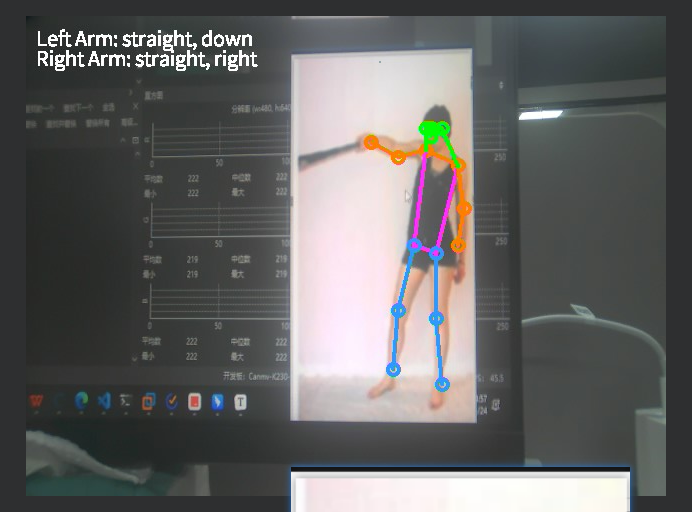
image-20250424145743714

Code Explanation

We mainly analyze the ideas of judging posture

This code implements the human posture analysis function, mainly analyzing the state (straight/bent) and orientation of the arm. Let me explain it in detail in modules:

  1. analyze_pose Function
def analyze_pose(self, kpses):

This is the main analysis function, handling posture analysis of multiple people:

  • The input parameter kpses contains the key point data of multiple people in the format of [number of people, number of key points, 3]
  • Each key point contains three values: (x, y, confidence)
  • Analyze the left and right arms separately for each detected person
  • Call _analyze_arm to process the left arm (key points 5, 7, and 9) and the right arm (key points 6, 8, and 10) respectively.
  1. _analyze_arm function
xxxxxxxxxx
def _analyze_arm(self, shoulder, elbow, wrist):

This is the core analysis function, which analyzes a single arm by following these steps:

A. Validity Check:

  • Check if the confidence of the three key points (shoulder, elbow, wrist) is > 0
  • If invalid, return "unknown" status

B. Angle calculation:

  • Calculate the shoulder-to-elbow and elbow-to-wrist vectors
  • Calculate the angle between two vectors using the vector dot product
  • Get the angle value through arccos

C. Status judgment:

  • Angle <= 60 degrees is considered "straight"
  • Angle > 60 degrees is considered "bent"

D. Direction judgment:

  • Compare the x and y components of the shoulder to elbow vector
  • If the horizontal component is large, judge left/right
  • If the vertical component is large, it determines up/down
  1. draw_result function
xxxxxxxxxx
def draw_result(self, pl, res, pose_results):

Here is the visualization function:

  • Draw bone key point connection lines
  • Display pose analysis results above each detected person
  • Includes coordinate transformations to ensure correct display

Key technologies:

  1. Vector computing: vector operations using numpy
  2. Angle calculation: use dot product and arccos to calculate the angle
  3. Posture determination: based on angle threshold and vector projection
  4. Coordinate transformation: coordinate mapping considering display size

Core code

xxxxxxxxxx
    def analyze_pose(self, kpses):
        """
        分析人体姿势,判断手臂的伸直/弯曲状态及朝向
        Analyze human pose, determine arm straight/bent state and direction
​
        Args:
            kpses: 关键点数据,格式为 [num_persons, num_keypoints, 3],每个关键点包含 (x, y, confidence)
                  (Keypoint data in format [num_persons, num_keypoints, 3], each keypoint contains (x, y, confidence))
        Returns:
            pose_results: 包含每个人的姿势分析结果的列表 (List containing pose analysis results for each person)
        """
        pose_results = []
        for i in range(len(kpses)):  # 遍历每个检测到的人 (Iterate through each detected person)
            person_kps = kpses[i]
            person_pose = {}
​
            # 左臂分析(关键点 5: 左肩, 7: 左肘, 9: 左手腕)
            # Left arm analysis (keypoint 5: left shoulder, 7: left elbow, 9: left wrist)
            left_arm_result = self._analyze_arm(
                shoulder=person_kps[5],  # 关键点索引从1开始,数组从0开始 (Keypoint index starts from 1, array starts from 0)
                elbow=person_kps[7],
                wrist=person_kps[9]
            )
            person_pose["left_arm"] = left_arm_result
​
            # 右臂分析(关键点 6: 右肩, 8: 右肘, 10: 右手腕)
            # Right arm analysis (keypoint 6: right shoulder, 8: right elbow, 10: right wrist)
            right_arm_result = self._analyze_arm(
                shoulder=person_kps[6],
                elbow=person_kps[8],
                wrist=person_kps[10]
            )
            person_pose["right_arm"] = right_arm_result
​
            pose_results.append(person_pose)
​
        return pose_results
​
    def _analyze_arm(self, shoulder, elbow, wrist):
        """
        分析单条手臂的姿势
        Analyze the pose of a single arm
​
        Args:
            shoulder: 肩关节坐标 (x, y, confidence) (Shoulder joint coordinates (x, y, confidence))
            elbow: 肘关节坐标 (x, y, confidence) (Elbow joint coordinates (x, y, confidence))
            wrist: 手腕坐标 (x, y, confidence) (Wrist coordinates (x, y, confidence))
        Returns:
            result: 包含伸直/弯曲状态和朝向的字典 (Dictionary containing straight/bent state and direction)
        """
        result = {"state": "unknown", "direction": "unknown"}
​
        # 检查关键点是否有效(置信度 > 0)(Check if keypoints are valid (confidence > 0))
        if shoulder[2] <= 0 or elbow[2] <= 0 or wrist[2] <= 0:
            return result
​
        # 计算肩-肘向量和肘-腕向量 (Calculate shoulder-elbow vector and elbow-wrist vector)
        vec_shoulder_to_elbow = np.array([elbow[0] - shoulder[0], elbow[1] - shoulder[1]])
        vec_elbow_to_wrist = np.array([wrist[0] - elbow[0], wrist[1] - elbow[1]])
​
        # 计算向量模长 (Calculate vector magnitudes)
        norm_se = np.linalg.norm(vec_shoulder_to_elbow)
        norm_ew = np.linalg.norm(vec_elbow_to_wrist)
​
        # 避免除零 (Avoid division by zero)
        if norm_se == 0 or norm_ew == 0:
            return result
​
        # 计算夹角(角度)(Calculate angle (in degrees))
        cos_theta = np.dot(vec_shoulder_to_elbow, vec_elbow_to_wrist) / (norm_se * norm_ew)
        cos_theta = min(1.0, max(-1.0, cos_theta))  # 限制cos值范围 (Restrict cos value range)
        angle = math.degrees(math.acos(cos_theta))
​
        # 判断手臂伸直或弯曲 (Determine if arm is straight or bent)
        if angle <= 60:
            result["state"] = "straight"
        elif angle > 60:
            result["state"] = "bent"
​
        # 判断手臂朝向 (Determine arm direction)
        dx = elbow[0] - shoulder[0]
        dy = elbow[1] - shoulder[1]
        if abs(dx) > abs(dy):
            # 水平方向为主 (Primarily horizontal direction)
            result["direction"] = "left" if dx > 0 else "right"
        else:
            # 垂直方向为主 (Primarily vertical direction)
            result["direction"] = "down" if dy > 0 else "up"
​
        return result
​
    def draw_result(self, pl, res, pose_results=None):
        """
        绘制结果,包括骨骼、关键点和姿势信息
        Draw results including skeleton, keypoints and pose information
​
        Args:
            pl: PipeLine实例 (PipeLine instance)
            res: 检测结果 (Detection results)
            pose_results: 姿势分析结果 (Pose analysis results)
        """
        with ScopedTiming("display_draw", self.debug_mode > 0):
            if res[0]:  # 如果检测到人 (If persons are detected)
                pl.osd_img.clear()
                kpses = res[1]
                for i in range(len(res[0])):
                    # 绘制关键点和骨骼(原有逻辑)(Draw keypoints and skeleton (original logic))
                    for k in range(17+2):
                        if k < 17:
                            kps_x, kps_y, kps_s = round(kpses[i][k][0]), round(kpses[i][k][1]), kpses[i][k][2]
                            kps_x1 = int(float(kps_x) * self.display_size[0] // self.rgb888p_size[0])
                            kps_y1 = int(float(kps_y) * self.display_size[1] // self.rgb888p_size[1])
                            if kps_s > 0:
                                pl.osd_img.draw_circle(kps_x1, kps_y1, 5, self.KPS_COLORS[k], 4)
​
                        ske = self.SKELETON[k]
                        pos1_x, pos1_y = round(kpses[i][ske[0]-1][0]), round(kpses[i][ske[0]-1][1])
                        pos1_x_ = int(float(pos1_x) * self.display_size[0] // self.rgb888p_size[0])
                        pos1_y_ = int(float(pos1_y) * self.display_size[1] // self.rgb888p_size[1])
​
                        pos2_x, pos2_y = round(kpses[i][(ske[1]-1)][0]), round(kpses[i][(ske[1]-1)][1])
                        pos2_x_ = int(float(pos2_x) * self.display_size[0] // self.rgb888p_size[0])
                        pos2_y_ = int(float(pos2_y) * self.display_size[1] // self.rgb888p_size[1])
​
                        pos1_s, pos2_s = kpses[i][(ske[0]-1)][2], kpses[i][(ske[1]-1)][2]
                        if pos1_s > 0.0 and pos2_s > 0.0:
                            pl.osd_img.draw_line(pos1_x_, pos1_y_, pos2_x_, pos2_y_, self.LIMB_COLORS[k], 4)
​
                    # 绘制姿势信息 (Draw pose information)
                    if pose_results and i < len(pose_results):
                        pose = pose_results[i]
                        # 显示左臂信息 (Display left arm information)
                        left_arm_text = f"Left Arm: {pose['left_arm']['state']}, {pose['left_arm']['direction']}"
                        pl.osd_img.draw_string_advanced(
                            10, 10 + i * 60, 20, left_arm_text, (255, 255, 255, 255)
                        )
                        # 显示右臂信息 (Display right arm information)
                        right_arm_text = f"Right Arm: {pose['right_arm']['state']}, {pose['right_arm']['direction']}"
                        pl.osd_img.draw_string_advanced(
                            10, 30 + i * 60, 20, right_arm_text, (255, 255, 255, 255)
                        )
                gc.collect()
            else:
                pl.osd_img.clear()
​

Human key point detection
Fall detection

COMPANY

  • About us
  • Team Style
  • Blog

LEARNING & EXPLORATION

  • Tutorials
  • Edge AI hardware
  • Educational robots
  • Embedded intelligent hardware

WHERE TO BUY

  • Yahboom Online Store
  • Amazon
  • Alibaba
  • AliExpress
  • Mercado

TECHNOLOGY SUPPORT

  • Email: support@yahboom.com

BE A DISTRIBUTOR

  • Email: sales@yahboom.com
QR Code
QR Code

Copyright © 2017-2026 Yahboom. All Rights Reserved.

EN/中文