Welcome to MicroROS V2 Robot Car repository
4. YOLO Object Recognition and Tracking
YOLO Object Recognition and Tracking (PTZ)
1. Experiment Objective
Click any YOLO-detected object with the mouse, and the car body rotates to keep tracking it.
2. Model and Configuration Check
The YOLO ONNX follow node reads the configuration file by default:
~/microros_ws/src/yolo_onnx_follow_pkg/config/yolo_onnx_follow_config.yamlFocus on the following parameters:
xxxxxxxxxxYOLO_ONNX_FOLLOW model_path"/home/yahboom/MODELS/yolo/yolo11n.onnx" image_topic"/camera/image_raw" input_width640 input_height640 conf_threshold0.2 nms_threshold0.45 max_detections3If the model path on your machine differs (you can replace it with your own trained model), modify model_path, or override it at launch with model_path:=:
xxxxxxxxxxros2 launch yolo_onnx_follow_pkg yolo_onnx_follow.launch.py model_path:=/home/yahboom/MODELS/yolo/yolo11n.onnxReplacing the Model with a Custom One
In general, if you only switch to a standard YOLOv8/YOLOv11 ONNX model, you do not need to change the Python source code; you only need to edit the configuration file:
model_path: change it to your own.onnxmodel path.class_names_path: change it to your own class names file path.input_width,input_height: change them to the input size used when exporting the ONNX model.target_classortarget_class_id: set this if you want to auto-follow a certain class of target.conf_threshold: lower it if your self-trained model misses detections; raise it if there are too many false positives.
There are mainly two cases that require changing the source code.
First: if you want to hard-code the class names directly in the program instead of using class_names_path, modify the COCO_CLASS_NAMES at the top of yolo_onnx_follow_pkg/yolo_onnx_follow_node.py:
xxxxxxxxxxCOCO_CLASS_NAMES = [ "person", "cup", "bottle",]Using class_names_path is recommended instead, so you do not need to change the source code when switching models.
3. Experiment Steps
1. Hardware Preparation
| Hardware | Requirement |
|---|---|
| PTZ version | ❌ |
| No-PTZ version | ✅ |
| Required peripherals | ESP32 camera (fixed on a bracket) |
Change the car model in the .bashrc file to the corresponding model:
xxxxxxxxxxgedit .bashrc

After editing, save and exit, then run the following command to apply the changes:
xxxxxxxxxxsource ~/.bashrc
2. Start Agent + Camera + Joint Model (Terminal 1)
xxxxxxxxxxros2 launch microros_v2_bringup car_base.launch.py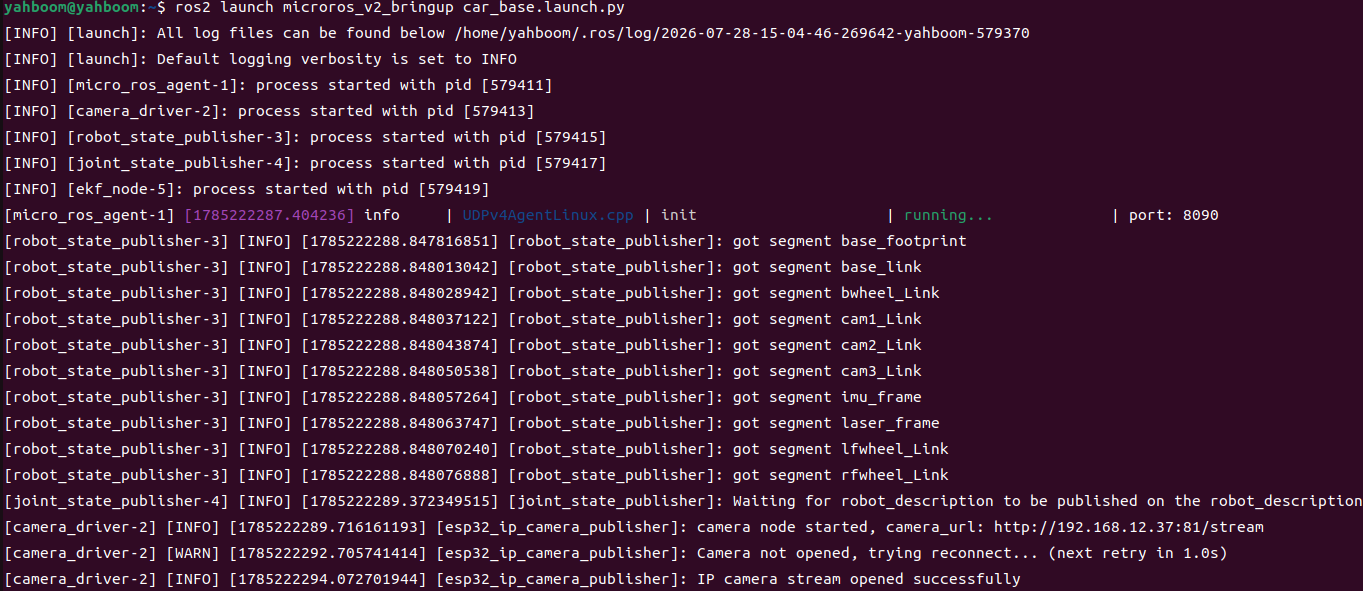
3. Start Object Recognition and Tracking (Terminal 2)
xxxxxxxxxxros2 launch yolo_onnx_follow_pkg yolo_onnx_follow.launch.py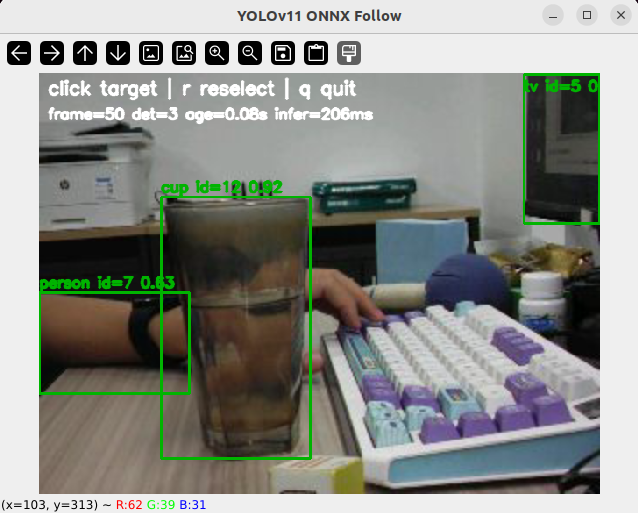
Click the object you want to follow in the detected results with the mouse:
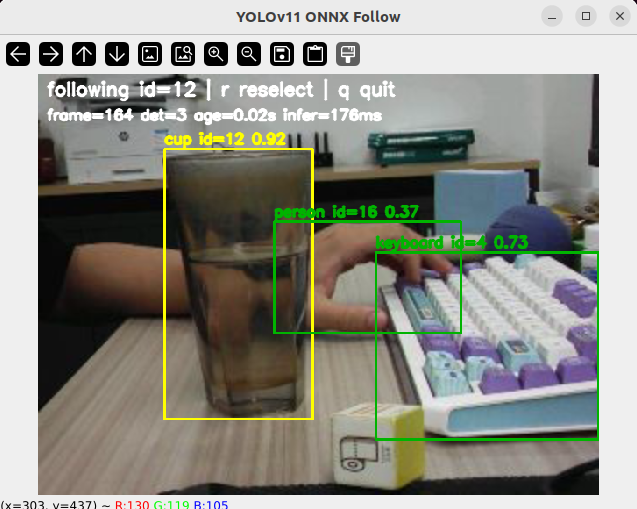
Operation Instructions
After the program starts, an OpenCV window pops up showing the detection boxes, class names, tracking IDs, and confidence scores.
- Left-click a target box: select and start following that target.
r: clear the current target, stop the chassis turning, and re-select a target.qorEsc: exit the program; on exit it publishes a stop velocity and returns the pan-tilt to its initial angle.
Normal operation:
- Green detection boxes appear in the window.
- The target box turns yellow after being clicked.
- When the target deviates from the frame center, the pan-tilt turns first to correct.
- When the pan-tilt horizontal angle deviates a lot, the chassis publishes
angular.zto turn in place. - After the target-lost time exceeds the threshold, the chassis stops turning; if a target of the same class reappears nearby within a short time, the program tries to re-acquire it.
Now slowly move the recognized object, and the pan-tilt and car chassis will track it.
4. Source Code Analysis
4.1 File Structure
xxxxxxxxxxyolo_onnx_follow_pkg/├── launch/│ └── yolo_onnx_follow.launch.py├── config/│ └── yolo_onnx_follow_config.yaml├── yolo_onnx_follow_pkg/│ ├── yolo_onnx_follow_node.py│ └── ptz_controller.py├── setup.py└── package.xml4.2 Configuration File
config/yolo_onnx_follow_config.yaml is divided into three main sections:
SYSTEM: configures the chassis velocity topic,/cmd_velby default.PTZ: configures the pan-tilt angle topic, servo limits, initial angle, publish count, and whether to recenter after stopping.YOLO_ONNX_FOLLOW: configures the model path, image topic, detection thresholds, window display, target selection, tracking re-acquisition, and control parameters.
Commonly tuned parameters:
| Parameter | Description |
|---|---|
conf_threshold | Detection confidence threshold; lower values detect more easily but also cause more false positives |
max_detections | Maximum number of high-confidence detection boxes kept per frame |
max_inference_rate_hz | Maximum inference rate; lower it when performance is insufficient |
follow_rate_hz | Follow control rate |
pixel_tolerance | The pan-tilt is not corrected when the target center error is smaller than this pixel value |
kp_x, kd_x | Pan-tilt horizontal control parameters |
kp_y, kd_y | Pan-tilt tilt control parameters |
max_step_xy | Maximum pan-tilt angle step per control cycle |
enable_body_turn_follow | Whether the chassis is allowed to turn following the pan-tilt horizontal deviation |
body_kp, body_kd | Chassis turning control parameters |
max_angular_z | Maximum chassis angular velocity |
4.3 Core Source Code Analysis
The main program file is:
xxxxxxxxxxyolo_onnx_follow_pkg/yolo_onnx_follow_node.pyIts core flow can be summarized as:
xxxxxxxxxxLoad config -> initialize ROS topics -> load the ONNX model -> receive camera images-> YOLO inference -> NMS filtering -> assign tracking IDs -> select/re-acquire the target-> compute the pan-tilt angle -> compute the chassis angular velocity -> publish control commands4.3.1 Detection Data Structure
Detection stores the information of each detection box:
xxxxxxxxxxclass Detection: bbox: tuple[float, float, float, float] score: float class_id: int class_name: str track_id: int = -1Where:
bbox: detection box coordinates in the format(x1, y1, x2, y2).score: confidence score.class_id: class index.class_name: class name.track_id: the temporary tracking ID assigned to the target internally by the program.
cx, cy, width, and height are property functions that quickly give the target center and box size; the subsequent pan-tilt control mainly uses cx and cy.
4.3.2 SimpleIouTracker Tracking ID Assignment
SimpleIouTracker is a lightweight local tracker that does not depend on any external tracking library. Its purpose is to keep the same object in consecutive frames assigned the same ID as much as possible.
The core logic is in update():
xxxxxxxxxxtracked = self.tracker.update( detections, image_width=frame.shape[1], image_height=frame.shape[0])Matching order:
- Compute IoU against same-class targets first; inherit the old ID when the IoU is greater than
track_iou_threshold. - If IoU matching fails, use the center-point distance between same-class targets as a fallback match.
- If it still does not match, assign a new
track_id.
This reduces follow jitter when same-class objects move fast, when detection boxes suddenly grow or shrink, or when IDs briefly jump.
Related configuration:
xxxxxxxxxxtrack_iou_threshold0.2track_center_threshold_ratio0.12track_max_lost_frames30A larger track_center_threshold_ratio makes it easier to join nearby same-class targets into the same ID; however, if several same-class targets are close together in the frame, a value that is too large may cause wrong matches.
4.3.3 Model Loading _load_model()
_load_model() checks the model path and loads the ONNX model:
xxxxxxxxxxmodel_path = str(self.demo_config.get("model_path", "") or "")if not model_path or not os.path.exists(model_path): raise FileNotFoundError(...)self.net = cv2.dnn.readNetFromONNX(model_path)If use_cuda is true, the program tries to use the OpenCV DNN CUDA backend:
xxxxxxxxxxself.net.setPreferableBackend(cv2.dnn.DNN_BACKEND_CUDA)self.net.setPreferableTarget(cv2.dnn.DNN_TARGET_CUDA_FP16)If the current OpenCV has no CUDA support, keep the following in the configuration:
xxxxxxxxxxuse_cudafalse4.3.4 Image Callback _image_callback()
After the camera image enters the program, it is first converted to an OpenCV image with cv_bridge:
xxxxxxxxxxframe = self.bridge.imgmsg_to_cv2(msg, "bgr8")The maximum inference rate is then limited by max_inference_rate_hz to avoid saturating the CPU by inferring on every frame:
xxxxxxxxxxif now - self.last_inference_time < 1.0 / max_rate: returnThe actual recognition and tracking flow is:
xxxxxxxxxxdetections = self._run_yolo(frame)tracked = self.tracker.update(detections, image_width=frame.shape[1], image_height=frame.shape[0])self._update_selected_target(tracked, frame.shape[1], frame.shape[0])In other words: YOLO detection first, then ID assignment, and finally updating the target to follow.
4.3.5 YOLO Inference _run_yolo() and Result Parsing _decode_outputs()
_run_yolo() first letterboxes the original image to the model input size:
xxxxxxxxxxletterboxed, scale, pad_x, pad_y = self._letterbox(frame, input_w, input_h)It then builds the blob and runs the ONNX forward inference:
xxxxxxxxxxblob = cv2.dnn.blobFromImage(letterboxed, 1.0 / 255.0, (input_w, input_h), swapRB=True, crop=False)self.net.setInput(blob)outputs = self.net.forward()_decode_outputs() does four things:
- Calls
_parse_yolo_row()to parse each output row. - Filters low-confidence results with
conf_threshold. - Removes duplicate boxes with
cv2.dnn.NMSBoxes(). - Sorts by confidence and keeps only
max_detectionstargets.
The current default configuration is:
xxxxxxxxxxconf_threshold0.2max_detections3So the window shows at most the 3 highest-confidence targets, reducing interference from cluttered detection boxes during selection and tracking.
4.3.6 Target Selection and Re-acquisition
There are two main entry points for target selection:
_on_mouse(): after clicking a detection box in the window, records the target'strack_idand class._select_detection(): finds the target that should currently be followed from the detection results each frame.
After clicking a target, the program saves:
xxxxxxxxxxself.selected_track_id = int(detection.track_id)self.selected_class_id = int(detection.class_id)self.selected_last_bbox = detection.bboxIf the same track_id can still be found in the next frame, it keeps following directly. If the ID has jumped, it enters _try_reacquire_selected_detection() to find the target again by the same class and the previous frame's position.
The re-acquisition score considers three factors:
- IoU with the previous frame's detection box.
- Distance from the previous frame's target center.
- The current detection box's confidence.
Related configuration:
xxxxxxxxxxreacquire_enabletruereacquire_iou_threshold0.05reacquire_max_center_ratio0.45reacquire_max_lost_frames30reacquire_score_weight0.15_smooth_target_center() smooths the target center point:
xxxxxxxxxxtarget_center_smoothing_alpha0.65The smaller this parameter, the smoother the target center, but the slower the response; the closer to 1.0, the faster the response, but the more visible the frame detection jitter.
4.3.7 OpenCV Display and Keys
_show_frame() draws the detection boxes, class names, IDs, and status information:
- Regular detection boxes are green.
- The currently followed target is yellow.
- The top shows the current frame count, detection count, image latency, and inference time.
_handle_window_key() handles keyboard input:
xxxxxxxxxxif key in (ord("r"), ord("R")): self._clear_selection()elif key in (ord("q"), ord("Q"), 27): self.shutdown_requested = TruePressing r clears the current target and publishes zero velocity; pressing q or Esc exits the program.
4.3.8 Pan-Tilt Following _apply_ptz_follow()
The input to pan-tilt following is the target center point:
xxxxxxxxxxerr_x = float(state["cx"]) - half_werr_y = float(state["cy"]) - half_hIf the error is smaller than pixel_tolerance, no correction is made to avoid small jitter:
xxxxxxxxxxif abs(err_x) <= cfg["pixel_tolerance"]: step_x = 0.0Otherwise, the error is normalized and the angle step is computed with P+D control:
xxxxxxxxxxout_x = clamp(cfg["ptz_kp"] * norm_x + cfg["ptz_kd"] * deriv_x, -1.0, 1.0)step_x = out_x * cfg["max_ptz_step"]Finally, the pan-tilt angle is published through PtzController.publish_servo_angles():
xxxxxxxxxxself.ptz.publish_servo_angles( servo1_angle=..., servo2_angle=..., repeat=False,)If the pan-tilt moves in the wrong direction, first change the following in the configuration:
xxxxxxxxxxsign_x1.0sign_y-1.04.3.9 Chassis Turning _compute_body_turn()
The chassis does not turn directly from the image pixel error; instead it turns according to the pan-tilt horizontal deviation. This way the pan-tilt chases the target first, and the chassis then slowly turns the car body back toward the target direction.
The judgment logic:
xxxxxxxxxxif abs(servo_err) >= cfg["servo1_engage_deg"]: self.body_correcting = Trueelif abs(servo_err) <= cfg["body_tolerance_deg"]: self.body_correcting = FalseThat is:
- When the pan-tilt horizontal deviation exceeds
servo1_engage_deg, the chassis starts turning. - When the pan-tilt returns within the
body_tolerance_degrange, the chassis stops turning.
Chassis angular velocity computation:
xxxxxxxxxxangular_z = cfg["body_dir"] * ( cfg["body_kp"] * servo_err + cfg["body_kd"] * deriv)angular_z = clamp(angular_z, -cfg["max_angular_z"], cfg["max_angular_z"])If the chassis turning direction is wrong, modify:
xxxxxxxxxxbody_dir-1.0If the chassis turns too slowly, increase body_kp appropriately; if it turns too aggressively, reduce body_kp or max_angular_z.
4.3.10 PTZ Controller ptz_controller.py
ptz_controller.py encapsulates the pan-tilt angle publishing logic. The topic it publishes is:
xxxxxxxxxx/cmd_ptz_angleThe message type is:
xxxxxxxxxxgeometry_msgs/msg/Vector3Where:
Vector3.x: horizontal servo angle.Vector3.y: tilt servo angle.Vector3.z: currently unused.
publish_servo_angles() clamps the angles with the servo limits before publishing:
xxxxxxxxxxself.servo1_angle = clamp(new_servo1_angle, self.servo1_min_angle, self.servo1_max_angle)self.servo2_angle = clamp(new_servo2_angle, self.servo2_min_angle, self.servo2_max_angle)On program exit, recenter_after_stop() returns the pan-tilt to its initial angle.