Welcome to MicroROS V2 Robot Car repository
3. Embodied Intelligent System Architecture
Multi-Agent Embodied Architecture
Multi-Agent Embodied Architecture1. Course Content2. multi_brains Introduction3. Multi-layer Reasoning Architecture3.1 Advantages of Layered Reasoning3.1.1 Decoupling of Task Decision and Action Conversion3.1.2 Improving the Success Rate of Long-Flow Tasks3.2 Decision-Layer AI3.3 Execution-Layer AI3.4 Box-Selection-Layer AI4. Task Cycle5. Historical Context6. Map Mapping7. Action Function Library
1. Course Content
Understand the multi_brains framework of the microros_v2 multi-agent embodied architecture.
2. multi_brains Introduction
multi_brains is an embodied intelligence framework developed by Yahboom that adapts to general-purpose AI large models. It avoids the situations where VLA models and end-to-end models require dedicated hardware, local computing power support, and long data collection and training times. Simply by connecting to general-purpose AI models from cloud model providers, edge robots can obtain powerful embodied intelligence effects.
multi_brains extends training samples through the RAG knowledge base, allowing robots to quickly adapt to different scenario tasks. It can be deployed on most small main control devices, placing the massive model inference in the cloud or on a local server.
The core idea of multi_brains is to decouple different stages of a task through multiple AI models at different layers. Currently, the package uses terminal text interaction as the default entry point, with
terminal_client.pypublishing user text andllm_agent_node.pyhandling Dify calls, action execution, and feedback loops. Its main improvements include:- A more stable text debugging entry point that does not depend on microphones, wake words, or ASR/TTS services, suitable for development, teaching, and reproducible experiments.
- A more flexible decision mechanism with task routing added, allowing the AI agent to autonomously choose between multi-layer reasoning or simplified reasoning based on task difficulty, giving AI higher autonomy and better user experience.
- An easy-to-understand visual architecture flow. multi_brains builds visual agents through Dify, allowing users to observe the data flow of the AI agent in real time during debugging, making it easier to intuitively understand the specific process of multi-layer reasoning.
- A fully localized RAG knowledge base, so there is no need to worry about data sensitivity issues.
- Seamless access to most AI models worldwide. Through Dify's model provider plugins, hundreds of AI models can be quickly and seamlessly integrated (if you have local model deployment needs, you can also connect local models).
- Traceable history records. By querying Dify's backend access history, users can query all the steps and history of task instruction execution.
- Terminal-trackable interaction process.
terminal_client.pywill display progress, final replies, and executed actions, making it easy to verify whether Dify's decisions and the robot's actions are consistent. - A complete testing toolbox that can quickly verify core functional modules.
- Simpler getting-started steps, simplifying most operations and providing convenient commands.
3. Multi-layer Reasoning Architecture
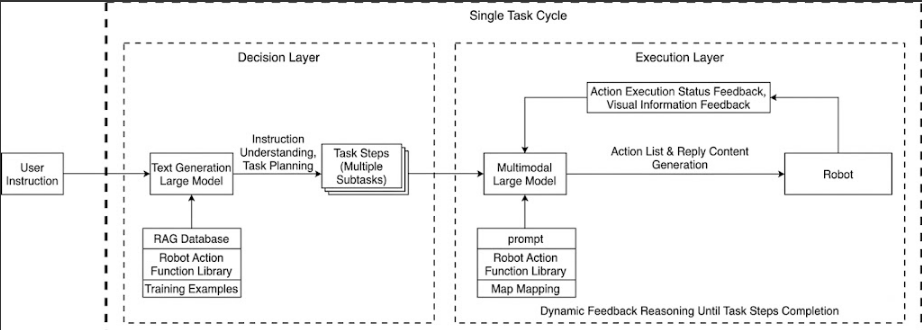
- The current workflow mainly consists of the decision layer and the execution layer, with a new box-selection layer added to the visual tracking tasks. Normal actions still run in the closed loop of "decision layer -> execution layer -> ROS action feedback"; when a task needs to track a target in the image, a visual branch of "box-selection layer -> execution layer starts tracking" is added.
- The design of layered reasoning and dynamic feedback reasoning provides stronger system robustness compared to single-model architectures.
3.1 Advantages of Layered Reasoning
3.1.1 Decoupling of Task Decision and Action Conversion
- The decision-layer AI focuses on thinking, planning, and decomposing task instructions.
- The execution-layer AI focuses on chat replies and converting task steps into JSON text.
- The box-selection-layer AI is only responsible for outputting bbox coordinates based on images and target descriptions, and does not participate in task planning or action control.
3.1.2 Improving the Success Rate of Long-Flow Tasks
When using a single-model approach for reasoning, "natural language understanding + environment perception + process decomposition + bbox estimation + action function output" must all be done simultaneously, which can easily lead to modal interference (language ambiguity or overly long instructions causing understanding errors). Layered reasoning processes tasks in stages, allowing the decision layer to focus on task planning, the execution layer to focus on action execution, and the box-selection layer to focus on visual target localization.
3.2 Decision-Layer AI
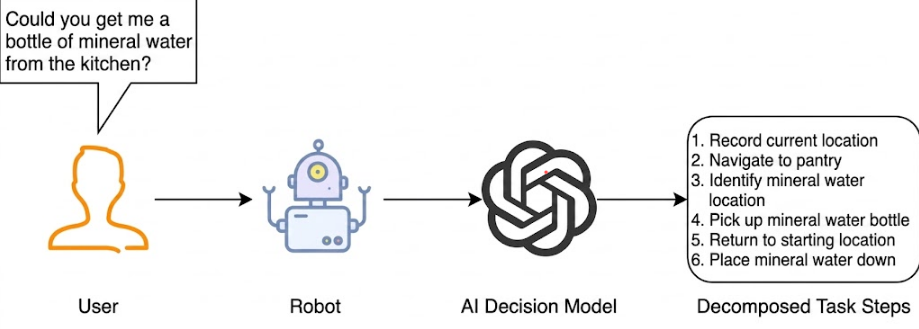
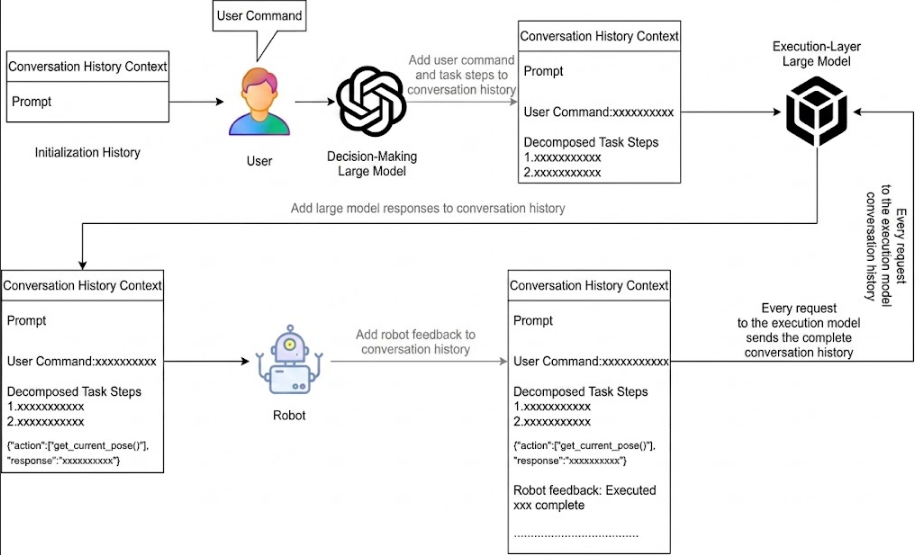
- The decision-layer large model is mainly responsible for task planning. It can understand complex human instructions and decompose them into specific task steps. For example, when receiving the instruction "Can you help me get a bottle of mineral water from the kitchen?", the large language model will decompose it into several tasks, as shown in the figure below.
3.3 Execution-Layer AI
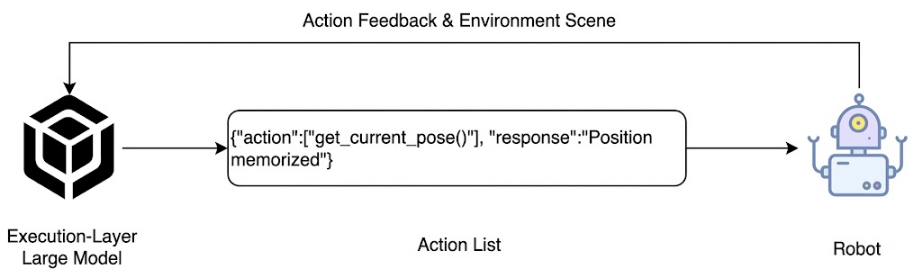
- The execution-layer large model is mainly responsible for chat replies and converting task steps into JSON text. It continuously receives feedback (success/failure) on the results of robot action execution and images, and gives the next action instruction based on whether the action execution succeeded.
- The execution-layer large model acts as a supervisor, continuously monitoring the progress of the robot's task steps, and thinking and judging which action to execute next based on the feedback from the robot's action results and environmental information, until the task is successfully completed or is ended early due to special circumstances.
3.4 Box-Selection-Layer AI
- The box-selection-layer AI only works when visually tracking, locking onto, or following targets. It receives the current image, the user's original instruction, and the current step of the decision layer, and outputs whether the target is found, the target name, bbox coordinates, confidence, and a brief reason.
- The box-selection layer output format is strict JSON, for example:
{"found":true,"target":"green block","bbox":[120,80,360,300],"confidence":0.86,"reason":"target clearly visible"}- After the execution layer reads the box-selection layer output, it will only output
track_kcf(x1,y1,x2,y2)iffound=trueand the bbox is valid; if there is no box-selection result or the target is unclear, the execution layer will end the task and explain the reason to the user.
4. Task Cycle
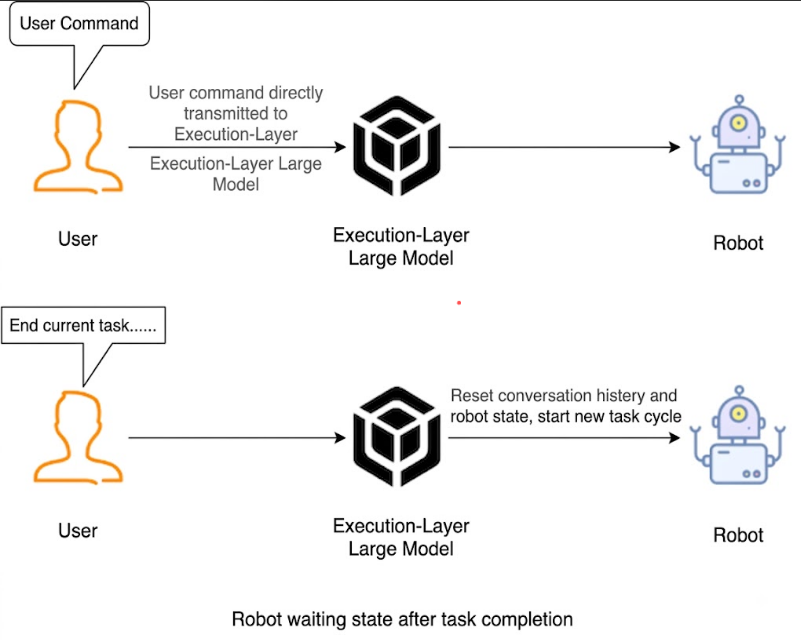
- After the user inputs a natural language instruction in the terminal client, a task cycle begins. During this cycle, the user instruction, action result feedback, and image feedback will all continue reasoning in the same Dify
conversation_id, which acts as the robot's temporary memory, allowing it to "remember" what has happened during this round of tasks. - When the execution layer outputs
finishtask(), or the user inputsresetin the terminal to reset the conversation, the robot will reset the AI model's historical context, equivalent to the robot "losing its memory" and forgetting what happened before. - If a new instruction is input during execution,
llm_agent_nodewill prioritize the new instruction and cancel the current navigation, line-following, or tracking actions as soon as possible.
5. Historical Context
- The robot's conversation history is stored in Dify's AI application variables, with a default maximum of 50 rounds of conversation memory.
6. Map Mapping
- The robot uses a grid map for navigation. If the robot needs to understand location areas in the real world, a mapping relationship must be established between the grid map and the real environment areas. This relationship is called map mapping.
- Suppose we use the robot to perform SLAM mapping in a factory environment to generate a grid map. In the real factory, there are several artificially divided areas, as shown in the figure below.
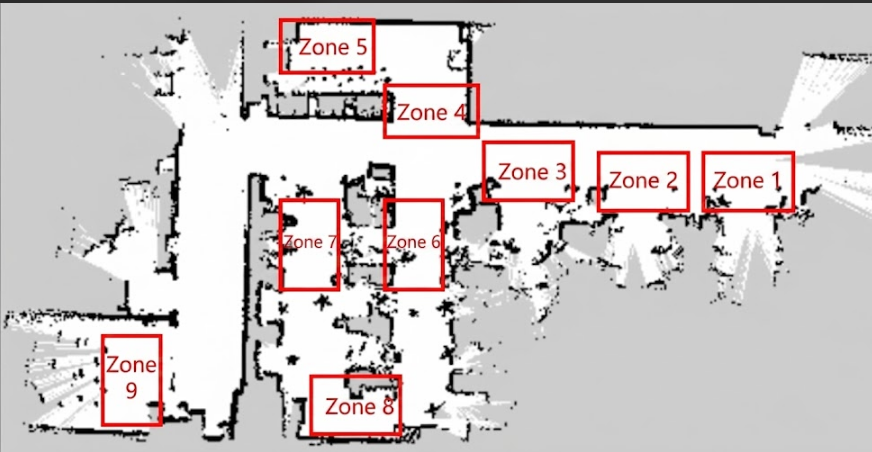
We establish a one-to-one correspondence between these real environment areas and letter symbols:
A: "Zone 1", B: "Zone 2", C: "Zone 3", D: "Zone 4", E: "Zone 5", F: "Zone 6", G: "Zone 7", H: "Zone 8", I: "Zone 9"
Then write the map coordinates for the letter symbols in the yaml file, for example:
xxxxxxxxxxA name'Zone 1' position x4.4034953117370605 y0.4879316985607147 orientation x0.0 y0.0 z0.701498621044694 w0.7126708108744126When we ask the robot to go to an actual area, we only need to have the large model convert it into the corresponding letter symbol, so that the robot can understand the locations of areas in the real environment.
7. Action Function Library
- The API functions in the robot's action function library are the bridge for the large model to control the robot to interact with the real world.
- These API functions define the smallest actions that the physical robot can perform in the physical world.
- The AI large model converts the actions to be performed into JSON text and sends it to the robot, which then parses the JSON text to execute the corresponding actions.
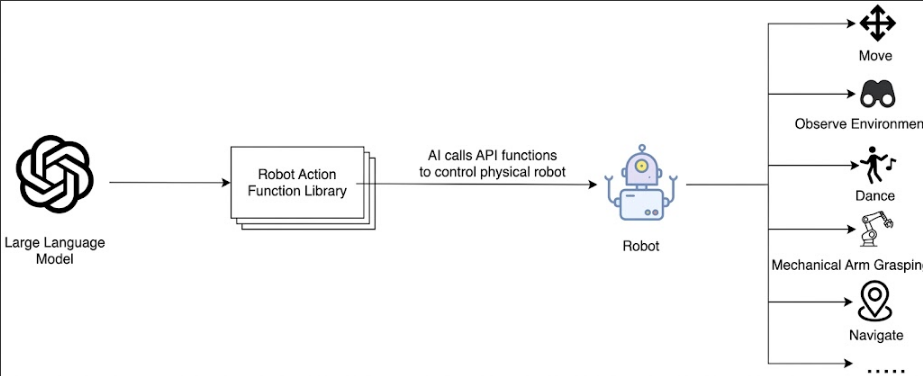
All action functions and their corresponding functions are shown in the following table:
Car functions
| Function Name | Parameters | Implemented Function | Invocation Instruction |
|---|---|---|---|
| move_forward(speed, duration) | speed: linear velocity, duration: duration | Control the car to move forward | Move forward x meters / move forward for a few seconds |
| move_backward(speed, duration) | speed: linear velocity, duration: duration | Control the car to move backward | Move backward |
| turn_left(angle, angular_speed) | angle: rotation angle, angular_speed: angular velocity | Turn left angle degrees / rotate counterclockwise | Turn left x degrees |
| turn_right(angle, angular_speed) | angle: rotation angle, angular_speed: angular velocity | Turn right angle degrees / rotate clockwise | Turn right x degrees |
| stop() | - | Stop the chassis, line following, and visual tracking | Stop / park |
| navigation(x) | x: the symbol corresponding to the target point in map mapping | Control the robot to navigate to the target point | Navigate to a location |
| navigation(zero) | zero: the recorded coordinate point | Navigate back to the previously recorded coordinate point | Return to origin, the starting position |
| get_current_pose() | - | Record the current coordinates in the global map into the zero parameter | Remember the current position |
| seewhat() | - | Take a photo of the robot's current perspective and upload it to the execution-layer large model | Observe the environment |
| observe_surroundings() | - | Control the pan-tilt to take photos in multiple directions and feed multiple images back to the execution-layer large model | Look around |
| finishtask() | - | Automatically called after the robot completes a task, used to stop feeding status back to the execution-layer model | - |
| servo_nod() | - | Pan-tilt servo nods | Nod your head |
| servo_shake() | - | Pan-tilt servo shakes | Shake your head |
| servo1_move(x) | x represents the angle to rotate | Control servo 1 to rotate back and forth by the set angle | Rotate servo 1 to x degrees |
| servo2_move(x) | x represents the angle to rotate | Control servo 2 to rotate back and forth by the set angle | Rotate servo 2 to x degrees |
| servo_init() | - | Initialize the pan-tilt position | Servo initial position, return to initial position, reset pan-tilt position |
| follow_line(color) | Automatically follow the specified color, color values: 'red', 'green', 'blue', 'yellow' | Color line-following function | Start following the green line |
| track_kcf(x1,y1,x2,y2) | Pass the top-left and bottom-right coordinates of the object | Call the external KCF tracking service and control the pan-tilt and chassis to follow | Start tracking the green block |