yahboom
HomeLearn
Solution
Blog
Online Store
About Us
EN/中文
MicroROS V2 Robot Car📖
01.Introduction
  • 0.Unboxing Video
  • 1. Readme Learning Route
  • 2. Must Read Before Use
  • 3. Introduction to MicroROS V2 Control Board
  • 4. Introduction to LiDAR
  • 5. Introduction to ESP32 Camera Module
  • 6. FAQ
  • 7. About Charging
02.Assembly course
  • Assembly Video
03.Preparation
  • 1. Quickly Start
  • 2. Write Firmware
  • 3. Install VM and Start System
  • 4. Configure VM and Connect Robot
  • 5. Connect to MicroROS Agent
04.Quick start control course
  • 1. VM Keyboard Remote Control
  • 2. VM Handle Remote Control
  • 3. USB Handle Control
05.Robot control course
  • 1. Robot Information Release
  • 2. Robot Keyboard Control
  • 3. Robot Handle Control
  • 4. Robot State Estimation
  • 5. Linear Speed Calibration
  • 6. Angular Velocity Calibration
  • 7. Robot URDF Model
06.Lidar course
  • 1. Precautions for LiDAR Mapping and Navigation
  • 2. Lidar Avoid
  • 3. Lidar Following
  • 4. Lidar Guard
  • 5. Lidar Patrol
  • 6. Gmapping Mapping
  • 7. Cartographer Mapping
  • 8. Cartographer Quickly Repositioning Navigation
  • 9. Slam Toolx Mapping
  • 10. Navigation2 Single Point Navigation
  • 11. Navigation2 Multi Point Navigation
  • 12. Ros Robot App Mapping And Navigation
07.Road network planning
  • 1. Introduction to Road Network Planning and Quick Start
  • 2. Build a Pose Map
  • 3. Road Network Annotation
  • 4. Planning and Navigation Between Road Networks
  • 5. Road Network Navigation in Any Pose
  • 6. Path Replanning
08.Vision basic course
OpenCV Image Processing
  • 1. Introduction to OpenCV Source CV
  • 2. Open Source CV Geometric Transformation
  • 3. Open Source CV Image Processing and Drawing Text Line Segments
  • 4. Open Source CV Image Beautification
09.Visual General Course (For Standard&Superior version)
4. Yolov11&26 Visual Recognition
  • 1. YOLO Environment Setup
  • 2. CLI Usage
  • 3. Object Detection
  • 4. Instance Segmentation
  • 5. Pose Estimation
  • 6. Image Classification
  • 7. Oriented Bounding Boxes Object Detection
  • 8. Model Prediction
1. ESP32 Visual Recognition Module Configuration
  • 1. Serial Port Configuration WiFi Instructions
  • 2. Use ESP32 Camera Module in Robot Car
  • 3. Servo PTZ Calibration
2. OpenCV Visual Recognition
  • 1. Human Pose Estimation
  • 2. Object Detection
  • 3. AR Vision
  • 4. QR Code
  • 5. Color Recognition
  • 6. Facial Recognition
  • 7. AprilTag Machine Code Recognition
3. Mediapipe Visual Recognition
  • 1. Hand Detection
  • 2. Pose Detection
  • 3. Holistic Detection
  • 4. Facial Detection
  • 5. Facial Recognition
  • 6. Facial Special Effects
  • 7. 3D Object Recognition
  • 8. Brush
  • 9. Gesture Recognition
  • 10. Palm Target Localization
  • 11. Fingertip Trajectory Recognition
10.Visual Advanced Course (Just for Standard version)
1. Visual Control
  • 1. QR Code Recognition Control Action
  • 2. AprilTag Control Car Action Group
  • 3. Gesture Control Car Action Group
  • 4. Visual Line Tracking
2. Visual Tracking
  • 1. Color Tracking
  • 2. Facial Tracking
  • 3. QR Code Tracking
  • 4. Object Recognition And Tracking
  • 5. Mediapipe Palm Tracking
  • 6. Mediapipe Gesture Tracking
  • 7. Mediapipe Human Pose Tracking
  • 8. KCF Object Tracking
  • 9. AprilTag Machine Code Tracking
3. Visual Following
  • 1. Color Follow
  • 2. Face Follow
  • 3. QR Code Follow
  • 4. Mediapipe Palm Follow
  • 5. Mediapipe Gesture Follow
  • 6. Mediapipe Human Posture Follow
  • 7. AprilTag Machine Code Follow
  • 8. Object Follow
11.Visual Advanced Course (Just for Superior version)
1. Visual Control
  • 1. QR Code Recognition Control Action
  • 2. AprilTag Control Car Action Group
  • 3. Gesture Control Car Action Group
  • 4. Visual Line Tracking
2. Visual Tracking
  • 1. Color Tracking
  • 2. Facial Tracking
  • 3. QR Code Tracking
  • 4. YOLO Object Recognition and Tracking
  • 5. Mediapipe Palm Tracking
  • 6. Mediapipe Gesture Tracking
  • 7. Mediapipe Human Pose Tracking
  • 8. KCF Object Tracking
  • 9. AprilTag Machine Code Tracking
3. Visual Follow
  • 1. Color Follow
  • 2. Face Follow
  • 3. QR Code Follow
  • 4. Mediapipe Palm Follow
  • 5. Mediapipe Gesture Follow
  • 6. Mediapipe Human Pose Follow
  • 7. AprilTag Machine Code Follow
  • 8. Object Follow
12.AI Large Model Basic and Applications Course
1. AI Large Model Preparation
  • 1.AI Large Model Preparation
2. AI Large Model Basic Course
  • 1. AI Large Model Types and Principles
  • 2. RAG Retrieval Augmented and Training Samples
  • 3. Embodied Intelligent System Architecture
  • 4. Embodied Intelligence Core Source Code
3. AI Large Model Development
  • 1. Register Model Service Account
  • 2. Configure API KEY
  • 3. Dify Introduction
  • 4. Dify Basic Features
  • 5. RAG Knowledge Base Deployment
  • 6. AI Application Development Chatbot
  • 7. RAG Knowledge Base and Chatbot
  • 8. AI Agent Workflow
4. AI Large Model (Text Version)
  • 1. Semantic Understanding and Instruction Following
  • 2. Multimodal Visual Understanding
  • 3. Multimodal Visual Understanding + Basic Control
  • 4. Multimodal Visual Understanding + Object Following
  • 5. Multimodal Visual Understanding + Visual Line Following
  • 6. Multimodal Visual Understanding + SLAM Navigation
  • 7. Multimodal Visual Understanding + SLAM Navigation + Visual Line Following
  • 8. Multimodal Visual Understanding + SLAM Navigation + Object Following
  • 9. Intent Inference + Multimodal Visual Understanding + SLAM Navigation
13.Openclaw Basics Course
  • 1. Openclaw Introduction
  • 2. Openclaw Core Concepts
  • 3. Openclaw Api-Key Configuration
  • 4. Openclaw Switching Models
  • 5. Openclaw System Prompt
  • 6. Openclaw Common CLI Command
14. Openclaw Interaction Course
  • 1. Openclaw Webchat Interaction
  • 2. Openclaw Tui Interaction
  • 3. Openclaw Whatsapp Interaction
15.Openclaw Development Course
  • 1. Openclaw Robot Mcp Service Integration
  • 2. Robot CLI Command Tools
  • 3. Robot-Control Plugin Tools
  • 4. Openclaw Skills Development
  • 5. Openclaw Scheduled Tasks
  • 6. Openclaw Multi Agent System
  • 7. Openclaw Proactive Interaction
  • 8. Openclaw Vector Memory
16.Openclaw Embodied Intelligence Course
  • 1. OpenClaw Natural Interaction + Basic Control
  • 2. OpenClaw Natural Interaction + Slam Navigation
  • 3. OpenClaw Natural Interaction + Multimodal Visual Understand
  • 4. OpenClaw Natural Interaction + Multimodal Visual Understand + Slam Navigation + Visual Follow
  • 5. OpenClaw Natural Interaction + Multimodal Visual Understand + Slam Navigation + Visual Track
17.Multi-machine Course
  • 1. Multi Machine Handle Control
  • 2. Multi Machine Keyboard Control
  • 3. Multi Machine Navigation
18.MicroROS-V2 Control Board Development Environment
  • 1. Set Up the ESP32-IDF Development Environment
  • 2. ESP32-IDF Configuration Tool
  • 3. ESP Flash Tool Flashing Firmware
  • 4. Install ESP32 Microros Components
  • 5. Install And Start Microros Agent
19.MicroROS-V2 Control Board ESP32 Basic Course
  • 1. Led Light Up
  • 2. Button Function
  • 3. Drive Buzzer
  • 4. Oled
  • 5. Usb Host Function
  • 6. Serial Communication
  • 7. Battery Voltage Detection
  • 8. Drive Pwm Servo
  • 9. Drive Motors
  • 10. Read Motor Encoder Data
  • 11. Pid Motor Speed Control
  • 12. Robot Kinematics Analysis Theory
  • 13. Read Imu Data
  • 14. Read Lidar Data
  • 15. Flash Data Storage
  • 16. Custom Partition Table
  • 17. Bluetooth Communication
  • 18. Wifi Connection
  • 19. ESP32 Visual Recognition Module
20.MicroROS-V2 Control Board Micro_ros Basic Course
  • 1. Publish Topics
  • 2. Subscribe To Topics
  • 3. Multi Topic Subscription And Publishing
  • 4. Subscribe To Buzzer Topic
  • 5. Subscribe To Pwm Servo Topic
  • 6. Subscribe To Speed Control Topic
  • 7. Publish Odometry Topic
  • 8. Publish Imu Data Topic
  • 9. Publish Lidar Data Topic
21. Linux System Course
  • 1.Introduction to Linux system
  • 2.Ubuntu file system
  • 3.Ubuntu common commands
  • 4.Ubuntu common editors
  • 5.Ubuntu software operation commands
  • 6.Virtual machine installation
  • 7.SSH remote control
  • 8.VNC remote control
  • 9.Transfer files remotely
  • 10.Driver library and communication
  • 11.Static IP and hotspot mode
  • 12.Bind device ID
  • 13.Capacity expansion and resource allocation
  • 14.Update system software sources
  • 15.Set root user password
  • 16.sudo free password
  • 17.Connect to WiFi network
  • 18.View system version
  • 19.Customized service management
  • 20.Back up system image
22.Docker Course
  • 1.Docker overview and docker installation
  • 2.Common commands for docker image containers
  • 3.Docker images deeply understand and publish images
23.ROS Basic Course
  • 1.Introduction to ROS2
  • 2.ROS2 install Humble
  • 3.ROS2 development environment
  • 4.ROS2 workspace
  • 5.ROS2 function package
  • 6.ROS2 node
  • 7.ROS2 topic communication
  • 8.ROS2 service communication
  • 9.ROS2 action communication
  • 10.ROS2 custom interface message
  • 11.ROS2 parameter service case
  • 12.ROS2 meta-function package
  • 13.ROS2 distributed communication
  • 14.ROS2 DDS
  • 15.ROS2 time related API
  • 16.ROS2 common command tools
  • 17.ROS2 rviz2 use
  • 18.ROS2 rqt toolbox
  • 19.ROS2 Launch startup file configuration
  • 20.ROS2 recording and playback tool
  • 21.ROS2 URDF model
  • 22.ROS2 Gazebo simulation platform
  • 23.ROS2 TF2 coordinate transformation
Download
  • Mapping_APP(iOS_Android)
  • Code
  • Software_Tools
  • VM_System_File
  • 3D_Model_File
  • ESP32_Firmware
  • Dify LLM Base
  • Instruction_Manual
  • VMware
Download ZIP

Welcome to MicroROS V2 Robot Car repository

2. Multi Machine Keyboard Control

Multi-Machine Keyboard Control

Multi-Machine Keyboard Control1. Course Overview2. Preparation2.1 Configure Robot Namespaces3. Demonstration Case4. Check Node Communication5. Source Code Analysis

1. Course Overview

  • Configure namespace for multiple robot chassis, and connect multiple MicroROSv2 robot cars via the Micro-ROS agent for synchronized control.

[!NOTE]

  • This course uses 2 MicroROSv2 robot cars for demonstration.

2. Preparation

2.1 Configure Robot Namespaces

  • After powering on the device, use a Type-C cable to connect the computer to the robot car.
  • Double-click the RobotManager application icon on the virtual machine desktop, select the Control page, and add the namespace of robot1 under ROS — rosnamespace.
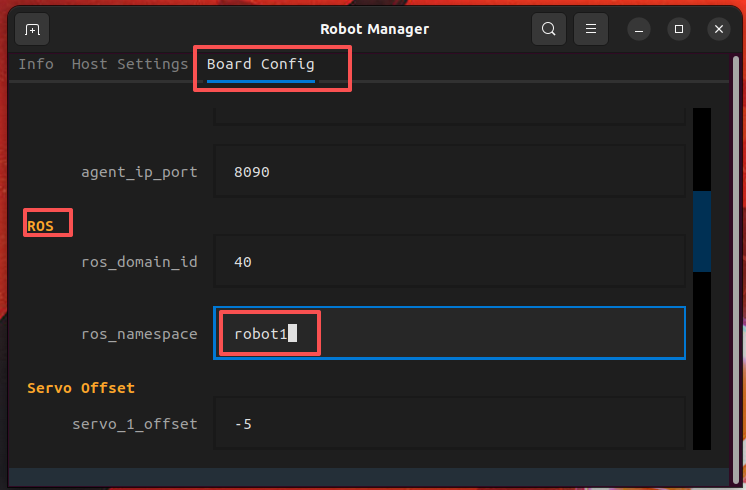
image-20260731160105047

  • Click Apply Configuration to write the parameters to the control board.
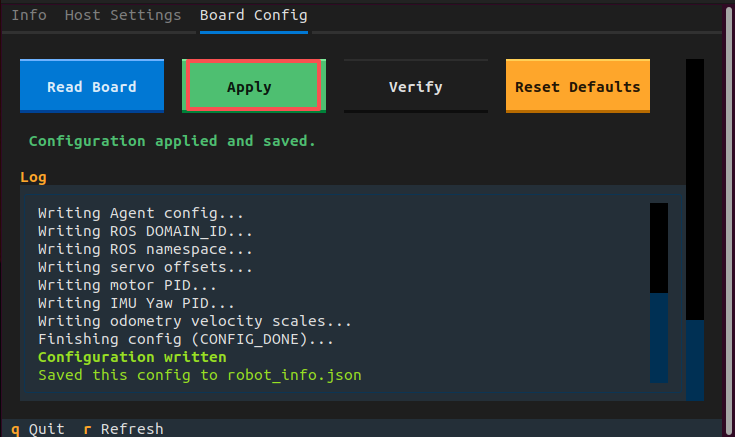
image-20260731160202338


  • robot2

Refer to the operation steps above to change the chassis namespace on the second robot car.
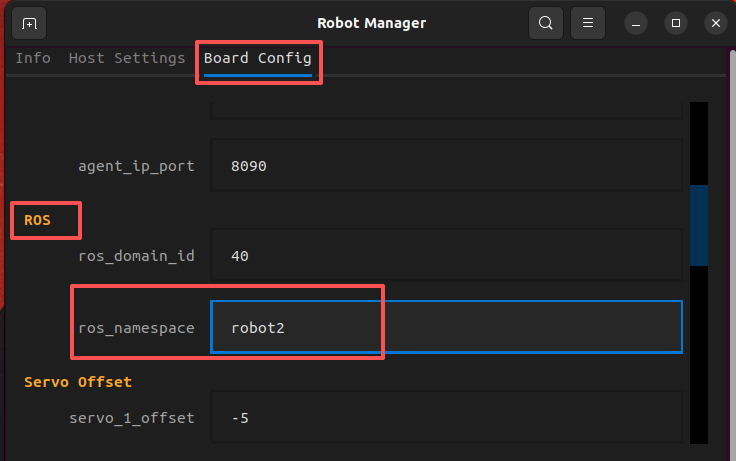
image-20260731160320801


3. Demonstration Case

ros2 launch microros_v2_bringup multi_robot_demo.launch.py demo:=keyboard robot_names:=robot1,robot2 camera_types:=ptz,ptz
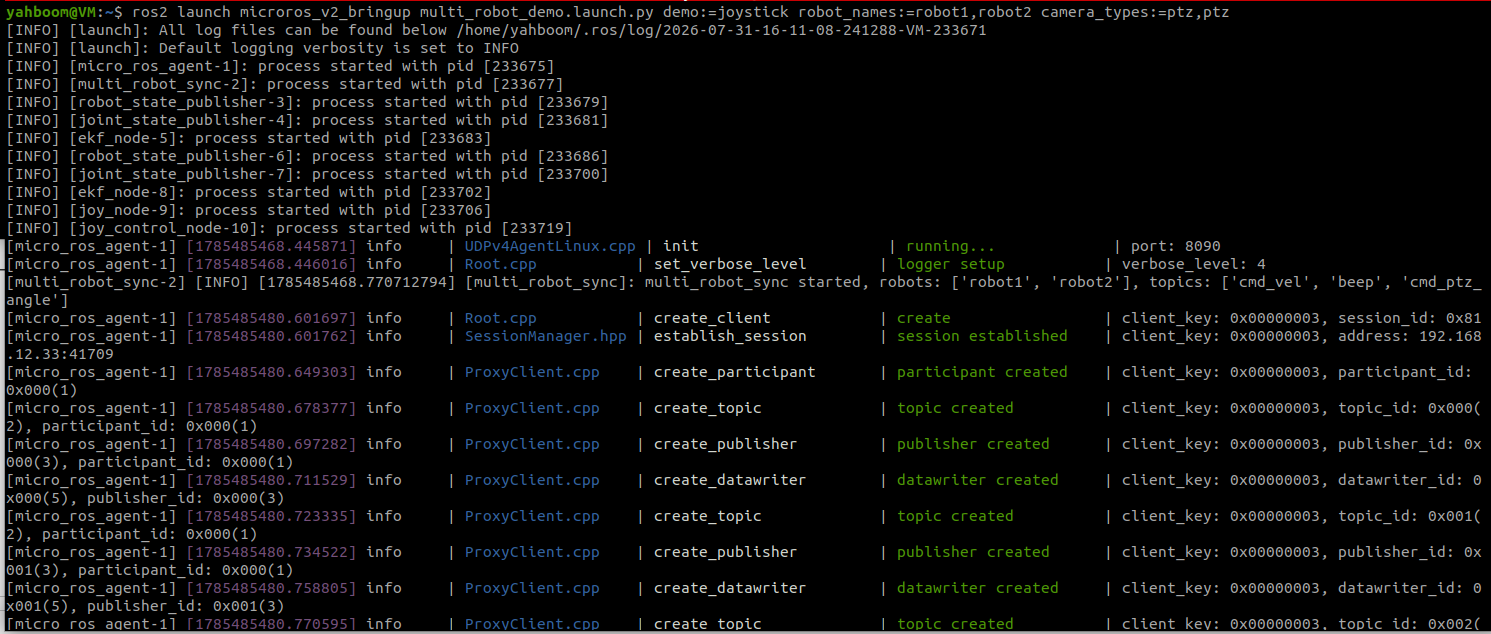
image-20260731161443427


  • Click the Keyboard UI with the mouse to perform synchronized keyboard control of the multiple robots.
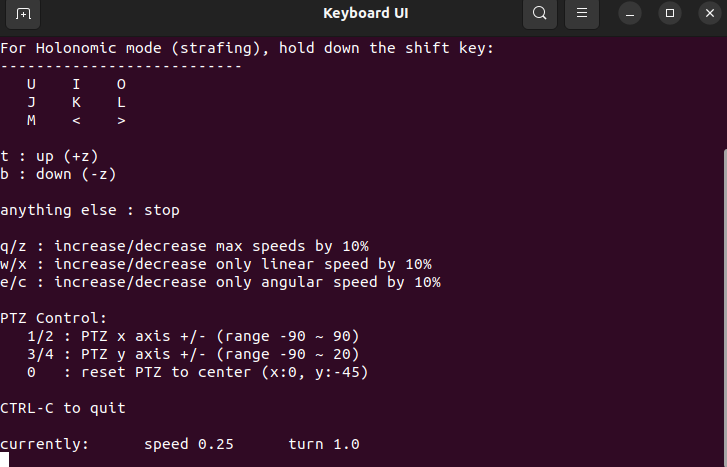
image-20260731164119528

[!TIP]

  • For setting up and operating multiple robots, refer to the above process. Just set a different namespace for each robot car, and make sure the parameters below actually match.
  • robot_names: List of robot names, separated by English commas. For example, robot1,robot2 means two MicroRosV2 robots.
  • camera_types: List of camera model types, separated by English commas. For example, ptz,no_ptz means the camera types of the two robots; the order matches the order of robot_names.


4. Check Node Communication

xxxxxxxxxx
rqt_graph
  • In the figure below, multi_robot_sync subscribes to the keyboard node's velocity control and servo PTZ control topics, and forwards the control commands to different robots.
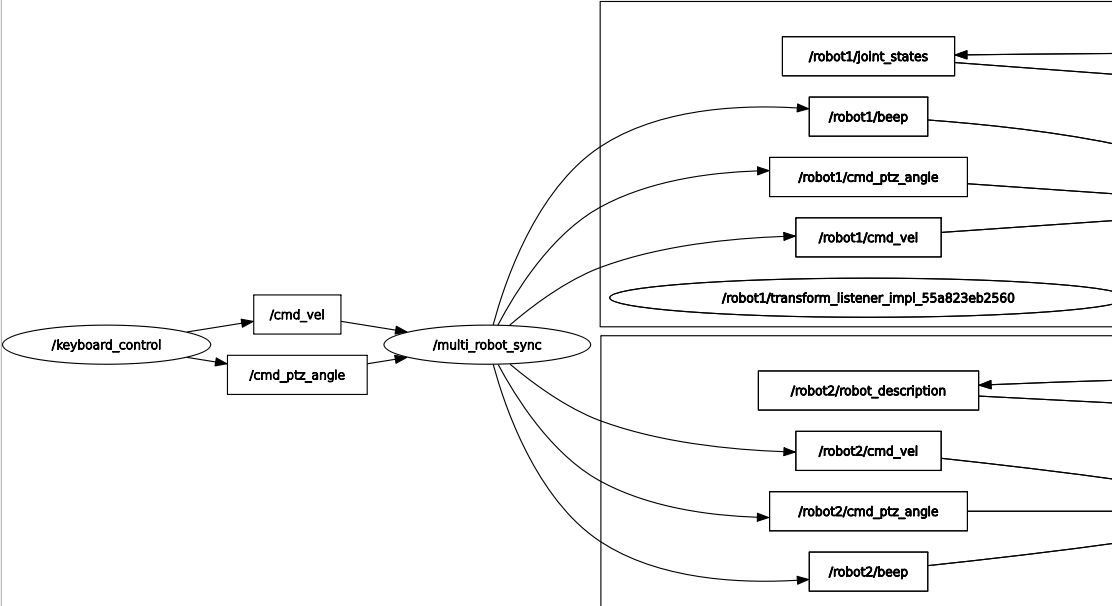
image-20260731164258930


5. Source Code Analysis

  • Source code path
xxxxxxxxxx
$HOME/microros_ws/src/common_demo/common_demo/multi_robot/multi_robot_sync.py
  • Launch file path
xxxxxxxxxx
$HOME/home/yahboom/microros_ws/src/microros_v2_bringup/multi_robot_demo.launch.py
  • This node is a message synchronization forwarder. It subscribes to the common topics published by the handle, then copies and forwards the messages to the namespaced topics of each robot.
  • SYNC_TOPICS: Defines the three topics to synchronize — cmd_vel (chassis velocity), beep (buzzer), and cmd_ptz_angle (PTZ angle).
  • Parameter declaration: Receives the list of robot names through the robot_names parameter, with a default value of ['robot1', 'robot2'], which can be passed in via the launch file at startup.
  • Creating publishers: Iterates over SYNC_TOPICS and creates a corresponding publisher under each robot's namespace, for example /robot1/cmd_vel, /robot2/cmd_vel.
  • Creating subscribers: Creates a non-namespaced subscriber for each topic (such as cmd_vel) to subscribe to the raw commands published by the handle node. Here lambda msg, t=topic: uses t=topic to correctly capture the current loop variable value in the closure.
  • sync_callback callback: After receiving a handle message, it retrieves all publishers for that topic from publishers_map and forwards the message unchanged one by one, so that each robot receives the same command, achieving synchronized control.
​x
SYNC_TOPICS = {
    'cmd_vel': Twist,
    'beep': UInt16,
    'cmd_ptz_angle': Vector3,
}
​
​
class MultiRobotSync(Node):
    def __init__(self):
        super().__init__('multi_robot_sync')
​
        self.declare_parameter('robot_names', ['robot1', 'robot2'])
        robot_names = [name.strip().strip('/') for name in
                       self.get_parameter('robot_names').value if name.strip()]
        if not robot_names:
            self.get_logger().error('robot_names is empty, nothing to sync')
​
​
        self.publishers_map = {}
        for topic, msg_type in SYNC_TOPICS.items():
            self.publishers_map[topic] = [
                self.create_publisher(msg_type, f'/{name}/{topic}', 10)
                for name in robot_names
            ]
            self.create_subscription(
                msg_type, topic,
                lambda msg, t=topic: self.sync_callback(t, msg), 10)
​
        self.get_logger().info(
            f'multi_robot_sync started, robots: {robot_names}, '
            f'topics: {list(SYNC_TOPICS.keys())}')
​
    def sync_callback(self, topic, msg):
        for pub in self.publishers_map[topic]:
            pub.publish(msg)


Multi Machine Handle Control
Multi Machine Navigation

COMPANY

  • About us
  • Team Style
  • Blog

LEARNING & EXPLORATION

  • Tutorials
  • Edge AI hardware
  • Educational robots
  • Embedded intelligent hardware

WHERE TO BUY

  • Yahboom Online Store
  • Amazon
  • Alibaba
  • AliExpress
  • Mercado

TECHNOLOGY SUPPORT

  • Email: support@yahboom.com

BE A DISTRIBUTOR

  • Email: sales@yahboom.com
QR Code

Copyright © 2017-2026 Yahboom. All Rights Reserved.

EN/中文