Welcome to MicroROS V2 Robot Car repository
3. Multi Topic Subscription And Publishing
Multi-Topic Subscription and Publishing
1. Experiment Objective
In this experiment, you will learn how to create multiple topic publishers and multiple topic subscribers simultaneously in the same micro-ROS node. Through this example, you will master managing multiple publishers/subscribers and multiple timers in a single node, as well as coordinating multiple handles within the same executor. This example creates 3 publishers (publisher_1, publisher_2, publisher_3) and 3 subscribers (subscriber_1, subscriber_2, subscriber_3) in a single node, all using the Int32 message type.
2. Experiment Principle
1. Keyword Explanation
| Keyword | Description |
|---|---|
| micro-ROS Agent | A proxy program running on the ROS2 host side, responsible for bridging communication between the ESP32 firmware and the ROS2 system, connecting with the microcontroller via the UDP protocol |
| publisher / subscriber | The publisher and the subscriber, the message-sending and message-receiving ends in the ROS2 communication model, decoupled through topics |
| rclc | A ROS2 client library for microcontrollers, providing lightweight node, publisher, subscriber, timer and other APIs, adapted to resource-constrained embedded devices |
| multi-handle executor | The multi-handle executor, where the same executor can manage multiple timer and subscriber handles at the same time, polling and processing them in order |
| executor handle count | The executor handle capacity, the maximum number of handles specified at initialization, which must be greater than or equal to the total number of handles actually added |
| QoS (Best Effort) | The "best effort" mode in the quality-of-service policy, which does not guarantee message delivery and ordering, suitable for scenarios with high real-time requirements but tolerant of a small amount of packet loss |
2. Technical Architecture
This experiment builds a multi-topic bidirectional communication channel between the ESP32 firmware and the ROS2 host:
Hardware layer: The MicroROS-V2 control board (ESP32) connects to the local network via Wi-Fi
Transport layer: Uses the UDP protocol, communicating with the ROS2 host through the micro-ROS Agent
Node configuration: Node name
esp32_pub_sub, managing 6 topics (3 publishers + 3 subscribers)Message type: All use
std_msgs/msg/Int32QoS mode: All publishers and subscribers use Best Effort, reducing the pressure on the multi-channel UDP communication link
Data flow: 3 timers (5 Hz period) → 3 timer callbacks →
rcl_publish()→ UDP → Agent → ROS2 topic bus; meanwhile, messages received from the ROS2 host go through Agent → UDP → executor → 3 subscription callbacks → serial port printingExecutor configuration: Handle capacity = 6 (3 timers + 3 subscribers), timeout 100 ms
3. Core Topic Quick Reference
Firmware Uplink (Published to ROS2 Host)
| Topic | Message Type | QoS | Description |
|---|---|---|---|
/publisher_1 | std_msgs/msg/Int32 | Best Effort | Published by the timer callback, 5 Hz incrementing integer |
/publisher_2 | std_msgs/msg/Int32 | Best Effort | Same as above |
/publisher_3 | std_msgs/msg/Int32 | Best Effort | Same as above |
Firmware Downlink (Subscribed from ROS2 Host)
| Topic | Message Type | QoS | Field | Range | Direction |
|---|---|---|---|---|---|
/subscriber_1 | std_msgs/msg/Int32 | Best Effort | data (int32) | Any integer value | Input, printed to serial port |
/subscriber_2 | std_msgs/msg/Int32 | Best Effort | data (int32) | Any integer value | Input, printed to serial port |
/subscriber_3 | std_msgs/msg/Int32 | Best Effort | data (int32) | Any integer value | Input, printed to serial port |
Usage Example:
x# View the published topicsros2 topic echo /publisher_1
# Publish messages to the subscribersros2 topic pub /subscriber_1 std_msgs/msg/Int32 "data: 100"4. Middleware Configuration
micro-ROS uses a static memory model (RCUTILS_AVOID_DYNAMIC_ALLOCATION=ON), all entity memory is pre-allocated at compile time, and runtime dynamic creation is not supported.
Configuration file:
~/esp/extra_components/micro_ros_espidf_component/colcon.meta
| RMW_UXRCE_TRANSPORT | udp | UDP transport (Wi-Fi communication) |
| RMW_UXRCE_MAX_PUBLISHERS | 6 | Maximum number of publishers |
| RMW_UXRCE_MAX_SUBSCRIPTIONS | 6 | Maximum number of subscribers |
| RMW_UXRCE_MAX_NODES | 1 | Maximum number of nodes |
| RMW_UXRCE_MAX_SERVICES | 0 | Services not supported |
| RMW_UXRCE_MAX_CLIENTS | 0 | Clients not supported |
| RMW_UXRCE_MAX_HISTORY | 1 | History depth = 1, no message queuing |
| UCLIENT_UDP_TRANSPORT_MTU | 4096 | Maximum UDP packet size 4 KB |
| UCLIENT_MIN_HEARTBEAT_TIME_INTERVAL | 1 | Agent heartbeat interval 1 ms |
Key Constraints:
MAX_HISTORY=1means there is no message buffer queue, so uplink topics (firmware → host) uniformly use best_effort QoSMAX_SERVICES=0, MAX_CLIENTS=0means only topic communication is supported, not Service/ClientAfter modifying
colcon.meta, the micro-ROS library must be recompiled for the changes to take effect: runidf.py clean-microrosin the project directory to clean and rebuild the micro-ROS library, thenidf.py buildto compile the firmware
Resource usage analysis of this experiment:
This experiment uses 3 publishers + 3 subscribers = 6 entities, approaching the limits of MAX_PUBLISHERS=6 and MAX_SUBSCRIPTIONS=6. If more topics are needed:
Modify the values of
RMW_UXRCE_MAX_PUBLISHERS/RMW_UXRCE_MAX_SUBSCRIPTIONSincolcon.metaCorrespondingly increase the executor handle count in the firmware code
#define EXECUTOR_HANDLE_COUNTRecompile the micro-ROS library and the firmware
3. Experiment Steps
1. Hardware Preparation
| Hardware | Requirement |
|---|---|
| MicroROS-V2 control board | ✅ Required |
| USB Type-C cable | ✅ Required |
| Wi-Fi network (2.4 GHz) | ✅ Required |
2. Prerequisites
The ESP32-IDF development environment has been set up
The MicroROS-V2 control board is connected to the computer via USB
Configure the Wi-Fi SSID, password, Agent IP and port via
idf.py menuconfig(themicro_rosmenu item)xxxxxxxxxxcd ~/esp/microROS_samples/publisher_subscribersource ~/esp/esp-idf/export.shidf.py menuconfig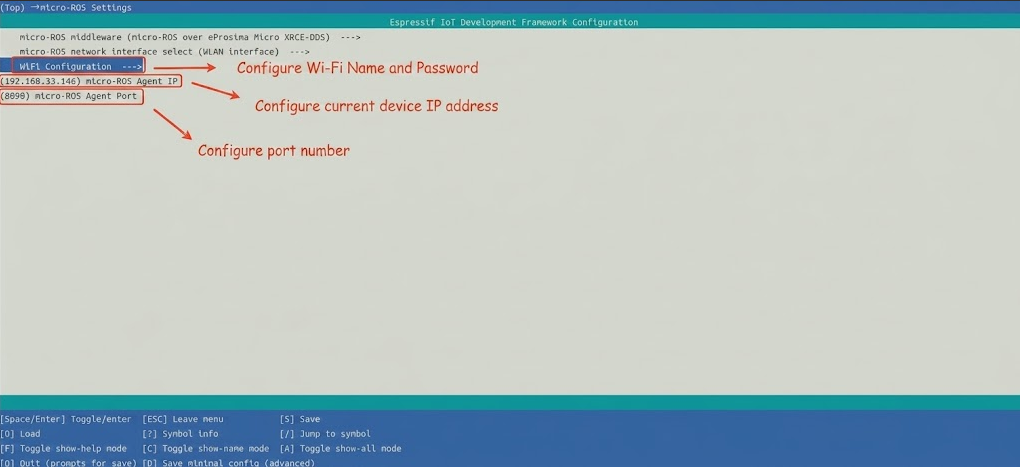
Select example-app setting to set the domain ID to be consistent with the virtual machine
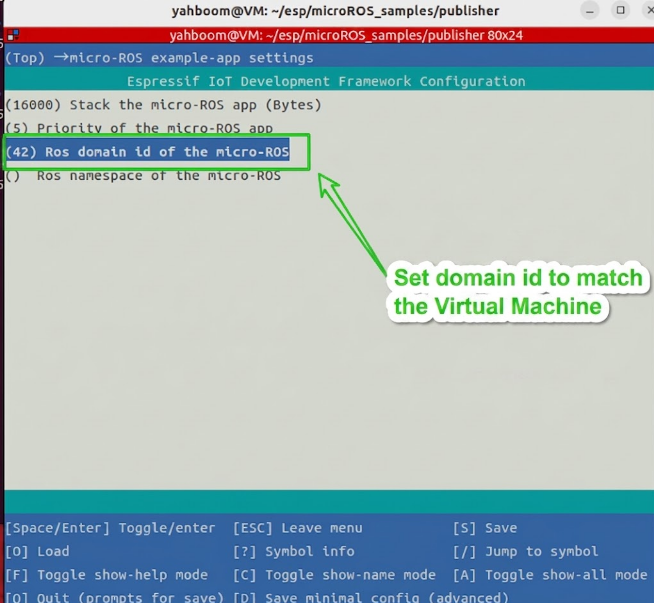
After configuration, press "s" to save and press "q" to exit the configuration interface.
3. Start micro_ros_agent (Terminal 1)
Start the micro-ROS Agent on the ROS2 host:
xxxxxxxxxxcd ~/uros_wssource install/local_setup.bashros2 run micro_ros_agent micro_ros_agent udp4 --port 8090 -v44. Build and Flash (Terminal 2)
xxxxxxxxxx
cd ~/esp/microROS_samples/publisher_subscribersource ~/esp/esp-idf/export.shidf.py build flash monitor
5. How to Stop
Press
Ctrl+]in Terminal 2 to exit the serial monitor (stop firmware execution)Press
Ctrl+Cin Terminal 1 to stop micro_ros_agent
4. Experiment Result
After the build and flash succeed, on the ROS2 host you can:
View the published topics:
xxxxxxxxxx# View the 3 publisher topicsros2 topic echo /publisher_1ros2 topic echo /publisher_2ros2 topic echo /publisher_3Each topic is expected to output incrementing integers at 5 Hz.
Publish messages to the subscribers:
xxxxxxxxxxros2 topic pub /subscriber_1 std_msgs/msg/Int32 "data: 100"ros2 topic pub /subscriber_2 std_msgs/msg/Int32 "data: 200"ros2 topic pub /subscriber_3 std_msgs/msg/Int32 "data: 300"The control board serial port will output:
xxxxxxxxxxI (xxx) MAIN: Agent reachable: 192.168.x.x:8888I (xxx) MAIN: free heap before support init: xxxI (xxx) MAIN: stack watermark before support init: xxxI (xxx) MAIN: free heap after support init: xxxI (xxx) MAIN: stack watermark after support init: xxxSub1 Received: 100Sub2 Received: 200Sub3 Received: 300
5. Program Analysis
Source code paths:
Firmware source code:
~/esp/microROS_samples/publisher_subscriber/main/main.c
1. Main Program Logic
main/main.c is the program entry point, and the flow is as follows:
app_main()initializes the Wi-Fi network and disables power saving modeCreates the
micro_ros_tasktask, in which:Zero-initializes the 6 ROS resources one by one (3 publishers, 3 subscribers, 3 timers, 6 message variables)
Waits for the micro-ROS Agent to be reachable
Initializes the rclc support layer
Creates the ROS2 node
esp32_pub_subInitializes 3 Best Effort publishers (
publisher_1,publisher_2,publisher_3)Initializes 3 Best Effort subscribers (
subscriber_1,subscriber_2,subscriber_3)Creates 3 timers, all with a publish period of 200 ms
Creates the executor (
EXECUTOR_HANDLE_COUNT=6) and adds all 6 handlesDrives the executor in the main loop
2. Key Components
Node resource configuration:
Parameter definition file:
~/esp/microROS_samples/publisher_subscriber/main/main.c
| Configuration Item | Value | Description |
|---|---|---|
| Node name | esp32_pub_sub | ROS2 node name |
| Number of publishers | 3 | publisher_1, publisher_2, publisher_3 |
| Number of subscribers | 3 | subscriber_1, subscriber_2, subscriber_3 |
| Message type (all) | std_msgs/msg/Int32 | 32-bit integer message |
| Publish frequency | 5 Hz (200 ms period) | All 3 timers share the same 200 ms period |
| Executor handle count | 6 | 3 timers + 3 subscribers |
| Executor timeout | 100 ms | Longer than the basic example to ensure all handles are processed |
Timer callback functions:
The 3 timers are bound to independent callback functions timer1_callback, timer2_callback, timer3_callback, each of which increments the data field of the corresponding message after a successful publish. On publish failure, rate-limited printing is performed (printed once every 50 failures):
Source file:
~/esp/microROS_samples/publisher_subscriber/main/main.c
xxxxxxxxxxstatic void timer1_callback(rcl_timer_t *timer, int64_t last_call_time){    RCLC_UNUSED(last_call_time);
    if (timer == NULL) {        return;    }
    rcl_ret_t rc = rcl_publish(&publisher_1, &msg_pub1, NULL);    if (rc == RCL_RET_OK) {        msg_pub1.data++;    } else {        pub1_fail_cnt++;        if ((pub1_fail_cnt % 50U) == 1U) {            printf("publisher_1 publish failed, rc=%d, cnt=%lu\n",                   (int)rc, (unsigned long)pub1_fail_cnt);            if (rcl_error_is_set()) {                print_rcl_error_limited("rcl_publish(&publisher_1, &msg_pub1, NULL)",                                        __LINE__, rc);            }        }    }}
Subscription callback functions:
The 3 subscribers are bound to 3 callback functions respectively, which print the received message to the serial port:
Source file:
~/esp/microROS_samples/publisher_subscriber/main/main.c
xxxxxxxxxxstatic void subscription_1_callback(const void *msgin){ const std_msgs__msg__Int32 *msg = (const std_msgs__msg__Int32 *)msgin; printf("Sub1 Received: %d\n", (int)msg->data);}Executor registration order:
Source file:
~/esp/microROS_samples/publisher_subscriber/main/main.c
xxxxxxxxxx// 1. Add timersRCCHECK(rclc_executor_add_timer(&executor, &timer_1));RCCHECK(rclc_executor_add_timer(&executor, &timer_2));RCCHECK(rclc_executor_add_timer(&executor, &timer_3));
// 2. Add subscribersRCCHECK(rclc_executor_add_subscription(    &executor, &subscriber_1, &msg_sub1, &subscription_1_callback, ON_NEW_DATA));RCCHECK(rclc_executor_add_subscription(    &executor, &subscriber_2, &msg_sub2, &subscription_2_callback, ON_NEW_DATA));RCCHECK(rclc_executor_add_subscription(    &executor, &subscriber_3, &msg_sub3, &subscription_3_callback, ON_NEW_DATA));
Notes on multiple handles:
The executor's
EXECUTOR_HANDLE_COUNTmust be greater than or equal to the total number of handles actually added, otherwise initialization will failEach timer and subscriber needs its own independent variable instance; they cannot be shared
All resources must be initialized before entering the main loop
Conditional compilation with
#ifdef CONFIG_MICRO_ROS_ESP_XRCE_DDS_MIDDLEWAREis used to support multiple middlewares
6. Common Problems
| Problem | Cause | Solution |
|---|---|---|
| Executor initialization fails | Insufficient handle count | Ensure EXECUTOR_HANDLE_COUNT (value 6) ≥ the actual total number of handles (3 timers + 3 subscribers = 6) |
| Some topics receive no messages | Topic name mismatch or the Agent has not completed registration | Wait a moment and retry; confirm the topic names match those in the code |
| Uneven publish frequency | Multiple timers competing for the same executor | The executor timeout has been set to 100 ms to ensure enough time to process all handles; it can be increased as needed |
| High Wi-Fi load causes packet loss | 6 topics communicating simultaneously, high pressure on the UDP link | All publishers and subscribers use Best Effort mode to reduce transmission overhead |