Welcome to MicroROS V2 Robot Car repository
7. Mediapipe Human Pose Tracking
Mediapipe Human Pose Tracking (PTZ)
1. Experiment Objective
The PTZ pan-tilt tracks the human body position. Based on MediaPipe Pose, it detects 33 whole-body landmarks (including face, hands, and feet), uses the average center of all landmarks as the tracking target, and drives the pan-tilt with PD control so that the human body stays at the center of the frame.
2. Experiment Principle
1. Key Terms
| Term | Description |
|---|---|
| MediaPipe Pose | Google's open-source human pose estimation framework; detects 33 whole-body landmarks (including face, hands, and feet) |
| Pose Landmark Average Center | The arithmetic mean of the coordinates of all detected landmarks, used as an estimate of the overall human body position |
| Visual Tracking | Detects and continuously locks onto a target through a vision algorithm; only the pan-tilt follows, the car does not move |
| PTZ Pan-Tilt | A two-degree-of-freedom servo pan-tilt; s1 rotates horizontally and s2 tilts, controlled via the /cmd_ptz_angle topic |
| PD Control | Proportional-derivative control; computes the pan-tilt angle step from the target offset and the offset change rate |
| Deadband | When the target offset is within the deadband pixel range, the pan-tilt does not move, avoiding continuous jitter caused by tiny errors |
2. Technical Architecture
State estimation (ekf_filter_node + camera_node) → pose_tracker_ptz_node → /cmd_ptz_angle → firmware servo control
Node chain explanation:
- ekf_filter_node: Extended Kalman filter node that fuses IMU/odometry data for state estimation
- camera_node: Camera driver node that handles the image topic published by the ESP32
- pose_tracker_ptz_node: MediaPipe human pose tracking node that detects 33 landmarks, computes the average center, and calculates the pan-tilt angle step with a PD controller
- /cmd_ptz_angle: PTZ servo angle command topic, bridged to the ESP32 firmware by micro_ros_agent, controlling the s1 (horizontal) and s2 (tilt) servos
3. Core Topics Quick Reference
Firmware Uplink (ESP32 firmware → micro_ros_agent → ROS2 node)
| Topic Name | Type | QoS | Description |
|---|---|---|---|
/camera/image_raw | sensor_msgs/Image | BEST_EFFORT, KEEP_LAST, depth=1, VOLATILE | Raw image frames published by the ESP32 camera |
Firmware Downlink (ROS2 node → micro_ros_agent → ESP32 firmware)
| Topic Name | Type | QoS | Description |
|---|---|---|---|
/cmd_ptz_angle | geometry_msgs/Vector3 | RELIABLE, KEEP_LAST, depth=10 | PTZ pan-tilt angle command (s1: horizontal angle, s2: tilt angle) |
ROS2 Internal (inter-node communication)
| Topic Name | Type | QoS | Description |
|---|---|---|---|
/camera/image_raw | sensor_msgs/Image | BEST_EFFORT | Camera image (bridged to ROS2 by micro_ros_agent; subscribed by the tracking node) |
/cmd_ptz_angle | geometry_msgs/Vector3 | RELIABLE | PTZ angle command (published by the tracking node; bridged to the firmware by micro_ros_agent) |
3. Experiment Steps
1. Hardware Preparation
| Hardware | Requirement |
|---|---|
| PTZ version | ✅ |
| No-PTZ version | ❌ |
| Required peripherals | ESP32 camera (pan-tilt) + PTZ servo |
2. Start Agent + Camera + Joint Model (Terminal 1)
xxxxxxxxxxros2 launch microros_v2_bringup car_base.launch.py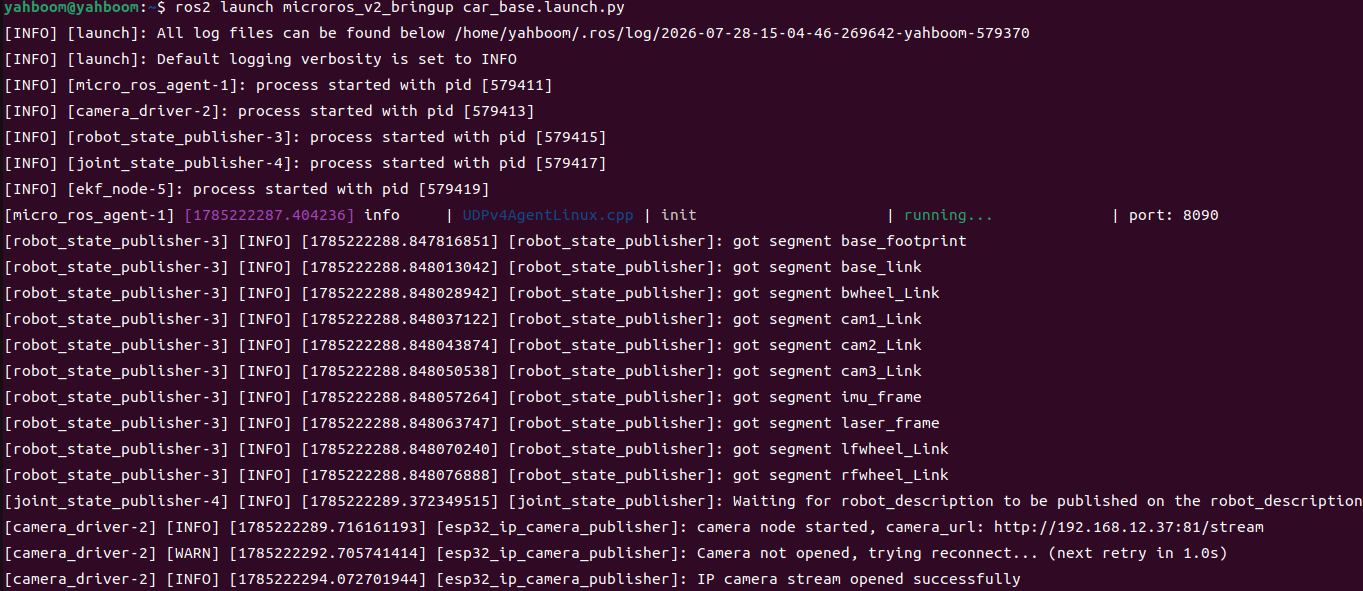
3. Start Mediapipe Human Pose Tracking (Terminal 2)
Open a second terminal, activate the MediaPipe environment, and start the human pose tracking node:
xxxxxxxxxxros2 launch microros_v2_ptz_visual_control_pkg pose_tracker_ptz.launch.py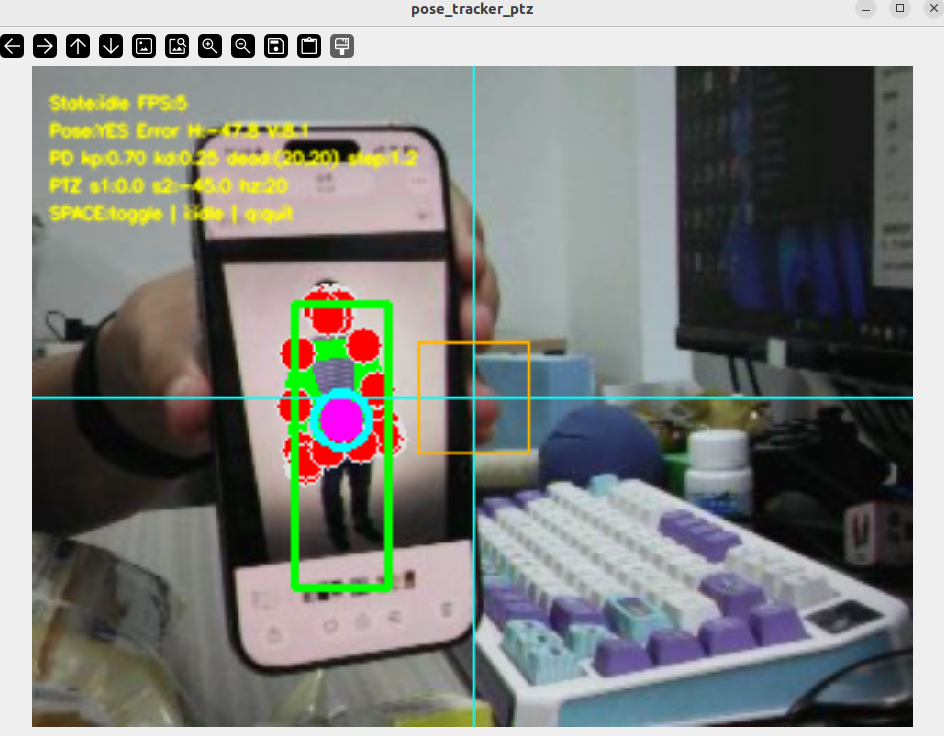
4. Operation Instructions
After startup, the node uses two independent timers: image processing (image_processing_rate_hz = 15 Hz) + pan-tilt control (control_rate_hz = 20 Hz). Minimal two-state machine: idle ↔ tracking.
Image reception and preprocessing
Subscribes to /camera/image_raw (QoS: BEST_EFFORT, KEEP_LAST); the image callback converts and caches the raw Image. The image processing timer takes a copy of the latest frame, scales it to the processing resolution (processing_width×processing_height = 320×240), and flips/rotates as needed.
MediaPipe Pose detection
Uses PoseDetector (based on MediaPipe Pose, detection confidence = pose_detection_confidence = 0.5, tracking confidence = pose_tracking_confidence = 0.5) to detect the human pose. pubPosePoint() returns the drawn image frame, the list of 33 landmarks, and the bbox information.
Tracking target computation
Takes the mean of the x coordinates and the mean of the y coordinates of all detected 33 landmarks as the overall body center (cx, cy). This algorithm is more stable than a single landmark (such as the nose tip): even if some landmarks are occluded or leave the frame, a good position estimate is still maintained.
Pose visualization
On-screen overlay: 33 landmarks and the skeleton connections (MediaPipe default style), a green bbox around the body, and a purple solid circle (tracking point) at the body center.
PD pan-tilt control (tracking + body present only)
Fixed-rate 20 Hz PD control: body center pixel coordinates → normalized error → PD step → limiting (±max_ptz_step = 1.2°) → step smoothing (α = ptz_step_smooth_alpha = 0.35) → direction reversal (horizontal not reversed, tilt reversed) → angle smoothing (α = ptz_smooth_alpha = 0.85) → clamp the angle and publish. When there is no body, no control is output, but the state is not changed and the PD history is not reset — tracking resumes seamlessly once the body is re-detected.
Shortcut keys
| Key | Function | Description |
|---|---|---|
| Space | idle ↔ tracking | Toggles between standby and tracking |
| i / I | Back to idle | Stops tracking and pan-tilt control |
| q / Q / ESC | Exit | Force-exits the node process with os._exit(0) |
On-screen overlay: The debug window shows the state (idle/tracking), frame rate, body detection status (YES/NO), tracking error H/V, PD parameters, pan-tilt angle, and control rate. A crosshair is drawn at the frame center + an orange deadband rectangle.
Safety and Edge Cases
- No body, no control: when no body is detected, the PD outputs nothing, but the state is not reset; tracking resumes seamlessly once a body is re-detected
- Pan-tilt angle limiting: horizontal [-90°, 90°], tilt [-90°, 20°]
- Deadband protection: the step is forced to zero when the body center offset is within the deadband (20 px)
- Initial PTZ publish at startup: the initial angle (0°, -45°) is published 20 times at 0.2 s intervals
- Exit strategy: press q/ESC to exit directly with
os._exit(0) - Runtime parameter validation: full range validation for all PD/image/detection parameters
5. How to Stop
Press Ctrl+C in the two terminals to stop each process; it is recommended to close them in the reverse order:
xxxxxxxxxx# Terminal 2: press Ctrl+C to stop the pose tracking node# Terminal 1: press Ctrl+C to stop micro_ros_agent4. Experiment Observations
- idle state: The frame streams in real time; pose detection works normally but no pan-tilt control is output, and the state is
idle - tracking + body present: The pan-tilt follows the body center with PD control; the 33-landmark skeleton + green bbox + purple tracking point are overlaid, and the frame shows "Pose:YES" and the error information
- tracking + body moved out of frame: The frame shows "Pose:NO", the pan-tilt stays at its last position, and tracking resumes automatically when the body reappears
- Body within the deadband: The step is zeroed and the pan-tilt stays completely still without jitter
- Some landmarks occluded: The body center is computed by averaging all detectable landmarks, so a reasonable position estimate is still maintained
- Multiple bodies: MediaPipe Pose takes the main body in the frame by default and tracks its center
- Press i to return to idle: The pan-tilt stays at its current position; press Space to re-enter tracking
5. Program Analysis
Source code paths:
- Launch file:
~/microros_ws/src/microros_v2_ptz_visual_control_pkg/launch/pose_tracker_ptz.launch.py- Node file:
~/microros_ws/src/microros_v2_ptz_visual_control_pkg/microros_v2_ptz_visual_control_pkg/pose_tracker_ptz_node.py- Pose detector:
~/microros_ws/src/microros_v2_ptz_visual_control_pkg/microros_v2_ptz_visual_control_pkg/pose_detector.py
1. Core Node Analysis
Node initialization (__init__) — create subscribers, publishers, the PoseDetector instance, and dual timers
xclass PoseTrackerPtzNode(Node): def __init__(self) -> None: super().__init__(DEFAULT_NODE_NAME) self._image_lock = threading.Lock() self._pose_lock = threading.Lock() self._latest_frame: Optional[np.ndarray] = None self._state = STATE_IDLE # "idle" ↔ "tracking" self._has_pose = False self._target_x: Optional[float] = None self._target_y: Optional[float] = None self._h_deg = 0.0 # PTZ horizontal angle self._p_deg = 0.0 # PTZ tilt angle # PD history self._prev_err_x = 0.0 self._prev_err_y = 0.0 self._prev_ctrl_t = 0.0 self._last_sx = 0.0 self._last_sy = 0.0 self._declare_params() # declare all ROS2 parameters self._load_params() # load parameters into instance variables self._h_deg = float(self._init_h_deg) self._p_deg = float(self._init_p_deg) # Initialize the MediaPipe Pose detector self._pose_det = PoseDetector( detectionCon=float(self._pose_conf), trackCon=float(self._pose_track_conf), ) # Create the image subscription (BEST_EFFORT QoS) self._img_sub = self.create_subscription( Image, self._img_topic, self._on_image, QoSProfile(history=QoSHistoryPolicy.KEEP_LAST, depth=1, reliability=QoSReliabilityPolicy.BEST_EFFORT, durability=QoSDurabilityPolicy.VOLATILE), ) # Create the PTZ angle publisher self._ptz_pub = self.create_publisher(Vector3, self._ptz_topic, 10) # Image processing timer (15 Hz) self._img_timer = self.create_timer( 1.0 / max(float(self._img_rate), MINIMUM_TIMER_RATE_HZ), self._process_image, ) # Pan-tilt control timer (20 Hz) self._ctrl_timer = None self._rebuild_ctrl_timer(False) # Initial PTZ angle publishing if self._pub_init_ptz: self._start_init_ptz() self.get_logger().info( f"Pose tracker PTZ started. SPACE=toggle, i=idle, q=quit. " f"ctrl={self._ctrl_rate:.0f}Hz img={self._img_rate:.0f}Hz" )Human pose detection (_detect) — 33-landmark average center computation
xxxxxxxxxxdef _detect(self, frame: np.ndarray) -> None: # Call PoseDetector to detect the human pose, returning the drawn frame and the landmark list frame, pose_points, _ = self._pose_det.pubPosePoint(frame) if not pose_points: with self._pose_lock: self._has_pose = False return # Compute the mean x/y of all 33 landmarks as the body center xs = [float(p[1]) for p in pose_points] ys = [float(p[2]) for p in pose_points] cx = sum(xs) / len(xs) cy = sum(ys) / len(ys) # Draw the purple tracking point + green bbox cv.circle(frame, (int(cx), int(cy)), 8, (255, 0, 255), -1) cv.circle(frame, (int(cx), int(cy)), 10, (255, 255, 0), 2) cv.rectangle(frame, (int(min(xs)), int(min(ys))), (int(max(xs)), int(max(ys))), (0, 255, 0), 2) with self._pose_lock: self._has_pose = True self._target_x = float(cx) self._target_y = float(cy)PD pan-tilt control (_ctrl_tick) — normalized error → PD step → smoothing → clamped publish
xxxxxxxxxxdef _ctrl_tick(self) -> None: if self._state != STATE_TRACKING: return with self._pose_lock: tx = self._target_x ty = self._target_y has_pose = self._has_pose if not has_pose or tx is None or ty is None: return # Compute the pixel offset icx = float(self._proc_w) * 0.5 icy = float(self._proc_h) * 0.5 pex = float(tx - icx) pey = float(ty - icy) # Deadband handling: force to zero when the offset is within the deadband cx = abs(pex) < self._db_x cy = abs(pey) < self._db_y if cx: pex = 0.0 if cy: pey = 0.0 # Compute dt n = time.perf_counter() dt = n - self._prev_ctrl_t if self._prev_ctrl_t > 0.0 else 1.0 / max(...) dt = max(dt, 1e-3) # Normalization + derivative nex = pex / icx ney = pey / icy dx = (nex - self._prev_err_x) / dt dy = (ney - self._prev_err_y) / dt # PD step computation + limiting rx = clamp((self._kp * nex + self._kd * dx) * self._max_step, -self._max_step, self._max_step) ry = clamp((self._kp * ney + self._kd * dy) * self._max_step, -self._max_step, self._max_step) # Step EMA smoothing a = self._step_alpha sx = (1.0 - a) * self._last_sx + a * rx sy = (1.0 - a) * self._last_sy + a * ry if cx: sx = 0.0; nex = 0.0 if cy: sy = 0.0; ney = 0.0 self._prev_err_x = nex self._prev_err_y = ney self._prev_ctrl_t = n self._last_sx = sx self._last_sy = sy # Direction reversal if self._rev_h: sx = -sx if self._rev_p: sy = -sy # Angle smoothing + limiting + publish sa = self._ptz_alpha self._h_deg = clamp((1.0 - sa) * self._h_deg + sa * clamp(self._h_deg + sx, ...), ...) self._p_deg = clamp((1.0 - sa) * self._p_deg + sa * clamp(self._p_deg + sy, ...), ...) self._pub_ptz()2. Key Parameters
Parameter definition file:
~/microros_ws/src/microros_v2_ptz_visual_control_pkg/launch/pose_tracker_ptz.launch.py
| Parameter | Type | Default Value | Description |
|---|---|---|---|
pd_kp / pd_kd | float | 0.7 / 0.25 | PD proportional/derivative gains |
control_rate_hz | float | 20.0 Hz | Pan-tilt control rate |
image_processing_rate_hz | float | 15.0 Hz | Image processing rate |
deadband_x / deadband_y | float | 20.0 / 20.0 px | Horizontal/vertical deadband |
max_ptz_step | float | 1.2° | Maximum single angle step |
ptz_step_smooth_alpha | float | 0.35 | Step EMA smoothing coefficient |
ptz_smooth_alpha | float | 0.85 | Pan-tilt angle EMA smoothing coefficient |
pose_detection_confidence | float | 0.5 | Pose detection confidence threshold |
pose_tracking_confidence | float | 0.5 | Pose tracking confidence threshold |
processing_width / processing_height | int | 320 / 240 px | Processing resolution |
display_width / display_height | int | 960 / 720 px | Debug display resolution |
initial_horizontal_deg / initial_pitch_deg | float | 0.0° / -45.0° | Initial pan-tilt angles |
6. Frequently Asked Questions
| Problem | Cause | Solution |
|---|---|---|
| Obvious lag | Pose inference (33 landmarks) is computationally heavy + the 15 Hz image processing adds double delay | Lower the processing resolution (e.g., 240×180) or accept some tracking delay |
| Tracking center offset | Some landmarks (e.g., limb tips) are far from the body center, skewing the mean | This is normal — the mean center reflects the overall distribution; for extreme offsets, run ros2 param set /pose_tracker_ptz_node deadband_x 30.0 and ros2 param set /pose_tracker_ptz_node deadband_y 30.0 to adjust the deadband |
| No detection after startup | The MediaPipe environment script was not sourced | First run source /opt/ros/humble/setup.bashsource ~/microros_ws/install/setup.bash |
| Body lost when partially out of frame | Fewer landmarks make the mean jump | Keep the body in the center region of the frame; the pan-tilt tracking auto-centers it |