yahboom
HomeLearn
Solution
Blog
Online Store
About Us
EN/中文
MicroROS V2 Robot Car📖
01.Introduction
  • 0.Unboxing Video
  • 1. Readme Learning Route
  • 2. Must Read Before Use
  • 3. Introduction to MicroROS V2 Control Board
  • 4. Introduction to LiDAR
  • 5. Introduction to ESP32 Camera Module
  • 6. FAQ
  • 7. About Charging
02.Assembly course
  • Assembly Video
03.Preparation
  • 1. Quickly Start
  • 2. Write Firmware
  • 3. Install VM and Start System
  • 4. Configure VM and Connect Robot
  • 5. Connect to MicroROS Agent
04.Quick start control course
  • 1. VM Keyboard Remote Control
  • 2. VM Handle Remote Control
  • 3. USB Handle Control
05.Robot control course
  • 1. Robot Information Release
  • 2. Robot Keyboard Control
  • 3. Robot Handle Control
  • 4. Robot State Estimation
  • 5. Linear Speed Calibration
  • 6. Angular Velocity Calibration
  • 7. Robot URDF Model
06.Lidar course
  • 1. Precautions for LiDAR Mapping and Navigation
  • 2. Lidar Avoid
  • 3. Lidar Following
  • 4. Lidar Guard
  • 5. Lidar Patrol
  • 6. Gmapping Mapping
  • 7. Cartographer Mapping
  • 8. Cartographer Quickly Repositioning Navigation
  • 9. Slam Toolx Mapping
  • 10. Navigation2 Single Point Navigation
  • 11. Navigation2 Multi Point Navigation
  • 12. Ros Robot App Mapping And Navigation
07.Road network planning
  • 1. Introduction to Road Network Planning and Quick Start
  • 2. Build a Pose Map
  • 3. Road Network Annotation
  • 4. Planning and Navigation Between Road Networks
  • 5. Road Network Navigation in Any Pose
  • 6. Path Replanning
08.Vision basic course
OpenCV Image Processing
  • 1. Introduction to OpenCV Source CV
  • 2. Open Source CV Geometric Transformation
  • 3. Open Source CV Image Processing and Drawing Text Line Segments
  • 4. Open Source CV Image Beautification
09.Visual General Course (For Standard&Superior version)
4. Yolov11&26 Visual Recognition
  • 1. YOLO Environment Setup
  • 2. CLI Usage
  • 3. Object Detection
  • 4. Instance Segmentation
  • 5. Pose Estimation
  • 6. Image Classification
  • 7. Oriented Bounding Boxes Object Detection
  • 8. Model Prediction
1. ESP32 Visual Recognition Module Configuration
  • 1. Serial Port Configuration WiFi Instructions
  • 2. Use ESP32 Camera Module in Robot Car
  • 3. Servo PTZ Calibration
2. OpenCV Visual Recognition
  • 1. Human Pose Estimation
  • 2. Object Detection
  • 3. AR Vision
  • 4. QR Code
  • 5. Color Recognition
  • 6. Facial Recognition
  • 7. AprilTag Machine Code Recognition
3. Mediapipe Visual Recognition
  • 1. Hand Detection
  • 2. Pose Detection
  • 3. Holistic Detection
  • 4. Facial Detection
  • 5. Facial Recognition
  • 6. Facial Special Effects
  • 7. 3D Object Recognition
  • 8. Brush
  • 9. Gesture Recognition
  • 10. Palm Target Localization
  • 11. Fingertip Trajectory Recognition
10.Visual Advanced Course (Just for Standard version)
1. Visual Control
  • 1. QR Code Recognition Control Action
  • 2. AprilTag Control Car Action Group
  • 3. Gesture Control Car Action Group
  • 4. Visual Line Tracking
2. Visual Tracking
  • 1. Color Tracking
  • 2. Facial Tracking
  • 3. QR Code Tracking
  • 4. Object Recognition And Tracking
  • 5. Mediapipe Palm Tracking
  • 6. Mediapipe Gesture Tracking
  • 7. Mediapipe Human Pose Tracking
  • 8. KCF Object Tracking
  • 9. AprilTag Machine Code Tracking
3. Visual Following
  • 1. Color Follow
  • 2. Face Follow
  • 3. QR Code Follow
  • 4. Mediapipe Palm Follow
  • 5. Mediapipe Gesture Follow
  • 6. Mediapipe Human Posture Follow
  • 7. AprilTag Machine Code Follow
  • 8. Object Follow
11.Visual Advanced Course (Just for Superior version)
1. Visual Control
  • 1. QR Code Recognition Control Action
  • 2. AprilTag Control Car Action Group
  • 3. Gesture Control Car Action Group
  • 4. Visual Line Tracking
2. Visual Tracking
  • 1. Color Tracking
  • 2. Facial Tracking
  • 3. QR Code Tracking
  • 4. YOLO Object Recognition and Tracking
  • 5. Mediapipe Palm Tracking
  • 6. Mediapipe Gesture Tracking
  • 7. Mediapipe Human Pose Tracking
  • 8. KCF Object Tracking
  • 9. AprilTag Machine Code Tracking
3. Visual Follow
  • 1. Color Follow
  • 2. Face Follow
  • 3. QR Code Follow
  • 4. Mediapipe Palm Follow
  • 5. Mediapipe Gesture Follow
  • 6. Mediapipe Human Pose Follow
  • 7. AprilTag Machine Code Follow
  • 8. Object Follow
12.AI Large Model Basic and Applications Course
1. AI Large Model Preparation
  • 1.AI Large Model Preparation
2. AI Large Model Basic Course
  • 1. AI Large Model Types and Principles
  • 2. RAG Retrieval Augmented and Training Samples
  • 3. Embodied Intelligent System Architecture
  • 4. Embodied Intelligence Core Source Code
3. AI Large Model Development
  • 1. Register Model Service Account
  • 2. Configure API KEY
  • 3. Dify Introduction
  • 4. Dify Basic Features
  • 5. RAG Knowledge Base Deployment
  • 6. AI Application Development Chatbot
  • 7. RAG Knowledge Base and Chatbot
  • 8. AI Agent Workflow
4. AI Large Model (Text Version)
  • 1. Semantic Understanding and Instruction Following
  • 2. Multimodal Visual Understanding
  • 3. Multimodal Visual Understanding + Basic Control
  • 4. Multimodal Visual Understanding + Object Following
  • 5. Multimodal Visual Understanding + Visual Line Following
  • 6. Multimodal Visual Understanding + SLAM Navigation
  • 7. Multimodal Visual Understanding + SLAM Navigation + Visual Line Following
  • 8. Multimodal Visual Understanding + SLAM Navigation + Object Following
  • 9. Intent Inference + Multimodal Visual Understanding + SLAM Navigation
13.Openclaw Basics Course
  • 1. Openclaw Introduction
  • 2. Openclaw Core Concepts
  • 3. Openclaw Api-Key Configuration
  • 4. Openclaw Switching Models
  • 5. Openclaw System Prompt
  • 6. Openclaw Common CLI Command
14. Openclaw Interaction Course
  • 1. Openclaw Webchat Interaction
  • 2. Openclaw Tui Interaction
  • 3. Openclaw Whatsapp Interaction
15.Openclaw Development Course
  • 1. Openclaw Robot Mcp Service Integration
  • 2. Robot CLI Command Tools
  • 3. Robot-Control Plugin Tools
  • 4. Openclaw Skills Development
  • 5. Openclaw Scheduled Tasks
  • 6. Openclaw Multi Agent System
  • 7. Openclaw Proactive Interaction
  • 8. Openclaw Vector Memory
16.Openclaw Embodied Intelligence Course
  • 1. OpenClaw Natural Interaction + Basic Control
  • 2. OpenClaw Natural Interaction + Slam Navigation
  • 3. OpenClaw Natural Interaction + Multimodal Visual Understand
  • 4. OpenClaw Natural Interaction + Multimodal Visual Understand + Slam Navigation + Visual Follow
  • 5. OpenClaw Natural Interaction + Multimodal Visual Understand + Slam Navigation + Visual Track
17.Multi-machine Course
  • 1. Multi Machine Handle Control
  • 2. Multi Machine Keyboard Control
  • 3. Multi Machine Navigation
18.MicroROS-V2 Control Board Development Environment
  • 1. Set Up the ESP32-IDF Development Environment
  • 2. ESP32-IDF Configuration Tool
  • 3. ESP Flash Tool Flashing Firmware
  • 4. Install ESP32 Microros Components
  • 5. Install And Start Microros Agent
19.MicroROS-V2 Control Board ESP32 Basic Course
  • 1. Led Light Up
  • 2. Button Function
  • 3. Drive Buzzer
  • 4. Oled
  • 5. Usb Host Function
  • 6. Serial Communication
  • 7. Battery Voltage Detection
  • 8. Drive Pwm Servo
  • 9. Drive Motors
  • 10. Read Motor Encoder Data
  • 11. Pid Motor Speed Control
  • 12. Robot Kinematics Analysis Theory
  • 13. Read Imu Data
  • 14. Read Lidar Data
  • 15. Flash Data Storage
  • 16. Custom Partition Table
  • 17. Bluetooth Communication
  • 18. Wifi Connection
  • 19. ESP32 Visual Recognition Module
20.MicroROS-V2 Control Board Micro_ros Basic Course
  • 1. Publish Topics
  • 2. Subscribe To Topics
  • 3. Multi Topic Subscription And Publishing
  • 4. Subscribe To Buzzer Topic
  • 5. Subscribe To Pwm Servo Topic
  • 6. Subscribe To Speed Control Topic
  • 7. Publish Odometry Topic
  • 8. Publish Imu Data Topic
  • 9. Publish Lidar Data Topic
21. Linux System Course
  • 1.Introduction to Linux system
  • 2.Ubuntu file system
  • 3.Ubuntu common commands
  • 4.Ubuntu common editors
  • 5.Ubuntu software operation commands
  • 6.Virtual machine installation
  • 7.SSH remote control
  • 8.VNC remote control
  • 9.Transfer files remotely
  • 10.Driver library and communication
  • 11.Static IP and hotspot mode
  • 12.Bind device ID
  • 13.Capacity expansion and resource allocation
  • 14.Update system software sources
  • 15.Set root user password
  • 16.sudo free password
  • 17.Connect to WiFi network
  • 18.View system version
  • 19.Customized service management
  • 20.Back up system image
22.Docker Course
  • 1.Docker overview and docker installation
  • 2.Common commands for docker image containers
  • 3.Docker images deeply understand and publish images
23.ROS Basic Course
  • 1.Introduction to ROS2
  • 2.ROS2 install Humble
  • 3.ROS2 development environment
  • 4.ROS2 workspace
  • 5.ROS2 function package
  • 6.ROS2 node
  • 7.ROS2 topic communication
  • 8.ROS2 service communication
  • 9.ROS2 action communication
  • 10.ROS2 custom interface message
  • 11.ROS2 parameter service case
  • 12.ROS2 meta-function package
  • 13.ROS2 distributed communication
  • 14.ROS2 DDS
  • 15.ROS2 time related API
  • 16.ROS2 common command tools
  • 17.ROS2 rviz2 use
  • 18.ROS2 rqt toolbox
  • 19.ROS2 Launch startup file configuration
  • 20.ROS2 recording and playback tool
  • 21.ROS2 URDF model
  • 22.ROS2 Gazebo simulation platform
  • 23.ROS2 TF2 coordinate transformation
Download
  • Mapping_APP(iOS_Android)
  • Code
  • Software_Tools
  • VM_System_File
  • 3D_Model_File
  • ESP32_Firmware
  • Dify LLM Base
  • Instruction_Manual
  • VMware
Download ZIP

Welcome to MicroROS V2 Robot Car repository

17. Bluetooth Communication

Bluetooth Communication

I. Experiment Objective

Learn the BLE (Bluetooth Low Energy) communication function of the MicroROS-V2 control board. Through this experiment, you will master how to initialize a BLE GATT server, create an SPP service with characteristic values, and implement data transmission and reception with a phone or other BLE devices.

II. Experiment Principle

1. Keywords

KeywordDescription
BLE (Bluetooth Low Energy)Bluetooth Low Energy technology, designed for low-power devices. It supports short-range data communication and is widely used in IoT devices.
GATT (Generic Attribute Profile)The Generic Attribute Protocol, which defines the architecture of data communication between BLE devices, based on a client-server model.
SPP (Serial Port Profile)Serial Port Profile, a service mode that emulates traditional Bluetooth serial communication over BLE.
CharacteristicThe data unit in a GATT service, containing a value, properties, and descriptors. It is the actual carrier of data reads and writes.
UUIDUniversally Unique Identifier, used to uniquely identify BLE services and characteristic values (16-bit/128-bit).
AdvertisingA BLE device periodically sends advertising packets to announce its presence so that peripheral devices can discover and connect to it.

2. Technical Architecture

This example implements a BLE GATT server based on the ESP32 Bluedroid protocol stack. After startup, the program initializes NVS Flash, the Bluetooth controller, and the Bluedroid protocol stack, registers a GATT application, and creates an SPP service (UUID 0xFFE0) with 4 characteristic values for data transmission and reception. The device advertises under the name "YahBoom_BL" and waits for a phone or other BLE client to connect.

Main component files:

  • main/main.c — Program entry, initializes BLE

  • components/ble_server/ble_server.c — BLE GATT service implementation

  • components/ble_server/ble_server.h — Characteristic index and constant definitions

III. Experiment Steps

1. Hardware Preparation

HardwareRequirement
MicroROS-V2 control boardRequired
USB data cableRequired
A phone that supports BLE (with nRF Connect or another Bluetooth debugging tool installed)Required

2. Prerequisites

  1. Set up the ESP32-IDF development environment

  2. Connect the MicroROS-V2 control board to the computer via USB

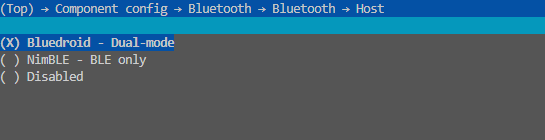
  3. First, the Bluetooth feature is disabled by default in ESP-IDF, so you need to enable Bluetooth in the configuration file.

    cd ~/esp/base_samples/bluetooch
    idf.py menuconfig

    image-20260723114012481

    Because only the Bluetooth BLE 5.0 feature is enabled by default, to make the compilation pass, you need to manually enable the Bluetooth BLE 4.2 feature.
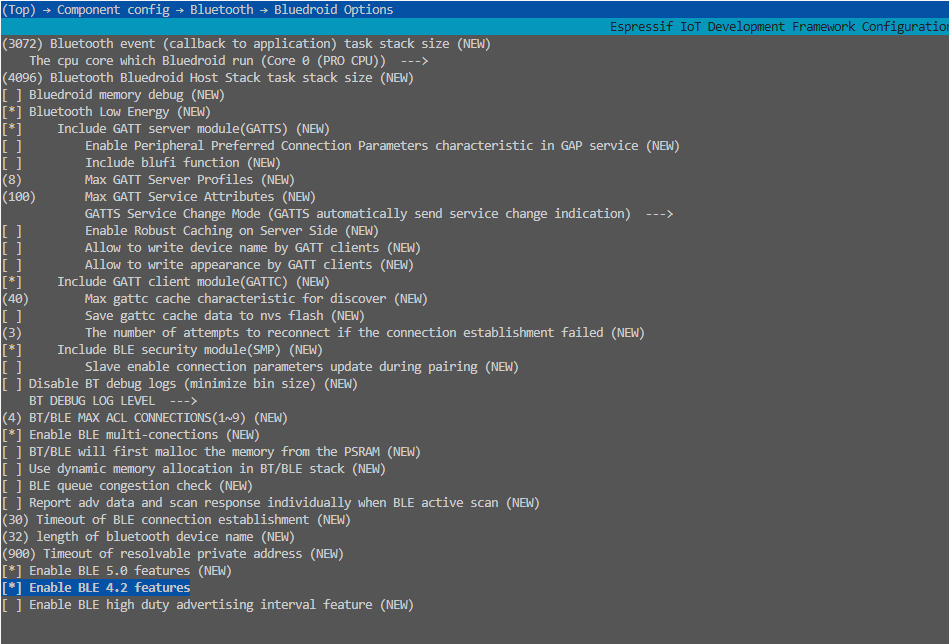
    image-20260723114104964

3. Compile and Flash

​x

cd ~/esp/base_samples/bluetooch
source ~/esp/esp-idf/export.sh
idf.py build flash monitor

4. Stopping Method

In the terminal, press Ctrl+] to exit the serial monitor.

IV. Experiment Result

After successful compilation and flashing, the Monitor will output:

xxxxxxxxxx
hello yahboom
I (xxx) MAIN: Nice to meet you!
I (xxx) BLE_SERVER: BLE_Init init bluetooth

Using a BLE debugging tool such as nRF Connect or LightBlue on your phone, you can scan for the BLE device named YahBoom_BL. After connecting, you can see the service with UUID 0xFFE0 and its 4 characteristic values underneath. You can write data to the 0xFFE1 characteristic, and the control board will print the received data in the log.

V. Program Analysis

Source code paths:

  • Firmware source: ~/esp/base_samples/bluetooch/main/main.c

  • BLE service: ~/esp/base_samples/bluetooch/components/ble_server/ble_server.h, ble_server.c

1. Main Program Logic

main/main.c is the program entry. After printing a welcome message, it calls BLE_Init() to initialize the BLE protocol stack:

xxxxxxxxxx
#include "ble_server.h"

void app_main(void)
{
    printf("hello yahboom\n");
    ESP_LOGI(TAG, "Nice to meet you!");
    BLE_Init();
}

2. BLE Service Initialization Flow

The BLE_Init() function in components/ble_server/ble_server.c completes the full initialization of the BLE protocol stack with the following steps:

  1. Initialize NVS Flash — Call nvs_flash_init() to initialize non-volatile storage for saving Bluetooth configuration information. If the NVS partition is abnormal, erase it first and then initialize.

  2. Release classic Bluetooth memory — Call esp_bt_controller_mem_release(ESP_BT_MODE_CLASSIC_BT) to release the memory occupied by classic Bluetooth, keeping only the BLE function.

  3. Initialize the Bluetooth controller — Start the BLE controller through esp_bt_controller_init() and esp_bt_controller_enable(ESP_BT_MODE_BLE).

  4. Initialize Bluedroid — Call esp_bluedroid_init() and esp_bluedroid_enable() to start the Bluedroid protocol stack.

  5. Register callback functions — Register the GATT Server callback and the GAP callback.

  6. Register the application — Call esp_ble_gatts_app_register(ESP_SPP_APP_ID) to register the SPP application, where ESP_SPP_APP_ID is defined as 0x56.

3. BLE Device Name and Advertising Data

The device advertising name is YahBoom_BL, and the advertising data packet format is as follows:

xxxxxxxxxx
static const uint8_t spp_adv_data[] = {
    0x02, 0x01, 0x06,                             /* Flags */
    0x03, 0x03, 0xF0, 0xAB,                       /* 16-bit Service Class UUIDs */
    0x0B, 0x09, 'Y', 'a', 'h', 'B', 'o', 'o', 'm', '_', 'B', 'L'  /* Complete Local Name */
};

Advertising parameter settings:

xxxxxxxxxx
static esp_ble_adv_params_t spp_adv_params = {
    .adv_int_min = 0x20,         // Minimum advertising interval
    .adv_int_max = 0x40,         // Maximum advertising interval
    .adv_type = ADV_TYPE_IND,    // Connectable advertising type
    .own_addr_type = BLE_ADDR_TYPE_PUBLIC,
    .channel_map = ADV_CHNL_ALL,
    .adv_filter_policy = ADV_FILTER_ALLOW_SCAN_ANY_CON_ANY,
};

4. SPP Service and Characteristic Values

This example implements a BLE service similar to SPP (Serial Port Profile). The service UUID is 0xFFE0 and it contains 4 characteristic values:

CharacteristicUUIDPropertiesDescription
SPP_DATA_RECEIVE0xFFE1Read/WriteData reception channel, used to receive data sent from the phone
SPP_DATA_NOTIFY0xFFE2Read/NotifyData notification channel, used to send data notifications to the phone
SPP_COMMAND_RECEIVE0xFFE3Read/WriteCommand reception channel, used to receive commands sent from the phone
SPP_COMMAND_NOTIFY0xFFE4Read/NotifyCommand status notification channel, used to notify the phone of status changes

The data length limits of each characteristic (defined in ble_server.h):

  • SPP_DATA_MAX_LEN = 512 bytes (maximum length of the data channel)

  • SPP_CMD_MAX_LEN = 20 bytes (maximum length of the command channel)

  • SPP_STATUS_MAX_LEN = 20 bytes (maximum length of the status channel)

5. Data Reception and Processing

The gatts_profile_event_handler handles the ESP_GATTS_WRITE_EVT event:

  • When the write handle is SPP_IDX_SPP_DATA_RECV_VAL, call BLE_Parse_Rx_Data() to process the received data

  • When the write handle is SPP_IDX_SPP_COMMAND_VAL, save the command data to the buffer

  • When the write handle is SPP_IDX_SPP_DATA_NTF_CFG, enable or disable the notification function according to the CCCD value written by the client

6. Key Components

ble_server.h defines the characteristic index enum and key constants:

Parameter definition file: ~/esp/base_samples/bluetooch/components/ble_server/ble_server.h

DefinitionValueDescription
SPP_IDX_SVC0Service declaration index
SPP_IDX_SPP_DATA_RECV_VAL2Data reception characteristic index
SPP_IDX_SPP_DATA_NTY_VAL4Data notification characteristic index
SPP_IDX_SPP_COMMAND_VAL7Command characteristic index
SPP_IDX_SPP_STATUS_VAL9Status characteristic index
SPP_IDX_NB11Total number of attribute table entries

7. Connection and Disconnection Events

  • Connection event (ESP_GATTS_CONNECT_EVT): Save the connection ID and the GATT interface handle, and set is_connected = true

  • Disconnection event (ESP_GATTS_DISCONNECT_EVT): Reset the connection state and restart advertising to wait for a new connection

  • MTU negotiation (ESP_GATTS_MTU_EVT): Save the negotiated MTU size to spp_mtu_size, with an initial value of 23 bytes

VI. Common Problems

ProblemCauseSolution
Cannot scan the YahBoom_BL deviceAdvertising did not start normally or the controller is faultyCheck the Monitor log and confirm that BLE initialization succeeded
Cannot connect to the BLE deviceBluetooth compatibility issue with the phone or computerTry using a different BLE debugging tool
NVS initialization failsThe NVS partition data is corruptedRun idf.py erase_flash to erase and re-flash
Custom Partition Table
Wifi Connection

COMPANY

  • About us
  • Team Style
  • Blog

LEARNING & EXPLORATION

  • Tutorials
  • Edge AI hardware
  • Educational robots
  • Embedded intelligent hardware

WHERE TO BUY

  • Yahboom Online Store
  • Amazon
  • Alibaba
  • AliExpress
  • Mercado

TECHNOLOGY SUPPORT

  • Email: support@yahboom.com

BE A DISTRIBUTOR

  • Email: sales@yahboom.com
QR Code
QR Code

Copyright © 2017-2026 Yahboom. All Rights Reserved.

EN/中文