Welcome to MicroROS V2 Robot Car repository
2. Use ESP32 Camera Module in Robot Car
Use ESP32 Camera Module in Robot Car
1. Experiment Purpose
Install the ESP32 camera module correctly on the car and feed the images into ROS2 through the MJPEG stream.
2. Experiment Principle
1. Key Term Explanation
| Keyword | Description |
|---|---|
| MJPEG | Motion JPEG, a video stream format in which each frame is independently JPEG-compressed and transported over HTTP |
| ESP32 camera module | An independent WiFi camera based on the ESP32-S3; it obtains the WiFi configuration from the control board over the serial port, joins the LAN, and provides an MJPEG stream |
| CV Bridge | A ROS2 library that converts between OpenCV cv::Mat / NumPy ndarray and sensor_msgs/Image |
| QoS | Quality of Service, the ROS2 communication quality policy; the current program uses the default queue-depth configuration of create_publisher(Image, '/camera/image_raw', 10) |
| Exponential backoff reconnection | The wait time doubles after each failed reconnection attempt (1s → 2s → 4s → …), avoiding frequent retries that would consume CPU, with an upper limit of 30s |
2. Technical Architecture
ESP32 camera module (WiFi AP STA)│ MJPEG HTTP Stream (http://<IP>:81/stream)▼esp32_ip_camera_node (ROS2 node)│ cv2.VideoCapture() → cv2.resize() → CvBridge│└── /camera/image_raw (sensor_msgs/Image)│▼Downstream vision nodes (OpenCV / MediaPipe / YOLO)
Data flow: The camera module provides an MJPEG HTTP stream over WiFi → cv2.VideoCapture pulls the frames → the frames are fixed-resized to 640×480 → CvBridge converts them to sensor_msgs/Image → they are published on /camera/image_raw for downstream consumption.
This node is a pure ROS2 node and does not depend on micro_ros_agent or the state estimation layer. The camera obtains its WiFi configuration from the car control board over the serial port (see the previous section), but the camera node works independently at runtime.
3. Experiment Steps
1. Hardware Preparation
| Hardware | Requirement |
|---|---|
| PTZ version | ✅ (camera mounted on the gimbal) |
| No-PTZ version | ✅ (camera fixed on the bracket) |
| Required peripherals | ESP32 vision module, WiFi already configured (see the Serial Port Configuration WiFi Instructions in the previous section) |
2. Prerequisites
- The correct WiFi information has been written to the ESP32 camera module with the configuration script
- The car is powered on and the camera module indicator light is solid on (meaning it has connected to WiFi)
- Confirm the camera IP can be pinged (e.g.
ping 192.168.33.154)
3. Start the Camera Node
xxxxxxxxxxros2 run microros_v2_bringup camera_driver --ros-args -p camera_url:=http://192.168.12.37:81/stream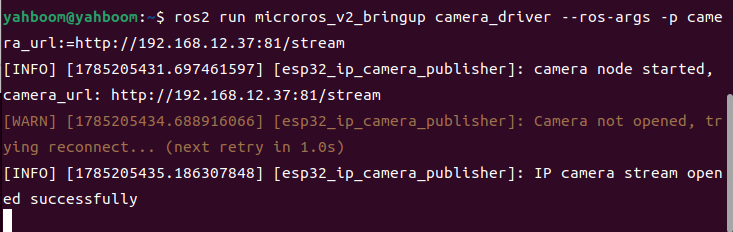
Note: Replace the
<camera_ip>placeholder with the camera IP address obtained during the serial port configuration in the previous section.
4. Verify Image Publication
Check the image publication rate. Due to device hardware bandwidth limitations, the maximum is 7 frames per second under good network conditions:
xxxxxxxxxxros2 topic hz /camera/image_raw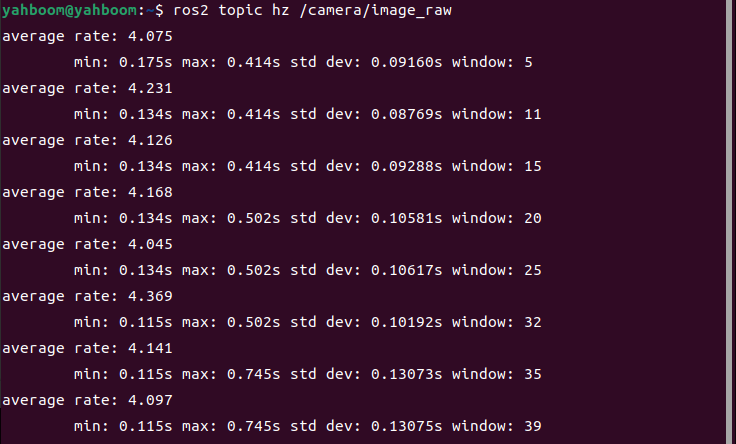
Use rqt_image_view to view the live image:
xxxxxxxxxxros2 run rqt_image_view rqt_image_view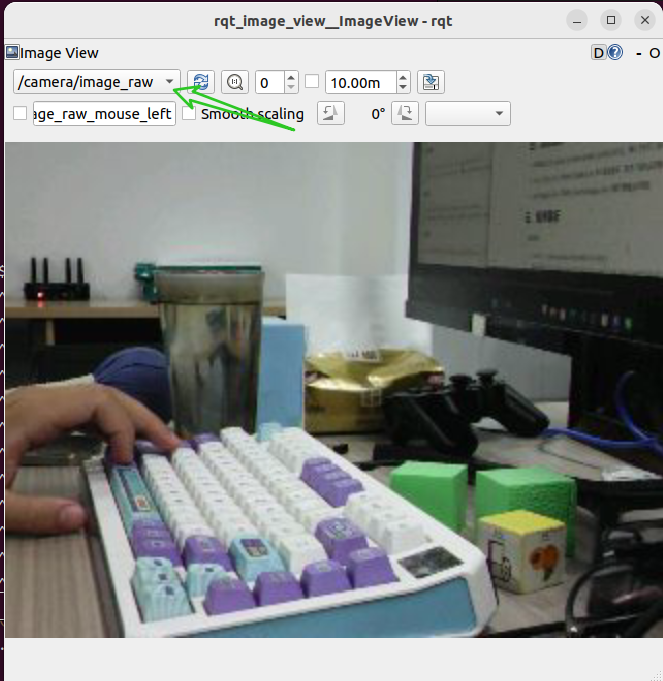
5. How to Stop
Press Ctrl+C in the camera node terminal to stop it. When the node is destroyed, the cv2.VideoCapture resource is released automatically.
4. Experimental Results
- The terminal outputs
IP camera stream opened successfully, confirming that the MJPEG stream connected successfully ros2 topic hz /camera/image_rawshows a stable frame rate (depending on the actual camera frame rate and WiFi signal quality)- Select the
/camera/image_rawtopic inrqt_image_viewto view the live image
5. Program Analysis
Source path:
- Node source:
~/microros_car_v2_ws/src/microros_v2_bringup/microros_v2_bringup/camera_driver.py
1. Overall Node Function
IPCameraPublisher is a ROS2 Python node named esp32_ip_camera_publisher. It reads image frames from the ESP32 camera's MJPEG HTTP stream with OpenCV, resizes the images to 640×480, converts them to sensor_msgs/Image via cv_bridge, and publishes them to /camera/image_raw.
The current program only publishes the raw image topic /camera/image_raw; it does not publish /camera/image_raw/compressed, and it has no JPEG compression quality parameter.
2. Initialization Flow
xxxxxxxxxxclass IPCameraPublisher(Node): def __init__(self): super().__init__('esp32_ip_camera_publisher') self.declare_parameter('camera_url', 'http://192.168.12.53:81/stream') self.camera_url = self.get_parameter('camera_url').value self.declare_parameter('startup_delay', 3.0) self.declare_parameter('reconnect_min_delay', 1.0) self.declare_parameter('reconnect_max_delay', 30.0) self.startup_delay = self._get_float_parameter('startup_delay', 3.0) self.reconnect_min_delay = self._get_float_parameter('reconnect_min_delay', 1.0) self.reconnect_max_delay = self._get_float_parameter('reconnect_max_delay', 30.0) self._next_reconnect_time = time.time() + self.startup_delay self._current_reconnect_delay = self.reconnect_min_delay self.bridge = CvBridge() self.image_pub = self.create_publisher(Image, '/camera/image_raw', 10)The initialization phase does the following:
- Declares and reads the
camera_url,startup_delay,reconnect_min_delay, andreconnect_max_delayparameters. - Creates a
CvBridgefor converting between OpenCV images and ROS2Imagemessages. - Creates the
/camera/image_rawpublisher with a queue depth of 10. - Creates the background reader thread
_reader_thread; both camera reading and publishing run in this thread.
3. Parameter Read Protection
xxxxxxxxxxdef _get_float_parameter(self, name, default_value): value = self.get_parameter(name).value try: return float(value) except (TypeError, ValueError): self.get_logger().warn(f'Invalid float parameter {name}={value}, fallback to {default_value}') return default_valueThe startup_delay and reconnect interval parameters are converted to float. If a value cannot be converted, the program prints a warning and falls back to the default value, preventing the node from crashing because of a bad parameter.
4. Camera Opening and Low-Latency Settings
xxxxxxxxxxdef open_camera(self): if self.cap is not None: self.cap.release() self.cap = cv2.VideoCapture(self.camera_url, cv2.CAP_FFMPEG) self.cap.set(cv2.CAP_PROP_BUFFERSIZE, 1) if not self.cap.isOpened(): self.get_logger().error('Failed to open IP camera stream') else: self.get_logger().info('IP camera stream opened successfully') self._current_reconnect_delay = self.reconnect_min_delayopen_camera() opens the MJPEG stream pointed to by camera_url with cv2.VideoCapture() and specifies the FFMPEG backend. Before each reopen, the old VideoCapture is released so the old connection does not keep occupying resources.
CAP_PROP_BUFFERSIZE is set to 1 to minimize the frame latency caused by OpenCV's internal buffering. After a successful connection, the current reconnect wait time is reset to the minimum value.
5. Background Reading and Reconnection Logic
xdef _reader_loop(self): time.sleep(self.startup_delay) publish_interval = 1.0 / 30.0 last_publish_time = 0.0 while self._running: if self.cap is None or not self.cap.isOpened(): self._try_reconnect() time.sleep(0.01) continue ret, frame = self.cap.read() if not ret or frame is None: self.get_logger().warn('Failed to read frame, reconnecting...') self.open_camera() time.sleep(0.01) continue now = time.time() if now - last_publish_time >= publish_interval: self.publish_raw_image(frame) last_publish_time = nowThe background thread first waits for startup_delay to give the camera module time to boot and join the network. It then loops reading camera frames:
- If the camera is not open, it calls
_try_reconnect()to reconnect using the exponential backoff strategy. - If reading a frame fails, it immediately reopens the camera stream.
- If reading succeeds, it publishes the image by calling
publish_raw_image()at a fixed upper limit of 30Hz.
The 30Hz here is a fixed internal value of the program, not a ROS parameter. The actual frame rate is still limited by the ESP32 camera's output capability and the WiFi quality.
6. Exponential Backoff Reconnection
xxxxxxxxxxdef _try_reconnect(self): now = time.time() if now < self._next_reconnect_time: return self.get_logger().warn( f'Camera not opened, trying reconnect... ' f'(next retry in {self._current_reconnect_delay:.1f}s)' ) self.open_camera() self._current_reconnect_delay = min( self._current_reconnect_delay * 2.0, self.reconnect_max_delay ) self._next_reconnect_time = now + self._current_reconnect_delayWhen a reconnection fails, the wait time starts from reconnect_min_delay and doubles each time, up to a maximum of reconnect_max_delay. This prevents the node from retrying at high frequency while the camera is offline, which would waste CPU and network resources.
7. Image Publishing
xxxxxxxxxxdef publish_raw_image(self, frame): frame = cv2.resize(frame, (640, 480)) msg = self.bridge.cv2_to_imgmsg(frame, encoding='bgr8') msg.header.stamp = self.get_clock().now().to_msg() msg.header.frame_id = 'camera' self.image_pub.publish(msg)Before publishing, the program fixed-resizes the image to 640×480 and then converts it to sensor_msgs/Image with cv_bridge:
encoding='bgr8': consistent with the default BGR image format of OpenCV.header.stamp: uses the current time of the ROS2 node.header.frame_id='camera': marks the name of the image coordinate frame.- Publication topic:
/camera/image_raw.
8. Resource Release
xxxxxxxxxxdef destroy_node(self): self._running = False if self._reader_thread is not None: self._reader_thread.join(timeout=5.0) if self.cap is not None: self.cap.release() super().destroy_node()When the node exits, it first stops the background reading loop, then waits for the thread to exit, and finally releases the OpenCV camera connection, so the network stream resources are not still held after the program is closed.
9. Key Parameters
| Parameter | Type | Default | Description |
|---|---|---|---|
camera_url | string | http://192.168.12.53:81/stream | The MJPEG stream address of the ESP32 camera |
startup_delay | float | 3.0 | Time to wait for the camera to become available after the node starts, in seconds |
reconnect_min_delay | float | 1.0 | Minimum wait time for the reconnect backoff, in seconds |
reconnect_max_delay | float | 30.0 | Maximum wait time for the reconnect backoff, in seconds |
Fixed internal configurations of the program:
| Configuration Item | Current Value | Description |
|---|---|---|
| Publication topic | /camera/image_raw | Publishes the raw sensor_msgs/Image |
| Publication queue depth | 10 | create_publisher(Image, '/camera/image_raw', 10) |
| Image size | 640×480 | Fixed resize in publish_raw_image() |
| Publication upper limit | 30Hz | Fixed publish_interval = 1.0 / 30.0 in _reader_loop() |
| Image encoding | bgr8 | Consistent with the OpenCV default BGR format |
| frame_id | camera | The coordinate frame name in the image message header |
10. Startup Parameters Quick Reference
xxxxxxxxxxros2 run microros_v2_bringup camera_driver --ros-args \ -p camera_url:=http://<camera_ip>:81/stream \ -p startup_delay:=3.0 \ -p reconnect_min_delay:=1.0 \ -p reconnect_max_delay:=30.0The most commonly used one is modifying camera_url. The other parameters can usually keep their defaults.
6. Common Issues
| Problem | Cause | Solution |
|---|---|---|
| No image | Camera IP unreachable or the IP was not updated | Ping the camera IP and confirm the WiFi connection; check whether camera_url matches the camera's actual IP |
| Very low frame rate | Limited by the ESP32 camera output capability, the WiFi signal, or network latency | Improve the WiFi signal; if necessary, lower the resolution/frame rate on the camera side. The current ROS node fixed-resizes to 640×480 |
| Frequent disconnections and reconnections | Unstable WiFi signal | Check the distance between the camera and the router; increase reconnect_min_delay to reduce the retry frequency |
Failed to open IP camera stream | The camera has not finished starting up or the URL format is wrong | Wait a few seconds and retry; confirm the URL format is http://<IP>:81/stream |