yahboom
HomeLearn
Solution
Blog
Online Store
About Us
EN/中文
MicroROS V2 Robot Car📖
01.Introduction
  • 0.Unboxing Video
  • 1. Readme Learning Route
  • 2. Must Read Before Use
  • 3. Introduction to MicroROS V2 Control Board
  • 4. Introduction to LiDAR
  • 5. Introduction to ESP32 Camera Module
  • 6. FAQ
  • 7. About Charging
02.Assembly course
  • Assembly Video
03.Preparation
  • 1. Quickly Start
  • 2. Write Firmware
  • 3. Install VM and Start System
  • 4. Configure VM and Connect Robot
  • 5. Connect to MicroROS Agent
04.Quick start control course
  • 1. VM Keyboard Remote Control
  • 2. VM Handle Remote Control
  • 3. USB Handle Control
05.Robot control course
  • 1. Robot Information Release
  • 2. Robot Keyboard Control
  • 3. Robot Handle Control
  • 4. Robot State Estimation
  • 5. Linear Speed Calibration
  • 6. Angular Velocity Calibration
  • 7. Robot URDF Model
06.Lidar course
  • 1. Precautions for LiDAR Mapping and Navigation
  • 2. Lidar Avoid
  • 3. Lidar Following
  • 4. Lidar Guard
  • 5. Lidar Patrol
  • 6. Gmapping Mapping
  • 7. Cartographer Mapping
  • 8. Cartographer Quickly Repositioning Navigation
  • 9. Slam Toolx Mapping
  • 10. Navigation2 Single Point Navigation
  • 11. Navigation2 Multi Point Navigation
  • 12. Ros Robot App Mapping And Navigation
07.Road network planning
  • 1. Introduction to Road Network Planning and Quick Start
  • 2. Build a Pose Map
  • 3. Road Network Annotation
  • 4. Planning and Navigation Between Road Networks
  • 5. Road Network Navigation in Any Pose
  • 6. Path Replanning
08.Vision basic course
OpenCV Image Processing
  • 1. Introduction to OpenCV Source CV
  • 2. Open Source CV Geometric Transformation
  • 3. Open Source CV Image Processing and Drawing Text Line Segments
  • 4. Open Source CV Image Beautification
09.Visual General Course (For Standard&Superior version)
4. Yolov11&26 Visual Recognition
  • 1. YOLO Environment Setup
  • 2. CLI Usage
  • 3. Object Detection
  • 4. Instance Segmentation
  • 5. Pose Estimation
  • 6. Image Classification
  • 7. Oriented Bounding Boxes Object Detection
  • 8. Model Prediction
1. ESP32 Visual Recognition Module Configuration
  • 1. Serial Port Configuration WiFi Instructions
  • 2. Use ESP32 Camera Module in Robot Car
  • 3. Servo PTZ Calibration
2. OpenCV Visual Recognition
  • 1. Human Pose Estimation
  • 2. Object Detection
  • 3. AR Vision
  • 4. QR Code
  • 5. Color Recognition
  • 6. Facial Recognition
  • 7. AprilTag Machine Code Recognition
3. Mediapipe Visual Recognition
  • 1. Hand Detection
  • 2. Pose Detection
  • 3. Holistic Detection
  • 4. Facial Detection
  • 5. Facial Recognition
  • 6. Facial Special Effects
  • 7. 3D Object Recognition
  • 8. Brush
  • 9. Gesture Recognition
  • 10. Palm Target Localization
  • 11. Fingertip Trajectory Recognition
10.Visual Advanced Course (Just for Standard version)
1. Visual Control
  • 1. QR Code Recognition Control Action
  • 2. AprilTag Control Car Action Group
  • 3. Gesture Control Car Action Group
  • 4. Visual Line Tracking
2. Visual Tracking
  • 1. Color Tracking
  • 2. Facial Tracking
  • 3. QR Code Tracking
  • 4. Object Recognition And Tracking
  • 5. Mediapipe Palm Tracking
  • 6. Mediapipe Gesture Tracking
  • 7. Mediapipe Human Pose Tracking
  • 8. KCF Object Tracking
  • 9. AprilTag Machine Code Tracking
3. Visual Following
  • 1. Color Follow
  • 2. Face Follow
  • 3. QR Code Follow
  • 4. Mediapipe Palm Follow
  • 5. Mediapipe Gesture Follow
  • 6. Mediapipe Human Posture Follow
  • 7. AprilTag Machine Code Follow
  • 8. Object Follow
11.Visual Advanced Course (Just for Superior version)
1. Visual Control
  • 1. QR Code Recognition Control Action
  • 2. AprilTag Control Car Action Group
  • 3. Gesture Control Car Action Group
  • 4. Visual Line Tracking
2. Visual Tracking
  • 1. Color Tracking
  • 2. Facial Tracking
  • 3. QR Code Tracking
  • 4. YOLO Object Recognition and Tracking
  • 5. Mediapipe Palm Tracking
  • 6. Mediapipe Gesture Tracking
  • 7. Mediapipe Human Pose Tracking
  • 8. KCF Object Tracking
  • 9. AprilTag Machine Code Tracking
3. Visual Follow
  • 1. Color Follow
  • 2. Face Follow
  • 3. QR Code Follow
  • 4. Mediapipe Palm Follow
  • 5. Mediapipe Gesture Follow
  • 6. Mediapipe Human Pose Follow
  • 7. AprilTag Machine Code Follow
  • 8. Object Follow
12.AI Large Model Basic and Applications Course
1. AI Large Model Preparation
  • 1.AI Large Model Preparation
2. AI Large Model Basic Course
  • 1. AI Large Model Types and Principles
  • 2. RAG Retrieval Augmented and Training Samples
  • 3. Embodied Intelligent System Architecture
  • 4. Embodied Intelligence Core Source Code
3. AI Large Model Development
  • 1. Register Model Service Account
  • 2. Configure API KEY
  • 3. Dify Introduction
  • 4. Dify Basic Features
  • 5. RAG Knowledge Base Deployment
  • 6. AI Application Development Chatbot
  • 7. RAG Knowledge Base and Chatbot
  • 8. AI Agent Workflow
4. AI Large Model (Text Version)
  • 1. Semantic Understanding and Instruction Following
  • 2. Multimodal Visual Understanding
  • 3. Multimodal Visual Understanding + Basic Control
  • 4. Multimodal Visual Understanding + Object Following
  • 5. Multimodal Visual Understanding + Visual Line Following
  • 6. Multimodal Visual Understanding + SLAM Navigation
  • 7. Multimodal Visual Understanding + SLAM Navigation + Visual Line Following
  • 8. Multimodal Visual Understanding + SLAM Navigation + Object Following
  • 9. Intent Inference + Multimodal Visual Understanding + SLAM Navigation
13.Openclaw Basics Course
  • 1. Openclaw Introduction
  • 2. Openclaw Core Concepts
  • 3. Openclaw Api-Key Configuration
  • 4. Openclaw Switching Models
  • 5. Openclaw System Prompt
  • 6. Openclaw Common CLI Command
14. Openclaw Interaction Course
  • 1. Openclaw Webchat Interaction
  • 2. Openclaw Tui Interaction
  • 3. Openclaw Whatsapp Interaction
15.Openclaw Development Course
  • 1. Openclaw Robot Mcp Service Integration
  • 2. Robot CLI Command Tools
  • 3. Robot-Control Plugin Tools
  • 4. Openclaw Skills Development
  • 5. Openclaw Scheduled Tasks
  • 6. Openclaw Multi Agent System
  • 7. Openclaw Proactive Interaction
  • 8. Openclaw Vector Memory
16.Openclaw Embodied Intelligence Course
  • 1. OpenClaw Natural Interaction + Basic Control
  • 2. OpenClaw Natural Interaction + Slam Navigation
  • 3. OpenClaw Natural Interaction + Multimodal Visual Understand
  • 4. OpenClaw Natural Interaction + Multimodal Visual Understand + Slam Navigation + Visual Follow
  • 5. OpenClaw Natural Interaction + Multimodal Visual Understand + Slam Navigation + Visual Track
17.Multi-machine Course
  • 1. Multi Machine Handle Control
  • 2. Multi Machine Keyboard Control
  • 3. Multi Machine Navigation
18.MicroROS-V2 Control Board Development Environment
  • 1. Set Up the ESP32-IDF Development Environment
  • 2. ESP32-IDF Configuration Tool
  • 3. ESP Flash Tool Flashing Firmware
  • 4. Install ESP32 Microros Components
  • 5. Install And Start Microros Agent
19.MicroROS-V2 Control Board ESP32 Basic Course
  • 1. Led Light Up
  • 2. Button Function
  • 3. Drive Buzzer
  • 4. Oled
  • 5. Usb Host Function
  • 6. Serial Communication
  • 7. Battery Voltage Detection
  • 8. Drive Pwm Servo
  • 9. Drive Motors
  • 10. Read Motor Encoder Data
  • 11. Pid Motor Speed Control
  • 12. Robot Kinematics Analysis Theory
  • 13. Read Imu Data
  • 14. Read Lidar Data
  • 15. Flash Data Storage
  • 16. Custom Partition Table
  • 17. Bluetooth Communication
  • 18. Wifi Connection
  • 19. ESP32 Visual Recognition Module
20.MicroROS-V2 Control Board Micro_ros Basic Course
  • 1. Publish Topics
  • 2. Subscribe To Topics
  • 3. Multi Topic Subscription And Publishing
  • 4. Subscribe To Buzzer Topic
  • 5. Subscribe To Pwm Servo Topic
  • 6. Subscribe To Speed Control Topic
  • 7. Publish Odometry Topic
  • 8. Publish Imu Data Topic
  • 9. Publish Lidar Data Topic
21. Linux System Course
  • 1.Introduction to Linux system
  • 2.Ubuntu file system
  • 3.Ubuntu common commands
  • 4.Ubuntu common editors
  • 5.Ubuntu software operation commands
  • 6.Virtual machine installation
  • 7.SSH remote control
  • 8.VNC remote control
  • 9.Transfer files remotely
  • 10.Driver library and communication
  • 11.Static IP and hotspot mode
  • 12.Bind device ID
  • 13.Capacity expansion and resource allocation
  • 14.Update system software sources
  • 15.Set root user password
  • 16.sudo free password
  • 17.Connect to WiFi network
  • 18.View system version
  • 19.Customized service management
  • 20.Back up system image
22.Docker Course
  • 1.Docker overview and docker installation
  • 2.Common commands for docker image containers
  • 3.Docker images deeply understand and publish images
23.ROS Basic Course
  • 1.Introduction to ROS2
  • 2.ROS2 install Humble
  • 3.ROS2 development environment
  • 4.ROS2 workspace
  • 5.ROS2 function package
  • 6.ROS2 node
  • 7.ROS2 topic communication
  • 8.ROS2 service communication
  • 9.ROS2 action communication
  • 10.ROS2 custom interface message
  • 11.ROS2 parameter service case
  • 12.ROS2 meta-function package
  • 13.ROS2 distributed communication
  • 14.ROS2 DDS
  • 15.ROS2 time related API
  • 16.ROS2 common command tools
  • 17.ROS2 rviz2 use
  • 18.ROS2 rqt toolbox
  • 19.ROS2 Launch startup file configuration
  • 20.ROS2 recording and playback tool
  • 21.ROS2 URDF model
  • 22.ROS2 Gazebo simulation platform
  • 23.ROS2 TF2 coordinate transformation
Download
  • Mapping_APP(iOS_Android)
  • Code
  • Software_Tools
  • VM_System_File
  • 3D_Model_File
  • ESP32_Firmware
  • Dify LLM Base
  • Instruction_Manual
  • VMware
Download ZIP

Welcome to MicroROS V2 Robot Car repository

11. Fingertip Trajectory Recognition

Fingertip Trajectory Recognition

1. Experiment Objective

Use MediaPipe Hands to track the index fingertip's movement trajectory in the air, control trajectory recording and recognition with hand gestures, and automatically classify the shape as triangle, square, circle or star.

2. Experiment Principle

1. Key Terms

KeywordDescription
Fingertip trajectoryThe sequence of coordinates of the index fingertip (landmark 8) over time, recording the air-writing path
Trajectory classificationAutomatically classifies the trajectory into a geometric shape based on shape features (number of corners, aspect ratio, circularity, etc.)
Record/recognize gesturesone (index finger extended, other four fingers bent): hold it for several consecutive frames to trigger recording; five (all five fingers spread): ends recording and triggers automatic classification. Gestures are recognized from finger joint angles, not a simple y-coordinate comparison

2. Technical Architecture

Terminal 1: start agent + camera + joint models
Terminal 2: start hand detection

3. Experiment Steps

1. Hardware Preparation

HardwareRequirement
PTZ version✅ Supported
No-PTZ version✅ Supported
Required peripheralsESP32 camera

2. Start the agent + camera + joint models (Terminal 1)

xxxxxxxxxx
ros2 launch microros_v2_bringup car_base.launch.py
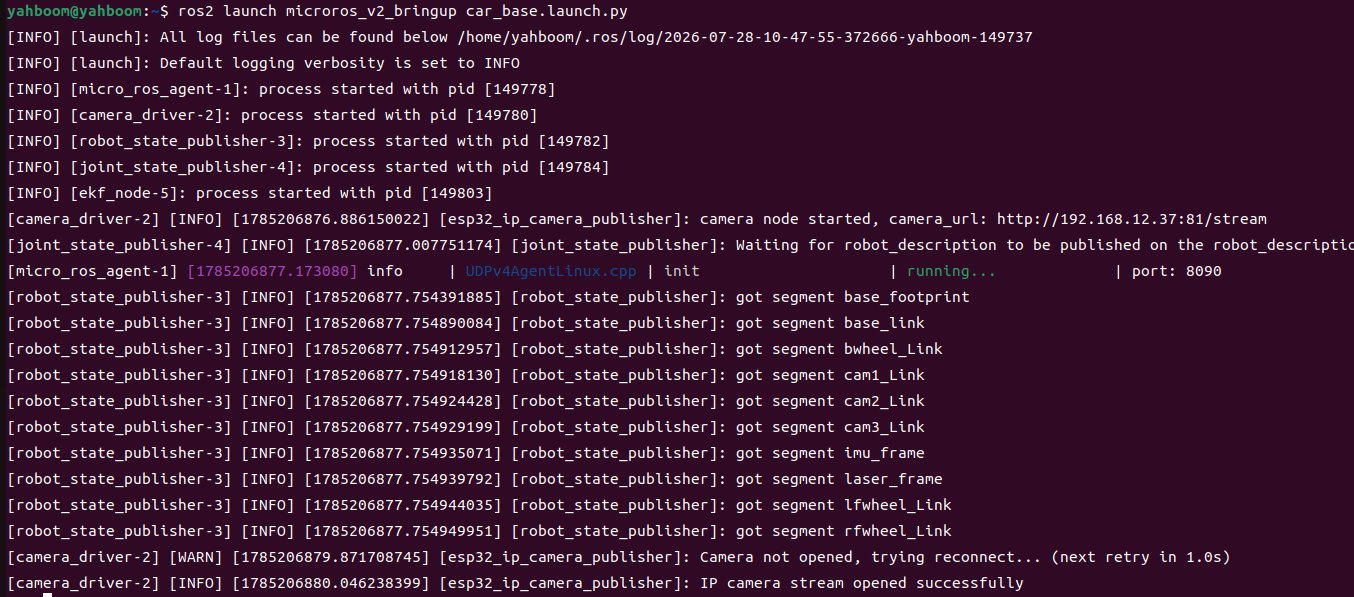
image-20260728104932103

3. Start fingertip trajectory recognition (Terminal 2)

xxxxxxxxxx
ros2 launch microros_v2_mediapipe_pkg finger_trajectory.launch.py

4. Operating Instructions

StepGestureDescription
Start recordingone (index finger extended, other four fingers bent)Hold it for about several consecutive frames (5 frames); the progress bar on screen confirms, and the prompt START DRAWING appears
Draw the trajectoryKeep the index finger extendedDraw a geometric shape (triangle/square/circle/star) in the air with the fingertip; the trajectory is drawn in real time with red lines
Finish and recognizefive (all five fingers spread)Recording ends immediately; contour extraction → polygon approximation → corner classification runs automatically, and the result shows Result: Triangle/Square/Circle/Star
Cancel / redoPress the space barClear the current trajectory points and draw again
ExitPress qExit the program

Gestures are recognized via h_gesture(hand_angle(landmarks)): the flexion angles of the five fingers' joints are computed and compared against thresholds to classify the gesture as one/five/none — not a simple comparison of fingertip y-coordinates.

4. Observed Results

  • As the index fingertip moves across the frame, the trajectory is drawn in real time with colored lines
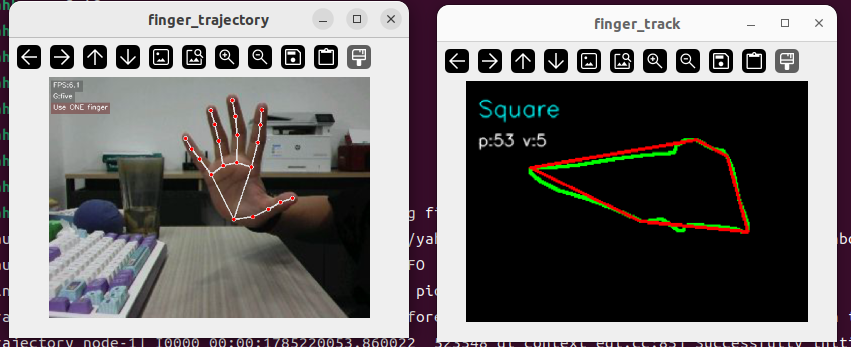
  • After recording finishes, the trajectory is automatically classified as triangle/square/circle/star
  • The recognition result is shown in the on-screen overlay info area
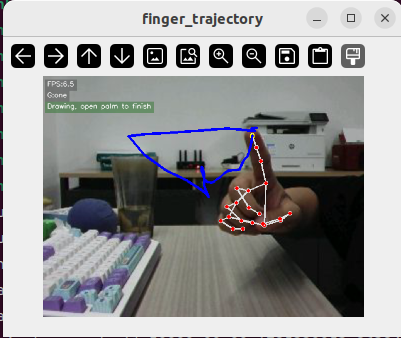
image-20260728142909408

image-20260728142829047

5. Code Walkthrough

Source code paths:

  • Launch: ~/microros_ws/src/microros_v2_mediapipe_pkg/launch/finger_trajectory.launch.py
  • Node: ~/microros_ws/src/microros_v2_mediapipe_pkg/microros_v2_mediapipe_pkg/FingerTrajectory.py

1. Core Node Analysis

FingerTrajectory recognizes gestures from finger joint angles and uses a state machine to control trajectory recording and shape classification.

Gesture recognition (h_gesture) — based on finger joint angles

​x
# Source file: ~/microros_ws/src/microros_v2_mediapipe_pkg/microros_v2_mediapipe_pkg/FingerTrajectory.py
def h_gesture(angle_list):
    """
    five: all five fingers spread, used to end the trajectory
    one : index finger extended, used to prepare and draw the trajectory
    none: other gestures
    """
    thr_angle = 65.0
    thr_angle_s = 49.0
​
    if all(a < thr_angle_s for a in angle_list):
        return "five"
​
    if (
        (angle_list[0] > 5)
        and (angle_list[1] < thr_angle_s)
        and (angle_list[2] > thr_angle)
        and (angle_list[3] > thr_angle)
        and (angle_list[4] > thr_angle)
    ):
        return "one"
​
    return "none"

Key logic:

  • hand_angle(landmarks): computes the joint flexion angles of the 5 fingers (thumb[0], index[1], middle[2], ring[3], pinky[4]), using vector_2d_angle to compute the 2D vector angles between adjacent phalanges
  • five (all fingers spread): all 5 angles < 49°, fingers fully extended → ends recording and triggers classification
  • one (index extended): thumb > 5° (not pressed against the palm) + index < 49° (extended) + middle/ring/pinky > 65° (bent), i.e. only the index finger is extended
  • none: any other gesture, ignored

State machine (get_rgb_image_callback) — gesture-driven recording control

xxxxxxxxxx
# Source file: ~/microros_ws/src/microros_v2_mediapipe_pkg/microros_v2_mediapipe_pkg/FingerTrajectory.py
class FingerTrajectory(Node):
    def __init__(self):
        self.state = State.NULL          # idle / recording
        self.points = []                 # trajectory point list
        self.start_count = 0             # "one" consecutive frame count
        self.start_count_threshold = 5   # requires 5 consecutive frames to confirm (prevents mis-triggering)
​
    def get_rgb_image_callback(self, msg):
        # ... decode image, MediaPipe Hands inference ...
​
        if self.state == State.NULL:
            if gesture == "one":
                self.start_count += 1
                if self.start_count >= self.start_count_threshold:
                    self.start_tracking()  # enter the recording state
            else:
                self.start_count = 0       # gesture interrupted, reset the count
​
        elif self.state == State.TRACKING:
            if gesture == "five":
                self.finish_tracking()     # finish recording → shape classification
            elif index_finger_tip is not None:
                tip = self.smooth_point(index_finger_tip)
                # minimum distance filtering to avoid duplicate sampling when stationary
                if len(self.points) == 0 or distance(self.points[-1], tip) >= self.min_point_distance:
                    self.points.append(tip)

Key logic:

  • Debounce mechanism: one must be held for start_count_threshold=5 consecutive frames before recording triggers, preventing transient mis-triggers during gesture transitions
  • Lost timeout: if no hand is detected for longer than lost_timeout=3.0s during recording, recording is canceled automatically
  • Point-distance filtering: min_point_distance=5.0px, only sampling new points at least 5px apart to avoid redundant trajectory points from stationary jitter
  • Exponential smoothing: smooth_alpha=0.55 applies EMA smoothing to fingertip coordinates, reducing noise from slight hand tremor

Shape classification (finish_tracking) — contour → polygon approximation → corner counting

xxxxxxxxxx
# Source file: ~/microros_ws/src/microros_v2_mediapipe_pkg/microros_v2_mediapipe_pkg/FingerTrajectory.py
def finish_tracking(self):
    # 1. trajectory points → binary image (normalized to the minimum bounding box + 100px margin)
    track_img = get_track_img(self.points)
​
    # 2. contour extraction + morphological filtering (erode → dilate, morph_iterations=2)
    contour = get_area_max_contour(contours, self.contour_area_threshold)
​
    # 3. Douglas-Peucker polygon approximation (epsilon = 0.026 × perimeter)
    epsilon = self.approx_epsilon_ratio * cv.arcLength(contour, True)
    approx = cv.approxPolyDP(contour, epsilon, True)
​
    # 4. corner count → shape name
    if len(approx) == 3:          graph_name = "Triangle"
    elif len(approx) in (4, 5):   graph_name = "Square"
    elif 5 < len(approx) < 10:    graph_name = "Circle"
    elif len(approx) == 10:       graph_name = "Star"

Key logic:

  • approxPolyDP(epsilon=0.026*perimeter): uses 2.6% of the contour perimeter as the approximation precision, balancing polygon simplification against preserving shape features
  • Corner segmentation mapping: 3=triangle, 4~5=square (rounded corners may produce 5 vertices), 6~9=circle, 10=star
  • Morphological filtering: the erode → dilate closing operation fills small breaks in the trajectory, preventing contour fragmentation from causing misclassification
  • Area threshold: contour_area_threshold=200 filters out tiny false contours caused by hand tremor

2. Key Parameters

Parameter definition files:

  • Launch: ~/microros_ws/src/microros_v2_mediapipe_pkg/launch/finger_trajectory.launch.py
  • Node: ~/microros_ws/src/microros_v2_mediapipe_pkg/microros_v2_mediapipe_pkg/FingerTrajectory.py
ParameterTypeDefaultDescription
min_detection_confidencefloat0.5Detection confidence threshold
min_tracking_confidencefloat0.5Tracking confidence threshold

3. Node Description

NodeFunction
finger_trajectory_nodeMediaPipe Hands index fingertip trajectory acquisition + finger state determination + shape classification

6. Frequently Asked Questions

IssueCauseSolution
Trajectory recording does not triggerFinger state determination is inaccurateMake sure only the index finger is extended and the other fingers are bent
Shape classification errorsThe trajectory is not clean enoughTry to draw standard geometric shapes and avoid overlapping
Palm Target Localization
QR Code Recognition Control Action

COMPANY

  • About us
  • Team Style
  • Blog

LEARNING & EXPLORATION

  • Tutorials
  • Edge AI hardware
  • Educational robots
  • Embedded intelligent hardware

WHERE TO BUY

  • Yahboom Online Store
  • Amazon
  • Alibaba
  • AliExpress
  • Mercado

TECHNOLOGY SUPPORT

  • Email: support@yahboom.com

BE A DISTRIBUTOR

  • Email: sales@yahboom.com
QR Code
QR Code

Copyright © 2017-2026 Yahboom. All Rights Reserved.

EN/中文