yahboom
HomeTutorialsProduct
Solution
Blog
Online Store
About Us
EN/中文
Store
Jetson Orin NANO Developer Kit📖
01.Get started
  • 01. Learning route
  • 02. Get started quickly
  • 03. System Update Notes
  • 04. Disabling automatic updates and troubleshooting issues
  • 05. Jetson Orin Nano official kit screwdriver instructions
02.Jetson basic course
  • 01.Jetson board introduction
  • 02.Write Jetson original system
  • 03.Installing Jetson environment
  • 04.Backup SSD system
  • 05.Restore initial image system
  • 06.Upgrade to SUPER version (Optional)
  • 07.Write SUPER boot (Must read)
  • 08.SSD expansion
  • 09.Jetpack old system upgraded to Yahboom SUPER factory system
  • 10.Write the system onto your own SSD
03.Basic setting course
  • 01.Basic knowledge
  • 02.Network configuration
  • 03.SSH remote login
  • 04.VNC remote control
  • 05.RDP remote control
  • 06.Remote file transfer
  • 07.Jtop tool
  • 08.Exchange space expansion
  • 09.Use VSCode
  • 10.Use VMware
  • 11.Modify screen resolution
04.GPIO control course
  • 01.GPIO description
  • 02.GPIO library installation
  • 03.GPIO reading
  • 04.GPIO output
  • 05.Serial communication
  • 06.I2C communication
05.Vision basic course
  • 01.CSI camera preview
  • 02.USB camera preview
  • 03.Use Jupyter Lab
  • 04.Use JetCam
06.OpenCV basic course
  • 01.Image reading
  • 02.Image saving
  • 03.Image modification
  • 04.Image scaling
  • 05.Image cropping
  • 06.Image translation
  • 07.Image mirroring
  • 08.Image grayscale conversion
  • 09.Image binarization
  • 10.Image edge detection
  • 11.Add line segments
  • 12.Add rectangles
  • 13.Add circular shape
  • 14.Add ellipses
  • 15.Add polygons
  • 16.Add Text
  • 17.Preview USB camera image
  • 18.Preview CSI camera image
07.Vision advanced course
01.Environment construction
  • 01.TensorFlow
  • 02.PyTorch
  • 03.Torchvision
02.DeepStream development
  • 01.DeepStream environment
  • 02.License plate detection and recognition
  • 03.Parallel multi-model inference
  • 04.Object embedding vector generation
  • 05.Pose recognition
  • 06.NV optical flow anomaly detection
  • 07.Single-view 3D tracking
  • 08.Multi-view 3D tracking
03.NVIDIA TAO toolkit application
  • 01.Traffic scene object detection
  • 02.Person object detection
  • 03.Vehicle brand classification
  • 04.Vehicle model classification
  • 05.License plate detection and recognition
  • 06.Person semantic segmentation
  • 07.Retail product detection and recognition
  • 08.Person feature extraction and matching (ReID)
  • 09.Person action and pose classification
  • 10.Transformer-based person detection
  • 11.3D human skeleton detection
  • 12.LiDAR 3D point cloud detection
04.YOLO11 development
  • 01.YOLO environment construction
  • 02.CLI use
  • 03.Object detection
  • 04.Instance segmentation
  • 05.Pose estimation
  • 06.Image classification
  • 07.Oriented object detection
  • 08.Model conversion
  • 09.Dataset annotation
  • 10.Model training conversion
  • 11.Model prediction
05.Mediapipe development
  • 01.Mediapipe environment
  • 02.Hand detection
  • 03.Face detection
  • 04.Face effects
  • 05.3D object recognition
  • 06.Virtual brush
  • 07.Gesture recognition
  • 08.Finger control
  • 09.Posture estimation
  • 10.Face mask
  • 11.Overall detection
  • 12.Green scene removal(Human)
06.YOLO26 development
  • 01.YOLO environment construction
  • 02.CLI use
  • 03.Object detection
  • 04.Instance segmentation
  • 05.Pose estimation
  • 06.Image classification
  • 07.Oriented object detection
  • 08.Model conversion
  • 09.Dataset annotation
  • 10.Model training conversion
  • 11.Model prediction
07.QR code recognition
  • QR code recognition
08.Docker basic course
  • 01.Docker introduction
  • 02.Docker installation
  • 03.Docker command
  • 04.Docker usage
  • 05.Docker interaction
09.ROS2-Jazzy
01.ROS2 basic course
  • 1.Introduction to ROS2
  • 2.ROS2 install Jazzy
  • 3.ROS2 development environment
  • 4.ROS2 workspace
  • 5.ROS2 function package
  • 6.ROS2 node
  • 7.ROS2 topic communication
  • 8.ROS2 service communication
  • 9.ROS2 action communication
  • 10.ROS2 custom interface message
  • 11.ROS2 parameter service case
  • 12.ROS2 meta-function package
  • 13.ROS2 distributed communication
  • 14.ROS2 DDS
  • 15.ROS2 time related API
  • 16.ROS2 common command tools
  • 17.ROS2 rviz2 use
  • 18.ROS2 rqt toolbox
  • 19.ROS2 Launch startup file configuration
  • 20.ROS2 recording and playback tool
  • 21.ROS2 URDF model
  • 22.ROS2 Gazebo simulation platform
  • 23.ROS2 TF2 coordinate transformation
02.ROS2 vision course
  • 01.Camera preview (USB)
  • 02.Camera preview (CSI)
  • 03.Camera calibration (USB)
  • 04.Camera calibration (CSI)
  • 05.AR vision (USB)
  • 06.AR vision (CSI)
10.Large model basic course
01.Offline large model
  • 01.AI large model environment deployment
  • 02.Install large model dialogue platform
  • 03.Meta AI - Llama model
  • 04.Alibaba Cloud - Qwen model
  • 05.Microsoft - Phi-4-mini model
  • 06.DeepSeek - DeepSeek model
  • 07.Alibaba Cloud - Qwen-VL visual multimodal large model
  • 08.Google - Gemma visual multimodal large model
  • 9.Llava visual multimodal large model
  • 10.MiniCPM-V visual multimodal large model
  • 11.High-quality vision-language grounding (LocateAnything)
02.Online large model
  • 01.Tongyi Qianwen large model
  • 02.OpenRouter large model API aggregation platform
11.Large model application practice
01.Voice interaction application
  • 1.Voice interaction hardware connection (Must read)
  • 2.Offline speech to text (ASR)
  • 3.Offline text to speech (TTS)
  • 4.AI large model voice interaction
  • 5.AI large model offline voice assistant
02.Multimodal large model application (Online_Offline large model + Text_Voice interaction)
  • 01.Multimodal visual understand application
  • 02.Multimodal text image application
  • 03.Multimodal video analysis application
  • 04.Multi module visual position application
  • 05.Multimodal table scanning application
  • 06.Multimodal autonomous agent application
12.NVIDIA Isaac ROS course
  • 01.Build Isaac ROS environment
  • 02.Deep segmentation
  • 03.DNN stereoscopic depth
  • 04.Free space segmentation
  • 05.Image distortion processing
  • 06.Image segmentation
  • 07.3D scene reconstruction and mapping
  • 08.Object detection
  • 09.3D attitude estimation
  • 10.Visual SLAM
13.OpenClaw deployment and basic usage
01.OpenClaw deployment and introduction
  • 01.Quick start with the pre-configured environment (Recommended)
  • 02.OpenClaw Deployment
  • 03.OpenClaw WhatsApp Plugin Application
  • 04.OpenClaw WebChat Interaction
  • 05.OpenClaw TUI Interaction
  • 06.OpenClaw Tools Introduction
  • 07.OpenClawGate Gateway User Manual
  • 08.OpenClaw Features Overview
  • 09.OpenClawHub Introduction (Skill Installation)
02.OpenClaw basic application
  • 01.OpenClaw Application - File Management
  • 02.OpenClaw Application - Camera
  • 03.OpenClaw Application - Browser Control
  • 04.OpenClaw Application - Script Execution
  • 05.OpenClaw Application - AI Programming (Peripheral & GPIO Control)
  • 06.OpenClaw Application - Dedicated AI Assistant
  • 07.OpenClaw Web Search Capability Configuration
03.NVIDIA official Agent Skills application
  • 01.AI-assisted development with VS Code or Cursor
  • 02.Jetson device skills
  • 03.Jetson BSP custom agent skills
14.OpenClaw advanced development
01.Preparation Before Use
  • 01.Peripheral Hardware Configuration
  • 02.OpenClaw API-KEY Configuration
  • 03.OpenClaw Model Switching
  • 04.OpenClaw Prompts
  • 05.AI Voice Interaction Configuration
  • 06.Three Dialogue Configuration Tests
02.OpenClaw AI Programming Peripheral Control
  • 1. Servo Control
  • 2. RGB Strip
  • 3. OLED Display
  • 4. Temperature and Humidity Sensor
  • 5. Camera Application
  • 6. AI Script Peripheral Control
03.OpenClaw Peripheral Integration Applications
  • 1. Plant Care Assistant
  • 2. AI Calorie Estimation
  • 3. AI Rock Paper Scissors Game
  • 4. AI Pet
  • 5. AI Weather Station
  • 6. Temperature Humidity Dashboard
  • 7. Scheduled Tasks
Download
  • System_File
  • VMFile_BootFile
  • 3D Model File
  • DataSheet
  • Software_Tools
  • Code
  • Manual
Download ZIP

Welcome to Jetson Orin NANO Developer Kit repository

02.Person object detection

TAO PeopleNet Pedestrian Object Detection

TAO PeopleNet Pedestrian Object Detection1. Case Goal and Processing Flow2. Pre-Run Checks3. Starting Detection4. USB Camera Real-Time Detection4.1 Direct Run4.2 Common Parameters5. CSI Camera Real-Time Detection5.1 Direct Run5.2 Common Parameters6. Common Issues

Applicable environment: Jetson Orin Nano 8GB, JetPack 7.2.1, DeepStream 9.1

After setting the power mode to MAXN, running the case may pop up an over-current warning; just ignore it.

1. Case Goal and Processing Flow

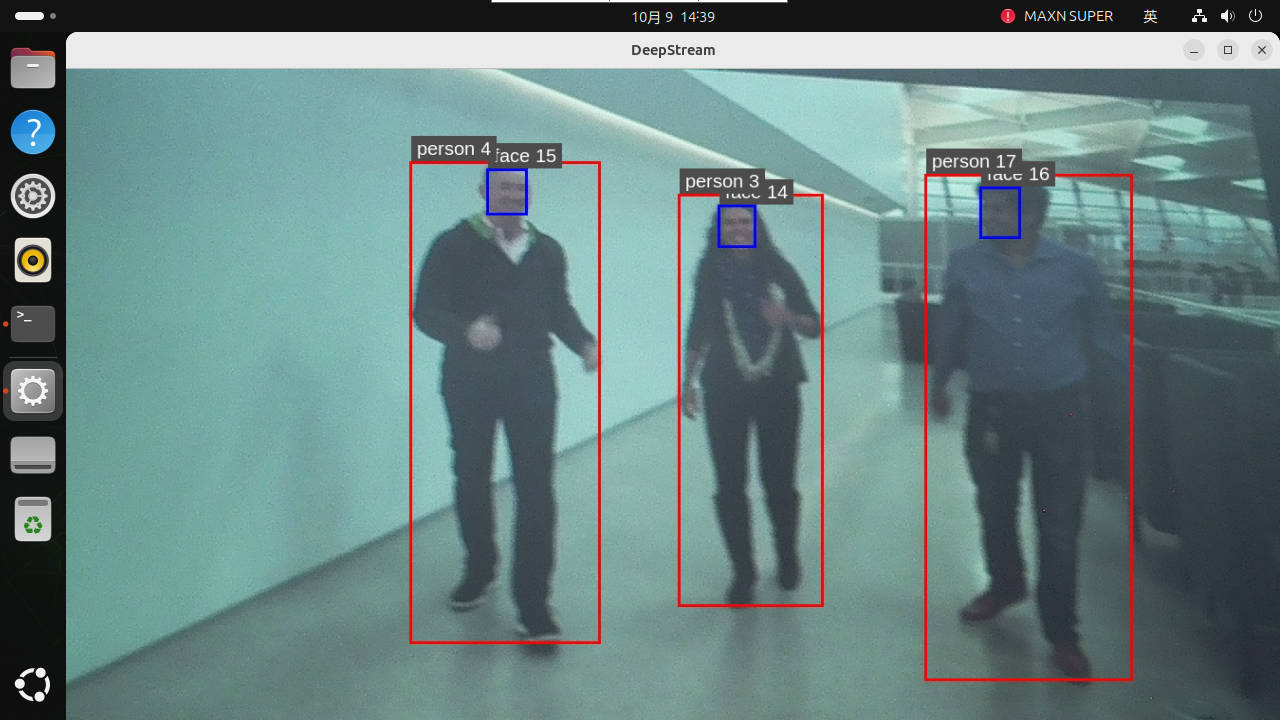
PeopleNet detects classes such as person, face, and bag in video frames, and outputs classes, confidence, and rectangles. It does not output pixel-level human silhouettes, nor does it automatically provide cross-frame identity IDs.

video/USB/CSI → PeopleNet TensorRT inference → OSD detection boxes
                                         ├→ desktop preview
                                         └→ video mode MP4

For human silhouettes use PeopleSemSegNet; for trajectory IDs add a Tracker; for cross-camera appearance matching use ReIdentificationNet.

2. Pre-Run Checks

Video mode runs in a Jetson desktop/VNC graphical session:

xxxxxxxxxx
cd ~/DeepStream/tao-toolkit-shell-demo
ls -lh video_in/Retail02_short.mp4
ls -ld video_out

Confirm the material exists and the output directory is writable. USB/CSI modes also require connecting the camera and confirming the device is not occupied by other programs.

3. Starting Detection

Run the preset video:

xxxxxxxxxx
./run_video.sh peoplenet

The current video input is video_in/Retail02_short.mp4, and the output is video_out/out_peoplenet.mp4. Detection boxes are displayed frame by frame; the class text depends on the order of the labels file and class IDs.
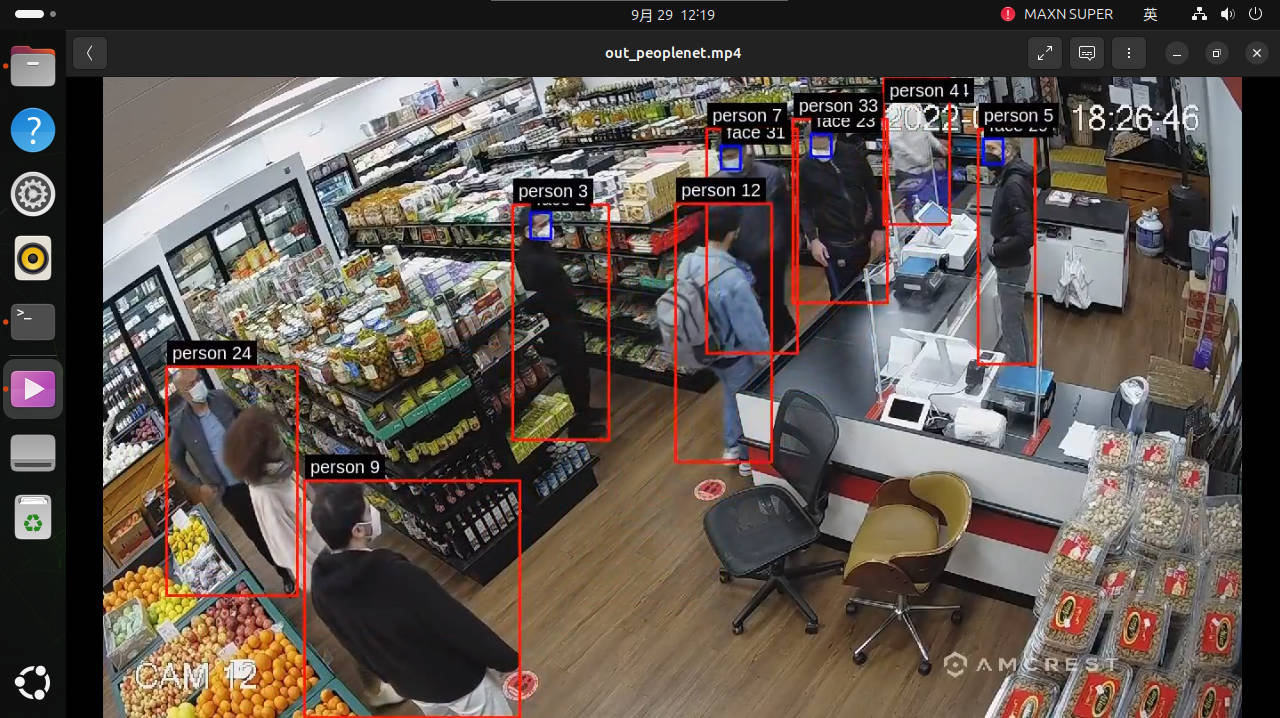
PeopleNet video detection screen

After waiting for EOS, check:

xxxxxxxxxx
gst-discoverer-1.0 video_out/out_peoplenet.mp4

The input file is specified by the case configuration. You can put a new video into Jetson's video_in/ and replace it using the file name used in the configuration, or check the configuration and modify the input source. Keep the original material before replacing; use gst-discoverer-1.0 to check the new material's encoding and confirm the device can decode it. The output is fixed to video_out/out_peoplenet.mp4; rename old results first when you need to keep them.

4. USB Camera Real-Time Detection

4.1 Direct Run

Start from the Jetson desktop/VNC:

xxxxxxxxxx
cd ~/DeepStream/tao-toolkit-shell-demo
./run_usb.sh peoplenet

USB mode is a live preview and does not generate this case's MP4. The class, confidence, and box meanings in the frame are the same as in video mode; the actual input format is determined by the camera.
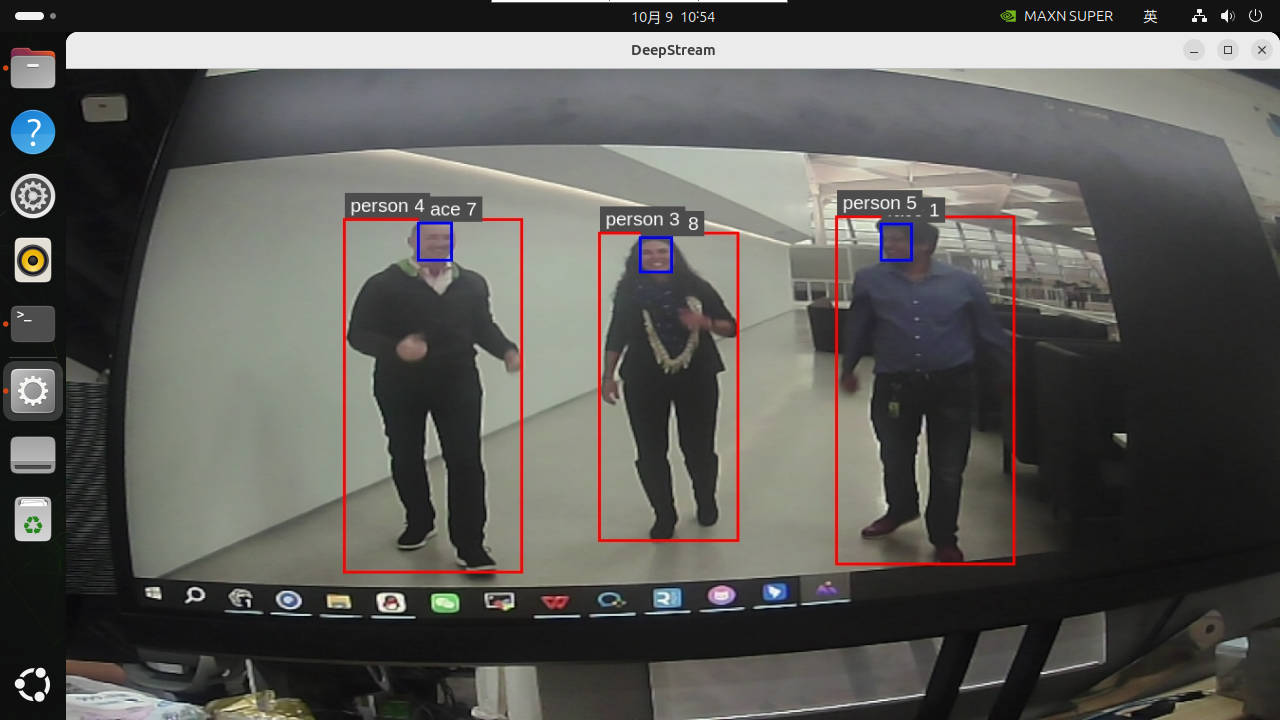
To stop, press Ctrl+C once in the launching terminal, wait for App run successful, and confirm the device is released. PeopleNet USB was verified on /dev/video0 YUYV 640x480@30; the specific performance does not represent other cameras.

4.2 Common Parameters

Before running, you can check the formats, resolutions, and frame rates supported by the camera:

xxxxxxxxxx
v4l2-ctl -d /dev/video0 --list-formats-ext
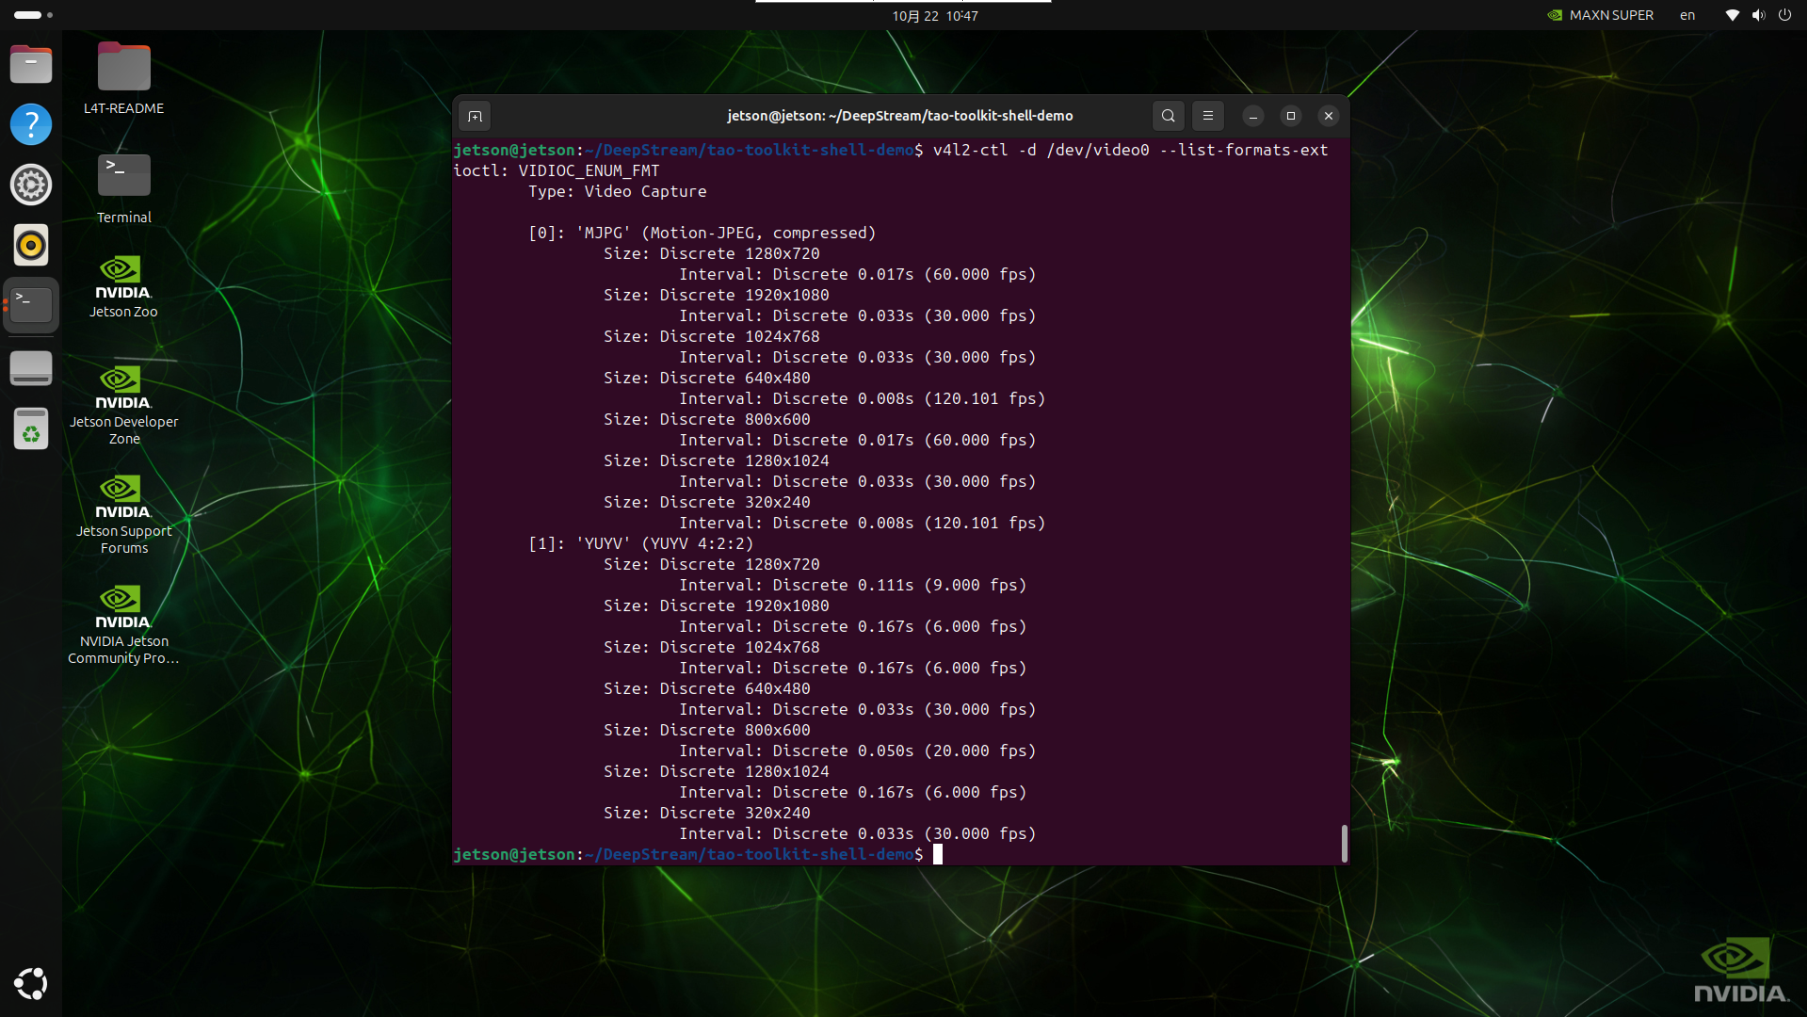
Note: the USB pipeline of Object Embedding Vector Generation is fixed to YUY2, so among the parameters below, choose the YUY2 parameters

​x
# View all parameters
./run_usb.sh peoplenet --help

# Use another video device
./run_usb.sh peoplenet --device /dev/video1

# Choose from the configurations found above that the camera supports; here we use 1280×720, 9FPS
./run_usb.sh peoplenet --width 1280 --height 720 --fps 9

5. CSI Camera Real-Time Detection

5.1 Direct Run

The course CSI entry supports live preview. Connect a compatible camera, confirm the driver and Argus service are working, then run the corresponding command in a Jetson desktop/VNC graphical terminal:

xxxxxxxxxx
cd ~/DeepStream/tao-toolkit-shell-demo
./run_csi.sh peoplenet

CSI uses the Jetson Argus link; the existence of a USB device node does not prove CSI streaming works. Camera mode is for live preview and does not generate the video mode's MP4.
5.2 Common Parameters

Before running, you can check the formats, resolutions, and frame rates supported by the camera; this must be run in a graphical interface:

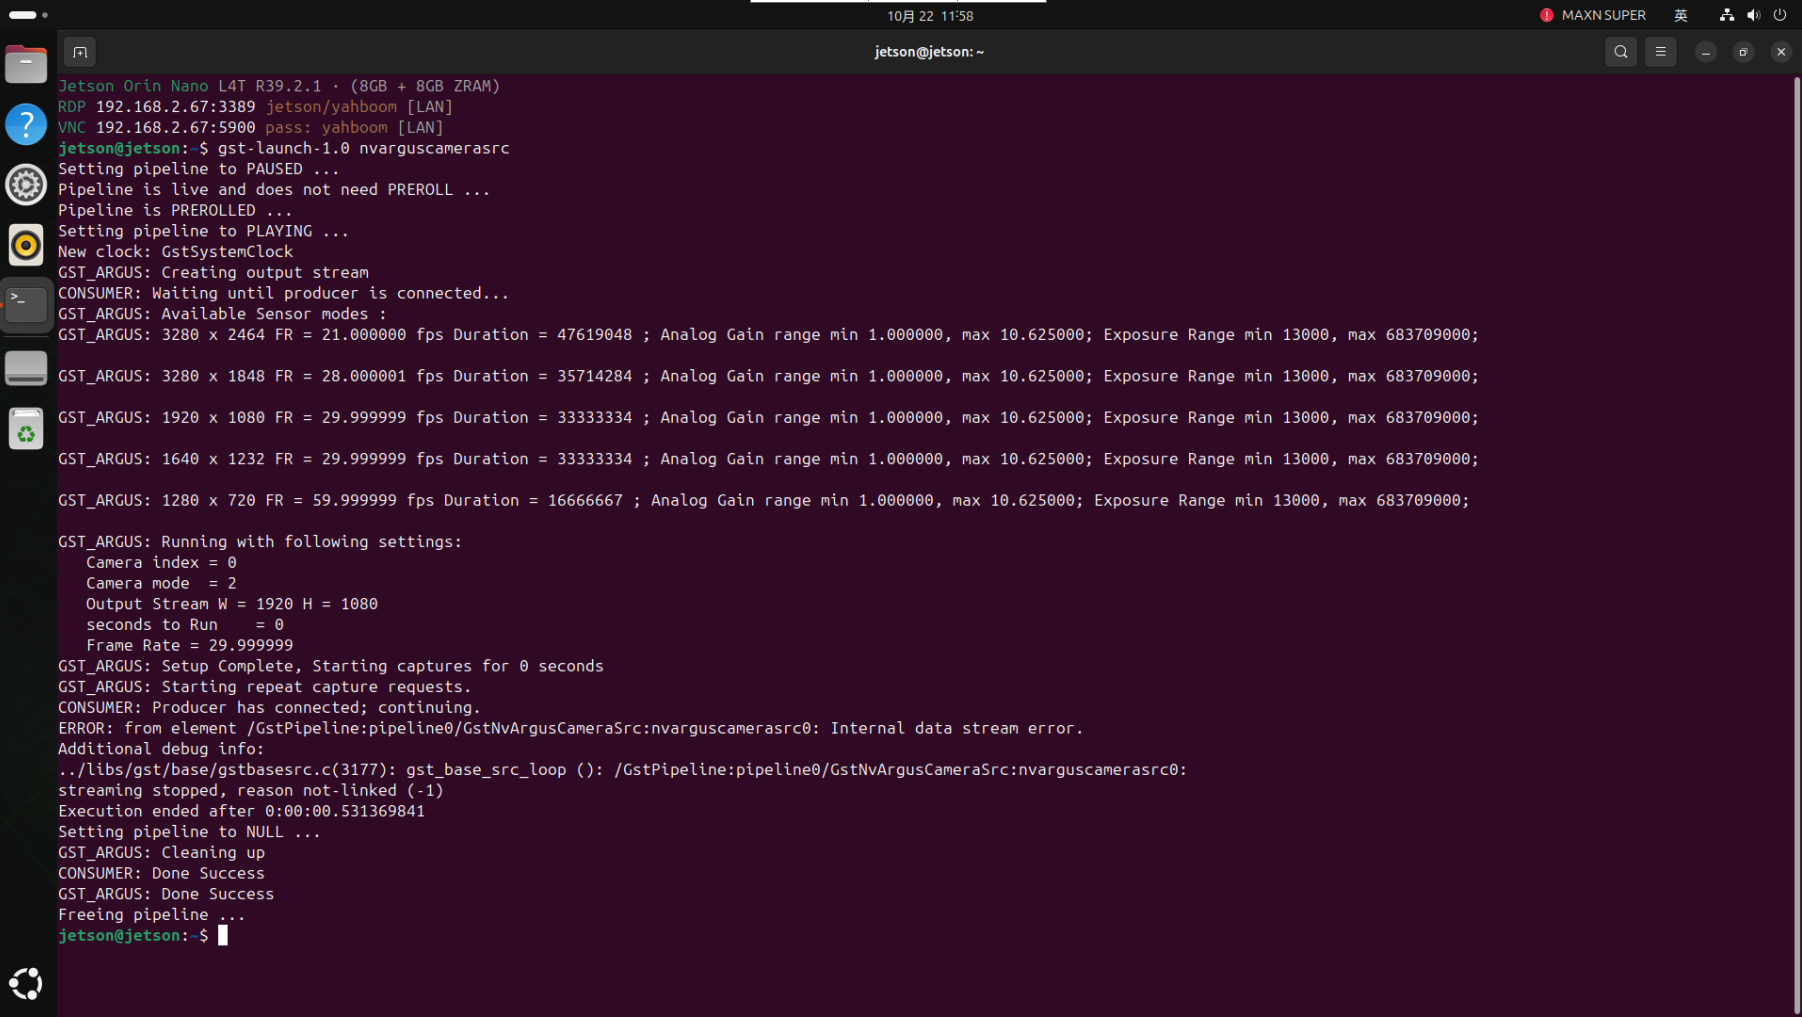
xxxxxxxxxx
gst-launch-1.0 nvarguscamerasrc

xxxxxxxxxx
# View all parameters
./run_csi.sh peoplenet --help

# Use the second CSI camera
./run_csi.sh peoplenet --sensor-id 1

# Adjust input size and frame rate
./run_csi.sh peoplenet --width 1920 --height 1080 --fps 30

6. Common Issues

SymptomCheck and Handling
No person boxesConfirm the input frame has targets and the pipeline is running; occlusion, scale, and lighting all affect detection.
Classes displayed incorrectlyCheck whether the PeopleNet engine, inference configuration, parser, and labels come from the same version.
USB cannot be openedCheck /dev/video*, supported formats, permissions, and device occupancy.
No CSI imageCheck the compatible module, connection, sensor driver, Argus service, and camera occupancy.
MP4 missing or cannot seekCamera mode only previews; in video mode, wait for EOS or a single Ctrl+C wrap-up before checking.
Traffic scene object detection
Vehicle brand classification

COMPANY

  • About us
  • Team Style
  • Blog

LEARNING & EXPLORATION

  • Tutorials
  • Edge AI hardware
  • Educational robots
  • Embedded intelligent hardware

WHERE TO BUY

  • Yahboom Online Store
  • Amazon
  • Alibaba
  • AliExpress
  • Mercado

TECHNOLOGY SUPPORT

  • Email: support@yahboom.com

BE A DISTRIBUTOR

  • Email: sales@yahboom.com
QR Code

Copyright © 2017-2026 Yahboom. All Rights Reserved.

EN/中文