Welcome to Jetson Orin NANO Developer Kit repository
3.Offline text to speech (TTS)
2. Text-to-Speech (TTS, Online/Offline)
2. Text-to-Speech (TTS, Online/Offline)1. Concept Introduction1.1 What is "TTS"?1.2 Implementation Principles Overview1. Text Analysis2. Language Processing3. Speech Synthesis4. Sound Waveform Generation2. Code AnalysisKey Code1. TTS Initialization and Invocation (largemodel/largemodel/model_service.py)2. TTS Backend Implementation (largemodel/utils/large_model_interface.py)Code Analysis3. Practical Operations3.1 Configuring TTS3.1.1 Configuring Offline TTS3.1.2 Configuring Online TTS3.2 Starting and Testing the Feature4. Common Problems and Solutions4.1 Playback ProblemsProblem 1: The program runs normally with no errors, but no sound can be heard.
1. Concept Introduction
1.1 What is "TTS"?
TTS technology converts written text into speech output that humans can hear. It enables computers to "read aloud" text content and is widely used in accessible reading, intelligent assistants, navigation systems, educational software, and many other fields. Through TTS, users can hear a natural and fluent machine-generated human voice, which greatly improves the convenience and flexibility of information acquisition.
1.2 Implementation Principles Overview
The implementation of a TTS system mainly includes the following key steps and technologies:
1. Text Analysis
At this stage, the input text is first preprocessed, including but not limited to removing irrelevant characters, normalizing punctuation and letter case, word segmentation, and identifying special symbols such as numbers and converting them into the corresponding word forms.
At the same time, linguistic analysis of the text is also required, for example determining the pronunciation of each word (which usually requires a pronunciation dictionary), the stress position, the intonation pattern, and the sentence structure.
2. Language Processing
This step mainly focuses on how to correctly pronounce and adjust intonation according to the context. For example, the word "read" has different pronunciations in different tenses (past tense/past participle pronounced /red/, while in other cases pronounced /riːd/). Therefore, a powerful language model is needed to understand these subtle differences.
Prosody modeling is also involved here, that is, deciding which parts should be emphasized, whether the speaking rate should be fast or slow, and the emotional tone of the whole sentence.
3. Speech Synthesis
The text information processed in the previous two stages is fed into a speech synthesis engine, which is responsible for generating the actual sound waveform.
Traditional TTS systems use concatenative synthesis, that is, selecting suitable units from a database of pre-recorded speech segments and concatenating them to form a complete sentence. Although this method can produce high-quality speech, it is limited by the samples in the database.
Modern TTS systems rely more on parametric synthesis or neural network synthesis (such as WaveNet, Tacotron, and so on). These methods can predict speech features directly from text and generate continuous sound signals. Deep learning-based methods in particular can better capture the subtle variations in speech, thereby producing more natural and fluent voices.
4. Sound Waveform Generation
Finally, the generated sound waveform is further processed to ensure that its quality meets the expected standards, for example adjusting the volume and equalizing the frequency response.
After that, these audio data can be played through speakers or other audio playback devices for people to listen to.
With the development of artificial intelligence and machine learning technologies, especially the application of deep learning, TTS systems have not only improved significantly in accuracy but also made considerable progress in naturalness and emotional expression, making machine-generated speech increasingly close to real human voice.
2. Code Analysis
Key Code
1. TTS Initialization and Invocation (largemodel/largemodel/model_service.py)
x# From largemodel/largemodel/model_service.pyclass LargeModelService(Node): def __init__(self): # ... self.system_sound_init() # ...
def init_param_config(self): # ... self.declare_parameter('useolinetts', False) self.useolinetts = self.get_parameter('useolinetts').get_parameter_value().bool_value if self.useolinetts: self.tts_out_path = os.path.join(self.pkg_path, "resources_file", "tts_output.mp3") else: self.tts_out_path = os.path.join(self.pkg_path, "resources_file", "tts_output.wav")
def system_sound_init(self): """Initialize TTS system""" model_type = "oline" if self.useolinetts else "local" self.model_client.tts_model_init(model_type, self.language) self.get_logger().info(f'TTS initialized with {model_type} model')
def _safe_play_audio(self, text_to_speak: str): """ Synthesizes and plays all non-empty messages only in non-text chat mode. """ if not self.text_chat_mode and text_to_speak: try: self.model_client.voice_synthesis(text_to_speak, self.tts_out_path) self.play_audio_async(self.tts_out_path) except Exception as e: self.get_logger().error(f"Safe audio playback failed: {e}")2. TTS Backend Implementation (largemodel/utils/large_model_interface.py)
xxxxxxxxxx# From largemodel/utils/large_model_interface.pyclass model_interface:    # ...    def tts_model_init(self,model_type='oline',language='zh'):        if model_type=='oline':            if self.tts_supplier=='baidu':                self.token=self.fetch_token()                self.model_type='oline'              elif model_type=='local':            self.model_type='local'            if language=='zh':                tts_model=self.zh_tts_model                tts_json=self.zh_tts_json            elif language=='en':                tts_model=self.en_tts_model                tts_json=self.en_tts_json            self.synthesizer = piper.PiperVoice.load(tts_model, config_path=tts_json, use_cuda=False)
    def voice_synthesis(self,text,path):        if self.model_type=='oline':            if self.tts_supplier=='baidu':                # ... (Baidu TTS implementation)                pass            elif self.tts_supplier=='aliyun':                # ... (Aliyun TTS implementation)                pass        elif self.model_type=='local':            with wave.open(path, 'wb') as wav_file:                wav_file.setnchannels(1)                wav_file.setsampwidth(2)                wav_file.setframerate(self.synthesizer.config.sample_rate)                self.synthesizer.synthesize(text, wav_file)
Code Analysis
The text-to-speech (TTS) feature is invoked by the LargeModelService node, with the specific implementation provided by the model_interface class. Its design switches between different backend services through parameter configuration.
Initialization Flow (
model_service.py):When
LargeModelServiceis initialized, theinit_param_configfunction reads the Boolean valueuseolinettsfrom the ROS parameter server.Based on the value of
useolinetts, thesystem_sound_initfunction decides whether to pass the string'local'or'oline'to theself.model_client.tts_model_initmethod.In
large_model_interface.py, thetts_model_initmethod executes the corresponding initialization logic according to the received string parameter. If it is'local',piper.PiperVoice.loadis used to load the local model file.
Synthesis and Playback Flow (
model_service.py):When voice announcement is needed, the
_safe_play_audiofunction is called.This function first calls the
self.model_client.voice_synthesismethod, passing in the text to be converted and the target audio pathself.tts_out_path.After the
voice_synthesismethod finishes executing and generates the audio file,_safe_play_audiothen callsself.play_audio_asyncto play the file asynchronously.
Backend Implementation Selection (
large_model_interface.py):The
voice_synthesismethod is the backend dispatch center of the TTS feature. Internally, it chooses the execution path by checking the value of theself.model_typeattribute set during initialization.If
self.model_typeis'local', the code block uses Python'swavelibrary to open a WAV file, sets its header parameters (channels, sample width, sample rate), and then calls theself.synthesizer.synthesizemethod to write the audio stream synthesized from the text directly into that file.If
self.model_typeis'oline', it enters the logic branches for different cloud service providers (such as Baidu, Aliyun).This structure separates the invocation issued by the upper-layer node ("say this passage") from the specific synthesis technology of the lower layer (which library to use, which API to call).
3. Practical Operations
3.1 Configuring TTS
Online and offline TTS share the language, speaker, and audio device settings, and useolinetts selects the synthesis backend. First open the main configuration file:
xxxxxxxxxxvim ~/yahboom_ws/src/largemodel/config/yahboom.yamlSet the language and backend in the existing model_service.ros__parameters parameter block:
xxxxxxxxxxmodel_service ros__parameters language'zh' # 'zh': Chinese; 'en': English useolinettsFalse # False: offline TTS; True: online TTS llm_platform'ollama' # Available platforms: 'ollama', 'tongyi', 'spark', 'qianfan' regional_setting"China"If the parameters already exist, simply modify the original values; do not add duplicate keys to the same YAML parameter block.
3.1.1 Configuring Offline TTS
Set useolinetts to False, and confirm in large_model_interface.yaml that the Piper model and configuration file paths for the selected language exist:
xxxxxxxxxxvim ~/yahboom_ws/src/largemodel/config/large_model_interface.yaml::xxxxxxxxxxzh_tts_model"/home/jetson/yahboom_ws/src/largemodel/MODELS/tts/zh/zh_CN-huayan-medium.onnx"zh_tts_json"/home/jetson/yahboom_ws/src/largemodel/MODELS/tts/zh/zh_CN-huayan-medium.onnx.json"en_tts_model"/home/jetson/yahboom_ws/src/largemodel/MODELS/tts/en/en_US-libritts-high.onnx"en_tts_json"/home/jetson/yahboom_ws/src/largemodel/MODELS/tts/en/en_US-libritts-high.onnx.json"3.1.2 Configuring Online TTS
Online TTS requires the API credentials of the corresponding service provider. The source tutorial takes Baidu AI Cloud as an example; fill in your own credentials and voice parameters in large_model_interface.yaml:
xxxxxxxxxx# large_model_interface.yaml
# Baidu AI Cloud text-to-speech configurationbaidu_API_KEY'your api key' # Baidu platform API keybaidu_SECRET_KEY'your secret key' # Baidu platform SECRET keyCUID'your device identifier ' # Device identifierPER4 # Speaker: basic voice library (0=Duxiaomei, 1=Duxiaoyu, 3=Duxiaoyao, 4=Duyaya)SPD5 # Speed (0-15), default 5PIT5 # Pitch (0-15), default 5VOL5 # Volume (0-9), default 5Confirm that model_service.ros__parameters.useolinetts in yahboom.yaml is True, and set the online service provider to use according to the project's current tts_supplier. Online synthesis requires that the Jetson can access the service provider's API; do not disclose real keys.
3.2 Starting and Testing the Feature
Start the TTS Node: Run the following command:
xxxxxxxxxxros2 launch largemodel tts_only.launch.py
Send the Text to Be Synthesized: Open a new terminal and run the following command to publish a voice announcement message:
xxxxxxxxxxros2 topic pub --once /tts_text_input std_msgs/msg/String '{data: "Speech synthesis test succeeded"}'Test: If everything works properly, you should hear the robot say "Speech synthesis test succeeded" from your speaker using the synthesized voice.
4. Common Problems and Solutions
4.1 Playback Problems
Problem 1: The program runs normally with no errors, but no sound can be heard.
Solution:
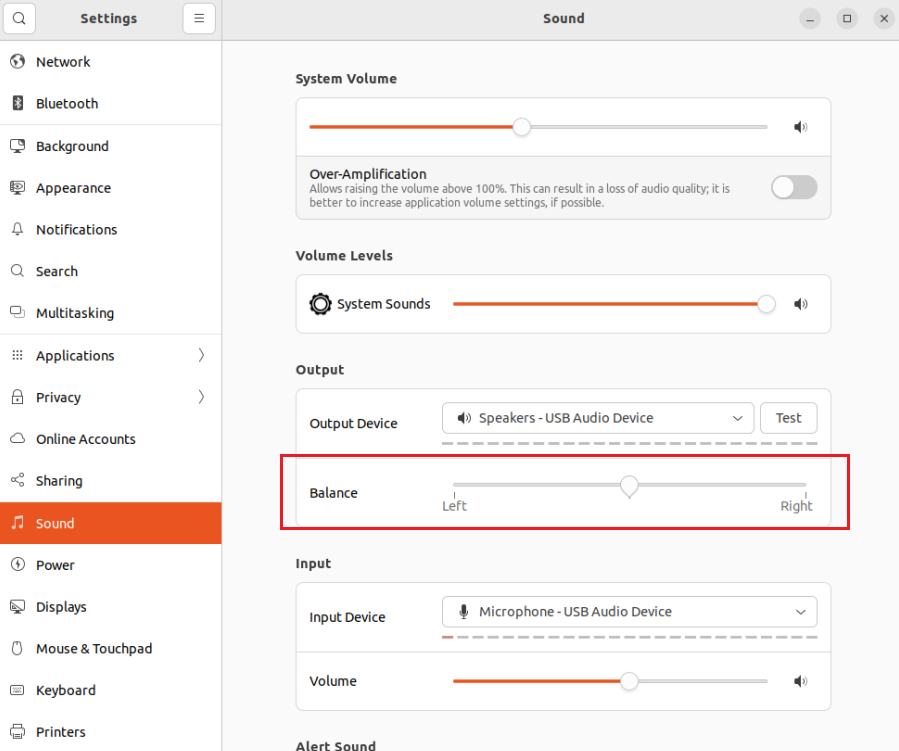
Check the audio output: Confirm that the system audio output device is selected correctly and that the volume is not muted. You can try playing an ordinary music file to test the hardware.
In the Sound settings, keep Balance in the middle position