Welcome to Jetson Orin NANO Developer Kit repository
02.License plate detection and recognition
DeepStream License Plate Detection and Recognition (LPR)
DeepStream License Plate Detection and Recognition (LPR)1. NVIDIA Official Deployment Method (For Reference Only)2. Example Goal and Processing Chain3. Model Versions and Scope of Application4. Course Script Entry Points5. Running with a Local Video6. Real-Time Running with a USB Camera6.1 Direct Run6.2 Common Parameters7. Real-Time Running with a CSI Camera7.1 Direct Run7.2 Common Parameters8. Stopping and Basic Troubleshooting
Applicable environment: JetPack 7.2.1, Ubuntu 24.04, DeepStream 9.1, Jetson Orin Nano Super. The factory environment already has the Chinese and US license plate models, TensorRT engines, the LPR program, and the course entry points ready. For normal study, run directly from Section 4; redeployment is only needed when the program or models are missing
After the power mode is set to MAXN, running the example may pop up an over-current warning; just ignore it
1. NVIDIA Official Deployment Method (For Reference Only)
The current factory system has already completed the above deployment; the following operations do not need to be repeated.
Official source code and documentation: https://github.com/NVIDIA/DeepStream/tree/main/src/apps/tao_apps/apps/tao_others/deepstream_lpr_app
The official LPR example is located in the DeepStream source tree. Only when the program, models, or engines are missing and the environment needs to be restored, follow the order below:
x# Download the models required by TAO LPR; network access is needed for the first downloadcd ~/DeepStream/src/apps/tao_apps./download_models.sh
# Compile the LPR application and the custom text parsercd apps/tao_others/deepstream_lpr_appmakeModel download location:
xxxxxxxxxx~/DeepStream/src/apps/tao_apps/models/On the first actual run, DeepStream automatically generates the TensorRT engine according to the local GPU, CUDA, and TensorRT versions. The official manual way to run it:
xxxxxxxxxxcd ~/DeepStream/src/apps/tao_apps/apps/tao_others/deepstream_lpr_app
# Chinese versioncp dict_ch.txt dict.txtsudo ./deepstream-lpr-app ../../../configs/app/lpr_app_ch_config.yml
# US versioncp dict_us.txt dict.txtsudo ./deepstream-lpr-app ../../../configs/app/lpr_app_us_config.yml
At the end, download_models.sh may try to download additional Tracker models to the legacy /opt/nvidia/deepstream/deepstream/.../Tracker path and report a failure because the regular user has no write permission for /opt. That model is not part of the vehicle, license plate, and text three-stage recognition chain of LPR, and does not affect this example.
2. Example Goal and Processing Chain
This example recognizes the license plate on a vehicle and displays the results in real time on the Jetson local machine or a VNC desktop.
The current setup uses NVIDIA's official TAO LPR three-stage chain:
xxxxxxxxxxTrafficCamNet vehicle detection ↓LPD license plate location detection ↓LPR license plate character recognitionTherefore, LPD only looks for license plates within vehicle regions that have already been detected. When a license plate detached from a vehicle is photographed alone, the preceding vehicle detection produces no result, and the subsequent license plate detection and text recognition are not executed.
3. Model Versions and Scope of Application
| Parameter | Model Used | Suitable License Plates |
|---|---|---|
--cn | LPD_ch + LPR_ch | Mainland China license plates, containing province abbreviations, such as Yue A83288, Wan A52718 |
--us | LPD_us + LPR_us | US state plates |
The Chinese version keeps the UTF-8 Chinese province abbreviation; stabilization must not cause only the trailing letters and digits to be displayed. The output Wan A88888 has been verified on a real USB camera.
The US version is not suitable for European long plates such as Romanian ones. Adjusting thresholds can improve recall and stability, but cannot make up for the fundamental differences in the model's region, plate proportions, and character layout.
4. Course Script Entry Points
The current unified launch script is located at ~/DeepStream/deepstream-shell-demo/:
xxxxxxxxxxcd ~/DeepStream/deepstream-shell-demo| Input Source | Chinese Version | US Version |
|---|---|---|
| Local video | ./run_video.sh lpr --cn | ./run_video.sh lpr --us |
| USB camera | ./run_usb.sh lpr --cn | ./run_usb.sh lpr --us |
| CSI camera | ./run_csi.sh lpr --cn | ./run_csi.sh lpr --us |
All three entry points will:
Switch to the corresponding character dictionary:
dict_ch.txtordict_us.txt.Use the corresponding Chinese or US model configuration.
Set the DeepStream/CUDA runtime library paths.
Display a real-time window on the Jetson local desktop or the VNC desktop.
Exactly one of --cn and --us must be chosen. Before running USB/CSI, confirm that no other program is occupying the corresponding camera.
Output rules: the local video entry displays in real time and also saves an MP4; the USB and CSI entries only display in real time and do not generate recording files.
5. Running with a Local Video
xxxxxxxxxxcd ~/DeepStream/deepstream-shell-demo./run_video.sh lpr --cn# US version: ./run_video.sh lpr --us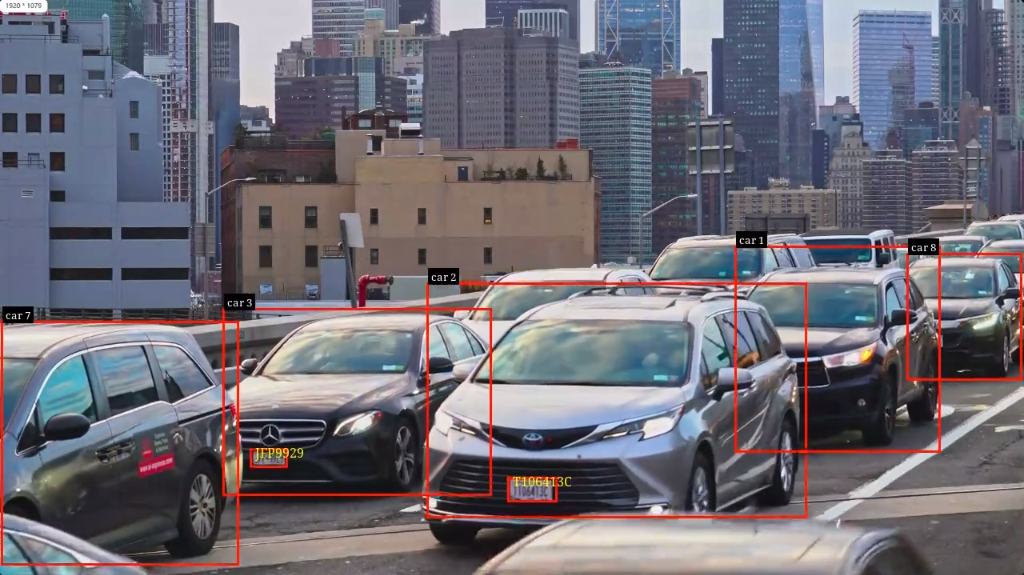
The video locations of the current configuration:
| Version | Configuration File | Default Video |
|---|---|---|
| Chinese version | ~/DeepStream/src/apps/tao_apps/configs/app/lpr_app_ch_config.yml | ~/DeepStream/src/apps/tao_apps/apps/tao_others/deepstream_lpr_app/cn.mp4 |
| US version | ~/DeepStream/src/apps/tao_apps/configs/app/lpr_app_us_config.yml | ~/DeepStream/src/apps/tao_apps/apps/tao_others/deepstream_lpr_app/us.mp4 |
To replace the video, change the list: under source-list in the corresponding YAML file to the absolute path of the target MP4. The file input of this official example only supports MP4/H.264.
After the video finishes playing naturally, an MP4 with recognition boxes and text is generated: for the Chinese version it is
~/DeepStream/src/apps/tao_apps/apps/tao_others/deepstream_lpr_app/lpr_ch_video.mp4,
and for the US version it is lpr_us_video.mp4 in the same directory. The recording muxing needs to be completed at EOS, so let the file video finish playing naturally; pressing Ctrl+C midway may leave an MP4 that cannot be played or has an incomplete duration.
The current version already handles early stopping: during a local video run, pressing Ctrl+C once sends EOS and waits for qtmux to finish writing the MP4 index before exiting. After the terminal shows Interrupted: finalizing MP4..., wait for End of stream; do not force-terminate the process repeatedly.
6. Real-Time Running with a USB Camera
6.1 Direct Run
xxxxxxxxxxcd ~/DeepStream/deepstream-shell-demo./run_usb.sh lpr --cn# US version: ./run_usb.sh lpr --us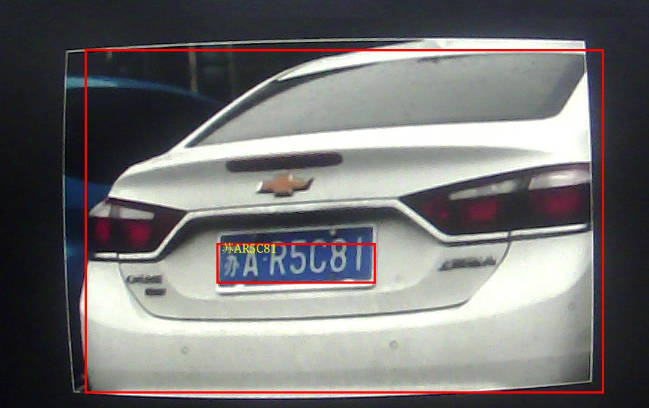
In the frame, the large red box indicates the vehicle region, the small red box indicates the license plate region, and the yellow text is the stabilized license plate result.
6.2 Common Parameters
Before running, you can check the formats, resolutions, and frame rates supported by the camera:
xxxxxxxxxxv4l2-ctl -d /dev/video0 --list-formats-ext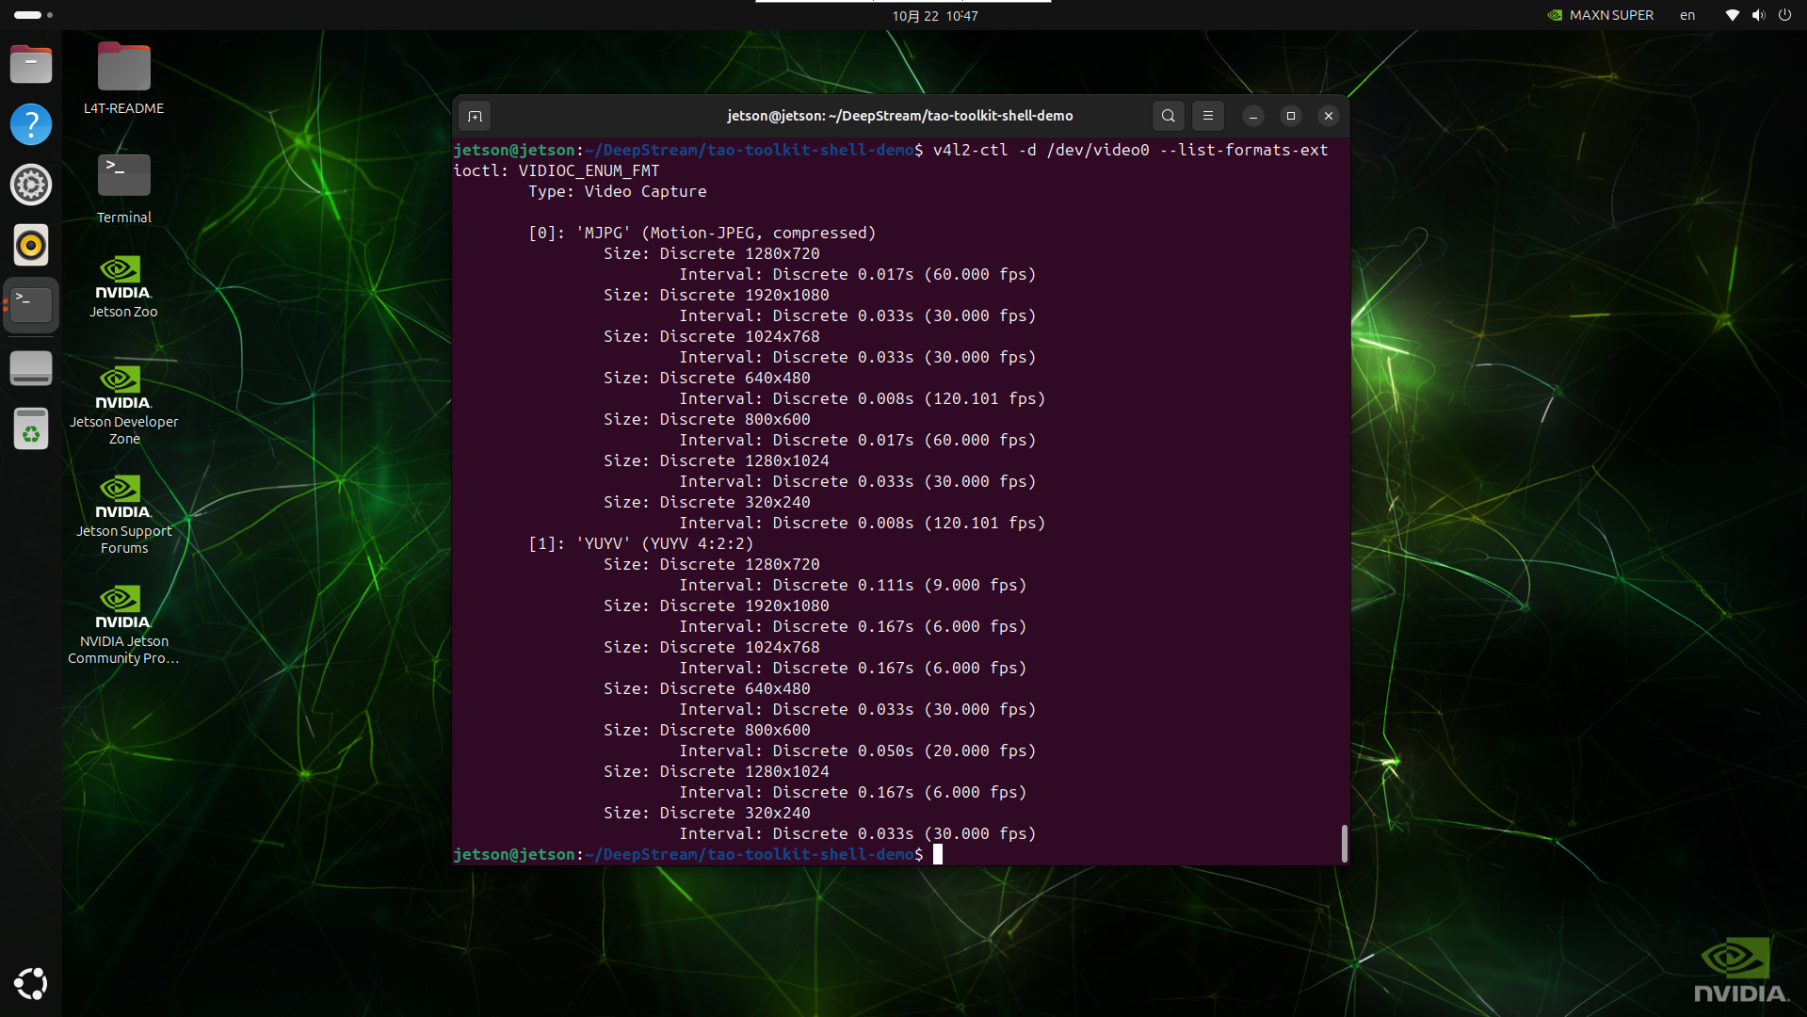
Note: the USB pipeline of LPR is fixed to MJPEG, so when choosing from the parameters below, select the MJPEG ones
xxxxxxxxxx# View all parameters./run_usb.sh lpr --help
# Use another video device./run_usb.sh lpr --cn --device /dev/video1
# Choose among the supported configurations listed above; 1280×720 at 60 FPS is used here./run_usb.sh lpr --cn --width 1280 --height 720 --fps 60
7. Real-Time Running with a CSI Camera
7.1 Direct Run
xxxxxxxxxxcd ~/DeepStream/deepstream-shell-demo./run_csi.sh lpr --cn# US version: ./run_csi.sh lpr --us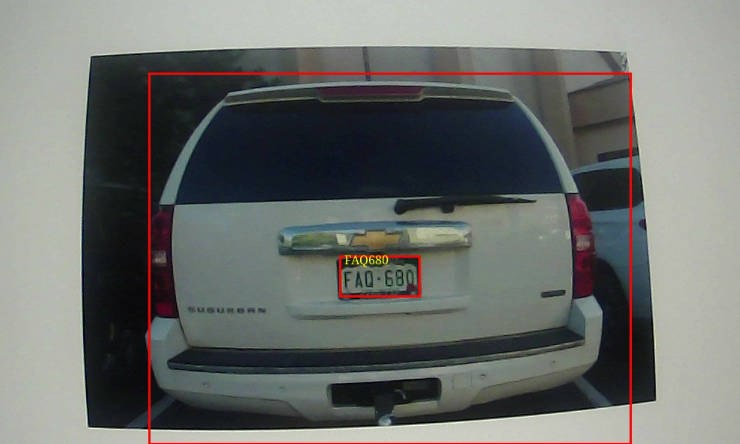
7.2 Common Parameters
Before running, you can check the formats, resolutions, and frame rates supported by the camera; this needs to be run in a graphical interface:
xxxxxxxxxxgst-launch-1.0 nvarguscamerasrc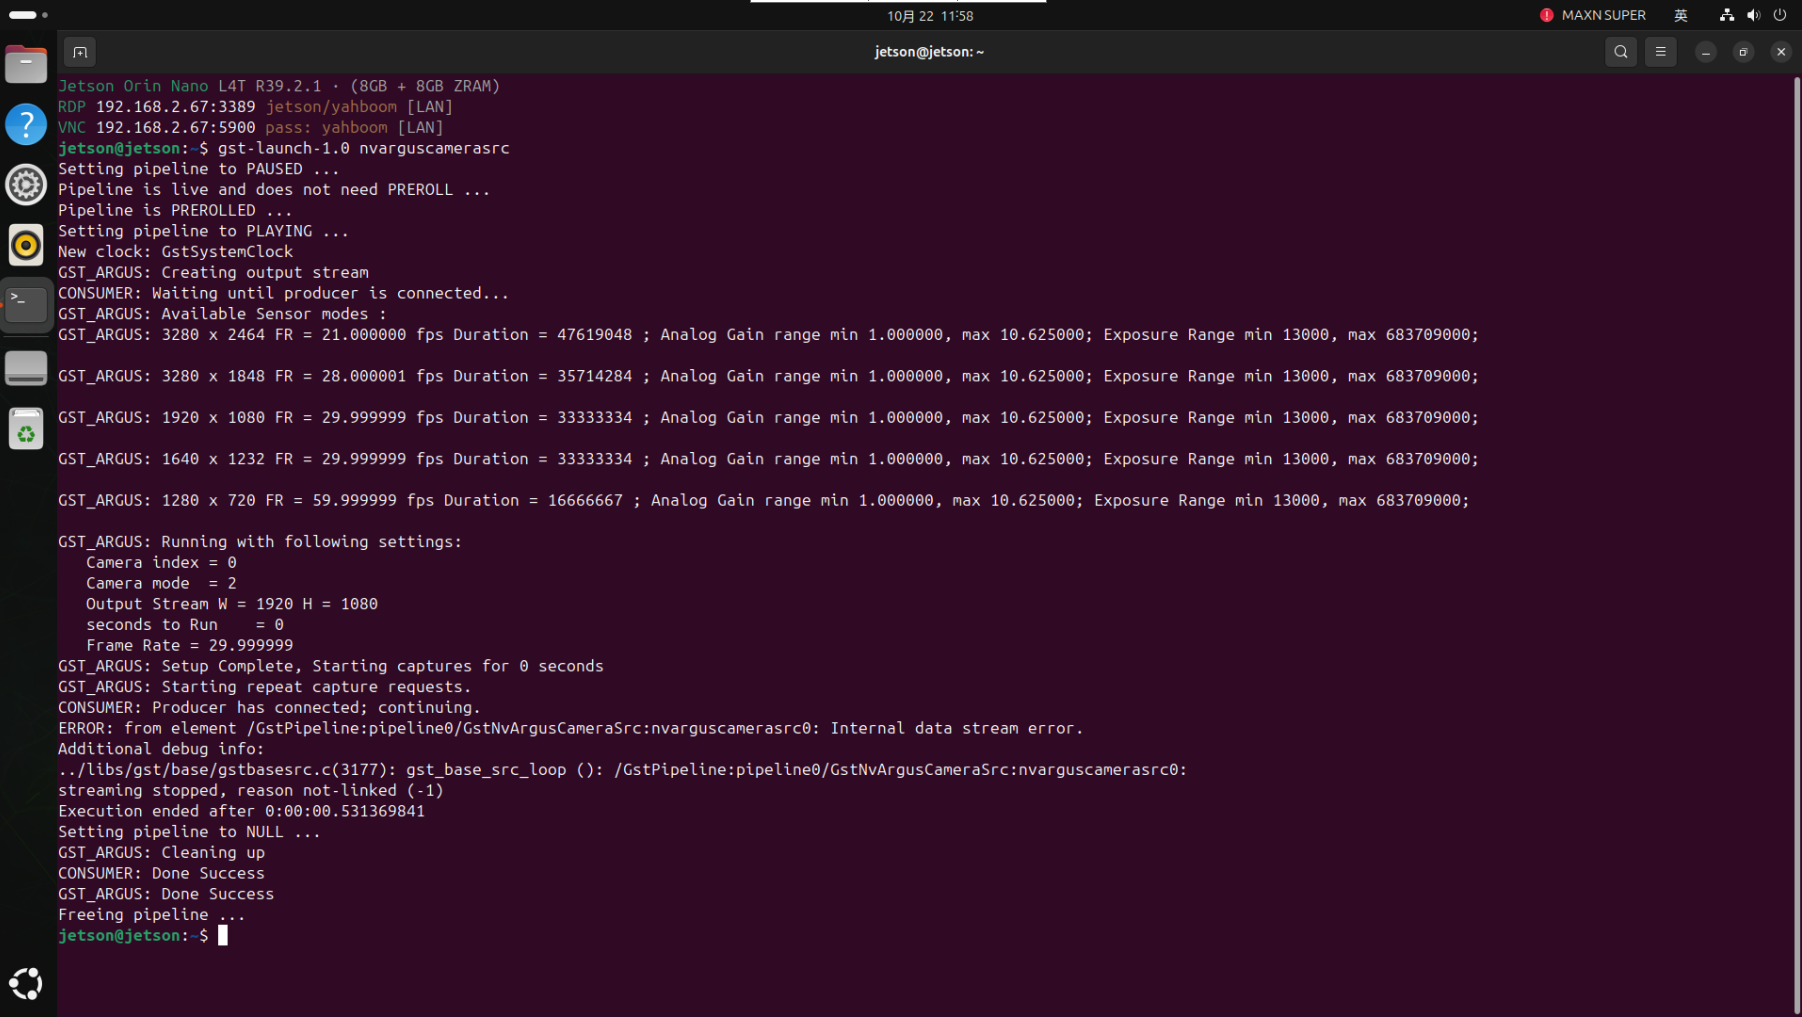
xxxxxxxxxx# View all parameters./run_csi.sh lpr --help
# Use the second CSI camera./run_csi.sh lpr --cn --sensor-id 1
# Adjust the input size and frame rate./run_csi.sh lpr --cn --width 1920 --height 1080 --fps 30
8. Stopping and Basic Troubleshooting
The real-time window is displayed on the Jetson local machine or the VNC desktop. To stop, return to the terminal where the launch command was run and press Ctrl+C once.
| Symptom | Priority Checks |
|---|---|
| Only the vehicle box, no license plate box | Whether the license plate is clear, complete, and large enough; whether the model version matches the plate region. |
| Chinese plate shows only letters and digits | Confirm that --cn is used, not --us. |
| USB fails to start | Run v4l2-ctl -d /dev/video0 --list-formats-ext and confirm the camera is not occupied by another program. |
| CSI shows no picture | First confirm the basic CSI camera example works, then check whether sensor-id=0 corresponds to the actual camera. |