yahboom
HomeTutorialsProduct
Solution
Blog
Online Store
About Us
EN/中文
Store
Jetson Orin NANO Developer Kit📖
01.Get started
  • 01. Learning route
  • 02. Get started quickly
  • 03. System Update Notes
  • 04. Disabling automatic updates and troubleshooting issues
  • 05. Jetson Orin Nano official kit screwdriver instructions
02.Jetson basic course
  • 01.Jetson board introduction
  • 02.Write Jetson original system
  • 03.Installing Jetson environment
  • 04.Backup SSD system
  • 05.Restore initial image system
  • 06.Upgrade to SUPER version (Optional)
  • 07.Write SUPER boot (Must read)
  • 08.SSD expansion
  • 09.Jetpack old system upgraded to Yahboom SUPER factory system
  • 10.Write the system onto your own SSD
03.Basic setting course
  • 01.Basic knowledge
  • 02.Network configuration
  • 03.SSH remote login
  • 04.VNC remote control
  • 05.RDP remote control
  • 06.Remote file transfer
  • 07.Jtop tool
  • 08.Exchange space expansion
  • 09.Use VSCode
  • 10.Use VMware
  • 11.Modify screen resolution
04.GPIO control course
  • 01.GPIO description
  • 02.GPIO library installation
  • 03.GPIO reading
  • 04.GPIO output
  • 05.Serial communication
  • 06.I2C communication
05.Vision basic course
  • 01.CSI camera preview
  • 02.USB camera preview
  • 03.Use Jupyter Lab
  • 04.Use JetCam
06.OpenCV basic course
  • 01.Image reading
  • 02.Image saving
  • 03.Image modification
  • 04.Image scaling
  • 05.Image cropping
  • 06.Image translation
  • 07.Image mirroring
  • 08.Image grayscale conversion
  • 09.Image binarization
  • 10.Image edge detection
  • 11.Add line segments
  • 12.Add rectangles
  • 13.Add circular shape
  • 14.Add ellipses
  • 15.Add polygons
  • 16.Add Text
  • 17.Preview USB camera image
  • 18.Preview CSI camera image
07.Vision advanced course
01.Environment construction
  • 01.TensorFlow
  • 02.PyTorch
  • 03.Torchvision
02.DeepStream development
  • 01.DeepStream environment
  • 02.License plate detection and recognition
  • 03.Parallel multi-model inference
  • 04.Object embedding vector generation
  • 05.Pose recognition
  • 06.NV optical flow anomaly detection
  • 07.Single-view 3D tracking
  • 08.Multi-view 3D tracking
03.NVIDIA TAO toolkit application
  • 01.Traffic scene object detection
  • 02.Person object detection
  • 03.Vehicle brand classification
  • 04.Vehicle model classification
  • 05.License plate detection and recognition
  • 06.Person semantic segmentation
  • 07.Retail product detection and recognition
  • 08.Person feature extraction and matching (ReID)
  • 09.Person action and pose classification
  • 10.Transformer-based person detection
  • 11.3D human skeleton detection
  • 12.LiDAR 3D point cloud detection
04.YOLO11 development
  • 01.YOLO environment construction
  • 02.CLI use
  • 03.Object detection
  • 04.Instance segmentation
  • 05.Pose estimation
  • 06.Image classification
  • 07.Oriented object detection
  • 08.Model conversion
  • 09.Dataset annotation
  • 10.Model training conversion
  • 11.Model prediction
05.Mediapipe development
  • 01.Mediapipe environment
  • 02.Hand detection
  • 03.Face detection
  • 04.Face effects
  • 05.3D object recognition
  • 06.Virtual brush
  • 07.Gesture recognition
  • 08.Finger control
  • 09.Posture estimation
  • 10.Face mask
  • 11.Overall detection
  • 12.Green scene removal(Human)
06.YOLO26 development
  • 01.YOLO environment construction
  • 02.CLI use
  • 03.Object detection
  • 04.Instance segmentation
  • 05.Pose estimation
  • 06.Image classification
  • 07.Oriented object detection
  • 08.Model conversion
  • 09.Dataset annotation
  • 10.Model training conversion
  • 11.Model prediction
07.QR code recognition
  • QR code recognition
08.Docker basic course
  • 01.Docker introduction
  • 02.Docker installation
  • 03.Docker command
  • 04.Docker usage
  • 05.Docker interaction
09.ROS2-Jazzy
01.ROS2 basic course
  • 1.Introduction to ROS2
  • 2.ROS2 install Jazzy
  • 3.ROS2 development environment
  • 4.ROS2 workspace
  • 5.ROS2 function package
  • 6.ROS2 node
  • 7.ROS2 topic communication
  • 8.ROS2 service communication
  • 9.ROS2 action communication
  • 10.ROS2 custom interface message
  • 11.ROS2 parameter service case
  • 12.ROS2 meta-function package
  • 13.ROS2 distributed communication
  • 14.ROS2 DDS
  • 15.ROS2 time related API
  • 16.ROS2 common command tools
  • 17.ROS2 rviz2 use
  • 18.ROS2 rqt toolbox
  • 19.ROS2 Launch startup file configuration
  • 20.ROS2 recording and playback tool
  • 21.ROS2 URDF model
  • 22.ROS2 Gazebo simulation platform
  • 23.ROS2 TF2 coordinate transformation
02.ROS2 vision course
  • 01.Camera preview (USB)
  • 02.Camera preview (CSI)
  • 03.Camera calibration (USB)
  • 04.Camera calibration (CSI)
  • 05.AR vision (USB)
  • 06.AR vision (CSI)
10.Large model basic course
01.Offline large model
  • 01.AI large model environment deployment
  • 02.Install large model dialogue platform
  • 03.Meta AI - Llama model
  • 04.Alibaba Cloud - Qwen model
  • 05.Microsoft - Phi-4-mini model
  • 06.DeepSeek - DeepSeek model
  • 07.Alibaba Cloud - Qwen-VL visual multimodal large model
  • 08.Google - Gemma visual multimodal large model
  • 9.Llava visual multimodal large model
  • 10.MiniCPM-V visual multimodal large model
  • 11.High-quality vision-language grounding (LocateAnything)
02.Online large model
  • 01.Tongyi Qianwen large model
  • 02.OpenRouter large model API aggregation platform
11.Large model application practice
01.Voice interaction application
  • 1.Voice interaction hardware connection (Must read)
  • 2.Offline speech to text (ASR)
  • 3.Offline text to speech (TTS)
  • 4.AI large model voice interaction
  • 5.AI large model offline voice assistant
02.Multimodal large model application (Online_Offline large model + Text_Voice interaction)
  • 01.Multimodal visual understand application
  • 02.Multimodal text image application
  • 03.Multimodal video analysis application
  • 04.Multi module visual position application
  • 05.Multimodal table scanning application
  • 06.Multimodal autonomous agent application
12.NVIDIA Isaac ROS course
  • 01.Build Isaac ROS environment
  • 02.Deep segmentation
  • 03.DNN stereoscopic depth
  • 04.Free space segmentation
  • 05.Image distortion processing
  • 06.Image segmentation
  • 07.3D scene reconstruction and mapping
  • 08.Object detection
  • 09.3D attitude estimation
  • 10.Visual SLAM
13.OpenClaw deployment and basic usage
01.OpenClaw deployment and introduction
  • 01.Quick start with the pre-configured environment (Recommended)
  • 02.OpenClaw Deployment
  • 03.OpenClaw WhatsApp Plugin Application
  • 04.OpenClaw WebChat Interaction
  • 05.OpenClaw TUI Interaction
  • 06.OpenClaw Tools Introduction
  • 07.OpenClawGate Gateway User Manual
  • 08.OpenClaw Features Overview
  • 09.OpenClawHub Introduction (Skill Installation)
02.OpenClaw basic application
  • 01.OpenClaw Application - File Management
  • 02.OpenClaw Application - Camera
  • 03.OpenClaw Application - Browser Control
  • 04.OpenClaw Application - Script Execution
  • 05.OpenClaw Application - AI Programming (Peripheral & GPIO Control)
  • 06.OpenClaw Application - Dedicated AI Assistant
  • 07.OpenClaw Web Search Capability Configuration
03.NVIDIA official Agent Skills application
  • 01.AI-assisted development with VS Code or Cursor
  • 02.Jetson device skills
  • 03.Jetson BSP custom agent skills
14.OpenClaw advanced development
01.Preparation Before Use
  • 01.Peripheral Hardware Configuration
  • 02.OpenClaw API-KEY Configuration
  • 03.OpenClaw Model Switching
  • 04.OpenClaw Prompts
  • 05.AI Voice Interaction Configuration
  • 06.Three Dialogue Configuration Tests
02.OpenClaw AI Programming Peripheral Control
  • 1. Servo Control
  • 2. RGB Strip
  • 3. OLED Display
  • 4. Temperature and Humidity Sensor
  • 5. Camera Application
  • 6. AI Script Peripheral Control
03.OpenClaw Peripheral Integration Applications
  • 1. Plant Care Assistant
  • 2. AI Calorie Estimation
  • 3. AI Rock Paper Scissors Game
  • 4. AI Pet
  • 5. AI Weather Station
  • 6. Temperature Humidity Dashboard
  • 7. Scheduled Tasks
Download
  • System_File
  • VMFile_BootFile
  • 3D Model File
  • DataSheet
  • Software_Tools
  • Code
  • Manual
Download ZIP

Welcome to Jetson Orin NANO Developer Kit repository

5. Camera Application

OpenClaw Camera Application Tutorial

Before starting, please complete 01-Hardware Configuration, 02-openclaw API-KEY Configuration, 03-openclaw Model Switching, 04-AI Voice Interaction Configuration, 05-Three Dialogue Solution Configuration Tests under the Prerequisites directory. This article assumes the basic environment has been prepared and only expands on camera-related content.

1. Tutorial Objectives

This article demonstrates OpenClaw's natural language control capabilities through CSI camera peripherals. After completing this tutorial, readers can:

  • Understand the basic approach to using cameras for photo capture and visual analysis with OpenClaw

  • Communicate with OpenClaw through three methods: whatsapp, TUI, and voice code

  • Complete four camera cases: photo archive, scene description, OCR recognition, object location and face detection

  • Understand the complete chain from "user proposing visual task" to "image capture" and "result return"

2. Hardware Preparation

  • OpenClaw mainboard

  • CSI camera module

  • Camera ribbon cable

  • [Optional] Microphone module

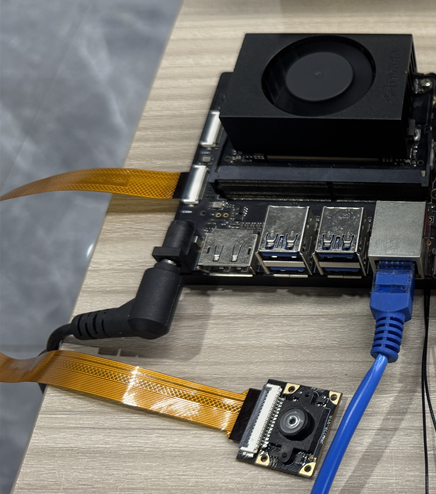
  • Wiring diagram

image-20260601101822137

3. Software Preparation

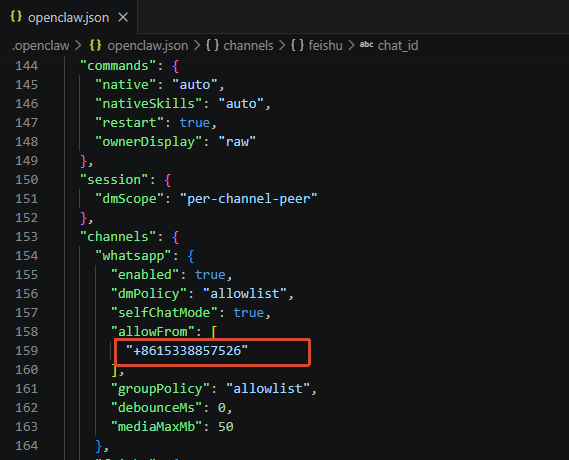
If using WhatsApp, to upload images directly to WhatsApp, you need to fill in the chat_id of your newly created WhatsApp dialogue in the following path "allowFrom"

  • Open your newly created WhatsApp dialogue to see the dialogue ID
image-20260429193615898

  • Fill this into "allowFrom":

image-20260429193515227

  • Terminal input the following command to take effect

openclaw gateway restart

4. Test Camera Application

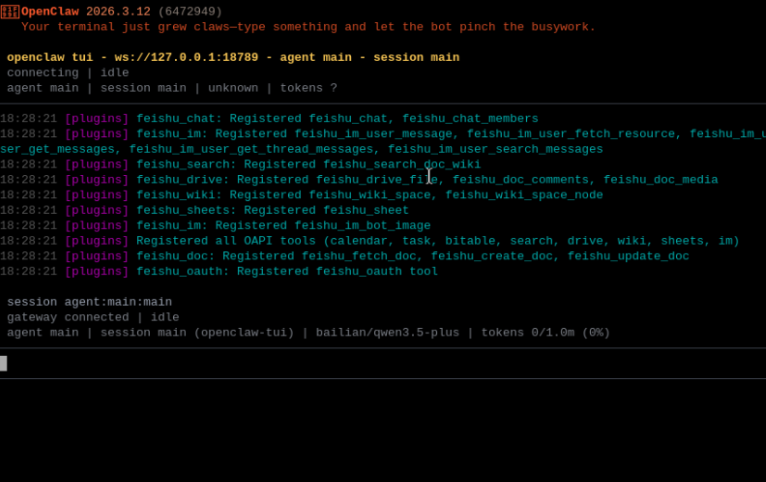
Before starting this tutorial, please complete one openclaw tui basic dialogue self-check; if you haven't done it yet, see 05-Three Dialogue Solution Configuration Tests. Additionally, please confirm the visual model has been configured. Refer to 02-openclaw API-KEY Configuration and 03-openclaw Model Switching. After passing, enter camera-specific testing.

Terminal input to enter TUI:

xxxxxxxxxx
openclaw tui

image-20260529192823501

You can try inputting the following content in the terminal:

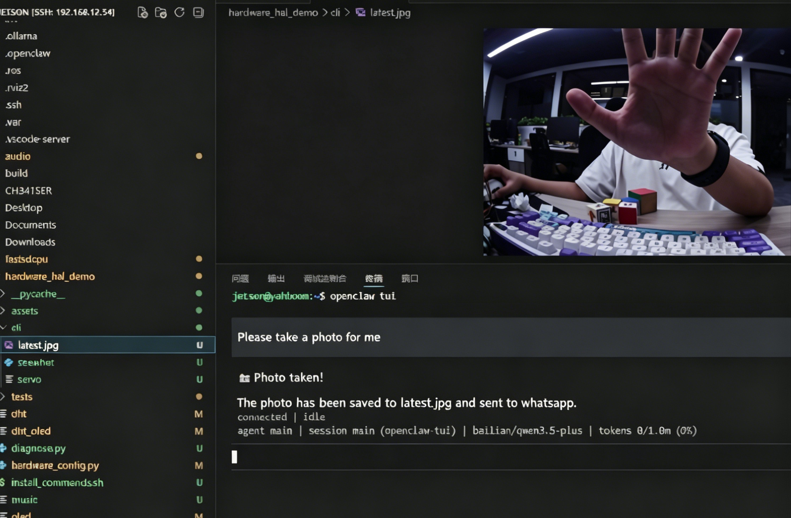
  • Help me take a photo

  • Recognize the text in this image

image-20260529192917157

  • Find the cup in the image (because the model will use context, remind it to retake, otherwise it might use the first photo)
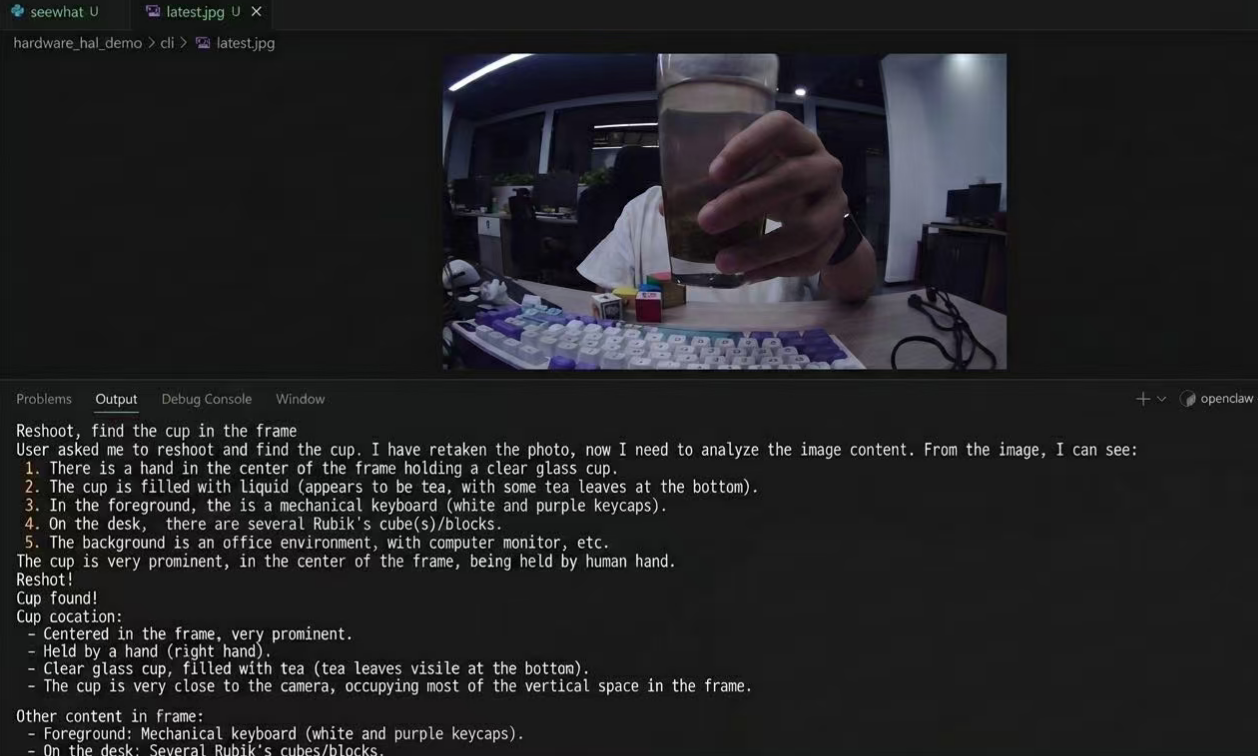
image-20260529193241659

  • Retake a photo and organize the text into a table
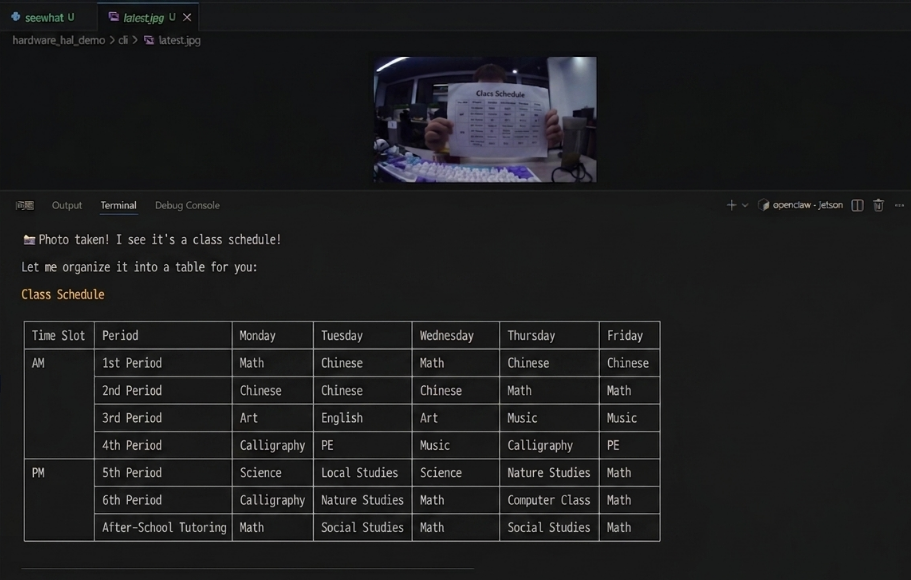
image-20260529193352617

5. Three Solutions for Communicating with OpenClaw

SolutionSuitable ScenariosAdvantagesRecommended Positioning
whatsappRemote control, classroom demonstrationsEasy to connect, suitable for multi-person experienceDemonstrate "remote natural language control"
TUILocal debugging, command verificationMost direct, easiest to troubleshootFirst run through the visual chain
Voice codeVoice interaction, complete AI experienceClosest to real conversation experienceAs final demonstration solution

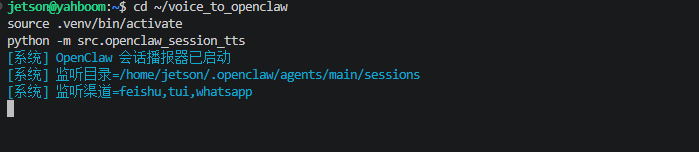
If optional AI voice module + speaker are selected, whatsapp dialogue, tui, whatsapp dialogue need to broadcast OpenClaw's reply content. You can run the following program in terminal. AI voice module dialogue does not need to run repeatedly

  • Modify whether to enable broadcast parameter

xxxxxxxxxx
/home/jetson/voice_to_openclaw/.env
xxxxxxxxxx
ENABLE_TTS=true  #This parameter controls whether to broadcast. After modification and saving, run the following program in terminal
  • Terminal input

xxxxxxxxxx
cd ~/voice_to_openclaw
source .venv/bin/activate
python -m src.openclaw_session_tts

image-20260529193417657

5.1 whatsapp Solution

For whatsapp connection steps, please directly refer to 05-Three Dialogue Solution Configuration Tests. This section only retains dialogue examples suitable for the camera tutorial.

After opening whatsapp, you can usually see the photos and recognition results triggered by openclaw tui earlier synchronized over.
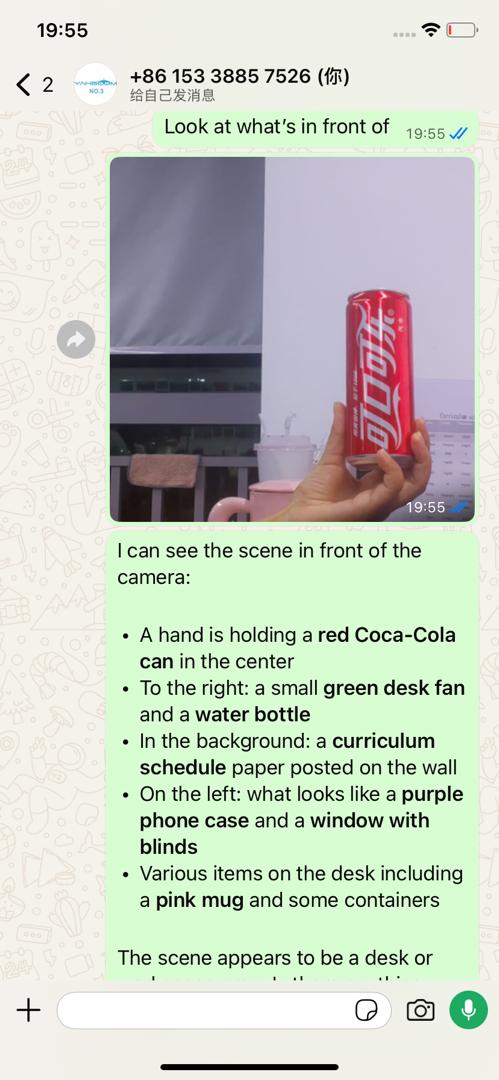
image-20260427191454322


5.2 TUI Solution

If you have completed the TUI self-check in Chapter 0, directly enter the following command in the terminal to continue the dialogue:

xxxxxxxxxx
openclaw tui

Then you can directly input camera-related commands, for example:

  • Take a photo of the current scene

  • Describe the scene in the camera

  • Check if there are faces

You can add TUI dialogue screenshots here.

5.3 Voice Code Solution

xxxxxxxxxx
Requires optional AI voice interaction module + speaker

For voice module installation, environment configuration, and basic wake-up process, please directly refer to 04-AI Voice Interaction Configuration. After waking up, you can directly say control content, for example:

  • Help me take a photo

  • Look at what's ahead

  • Help me read the text in the image

You can add voice wake-up and voice control screenshots here.

6. Comprehensive Cases

Note: The following are all dialogue demonstrations using openclaw tui method. You can also choose whatsapp or voice method to complete.

6.1 Case One: Photo Archive

Experimental Objective

Let OpenClaw first complete the most basic photo capture function and save the image.

Effect Description

After execution, a photo will be generated locally, usually retaining both this photo file and latest.jpg alias for the most recent photo. This case is suitable for verifying the image capture pipeline.

Example Instructions

  • Help me take a photo

  • Capture the current scene

  • Take a photo now for record

6.2 Case Two: Scene Description

Experimental Objective

Let OpenClaw make a brief description of the current scene after taking a photo.

Effect Description

OpenClaw can first complete photo capture, then call visual analysis script to make a one-sentence description of the image content, such as identifying desktop, people, food, or common objects.

Example Instructions

  • Look at what's ahead

  • Help me describe the current scene

  • After taking a photo, tell me what's mainly in the camera

6.3 Case Three: OCR Table Recognition

Experimental Objective

Let OpenClaw recognize text in images and organize it into a table.

Effect Description

This case is suitable for photographing labels, cards, packaging, or simple documents, then extracting text. It can output plain text or continue to organize into tables.

Example Instructions

  • Recognize the text in this image

  • After taking a photo, organize the text into a table

  • Find the cup in the image

  • Check if there are faces

  • Help me locate the phone on the right side of the desktop

Temperature and Humidity Sensor
AI Script Peripheral Control

COMPANY

  • About us
  • Team Style
  • Blog

LEARNING & EXPLORATION

  • Tutorials
  • Edge AI hardware
  • Educational robots
  • Embedded intelligent hardware

WHERE TO BUY

  • Yahboom Online Store
  • Amazon
  • Alibaba
  • AliExpress
  • Mercado

TECHNOLOGY SUPPORT

  • Email: support@yahboom.com

BE A DISTRIBUTOR

  • Email: sales@yahboom.com
QR Code

Copyright © 2017-2026 Yahboom. All Rights Reserved.

EN/中文