Welcome to Jetson Orin NANO Developer Kit repository
11.High-quality vision-language grounding (LocateAnything)
LocateAnything High-Quality Visual-Language Grounding
LocateAnything High-Quality Visual-Language Grounding1. What Is LocateAnything2. Applicable Devices and Capability Scope3. Preparation Before Deployment3.1 Checking the System and Disk3.2 Installing Build and Download Tools4. Downloading the Model5. Compiling the Image Grounding Program5.1 Getting the Adapted Version of the Source Code5.2 Configuring and Compiling the CUDA Version5.3 Organizing the Runtime Files6. Creating the Single-Image Run Script7. Preparing the Input Image8. Running Image Grounding8.1 Using the Default Image and Target8.2 Specifying the Image and Recognition Target9. Video Usage and Performance Limits10. Common Problems11. References
Note: Due to performance limitations, the Jetson Orin Nano 4GB cannot run this case
1. What Is LocateAnything
LocateAnything is a visual-language grounding model. It takes an image and a text description, finds the targets in the image that match the description, and returns the bounding box coordinates of the targets.
The difference between it and ordinary image classification models is: a classification model usually answers "what is in the image", while LocateAnything also points out the location of the target in the image. For example, input a street scene and query person, and the model returns the position of the pedestrian; query red car, and the model tries to locate the red car in the picture.
This tutorial uses the GGUF quantized model of LocateAnything-3B, and runs it through the llama.cpp multimodal program adapted to this model format. After the model is loaded, image inference can be completed offline on the local Jetson; the first download and installation of the model files and the program still require a network connection.
2. Applicable Devices and Capability Scope
This tutorial uses Jetson Orin Nano 8GB, JetPack 7.2.1, CUDA 13.2 as the baseline. Other Jetson models or software versions need to re-check the CUDA, compiler, and memory compatibility; the same parameters cannot be guaranteed to work directly.
The current solution is suitable for a single image or low-frequency offline grounding of frames extracted from a video, and is not a real-time video detector. On Orin Nano 8GB, a 1280×720 image measured in practice takes approximately 18–19 seconds; the memory usage during inference is close to the device limit. Do not start other large models or high-load GPU tasks at the same time.
3. Preparation Before Deployment
If you are using the factory image, the locateanything environment has already been set up, and you can skip this subsection and go to 8.1 to run the script directly
3.1 Checking the System and Disk
Open a Jetson terminal and confirm that CUDA 13.2 is available:
nvcc --versionfree -hdf -h /homenvcc --version should show CUDA 13.2. The model files occupy approximately 2.8GB, and compiling the source code also requires additional disk space; it is recommended to reserve at least 10GB for /home. The first download of the model and the source code requires a network connection that can access Hugging Face and GitHub.
When you need to observe the real-time memory of the device, you can run tegrastats and press Ctrl+C to stop the monitoring:
xxxxxxxxxxtegrastats --interval 10003.2 Installing Build and Download Tools
xxxxxxxxxxsudo apt updatesudo apt install -y git cmake build-essential wget libssl-dev libcurl4-openssl-devConfirm that Python OpenCV is available; the subsequent script uses it to read and draw images:
xxxxxxxxxxpython3 -c 'import cv2; print(cv2.__version__)'If it reports that cv2 cannot be found, you can install the system package:
xxxxxxxxxxsudo apt install -y python3-opencv4. Downloading the Model
The main model and the vision projector are matching files. The combination specified in this tutorial has been measured on Orin Nano 8GB; please download both files, and do not replace only one of them.
xmkdir -p ~/locateanything/LocateAnything-3B-4bitcd ~/locateanything/LocateAnything-3B-4bit
wget -c -O LocateAnything-3B-Q4_K_M.gguf \ "https://hf-mirror.com/liodon-ai/LocateAnything-3B-imatrix-GGUF/resolve/main/LocateAnything-3B-Q4_K_M.gguf"
wget -c -O mmproj-locateanything-3b-bf16.gguf \ "https://hf-mirror.com/sabafallah/LocateAnything-3B-GGUF/resolve/main/mmproj-locateanything-3b-bf16.gguf"-c means the download can continue after an interruption. Check the files after the download is complete:
xxxxxxxxxxls -lh ~/locateanything/LocateAnything-3B-4bit/*.ggufYou should see a main model of approximately 2.0GB and a vision projector of approximately 833MB. The actual file size may show slight differences due to unit conversion.
5. Compiling the Image Grounding Program
5.1 Getting the Adapted Version of the Source Code
The vision projector type of LocateAnything requires multimodal support from the corresponding version. Use the mtmd-grounders branch:
xxxxxxxxxxcd ~/locateanythinggit clone --depth 1 --branch mtmd-grounders \ https://github.com/yuuko-eth/llama.cpp.git5.2 Configuring and Compiling the CUDA Version
Orin Nano uses compute capability 87. Specify CUDA 13.2, which corresponds to JetPack 7.2.1, and build only the llama-mtmd-cli target required by this tutorial:
xxxxxxxxxxexport PATH=/usr/local/cuda-13.2/bin:$PATHexport CUDACXX=/usr/local/cuda-13.2/bin/nvcc
cd ~/locateanything/llama.cppcmake -S . -B build \  -DGGML_CUDA=ON \  -DBUILD_SHARED_LIBS=ON \  -DCMAKE_CUDA_ARCHITECTURES=87 \  -DCMAKE_BUILD_TYPE=Release \  -DCUDAToolkit_ROOT=/usr/local/cuda-13.2
cmake --build build --target llama-mtmd-cli -j2
When the compilation succeeds, the end of the output shows:
xxxxxxxxxx[100%] Built target llama-mtmd-cliThe CUDA compilation time varies with device load and system status. Do not run other large model tasks at the same time during compilation.
5.3 Organizing the Runtime Files
Place the program and its shared libraries in the LocateAnything home directory; the subsequent script loads them from this directory:
xxxxxxxxxxcd ~/locateanythingmkdir -p libcp llama.cpp/build/bin/llama-mtmd-cli ./llama-mtmd-clicp -a llama.cpp/build/bin/lib*.so* ./lib/chmod +x ./llama-mtmd-cliCheck whether the dynamic libraries are complete:
xxxxxxxxxxLD_LIBRARY_PATH="$HOME/locateanything/lib:/usr/local/cuda-13.2/lib64" \ ldd ~/locateanything/llama-mtmd-cli | grep "not found"If there is no output at all, no missing dynamic libraries were found. If not found is displayed, check whether the shared library copy in the previous step has been completed, and confirm that the CUDA 13.2 path exists.
6. Creating the Single-Image Run Script
By default, the script reads ~/locateanything/input.jpg, queries person, and saves the result with red boxes as out.jpg. Copy the entire command below to create the script:
xxxxxxxxxxcat > ~/locateanything/run_locateanything.sh <<'SCRIPT'set -u
BASE_DIR="$HOME/locateanything"BIN="$BASE_DIR/llama-mtmd-cli"MODEL="$BASE_DIR/LocateAnything-3B-4bit/LocateAnything-3B-Q4_K_M.gguf"MMPROJ="$BASE_DIR/LocateAnything-3B-4bit/mmproj-locateanything-3b-bf16.gguf"INPUT="${1:-$BASE_DIR/input.jpg}"QUERY="${2:-person}"OUTPUT="${3:-$BASE_DIR/out.jpg}"RAW="$BASE_DIR/locate-result.txt"
if [[ ! -f "$INPUT" ]]; then echo "Input image does not exist: $INPUT" >&2 exit 2fi
export LD_LIBRARY_PATH="$BASE_DIR/lib:/usr/local/cuda-13.2/lib64:${LD_LIBRARY_PATH:-}"echo "Recognizing: $INPUT"echo "Target: $QUERY"
"$BIN" \ -m "$MODEL" \ --mmproj "$MMPROJ" \ --image "$INPUT" \ -p "$QUERY" \ -ngl 10 \ -n 128 \ --temp 0 2>&1 | tee "$RAW"STATUS=${PIPESTATUS[0]}if [[ $STATUS -ne 0 ]]; then echo "Model inference failed, exit code: $STATUS" >&2 exit "$STATUS"fi
python3 - "$INPUT" "$OUTPUT" "$QUERY" "$RAW" <<'PY'import reimport sys
import cv2
input_path, output_path, query, raw_path = sys.argv[1:]image = cv2.imread(input_path)if image is None: raise SystemExit(f"Cannot read image: {input_path}")
height, width = image.shape[:2]with open(raw_path, "r", encoding="utf-8", errors="replace") as file: text = file.read()
boxes = [tuple(map(int, match)) for match in re.findall( r"<box>\s*<(-?\d+)>\s*<(-?\d+)>\s*<(-?\d+)>\s*<(-?\d+)>\s*</box>", text,)]
for index, (x1, y1, x2, y2) in enumerate(boxes, 1): left = max(0, min(width - 1, round(x1 * width / 1000))) top = max(0, min(height - 1, round(y1 * height / 1000))) right = max(left + 1, min(width - 1, round(x2 * width / 1000))) bottom = max(top + 1, min(height - 1, round(y2 * height / 1000))) cv2.rectangle(image, (left, top), (right, bottom), (0, 0, 255), 3) cv2.putText(image, f"{query} {index}", (left, max(28, top - 8)), cv2.FONT_HERSHEY_SIMPLEX, 0.75, (0, 0, 255), 2, cv2.LINE_AA)
if not cv2.imwrite(output_path, image): raise SystemExit(f"Cannot write output image: {output_path}")print(f"Output: {output_path}")print(f"Parsed {len(boxes)} boxes")PYSCRIPT
chmod +x ~/locateanything/run_locateanything.sh7. Preparing the Input Image
Copy the image to be recognized to the Jetson and save it with the default file name:
xxxxxxxxxxcp /path/to/image.jpg ~/locateanything/input.jpgYou can also extract a static image from a video as the input. The following example reads the frame at the 5th second of the video and saves it as input.jpg:
xxxxxxxxxxpython3 - <<'PY'import osimport cv2
video = os.path.expanduser("~/locateanything/sample_720p.mp4")output = os.path.expanduser("~/locateanything/input.jpg")capture = cv2.VideoCapture(video)capture.set(cv2.CAP_PROP_POS_MSEC, 5000)ok, frame = capture.read()capture.release()if not ok:    raise SystemExit(f"Failed to read video frame: {video}")if not cv2.imwrite(output, frame):    raise SystemExit(f"Failed to save image: {output}")print(f"Saved: {output}")PY
If the video path is different, change the path in the command to the actual location. This step only extracts one image and does not process the entire video.
8. Running Image Grounding
8.1 Using the Default Image and Target
xxxxxxxxxxcd ~/locateanything./run_locateanything.sh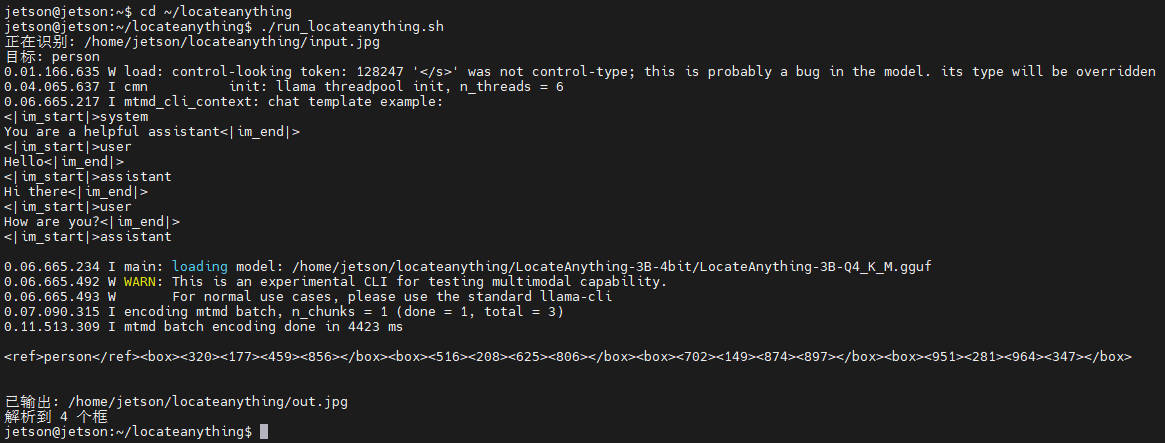
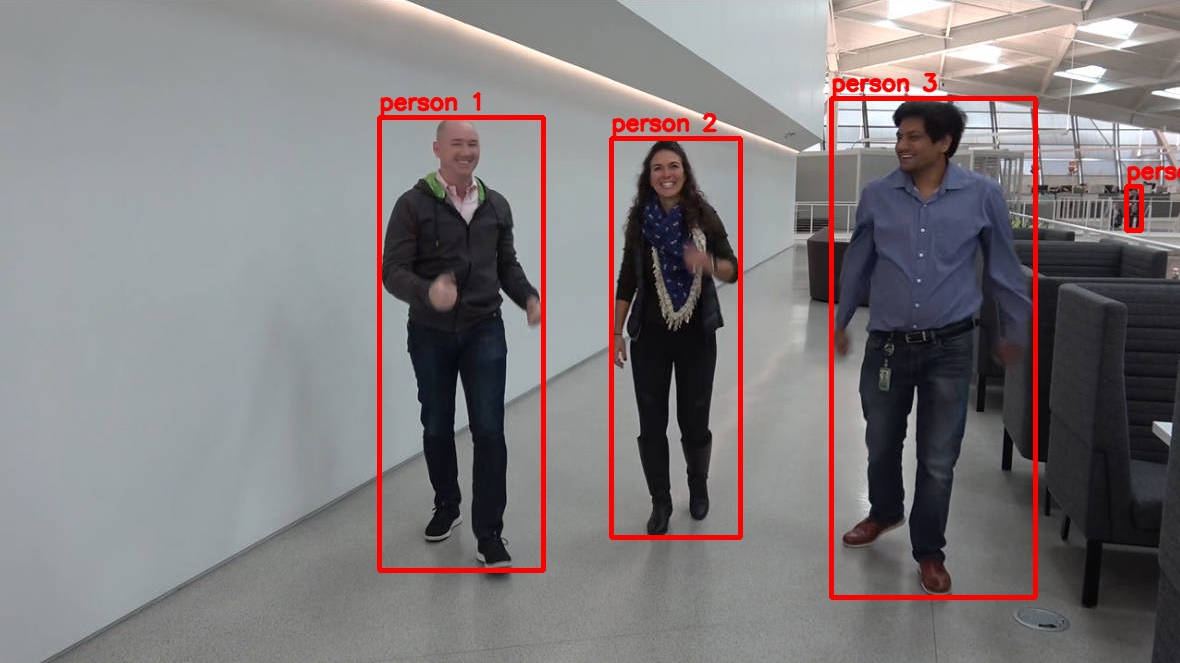
The default parameters are:
| Item | Default value |
|---|---|
| Input image | ~/locateanything/input.jpg |
| Query target | person |
| Output image | ~/locateanything/out.jpg |
| Raw model result | ~/locateanything/locate-result.txt |
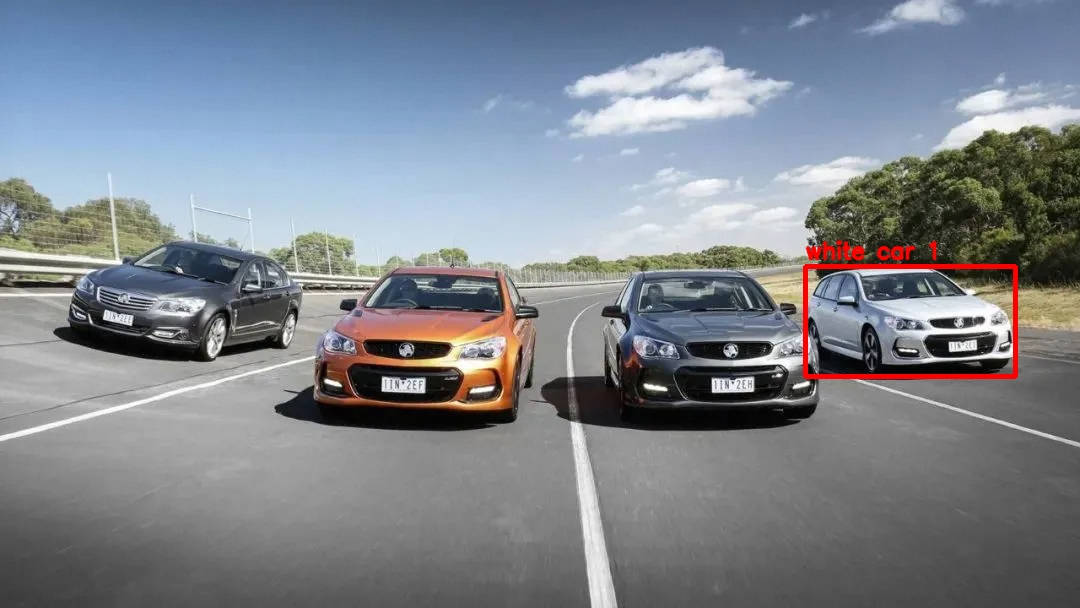
After the recognition is complete, the terminal displays the number of detected boxes; open out.jpg to view the image and the red grounding boxes. Running it again overwrites out.jpg and locate-result.txt.
8.2 Specifying the Image and Recognition Target
Command format:
xxxxxxxxxx./run_locateanything.sh [image path] [recognition target] [output image path]For example, to recognize the car in the image:
xxxxxxxxxx./run_locateanything.sh test.jpg car out.jpg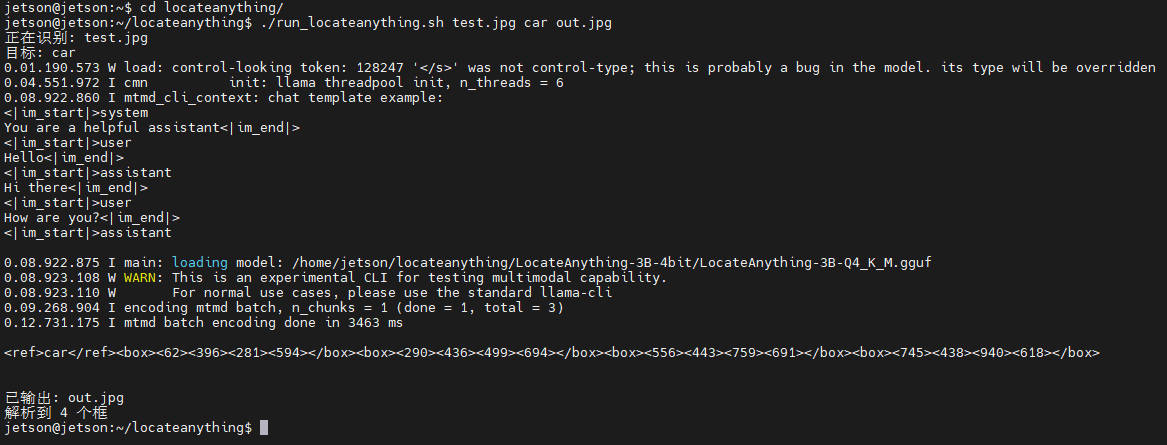
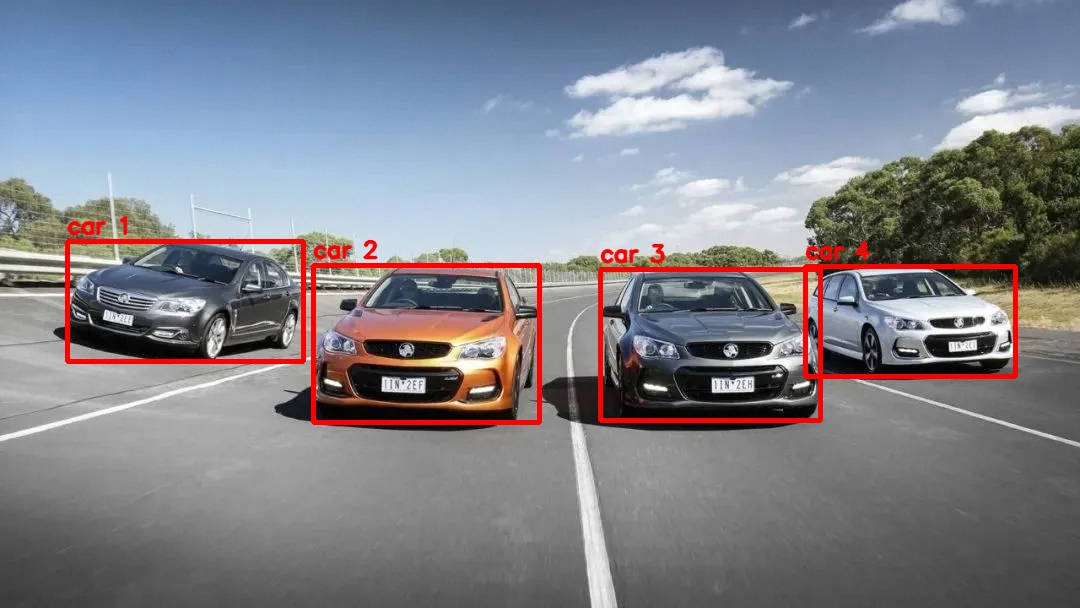
The recognition target can be an English word or phrase; enclose it in quotes when it contains spaces:
xxxxxxxxxx./run_locateanything.sh test.jpg "white car" out.jpg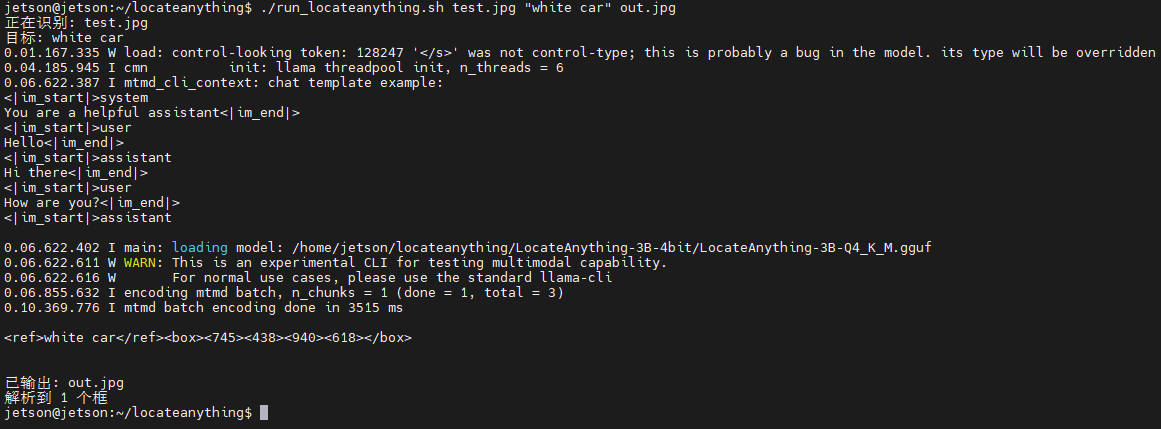
You can also specify other input and output paths:
xxxxxxxxxx./run_locateanything.sh /home/jetson/Pictures/street.jpg person /home/jetson/Pictures/street-result.jpgCurrently, it is recommended to use a short English target description. The predicted boxes of the model may miss targets or have inaccurate positions, especially for small distant targets and adjacent targets; please check manually based on the output image.
9. Video Usage and Performance Limits
The current run script accepts a single image and does not take an entire video directly. When a video needs to be analyzed, images can be extracted at time points and then passed to the script one by one. Each image requires a separate model inference.
On Orin Nano 8GB, a single 1280×720 image measured in practice takes approximately 18–19 seconds. If a 40-second, 30 FPS video is processed frame by frame, 1200 inferences are required in total, which is estimated to take approximately 6–6.3 hours; the actual time varies with the picture and the system load. Therefore, this solution is not suitable for real-time 30 FPS video analysis.
The peak memory during inference is approximately 7.0GB/7.5GB. Please avoid running other large models or GPU-intensive tasks at the same time; if CUDA out of memory occurs, close other high-memory applications and retry. Do not use increasing the number of GPU layers as the default solution.
10. Common Problems
| Symptom | Checking method |
|---|---|
Input image does not exist | Check the image path; the default input should be ~/locateanything/input.jpg. |
libllama-common.so.0: cannot open shared object file | Confirm that ~/locateanything/lib/ contains the shared libraries and start it through the run script; do not copy only llama-mtmd-cli and miss lib/. |
CUDA error: out of memory or insufficient system memory | Close other large model/GPU tasks before running; the inference memory headroom of Orin Nano 8GB is limited. |
| No boxes in the output, or the boxes do not fit the target | Check whether the query word is clear and whether the target is visible in the picture, and check the original image manually; LocateAnything is a prediction model, and the results are not guaranteed to be accurate every time. |
| Download interrupted | Run the wget command with -c again in the original download directory to continue the download. |
| CUDA compiler not found | Confirm the JetPack/CUDA version, and set PATH and CUDACXX to the CUDA 13.2 path before compiling. |
11. References
LocateAnything research introduction: NVIDIA LocateAnything
Model source: LocateAnything-3B Q4_K_M and LocateAnything-3B mmproj
Inference program source: yuuko-eth/llama.cpp, using the
mtmd-groundersbranch