yahboom
HomeTutorialsProduct
Solution
Blog
Online Store
About Us
EN/中文
Store
ROSMASTER M1 PRO📖
0.Robot Configuration and Operation Guidelines
  • 0.Unboxing and Review
  • 1.Assembly Videos
  • 2.User Manual
  • 3.Enter Docker (For Raspberry Pi)
  • 4.FAQ
  • 5.RobotManager User Guide
1.Chassis Control Course
  • 1.Robot Information Publishing
  • 2.Robot Handle Control
  • 3.Robot Keyboard Control
  • 4.Linear Velocity Calibration
  • 5.Angular Velocity Calibration
  • 6.Robot URDF Model
  • 7.Robot EKF State Estimation
2.Lidar Course
  • 1.Lidar Introduction And Use
  • 2.Lidar Obstacle Avoidance
  • 3.Lidar Following
  • 4.Lidar Guard
  • 5.Lidar Patrol
  • 6.GMapping-SLAM Mapping
  • 7.Cartographer-SLAM Mapping
  • 8.Slam-Toolbox Mapping
  • 9.Lifelong Mode Mapping
  • 10.Navigation2 Single Point Navigation
  • 11.Navigation2 Multi Point Navigation
  • 12.Cartographer Relocalization Navigation
  • 13.Slam-Toolbox Localization Navigation
  • 14.Synchronous Mapping And Navigation
  • 15.Aruco Visual Relocalization Navigation
  • 16.Mobile App Mapping And Navigation
3.USB Camera-Depth Camera Course
  • 1.USB Camera Introduction
  • 2.USB Camera Intrinsic Calibration
  • 3.Nuwa-HP60C Camera Introduction (Depth Camera Only)
  • 4.Depth Pseudo Color Image (Depth Camera Only)
  • 5.Depth Camera Distance Measurement (Depth Camera Only)
  • 6.Block Volume Calculation (Depth Camera Only)
  • 7.Edge Detection (Depth Camera Only)
  • 8.RTAB-Map SLAM Mapping (Depth Camera Only)
  • 9.RTAB-Map Navigation (Depth Camera Only)
4.Robotic Arm and 3D Space Gripping Course
  • 1.Robotic Arm Basic Usage
  • 2.Robotic Arm Kinematics
  • 3.Robotic Arm Chassis Coordination Control
  • 4.AprilTag ID Sorting
  • 5.AprilTag Height Anomaly Sorting
  • 6.AprilTag Tracking and Grasping
  • 7.Color Block Sorting
  • 8.Color Block Height Anomaly Sorting
  • 9.Color Block Tracking and Grasping
  • 10.Wood Block Shape Sorting
  • 11.KCF Tracking and Grasping Objects
  • 12.Mediapipe Gesture ID Sorting AprilTag
  • 13.Mediapipe Gesture Height Sorting AprilTag
  • 14.Desktop Tracking and Grasping AprilTag
  • 15.3D Spatial Tracking AprilTag
  • 16.Transformer Model Tracking Algorithm
  • 17.Line Following Obstacle Clearing
5.Road network planning and navigation
  • 1.Introduction To Road Network Planning
  • 2.Road Network Annotation
  • 3.Planning And Navigation Between Waypoints
  • 4.Road Network Navigation In Any Pose
  • 5.Path Re-planning
6.OpenClaw Basic Course
  • 1.Introduction to OpenClaw
  • 2.OpenClaw Core Concepts
  • 3.OpenClaw API-KEY Configuration
  • 4.OpenClaw Switch Models
  • 5.OpenClaw System Prompt Words
  • 6.OpenClaw Common CLI Commands
7.OpenClaw Interaction Method
  • 1.OpenClaw Webchat Interaction
  • 2.OpenClaw Tui Interaction
  • 3.OpenClaw Voice Dialogue Interaction
  • 4.OpenClaw WhatsApp Interaction
8.OpenClaw Development
  • 1.OpenClaw Connecting to Robot MCP Service
  • 2.Robot CLI Command Tool
  • 3.robot-control Plugin Tool
  • 4.reply-bridge Plugin Tool
  • 5.OpenClaw Multimodal Vision
  • 6.OpenClaw Chassis Control
  • 7.OpenClaw Robotic Arm Control
  • 8.OpenClaw Skills Development
  • 9.OpenClaw Scheduled Tasks
  • 10.OpenClaw Multi-Agent Intelligent Agent
  • 11.OpenClaw Active Interaction
  • 12.OpenClaw Vector Memory
9.OpenClaw Embodied intelligent application
  • 1.OpenClaw Target Tracking
  • 2.OpenClaw Arm Tracking And Grasping
  • 3.OpenClaw Arm Fixed-point Placement
  • 4.OpenClaw Waste Sorting
  • 5.OpenClaw SLAM Mapping And Navigation
  • 6.OpenClaw Navigation Transport
  • 7.OpenClaw AprilTag Grasping
  • 8.OpenClaw Color Line Patrol
  • 9.OpenClaw Visual Distance Measurement
10.OpenClaw scenario sandbox
  • 1.Map Description and Props Placement
  • 2.Building the Sandbox Map
  • 3.Visual Relocalization Marker
  • 4.Map Mapping Marker
  • 5.Sandbox Scenario Comprehensive Case
11.AI Large Model Basics
  • 1.AI Large Model Types and Principles
  • 2.RAG Retrieval Enhancement and Model Training Samples
  • 3.Embodied Intelligent Robot System Architecture
  • 4.Embodied Intelligent Functions Core Source Code
12.AI large Model Development
  • 1.Register a Model Service Provider Account
  • 2.Configuring API-KEY
  • 3.Introduction to Dify
  • 4.Basic Dify Features
  • 5.AI Large Model Development - Chatbot
  • 6.Deploy the RAG Knowledge Base
  • 7.RAG Knowledge Base + Chatbot
  • 8.AI Agent Workflow
  • 9.Custom Wake-up Response
13.AI Model - Voice Version
  • 1.Semantic Understanding and Command Following
  • 2.Multimodal Visual Understanding
  • 3.Multimodal Visual Understanding and Robotic Arm Gripping
  • 4.Multimodal Visual Understanding and SLAM Navigation
  • 5.Robotic arm gripping+Multimodal visual understand+SLAM navigation
  • 6.Intention Understanding
14.AI Model - Text Version
  • 1.Semantic Understanding and Command Following
  • 2.Multimodal Visual Understanding
  • 3.Multimodal Visual Understanding and Robotic Arm Gripping
  • 4.Multimodal Visual Understanding and SLAM Navigation
  • 5.Robotic arm gripping+Multimodal visual understand+SLAM navigation
  • 6.Intention estimation
15.Mediapipe Visual Course
  • 1.Hand detection
  • 2.Posture detection
  • 3.Overall detection
  • 4.Facial Landmark Detection
  • 5.Face detection
  • 6.Face special effects
  • 7.3D object recognition
  • 8.Brush
  • 9.Finger control
  • 10.Palm target positioning
  • 11.Fingertip trajectory recognition
  • 12.Fingertip gesture control robotic arm
  • 13.Gesture grabbing and releasing objects
  • 14.Finger control robotic arm
  • 15.Medipipe gesture control robotic arm action group
16.MoveIt2 Simulation Course
  • 1.MovelT2 configuration
  • 2.MovelT2 simulation-reality linkage
  • 3.Random movement
  • 4.Forward kinematics design
  • 5.Inverse kinematics design
  • 6.Cartesian path
  • 7.Trajectory Planning
  • 8.Collision Detection
  • 9.Scene Design
  • 10.3D perception obstacle‑avoidance
17.Multi-vehicle Course
  • 1.Multi-vehicle Control
  • 2.Multi-vehicle Navigation
  • 3.Multi-vehicle Formation
18.YOLO26 Development
  • 1.CLI Use
  • 2.Object Detection
  • 3.Instance Segmentation
  • 4.Pose Estimation
  • 5.Image Classification
  • 6.Oriented Object Detection
  • 7.YOLOv26 + DeepSORT Tracking
  • 8.Monocular Depth Estimation
19.Control Board STM32 Driver Course
  • 0.Notes (Must Read)
  • 1.About Expansion Board
  • 2.STM32 Development Environment
  • 3.Button Control
  • 4.FreeRTOS Application
  • 5.Serial Communication
  • 6.SBUS Model Aircraft Remote Control
  • 7.CAN Bus Communication
  • 8.RGB Colorful Light Bar
  • 9.Timer Interrupt to Control PWM Servo
  • 10.Control Serial Port Servos
  • 11.Nine-axis Attitude Sensor to Obtain Data
  • 12.Control Motor
  • 13.Timer Captures the Encoder Data
  • 14.1 Kinematic Analysis of Mecanum Wheel
  • 14.2 Kinematic Analysis of Ackerman
  • 14.3 Kinematic Analysis of 4WD
  • 15.PID Control Robot Movement
20.Docker Course
  • 1.Docker Introduction and Installation
  • 2.Docker Basic Commands
  • 3.Docker Submission and Multi-Terminal Access
  • 4. Docker Startup Script
  • 5.Docker-Vscode Environment Construction
21.Image Processing Basics Course
  • 1. Introduction to Open Source CV
  • 2. Image reading and display
  • 3. Image writing
  • 4. Image quality
  • 5. Pixel Operation
  • 6. Image zoom
  • 7. Image cutting
  • 8. Image translation
  • 9. Image Mirroring
  • 10. Affine Transformation
  • 11. Image Rotation
  • 12. Perspective Transformation
  • 13. Grayscale processing
  • 14. Image Binarization
  • 15. Edge Detection
  • 16. Line drawing
  • 17. Rectangle and circle drawing
  • 18. Drawing text and pictures
22.Linux System Course
  • 1.Introduction to Linux system
  • 2.Ubuntu file system
  • 3.Ubuntu common commands
  • 4.Ubuntu common editors
  • 5.Ubuntu software operation commands
  • 6.Virtual machine installation
  • 7.SSH remote control
  • 8.VNC remote control
  • 9.Transfer files remotely
  • 10.Driver library and communication
  • 11.Static IP and hotspot mode
  • 12.Bind device ID
  • 13.Capacity expansion and resource allocation
  • 14.Update system software sources
  • 15.Set root user password
  • 16.sudo free password
  • 17.Connect to WiFi network
  • 18.View system version
  • 19.Customized service management
  • 20.Back up system image
23.ROS2 Basic Course
  • 1.Introduction to ROS2
  • 2.ROS2 install Humble
  • 3.ROS2 development environment
  • 4.ROS2 workspace
  • 5.ROS2 function package
  • 6.ROS2 node
  • 7.ROS2 topic communication
  • 8.ROS2 service communication
  • 9.ROS2 action communication
  • 10.ROS2 custom interface message
  • 11.ROS2 parameter service case
  • 12.ROS2 meta-function package
  • 13.ROS2 distributed communication
  • 14.ROS2 DDS
  • 15.ROS2 time related API
  • 16.ROS2 common command tools
  • 17.ROS2 rviz2 use
  • 18.ROS2 rqt toolbox
  • 19.ROS2 Launch startup file configuration
  • 20.ROS2 recording and playback tool
  • 21.ROS2 URDF model
  • 22.ROS2 Gazebo simulation platform
  • 23.ROS2 TF2 coordinate transformation
24.Main Control Course
Jetson Orin Nano_NX
  • 1.Jetson Orin board introduction
  • 2.Restore the factory image system
  • 3.Backup SSD system
  • 4.SSD expansion
  • 5.Network configuration
  • 6.SSH remote login
  • 7.VNC remote control
  • 8.Remote file transfer
  • 9.Jtop tool
  • 10.Exchange space expansion
Raspberry Pi
  • 1. Introduction to Raspberry PI 5
  • 2. Raspberry PI system installation and backup
  • 3. Powering the Raspberry PI 5
  • 4. Startup of Raspberry PI 5
  • 5. Update and upgrade operating system
  • 6. Introduction to raspi-config tool
  • 7. config.txt file description
  • 8. Network Configuration
  • 9. remote access
  • 10. Transfer files remotely
  • 11. Set display resolution and rotation
  • 12. Set screen to sleep
  • 13. Play audio and video
  • 14. Using USB camera
  • 15. Using MIPI camera
  • 16. Get real-time temperature of Raspberry Pi
RDKX5
  • 1.Introduction to RDK X5 board
  • 2.Write system file
  • 3.Hardware interface description
  • 4.Install case and other accessories
  • 5.Network configuration
  • 6.Remote login
  • 7.Update system
  • 8.srpi-config user guide
  • 9.config. txt configuration file
  • 10.Self-startup setting
  • 11.RDK exclusive command usage
  • 12.Linux command usage
  • 13.GPIO readwrite operation
  • 14.Image classification algorithm
  • 15.Use USB camera
  • 16.Use MIPI camera
  • 17.Binocular camera depth algorithm
  • 18. Controlling RGB Cooling Fans
Download
  • System File
  • Code
  • 3D Model File
  • Software Tools
  • Hardware_Info
  • Deb function package
  • Dify AI Agent
Download ZIP

Welcome to ROSMASTER M1 PRO repository

4. Docker Startup Script

Docker Startup Script

1. Check the Bound Devices

The A1 Pro robot car has a total of three bound devices. After a successful boot, run the following commands to check whether the binding was successful.

  • Check the binding status of the ROS expansion board.
ll /dev/myserial

If the output matches the figure below, the binding was successful.

image-20250818142409811

  • Check the binding status of the LiDAR.
xxxxxxxxxx
ll /dev/rplidar 

If the output matches the figure below, the binding was successful.

image-20250818142532754

  • Check the binding status of the AI voice broadcast module.
xxxxxxxxxx
ll /dev/myspeech

If the output matches the figure below, the binding was successful.

image-20250818142636895

If you purchased the depth camera, you can also run the following command to check whether the depth camera was successfully bound.

xxxxxxxxxx
ll /dev/as_camera

If the output matches the figure below, the binding was successful.

image-20250818142740459

2. View the Script Definition

On the Raspberry Pi or Jetson Nano host, run the following command to open the Docker script.

xxxxxxxxxx
sudo gedit run_humble.sh

After pressing Enter, you can see the script contents.
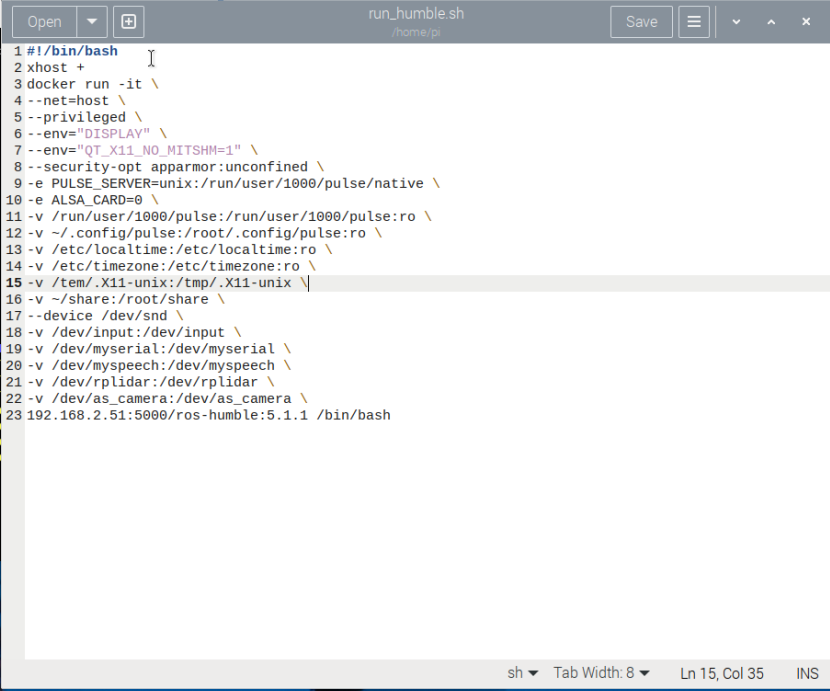
image-20250818143658591

Below is a brief explanation of each line of the Docker script. Its main function is to start a Docker container and map the hardware devices connected to the Raspberry Pi into the container, so that the peripherals connected to the Raspberry Pi's interfaces can be used freely in Docker.

xxxxxxxxxx
#!/bin/bash
xhost +             # allow the container to access the host's X11 display service, i.e. provide visualization capabilities to Docker
docker run -it \
--net=host \       # the container uses the host's network stack directly
--privileged \     # grant access to all hardware devices
--env="DISPLAY" \   # pass the visualization display environment variable
--env="QT_X11_NO_MITSHM=1" \
--security-opt apparmor:unconfined \   # disable the security policy when visualization is not possible
-e PULSE_SERVER=unix:/run/user/1000/pulse/native \  # PulseAudio service path
-e ALSA_CARD=0 \ 
-v /run/user/1000/pulse:/run/user/1000/pulse:ro \  # mount the audio socket read-only
-v ~/.config/pulse:/root/.config/pulse:ro \
-v /etc/localtime:/etc/localtime:ro \   # synchronize the local time
-v /etc/timezone:/etc/timezone:ro \
-v /tem/.X11-unix:/tmp/.X11-unix \
-v ~/share:/root/share \   # shared folder between the host and Docker
--device /dev/snd \   # access the host's sound card
-v /dev/input:/dev/input \ # mount all input devices (mouse/keyboard)
-v /dev/myserial:/dev/myserial \ # mount the ROS expansion board
-v /dev/myspeech:/dev/myspeech \ # mount the AI module serial port
-v /dev/rplidar:/dev/rplidar \  # mount the LiDAR
-v /dev/as_camera:/dev/as_camera \  # mount the depth camera
192.168.2.51:5000/ros-humble-a1:1.0.6 /bin/bash   # select the Docker image to run

Note that you should check whether the mounted peripherals are recognized correctly, and whether the Docker container to be run exists. A shared folder will be created on the host; you can place the files or photos you want to transfer into Docker into this folder.
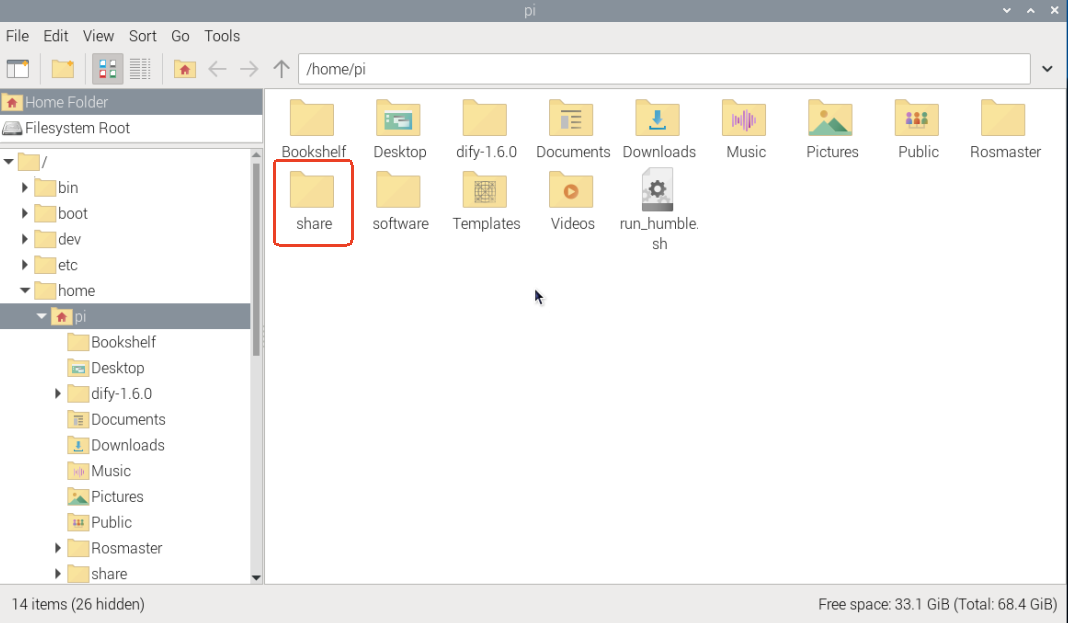
image-20250818144644316

3. Run the Docker Script

When we remotely connect via VNC using the IP address shown on the OLED small screen, we can open a terminal and run the following command to enter Docker.

xxxxxxxxxx
./run_humble.sh

If successful, the output is as follows.
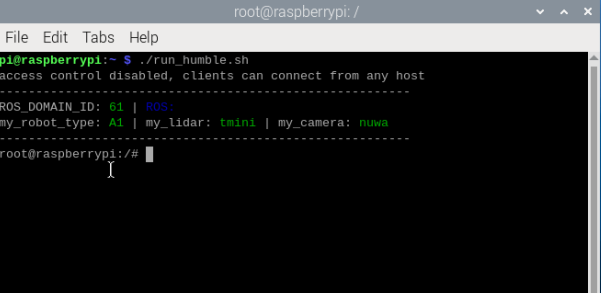
image-20250818145022359

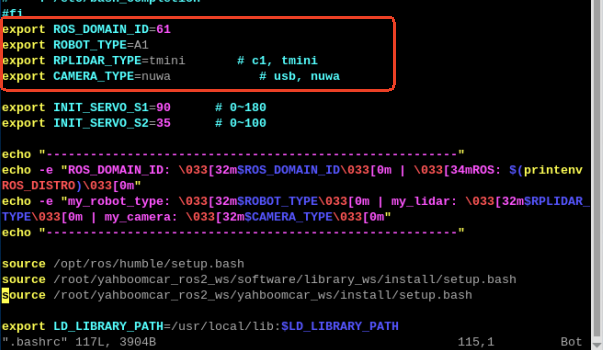
Because the robot is available in two camera models and two different LiDAR models, the factory system has pre-configured the routines for multiple devices. However, since the product cannot be identified automatically, the machine type and LiDAR model need to be set manually. Enter the following in the terminal.

xxxxxxxxxx
root@raspberrypi:/# cd
root@raspberrypi:~# vim .bashrc

image-20250818145249045

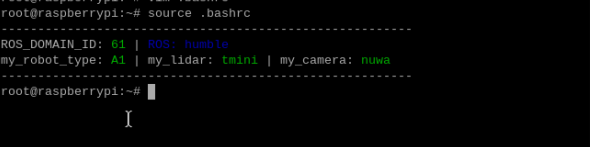
After configuring your own peripherals, save and exit vim, then run:

xxxxxxxxxx
source .bashrc

image-20250818145336492

You can now see the currently configured robot model, LiDAR type, and camera type of the modified robot car.

For the shared folder, you can run the following commands to view it.

xxxxxxxxxx
root@raspberrypi:~# cd share/
root@raspberrypi:~/share# ls

image-20250818145455582

We can see that there is a .db file and a compressed archive. On the Raspberry Pi side, the same files also exist.
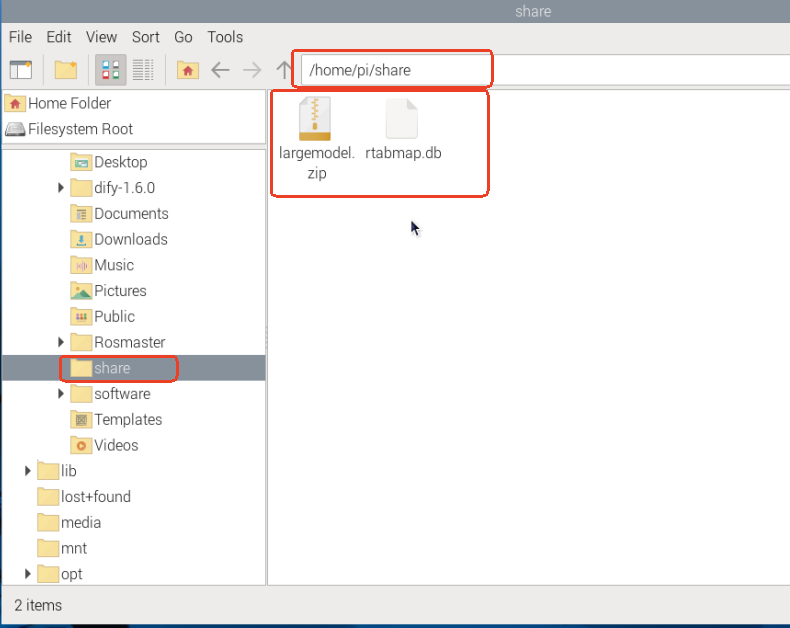
image-20250818145543413

Based on this principle, files can be transferred between the host and Docker.

Docker Submission and Multi-Terminal Access
Docker-Vscode Environment Construction

COMPANY

  • About us
  • Team Style
  • Blog

LEARNING & EXPLORATION

  • Tutorials
  • Edge AI hardware
  • Educational robots
  • Embedded intelligent hardware

WHERE TO BUY

  • Yahboom Online Store
  • Amazon
  • Alibaba
  • AliExpress
  • Mercado

TECHNOLOGY SUPPORT

  • Email: support@yahboom.com

BE A DISTRIBUTOR

  • Email: sales@yahboom.com
QR Code

Copyright © 2017-2026 Yahboom. All Rights Reserved.

EN/中文