Welcome to ROSMASTER M1 PRO repository
3.Multimodal Visual Understanding and Robotic Arm Gripping
Multimodal Visual Understanding + Robotic Arm Gripping
Multimodal Visual Understanding + Robotic Arm Gripping1. Course Content2. Preparation3. Running the Cases3.1 Case 1: "Find the red block in front of you and grasp it"3.2 Case 2: "Please help me remove the AprilTag in front of you whose height is higher than 5 centimeters"4. Source Code Analysis4.1 Case 14.2 Case 2
1. Course Content
Basic: Run the example program to perform a comprehensive task using the robot's visual understanding combined with the robotic arm gripping function.
Advanced: Master the key source code newly introduced in this lesson.
Note
Note
For the same test command, the reply content of the AI large model is not exactly the same each time, and it will differ slightly from the screenshots in the tutorial.
The depth camera and the USB monocular camera have different gripping functions. Depth camera: track and grasp the target; USB monocular camera: grasp a block of the specified color.
2. Preparation
xxxxxxxxxxros2 launch yahboomcar_bringup dify_llm_agents.launch.py use_tts:=true use_camera:=true
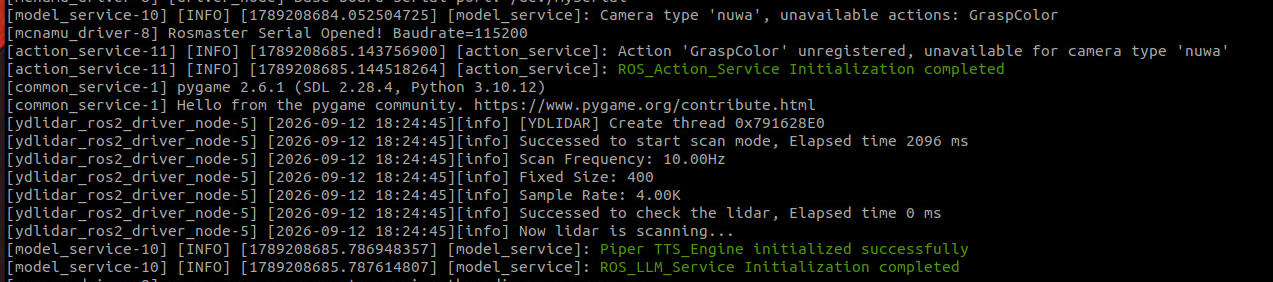
Voice recognition node
xxxxxxxxxxros2 run multi_brains asr_detect

3. Running the Cases
The cases here are for reference only. You can write your own test commands as you like. The wooden block used is 30x30x30mm.
3.1 Case 1: "Find the red block in front of you and grasp it"
Important
When grasping a color block here, the USB monocular camera can only grasp a color block in front of it, and it will first adjust the camera's viewing angle.
First wake it up with "Hi Yahboom". The robot will give a response reply, and at this time you can give commands to the robot.
The robot will first have a conversation reply with the user, then act according to the command. Meanwhile, the terminal prints the following information:
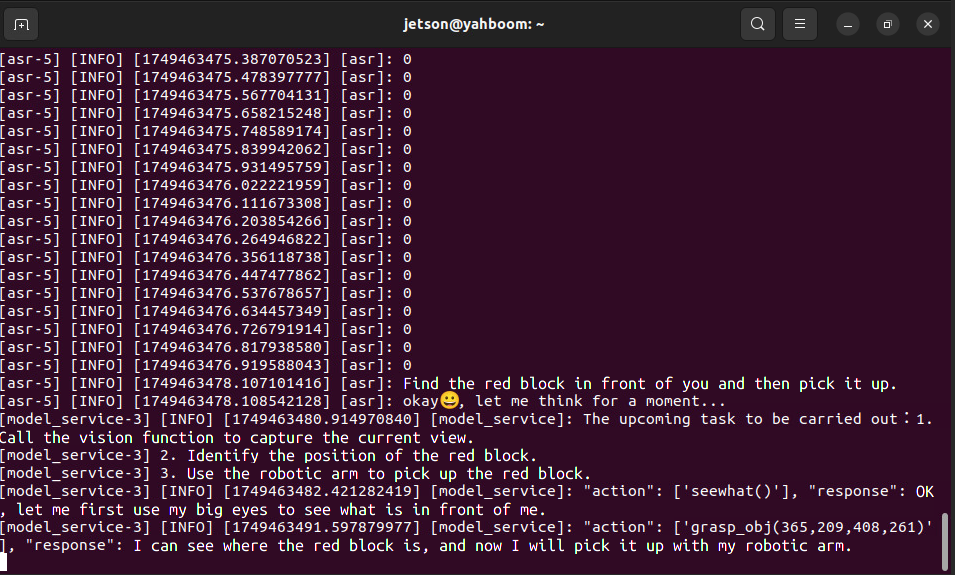
After the
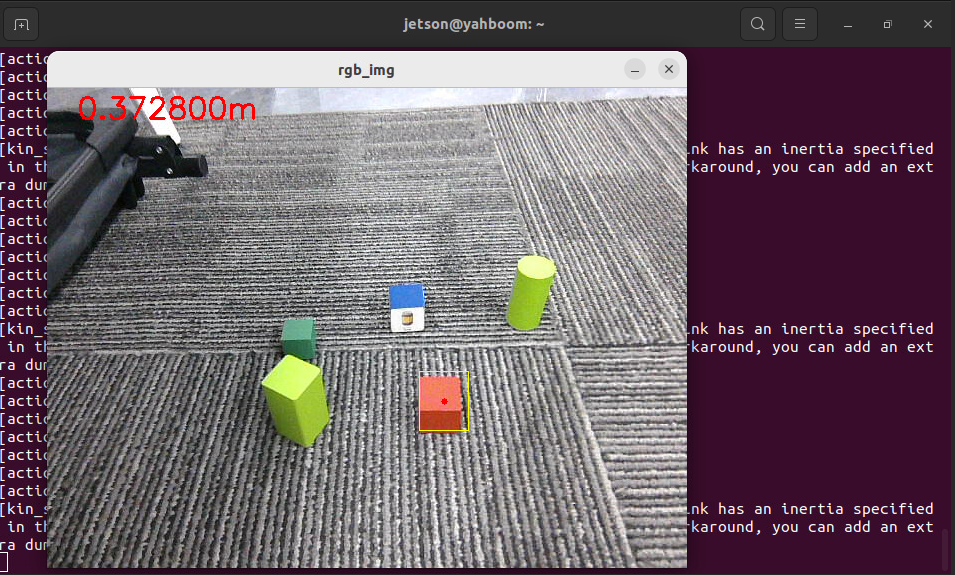
pick()function is called, a window titled rgb_img will open in the VNC screen to display the image of the current robot view. The robot will adjust the distance to the target object by itself. After the distance adjustment is complete, the robot will use the robotic arm to grasp the target item.
Important
Note: After the robot grasps an item, the robotic arm will be in a gripping state. If you need the robotic arm to return to its initial state, you can use the following methods.
Method 1: Wake up the robot again and ask the robot to put down the red block it just grasped.
Method 2: Wake up the robot again and issue the command "End the current task" to let the robot end the current task. After the task cycle ends, the robotic arm will reset to its initial pose.
3.2 Case 2: "Please help me remove the AprilTag in front of you whose height is higher than 5 centimeters"
The wooden blocks used are 30x30x30mm and 30x30x60mm AprilTag wooden blocks.
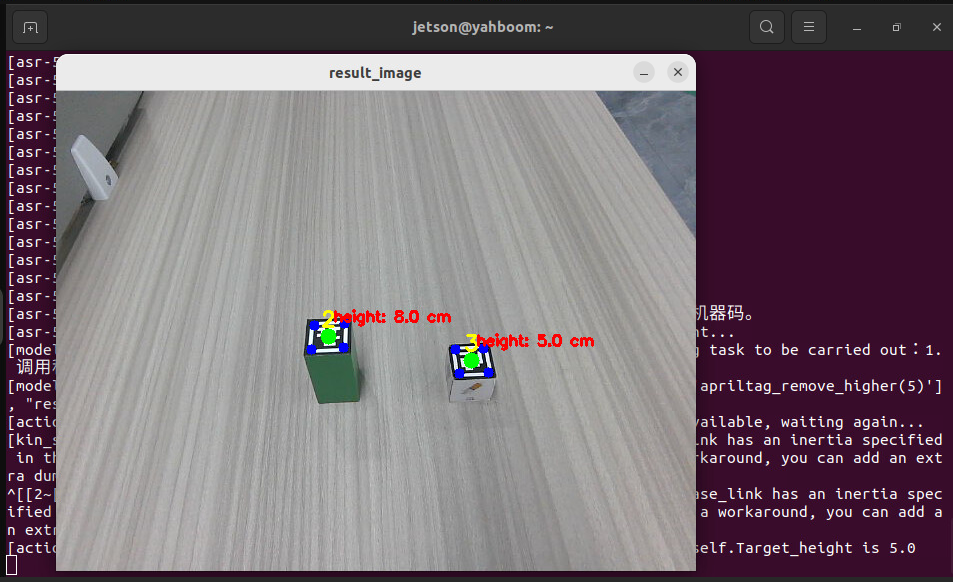
After waking up the robot, speak the command "Please remove the AprilTag in front of you whose height is higher than 5 centimeters". The terminal prints the following information:
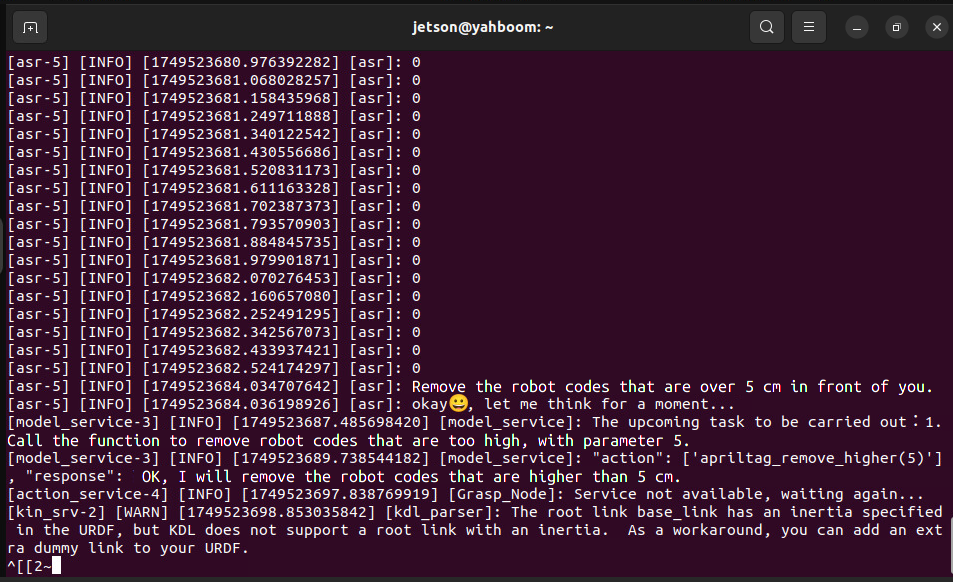
A window titled result_image will open in the VNC screen, where you can see the height of each AprilTag. After the distance measurement stabilizes, the robot will adjust the distance between itself and the target by itself, then use the robotic arm to grasp the AprilTag at the target height and move it to the right side of the robot.
4. Source Code Analysis
The path of the robot's action source code:
xxxxxxxxxx~/yahboomcar_ros2_ws/yahboomcar_ws/src/multi_brains/multi_brains/action_service.py
4.1 Case 1
action_service.py program:
Case 1 uses the seewhat and pick methods of the ActionController class. The seewhat function mainly acquires the color image of the depth camera, which has already been explained in the Multimodal Visual Understanding lesson. Here, the pick function is explained.
The coordinate rules of the object in the robotic arm gripping view are shown in the figure below:
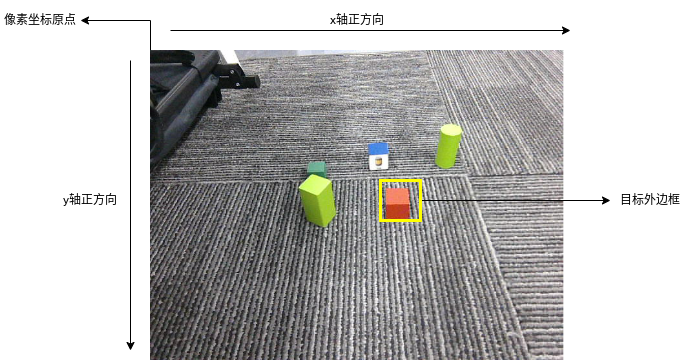
The pick(x1, y1, x2, y2) function is used to call the robotic arm to grasp the target object. The parameters are the coordinates of the top-left vertex and the bottom-right vertex of the outer bounding box of the object to be grasped (the top-left corner of the image is the pixel coordinate origin). For example, in Case 1, the outer bounding box coordinates of the red block to be grasped can be learned from the large model's reply: the top-left coordinate is (365,200), and the bottom-right coordinate is (408,261).
pick function code description:
@llm_action: A decorator that registers this method as an action that can be called by the large model. Before execution, it automatically checks prerequisite states such as wake-up interrupts.pick(self, x1, y1, x2, y2): Receives the pixel coordinates of the top-left corner(x1, y1)and the bottom-right corner(x2, y2)of the target's outer bounding box, and returns[bool, str]indicating whether it succeeded and the information._check_camera_action("pick", "nuwa"): Checks whether the depth camera is available and whether the current action has been interrupted; if abnormal, it directly returns a guard value to avoid subsequent invalid execution.start_track_client.wait_for_service(timeout_sec=5.0): Waits for the StartTrack service to come online; if it times out after 5 seconds, the service is judged to be unavailable.StartTrack.Request(x1=x1, y1=y1, x2=x2, y2=y2): Calls the visual tracking service, passing in the target bounding box coordinates so that the tracking node locks onto that region.response.success: Determines whether the tracking initialization succeeded; if it failed, cancels tracking and returns an error.time.sleep(1.0): Waits for tracking to run stably before proceeding to the next step.self.interrupt_event.is_set(): Checks before each step whether it has been interrupted by the wake-up word; if interrupted, callscancel_track_clientto cancel tracking and exits._adjust_grasp_pose(align_x, align_y): Calls the VisualTracker Action to move the robot chassis to a position aligned with the target.align_xis the desired front-back distance, andalign_yis the desired left-right offset._get_grasp_point(): Obtains the 3D grasp coordinates[success, x, y, z]of the target object in the robot's base coordinate frame.self._grasp(...): Executes the final grasping action, passing in the grasp coordinates, the pitch anglegrasp_pitch, and the gripper offsetoffset.
xxxxxxxxxx def pick(self, x1, y1, x2, y2) -> list[bool, str]: if (guard := self._check_camera_action("pick", "nuwa")) is not None: return guard #step 1: tracking object self.get_logger().info("Start tracking object") if not self.start_track_client.wait_for_service(timeout_sec=5.0): self.get_logger().error("StartTrack service not available") return [False, "Tracking service not available"] x1, y1, x2, y2 = int(x1), int(y1), int(x2), int(y2) response: StartTrack.Response = self.start_track_client.call( StartTrack.Request(x1=x1, y1=y1, x2=x2, y2=y2)) if not response.success: self.get_logger().error("Failed to initialize tracking target") return [False, "Failed to initialize tracking target"] time.sleep(1.0) #step 2: align to target if self.interrupt_event.is_set(): self.cancel_track_client.call(CancelTrack.Request()) return [False, "pick interrupted by wakeup"] self.get_logger().info("Start aligning to target") ok, message = self._adjust_grasp_pose(align_x=self.track_align_distance[0], align_y=self.track_align_distance[1]) if not ok: self.cancel_track_client.call(CancelTrack.Request()) self.get_logger().error(f"Failed to align to target: {message}") return [False, f"pick failed: {message}"] time.sleep(2.0)
#step 3: get grasp point coordinates if self.interrupt_event.is_set(): self.cancel_track_client.call(CancelTrack.Request()) return [False, "pick interrupted by wakeup"] result=self._get_grasp_point() if not result[0]: self.cancel_track_client.call(CancelTrack.Request()) self.get_logger().error("Failed to get grasp target position") return [False, "Failed to get grasp target position"] #step 4: grasp object self.get_logger().info("Start grasping object") self.cancel_track_client.call(CancelTrack.Request()) if not self._grasp(grasp_x=result[1], grasp_y=result[2], grasp_z=result[3], grasp_pitch=self.grasp_offset[3], offset=self.grasp_offset): self.get_logger().error("Failed to grasp object") return [False, "Failed to grasp object"] return [True, "Object grasped successfully"]
def _adjust_grasp_pose(self,align_x, align_y) -> list[bool, str]: if not self.visual_tracker_client.wait_for_server(timeout_sec=5.0): return [False, "VisualTracker action server not available"] goal = VisualTracker.Goal() goal.align_x = float(align_x) goal.align_y = float(align_y) goal.tolerance_x = float(self.track_align_tolerance[0]) goal.tolerance_y = float(self.track_align_tolerance[1]) send_goal_future = self.visual_tracker_client.send_goal_async(goal) while rclpy.ok() and not send_goal_future.done(): if self.interrupt_event.is_set(): return [False, "VisualTracker interrupted by wakeup"] time.sleep(0.2) if not send_goal_future.done() or not send_goal_future.result().accepted: return [False, "VisualTracker goal was rejected"]
goal_handle = send_goal_future.result() result_future = goal_handle.get_result_async() while rclpy.ok() and not result_future.done(): if self.interrupt_event.is_set(): try: goal_handle.cancel_goal_async() except Exception: pass return [False, "VisualTracker interrupted by wakeup"] time.sleep(0.2) if not result_future.done(): return [False, "VisualTracker failed to get result"]
status = result_future.result().status result = result_future.result().result if status == GoalStatus.STATUS_SUCCEEDED and result.success: self.get_logger().info("Grasp pose adjustment complete") return [True, result.message] return [False, f"Grasp pose adjustment failed: status={status}, message={result.message}"]
4.2 Case 2
ArUcoRemoveHigh function code description:
@llm_action: A decorator that registers the method as an action that can be called by the large model.self.pubSix_Arm(self.aruco_detect_pose): Moves the robotic arm to the preset detection pose, making it easier for the depth camera to observe the AprilTag on the tabletop._start_aruco_detect(height_cm=target_high * 100.0): Starts an independent AprilTag detection process and passes in the height threshold (in centimeters), detecting only AprilTags whose height exceeds the threshold._wait_for_any_aruco_target(timeout_sec=15.0): Waits for the detection process to return the first AprilTag that meets the condition; if it times out after 15 seconds, returns None.target_msg.id: Obtains the ID of the detected target AprilTag._adjust_grasp_pose(align_x=self.aruco_grasp_distance[0], align_y=self.aruco_grasp_distance[1]): Uses the dedicated AprilTag alignment distance parameters to adjust the chassis position so that the target is centered._get_aruco_grasp_point(target_id): Obtains the 3D grasp coordinates and angle[success, x, y, z, angle]of the target AprilTag in the robot's base coordinate frame._normalize_angle_to_0_45(grasp_point[4]): Normalizes the detected AprilTag angle to the range 0°~45°, which is used to determine the rotation direction of the gripper.self._grasp(...): Executes the grasping action.grasp_rollis the gripper rotation angle, andoffsetis the dedicated AprilTag gripper offset parameter.self._remove_pose(): After a successful grasp, moves the robotic arm to the placement pose and places the object to the side of the robot.
def ArUcoRemoveHigh(self, target_high): try: target_high = float(str(target_high).strip().strip("'\"")) / 100.0 except (TypeError, ValueError): return [False, f"apriltag_remove_higher failed: invalid target_high '{target_high}', must be a number in centimeters"] self.get_logger().info(f"apriltag_remove_higher: target_high {target_high * 100:.1f}cm parsed to {target_high:.3f}m")
self.pubSix_Arm(self.aruco_detect_pose) time.sleep(2.0) try: #step 1: launch the standalone detect process; it selects the first tag self.get_logger().info(f"apriltag_remove_higher: start detecting AprilTags above {target_high:.3f}m") self._start_aruco_detect(height_cm=target_high * 100.0) target_msg = self._wait_for_any_aruco_target(timeout_sec=15.0) if target_msg is None: return [False, f"No AprilTag above height {target_high:.3f}m detected (see aruco_detect process log for visible tags)"] target_id = target_msg.id self.get_logger().info(f"apriltag_remove_higher: selected target ID {target_id}") time.sleep(1.0)
#step 2: align to target if self.interrupt_event.is_set(): return [False, "apriltag_remove_higher interrupted by wakeup"] self.get_logger().info(f"apriltag_remove_higher: start aligning to target ID {target_id}") ok, message = self._adjust_grasp_pose(align_x=self.aruco_grasp_distance[0], align_y=self.aruco_grasp_distance[1]) if not ok: self.get_logger().error(f"apriltag_remove_higher failed to align to target: {message}") return [False, f"apriltag_remove_higher failed to align: {message}"] time.sleep(3.0)
#step 3: get grasp point coordinates (fresh measure-frame pose of the target tag) grasp_point = self._get_aruco_grasp_point(target_id) if not grasp_point[0]: self.get_logger().error(f"apriltag_remove_higher failed to get grasp point: {grasp_point[1]}") return [False, f"apriltag_remove_higher failed to get grasp point: {grasp_point[1]}"]
#step 4: grasp object self.get_logger().info(f"apriltag_remove_higher: grasp point x={grasp_point[1]:.3f}, y={grasp_point[2]:.3f}, " f"z={grasp_point[3]:.3f}, angle={grasp_point[4]:.1f}deg") grasp_roll = self._normalize_angle_to_0_45(grasp_point[4]) if not self._grasp(grasp_x=grasp_point[1], grasp_y=grasp_point[2], grasp_z=grasp_point[3], grasp_pitch=self.aruco_grasp_offset[3], grasp_roll=grasp_roll, offset=self.aruco_grasp_offset): self.get_logger().error("apriltag_remove_higher: failed to grasp object") return [False, "apriltag_remove_higher failed to grasp object"] self._remove_pose() return [True, f"AprilTag {target_id} above height {target_high:.3f}m grasped successfully"] finally: self._stop_aruco_detect()